[Plugin] GKWare Cabinet Maker
-
CabMaker 2 version 2.0.94 is now ready for download.
- Double drawers was causing duplicates points in array bug. Fixed.
- Alt – T short cut on Materials tab now toggles all the check boxes.
- Drawers were disabled for Fridge cabinets however the drawer setting was still
honored. - Added Handle Orientation in the “If Different” section for Cabinets.
Version 2.0.1.55 of CutMaster is now available for download
- Added “Save” button for Options form.
- Added Scoring Depth.
- Added PartType to Dxf.csv file
- Fixed flags bug. Flags were not set during import when called from CabMaker
- Added Symbols to edging form. This is used for DXF labeling.
- Added labeling location to Flags tab. There are 8 possible locations for labels including
none. - Added DXF labeling. Each part gets a scored label.
- DXF Rules are now global and are now read and written only to the default rule set
regardless on which rule is current.
-
You can now move cabinets into a group and they will stay there after an edit.
Also just added some more flexibility for sink cabinets
-
I'm starting to work on creating a library of tutorial videos. I'm trying to keep them short and have each one focus on specific training.
Initial Setup - 3:22
Project Settings - 2:45
Editing Cabinets - 2:26
Paste In Place - 2:56
Modify Layer Names - 2:37
-
CabMaker version 2.0.96 is available for download
- Cabinets will now remain inside a group after an edit.
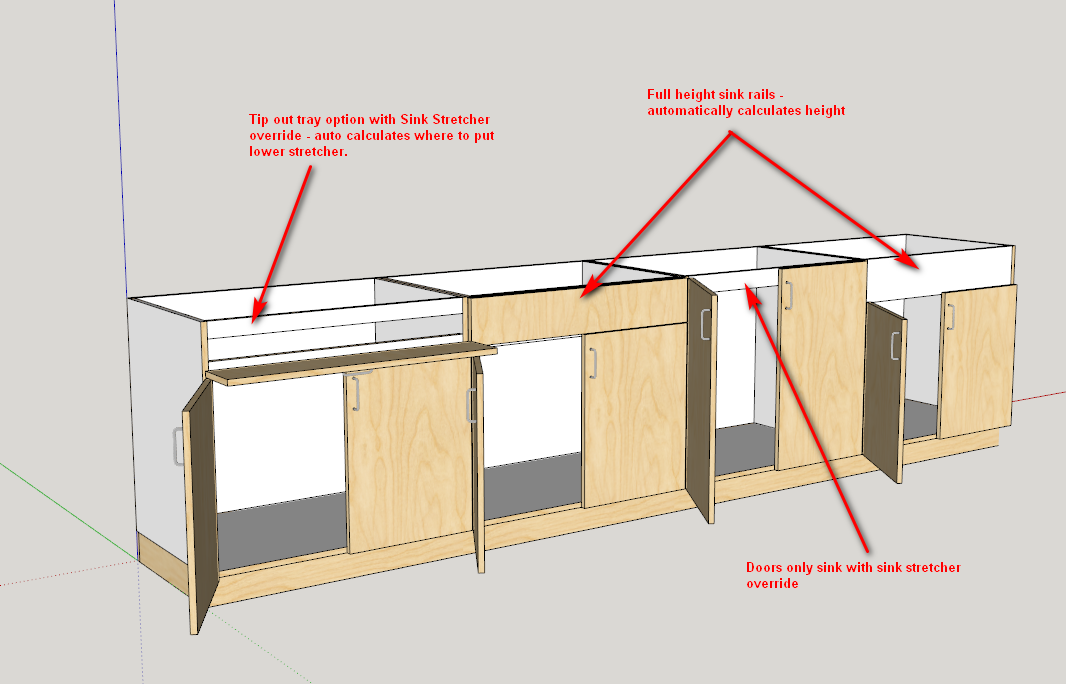
- Added Top Drawer Option for Sinks. You can now have a Tip Out Tray with a pair of
Sink Stretchers. You can also omit the top drawer for farm style sinks. - Added a Sink Stretcher auto checkbox. The Stretcher width will automatically adjust
based on the height of the top drawer. - Added a Sink Stretcher override. If set – this value takes precedence over the standard
Sink Stretcher Width. Set to -1 to ignore the override. A setting of 0 is valid. - Fixed bug which affected placement of doors and drawers with plain panels and bottom extruded handles.
CutMaster versin 2.0.1.56 is available for download
- Added double sink stretchers for Tip Out Tray.
- Fixed Dowel locations for Sink Stretchers and for Integrated Kicks.
- Modified DXF to support 2D labelling
- Modified Joinery Form
- Modified Options
-
CabMaker version 2.0.97 is available for download
- Fixed bug for users that have a non 0 value for Base Top Gap and want side by side drawers.
-
I'm considering a bit of cleanup with CabMaker which will change the behavior of adjustable shelves and pullouts. I'd like to hear back from users that work with templates and see if these changes are going to be an issue.
Essentially I'd like to change the spacing so that they are all a bit more consistent
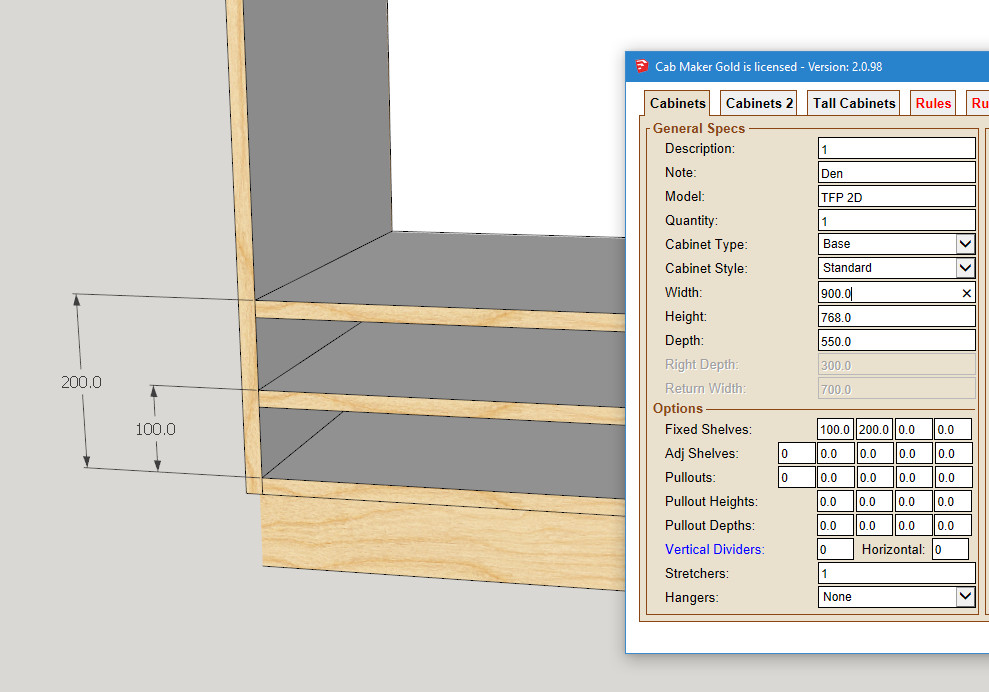
Fixed shelves use the number you enter and position the top of the shelf from the bottom of the opening.
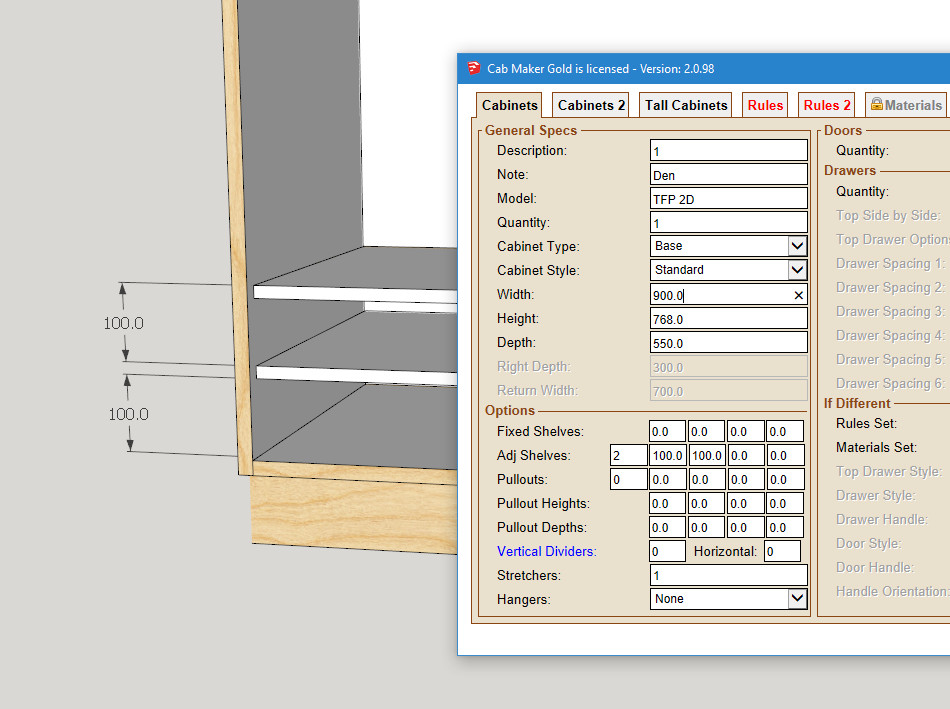
Adjustable shelf spacing currently works this way
It seems to me that the adjustable shelf spacing should be the same as the Fixed. That is from the bottom of the opening to the top of the shelf
Pullout spacing currently works this way. I think it may be better to have the spacing from the bottom of the opening to the bottom of the pullout. This allows you to change pullout heights while maintaining the position of the bottom.

-
The main reason for wanting feedback is I want to make these 4 sections totally consistent.
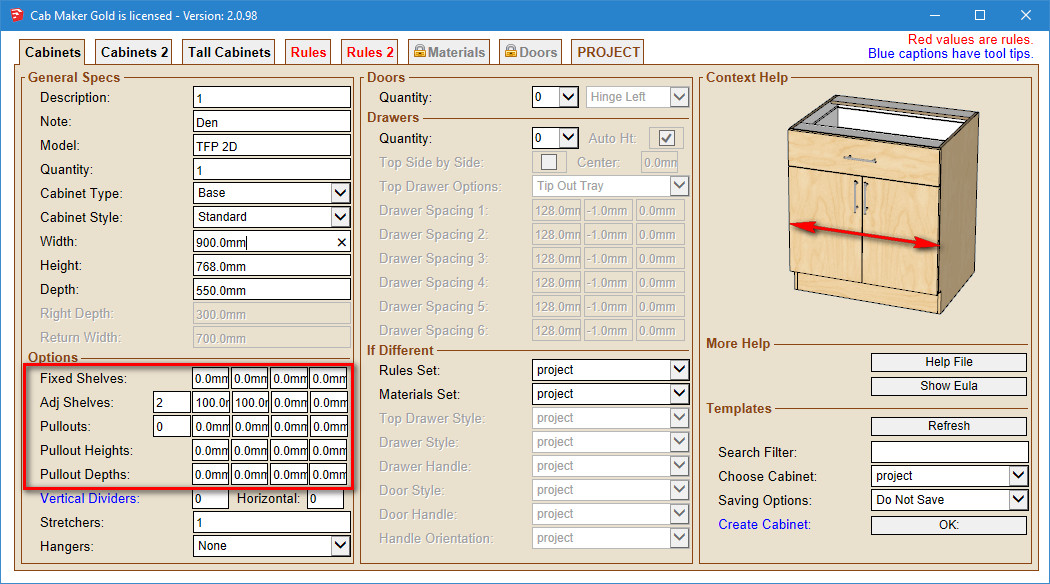
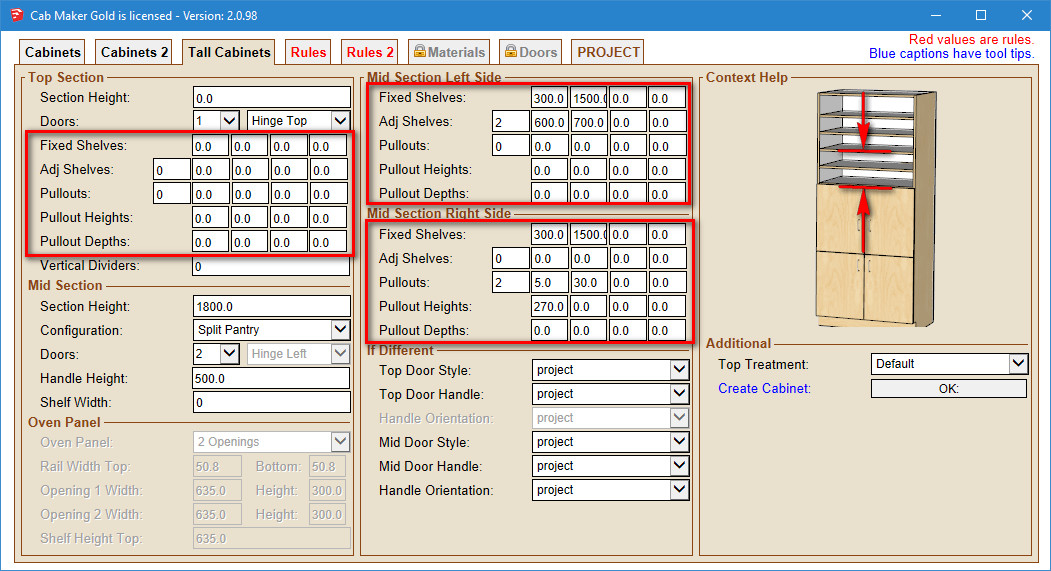
I've had requests for more control over the placement and size for the middle section of tall cabinets. As you can see - the items in outlined in red are consistent in look and feel. I think that they should also be consistent in how they work.
The only real problem is that this change will break user templates.
So is it worth it?
-
I've got + or - 20 templates and don't see it as any problem having to revisit each of them. Small price to pay for all of the added functionality you are adding.
-
I can say this one is inconsistent with the spacing of fixed vs. adjustable. I really do prefer to space any shelving fixed or otherwise with equal dimension between the shelf panels. I know the dimension of the shelf or pullout...what I need is to have however many shelves I call for spaced evenly from top to bottom. There is the occasional time that I would prefer to have unequal spacing but that is rare. Equal spacing is always the preferred method.
As a cabinet maker we provide consistent spacing (cutmaster settings) with the pin holes for the end user to make adjustment to their desire. However in graphic presentation equal spacing looks better.
-
Mostly we have holelines 32 mm distance and let the customers decide, where to put their adjustable shelves.
Pullouts and shelves should be equal for presentation. -
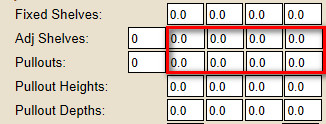
You have the choice for adjustable shelves to be spaced equal. Just give it a number and don't fill in the positional information.
With pullouts you can do the same - just fill in the number of pullouts. There is a setting in the rules which will provide that amount of space between pullouts.
However fixed shelves require you to place them exactly where they need to go.
The question is for those of you who want CutMaster to drill small clusters of holes you get to place the shelves precisely where you want them. In this case you can optionally fill out the positional information for adjustable shelves and pullouts and additionally adjust each and every pullout height and depth.
So again I refer to the first 3 images where I have put in the dimensions. The dimensions you see is how you must fill in the positional information. This is the part that I am considering making more consistent.
-
Making this consistent is a pretty good idea.
After thinking about it, I realize that I like to input the space I want between each. If the spaces all start from the bottom of the opening, I have to calculate what is the space left between each. If there is only 2 shelves, ok, but with 5 or 6, calculations would slow down the process. -
Currently with adjustable shelves if you want 6 inch space between shelves and you are using 3/4 inch material then you would enter 5 for number of shelves and 6 3/4 inches for the first position. Leave the rest of the spaces at 0. CabMaker will then position all shelves with 6 inches of space between them.
-
What I think I'm hearing is that users would like to control the space between the shelves.
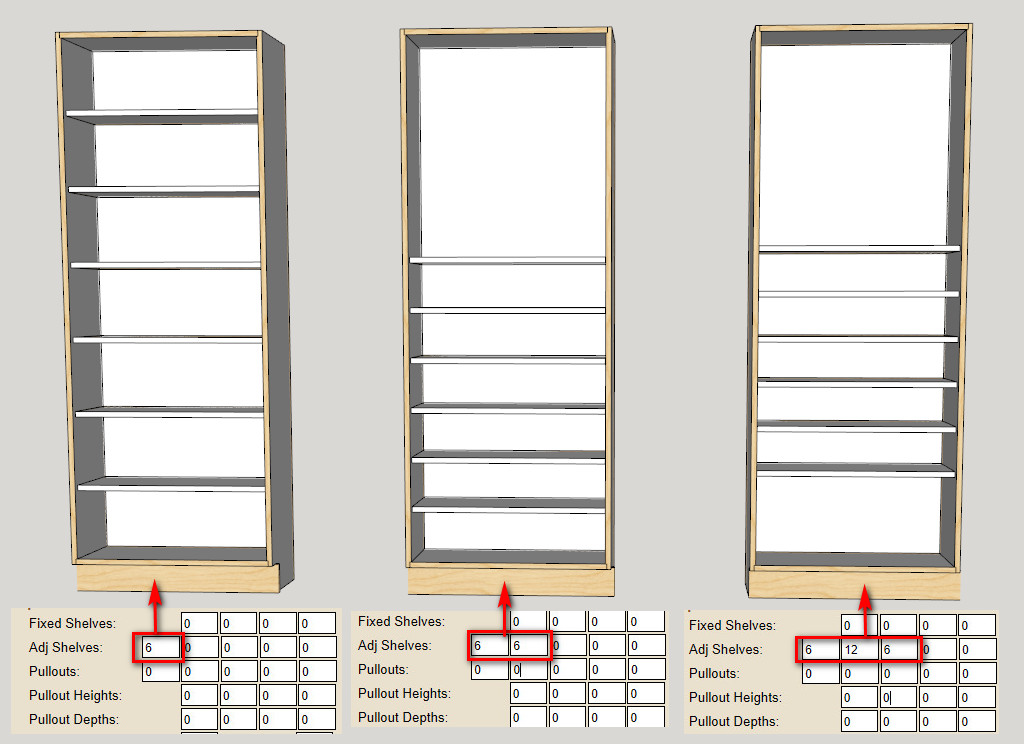
With first cabinet the user types in 6 and cabmaker calculates the spacing and positions the shelves evenly within the opening.
With the second cabinet the user types in 6 and types in 6 inches in the first positional spot and cabmaker spaces places each shelf so that there is 6 inches between shelves.
With the third cabinet the user types in 6 and then 12 inches in the first positional spot and 6 inches in the second. CabMaker then places the first shelf with a 12 inch space and all the rest with a 6 inch space.
-
CabMaker version 2.0.98 is now available for download
- Added Fixed count for Fixed shelves
- Modified the way fixed shelves and adjustable shelves work. They are not consistent.
- Added overrides at the cabinet level for legs.
- You can now adjust left and right Finished panels independently.
- Added bottom offset for Finished Backs.
- You can now control adjustable shelves, fixed shelves and pullouts for Mid section of
Tall cabinets. - Added an Extend Kicks. You can now choose to have them extende out to the fillers or
not. - Added Sink Stretchers to materials. You can now create Sink cabinet without drawer
fronts and independently texture the Sink Stretcher. - Added a rule for edging Sink Stretchers.
CutMaster version 2.0.1.57 is now available for download
- Parts are now clickable
- Added CAD support for current parts or nested dxf for Gold version.
- Added Auto Depth for drilling.
- Added an Edge Banding usage report in Gold version.
- Completed Dxf Tall Partition for Tall cabinets in Gold version.
-
Hello, could you please help me? I downloaded cabmaker 2.0.98 trial version for sketchup 2016 and when I try to make a cabinet I get an error ''nil can't be coerced into float''. I don't know how to solve this. Very glad if you helped. Thank you.
-
Hello, could you please help me? I downloaded cabmaker 2.0.98 trial version for sketchup 2016 and when I try to make a cabinet I get an error ''nil can't be coerced into float''. I don't know how to solve this. Very glad if you helped. Thank you.
-
Antonis - Please email me at gkernan@telus.net and I will be happy to help.
-
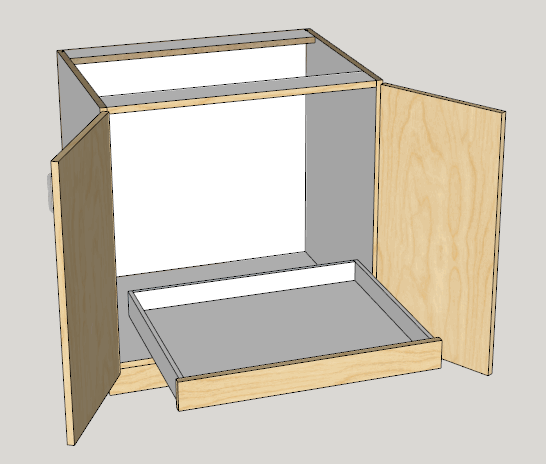
You can now adjust pullout width and position using hinge allowance. The red arrows are showing the extra clearance for hinges.

-
Here is an example of the new drawer system where you can specify at the project level a system for drawers and pullouts
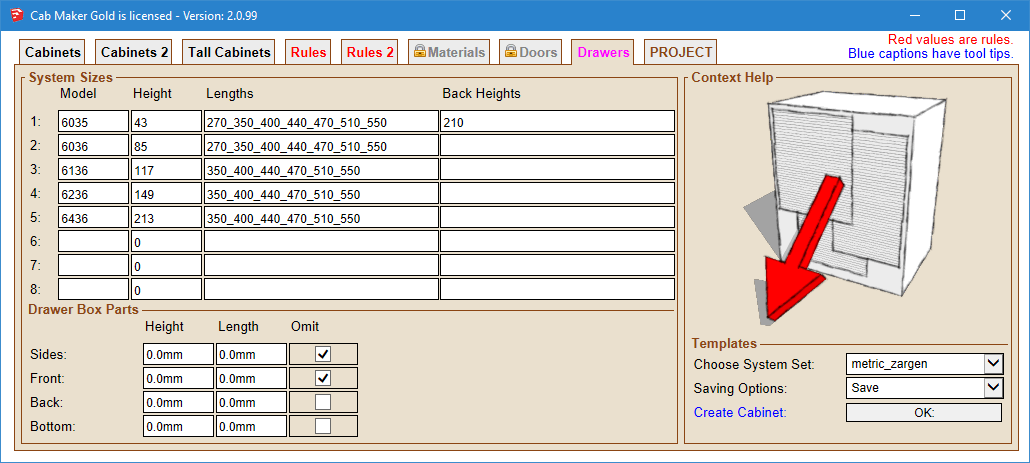
You will be able to (very soon) add finished fronts to pullouts
Hello! It looks like you're interested in this conversation, but you don't have an account yet.
Getting fed up of having to scroll through the same posts each visit? When you register for an account, you'll always come back to exactly where you were before, and choose to be notified of new replies (either via email, or push notification). You'll also be able to save bookmarks and upvote posts to show your appreciation to other community members.
With your input, this post could be even better 💗
Register Login


Advertisement