How can I cut the curved surface to cover a curved triangle.
-
Hi, could I ask if someone will help me (with reference to the attached file) place a curved surface over the curved triangular facet?
I've sort of succeeded in that I've managed to place the inner surface within the facet but without the outer surface. And I can't figure out how I managed it.
How can I cut the curved surface to cover a curved triangle.
-
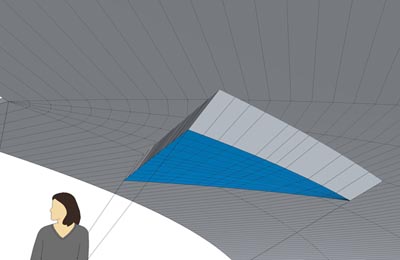
Do you mean adding a surface like the blue on in this render? If so, the easiest way is to use Fredo's Curviloft plugin. Just select all of the lower edges of the extended triangle and click the Skinning icon that comes with the loft tools.

-
Can you put an image and a version 6 of your file ?
Maybe the Joint push Pull and Zorro 2 can make that you want but without file and image that is difficult to say

-
EEbyRails will do it too...
The image shows how AND some other modeling 'tips'... -
Thank you Pilou, I'm attaching a version 6 file.
Thank you Alan, the Curviloft plugin certainly looks interesting. I thought though as a newcomer to SU that there might be a simpler solution, especially as the form of my surface (inner skin and outer) is a rotation of a precise ellipse and the triangular facet, a product of an Excel spreadsheet.
All that I want to do is cut the excess surface from the sides of the triangular facet.
-
Use intersect faces to cut through the surface, then select and delete the bits you don't want.
-
This is MUCH easier than your initial question suggested.

Away from other geometry make a triangular face, use pushpull on it to make a long extruded 'prism', height of ~three times the thickness of the 'roof'.
Reverse the faces so it's now 'inside' out [see my earlier comment about face reversals]
Select all of it and make it a group.
Position/rotate this group so that it projects through the curved 'roof' where the hole is to be.
Select the group, and the top and bottom surfaces of the the 'roof', right-click context-menu > Intersect Selected.
A set of lines will be added onto the top/bottom surfaces of the 'roof' where the group intersects it.
Now edit the group [double-click] and select all, right-click context-menu > Intersect with Model.
There are now lines added around the triangular 'prism' where it intersects the 'roof' surfaces.
Erase the unwanted parts inside the group, leaving just the 'lining' for the hole [note how reversing its faces earlier leaves you with a correctly oriented liner, making it somewhat taller than the roof thickness makes the erasing much easier].
Exit the group-edit.
Select and Delete the top and bottom surfaces of the 'roof' where the now 'outlined' hole is to be.
Select the 'lining' group and explode it.
It merges with the rest of the roof's geometry.
Done.
-
Yes, I read too much complexity into the problem. As others have already said, just superimpose your prism...the entire, filled-in oject...onto the Curve, select both, then right-click and choose Intersect > Selected. Trim off the excess, above and below.
-
Thank you to all who gave your time to help me. It seems that I couldn't figure out how to use intersect properly. My questions will become less simple in the future, but also better posed.
For now, thanks, the attached is what I've acheived so far.
-
Thx for the v6 so no problem for load it v6 v7

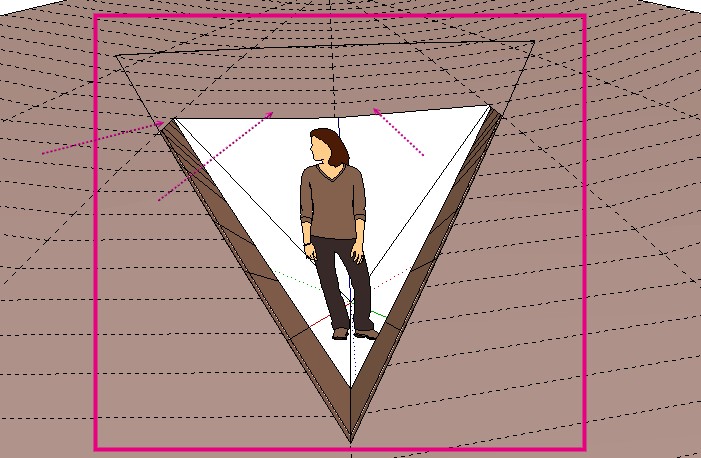
Another easy solution

Show "hidden geometry"
From a 3D top view : make a selection bounding box (pinky square) from right to left !
Intersect selected
You can now click each littles faces for erase any of them as you want!

-
@unknownuser said:
Did you do something to the drawing first?
No !

I made this in V7
 Colors and square are post production
Advertisement


