[Plugin] Hatchfaces (v1.8 beta) UPDATED 15-Dec-2012
-
Jolran, just a thought. I see that you now have the hatch assigned to a separate layer. It occurred to me if the hatch patterns were assigned layers by the distance between hatch lines. You would have a layer for small hatch patterns, medium patterns and large patterns. This way if I make a scene or PNG file of a small section of the overall model, I would just have the small hatch patterns turned on. And if I was making a scene or PNG graphic for the larger section of the over all model, I would have the small and medium hatch patterns turned off. This may be over kill and too much additional work.
And I can just assign layers to the hatches I make according to my wants.
To you Jolran and all who are helping, thanks for the running tutorial in making a plugin. This continued conversation is helpful.
Thanks to all, for the plugin and the ruby help.
-
@jolran said:
@unknownuser said:
Is that duplicate line needed at line# 136 ?
No

Thank you for spotting that
 Sometimes I get wierd results when I copy from ruby code editor and paste to Notepad ++.
Did not doublecheck the results well enough.
Note. It is AS ruby code editor, not Jims version. Is Jims more stable? I think it's a webdialogthingy-bug.Thank you for keeping on testing stuff! It's of big help. How about a choice of keeping faces? With possibility to attach
material? That way one could use transparent material or whatever? Wonder if it is possible to use a dropdownlist getting the materials already added in the palette...Anyway, must get this second crosshatching inputbox working correctly first, and do some fancy methoding.
I don't have any problems with copy/paste from Jim's Ruby Web Console (older one, not his newer one).
It's up to you about the features, keeping faces, or materials, ..etc. I don't have any preference as, I don't need to hatch stuff.
-Kwok
-
@sergey2402 said:
@kyyu said:
If you want to use the profile edge style.
Have I understood you correctly?
Yes, just hide or apply a transparent material to all the many small faces in the hatch group. Very easy to do with ruby.
-
@jolran said:
Or do the arguments in the definition heading like TIG said

def hatch(angle,spacing,gents)Hehum.. I'm to new to this.
I do it the way TIG is suggesting, passing arguments. I make instance varibles only when I really need to. I'm not saying I know the best way, but here is an example from a recent plugin of mine. Notice I have a @scale instance variable, but also a scale variable that's local to the scale method. What I'm doing in this paticular case is scaling back down. So I use "1/@scale", when calling the method. Also the method can't accicently change the instance variable, it's all local. Just to be clear, I'm not saying make instance variable and pass them to the method. It just happened that's the way I had it in that plugin. I think it was because, I had an initialize method at the begining and I wanted those values available to the main program method. So I made them class and instance variables.
def main ...stuff scale(@@ent.to_a, (1/@scale.to_f)) ...more stuff end def scale(ent, scale) tr = Geom;;Transformation.new(scale) Sketchup.active_model.active_entities.transform_entities(tr,ent) end -
@kyyu said:
@jolran said:
Or do the arguments in the definition heading like TIG said
def hatch(angle,spacing,gents)Hehum.. I'm to new to this.
I do it the way TIG is suggesting, passing arguments. I make instance varibles only when I really need to. I'm not saying I know the best way, but here is an example from a recent plugin of mine. Notice I have a @scale instance variable, but also a scale variable that's local to the scale method. What I'm doing in this paticular case is scaling back down. So I use "1/@scale", when calling the method. Also the method can't accicently change the instance variable, it's all local. Just to be clear, I'm not saying make instance variable and pass them to the method. It just happened that's the way I had it in that plugin. I think it was because, I had an initialize method at the begining and I wanted those values available to the main program method. So I made them class and instance variables.
def main
>   ...stuff
>   scale(@@ent.to_a, (1/@scale.to_f))
>   ...more stuff
> end
>
> def scale(ent, scale)
>   tr = Geom;;Transformation.new(scale)
>   Sketchup.active_model.active_entities.transform_entities(tr,ent)
> end
Ok, that was a strange example. How about this one, more applicable to your case.
def main @spacing1=20.to_l if not @spacing1 @spacing2=20.to_l if not @spacing2 ...some stuff scale(ent, @spacing1) scale(ent, @spacing2) ...more stuff end def scale(ent, scale) tr = Geom;;Transformation.new(scale) Sketchup.active_model.active_entities.transform_entities(tr,ent) end -
@kyyu said:
Also the method can't accicently change the instance variable, it's all local.
Careful here. It is because the type of the parameter is a Float that is can not be accidentally changed. If @scale were almost any other type of object, the local variable scale would be a reference to the passed-in object and changing scale could change @scale.
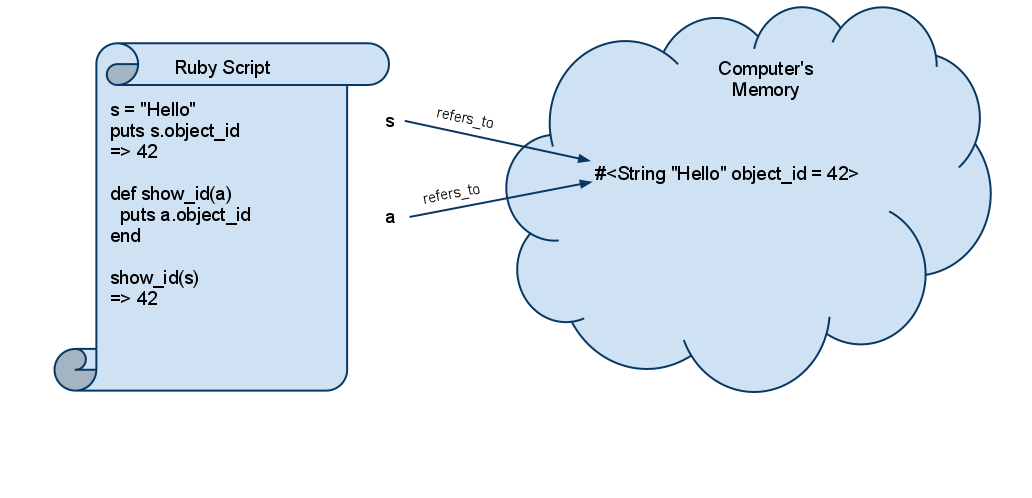
It doesn't help to think of Ruby variables a containers for values. Ruby variables are pointers to objects in the computer memory. Here's my attempt at a graphical explanation. It's an over-simplification because different types are treated differently. Floats and Fixnums are not passed by reference, for example. You also need to be aware of the circumstances when a new object is created, or the current object is modified.
The local variable a refers to the same String object as s.
-
Jim,
Good point. I knew of variables being a reference to an object, but still confusing at times.
-
Hi Ken. Thoose layers thing are very good ideas! They may or may not be hard to do, not sure yet. But IF they get implemented one could have them as an option? I don't think it should be default behavior of the plugin.
@unknownuser said:
thanks for the running tutorial in making a plugin. This continued conversation is helpful
I thought I was babbling nonsense
But if you like it, I will continue to report and discuss openly.Kyyu. Many thanks again for your advice
I think I am at sleep when you guys are active here on the forum.
Different timezones.I will head for doing as you advice. Using @varibles just when needed. I tried the opposit, but it got messy, and inefficient. Your code looks well structured.
When ordering methods and things right now, I must also think a little bit forward about the next steps.
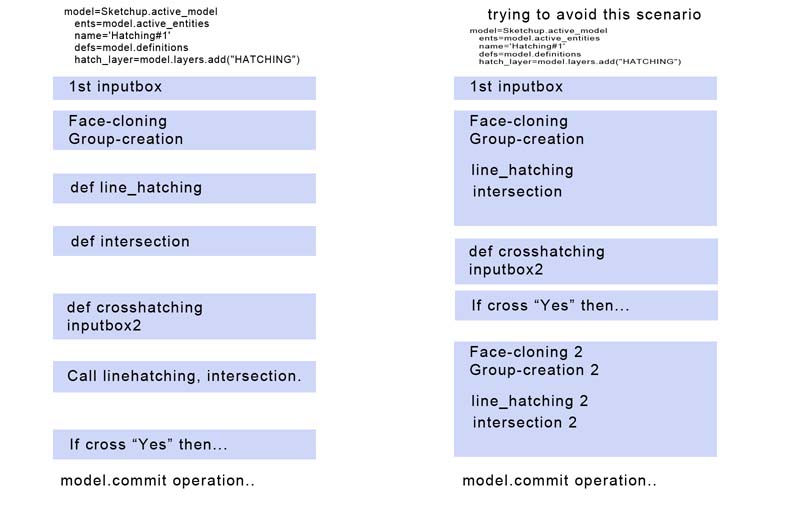
Added features like other hatch-types, and bugtracking etc. The "face-creating" part must be a method or a block itself(sort of main code), if I am going to use it with other hatch-types. The subroutine for crosshatches might get a little repetitive code, not sure yet. IF I will be able to do other hatch-types, it might be a good idea to split up thoose, AND the line-hatches in different modules. Calling from the main "face-creating" script. Eventually I might do a fast version
of crosshatching so you have something to try.They say Ruby is an easy language to learn. I haven't got any experience of other languages, so I can't tell.
However there seams to be many ways to do things in Ruby, and that can get confusing for a newbie.Jim. I like your graphic. Visual guides like that is very helpful.
-
Hi. I trying to figure out the "clever" way to setup the structure of the code. If anyone has any comments, I would be most greatful. Having decision anxiety.
I am little afraid to destroy the structure of current code and getting flamed for doing something inappropriate.
I'm trying to avoid using @varibles everywhere. I get the impression that could give some troubles later on.
The simplest way would of course be to repeat the whole last part(linecreation, intersection) without nesting so many methods, but that would probably be cheating. However the script is not that long so I guess it would not be a catastrophy to repeat things.
Also having trouble grouping. Where as we will have the structure:
(maingroup)/(hatchgroup1) (hatchgroup2)Questions are. Should "face-cloning" be a separate method?
Should one create a method for only using 1 inputbox getting values twice?(2 promts, 1 box) OVERKILL?
Another possiblities is to recreate the linehatching and intersection in a submethod calling on @gents?
-
Collect all of your dialog data at the very start.
If the 1st dialog has 'Yes' for 'Crosshatching?' then a second dialog opens with the -ve version of the angle and the same spacing - the user can change these if desired and press OK, or Cancel to skip crosshatching.
After the dialogs you use the data to make the grouped hatching.
If there is no crosshatching then the code is as currently.
If there is crosshatching then you simply run the coder twice.
However, as explained before - you remove the hatch code into a sub-def method where you pass values this
def hatch(angle, spacing, gents)
where 'gents' is ANY entities set that's passed to it [I left it called that because when you move the code into the method the name can remain - however, note how the angle/spacing variables can NO LONGER be @ variables inside the hatch def because they can be different @'s depending on whether you are making a hatch or a crosshatch from dialog input!]
and to use for the non-crosshatched version
self.hatch(@angle, @spacing, gents)
where you pass the @angle/@spacing variables
and 'gents' is entities of the 'group' that contains the hatching.
When you have crosshatching you first make 'group' to contain the TWO groups needed.
Then add two sub-groups
hgroup=gents.add_group() cgroup=gents.add_group()
here 'hgroup' will contain the hatching and 'cgroup' the crosshatching
To make then first make the hatching
self.hatch(@angle, @spacing, hgroup.entities)
note how we have passed a different entities set this time
To make the other part of the crosshatching use
self.hatch(@cangle, @cspacing, cgroup.entities)
Note here we have used different @ variables for the crosshatching - derived from the 2nd dialog AND we use the other entities set too...
By using the sub-def method for 'hatch' you can reuse the code for hatching or crosshatching as the values are remembered separately as @'s for the two types and if there is crosshatching then a simple extra step of making sub-groups inside the main hatch-group is all you need... -
Thank you TIG! Much appreciated, was a bit stuck.
I think I understand better now what you meant before. Before when you said "code into a sub-def method", I thought you meant ADDING a method or "doubbling" the code. There's where I was lost, should have asked earlier for help but pride got in the way.
Very clever solution! And probably quite natural solution for some off you guys in here

I will digest this and continue. Thanks again.
-
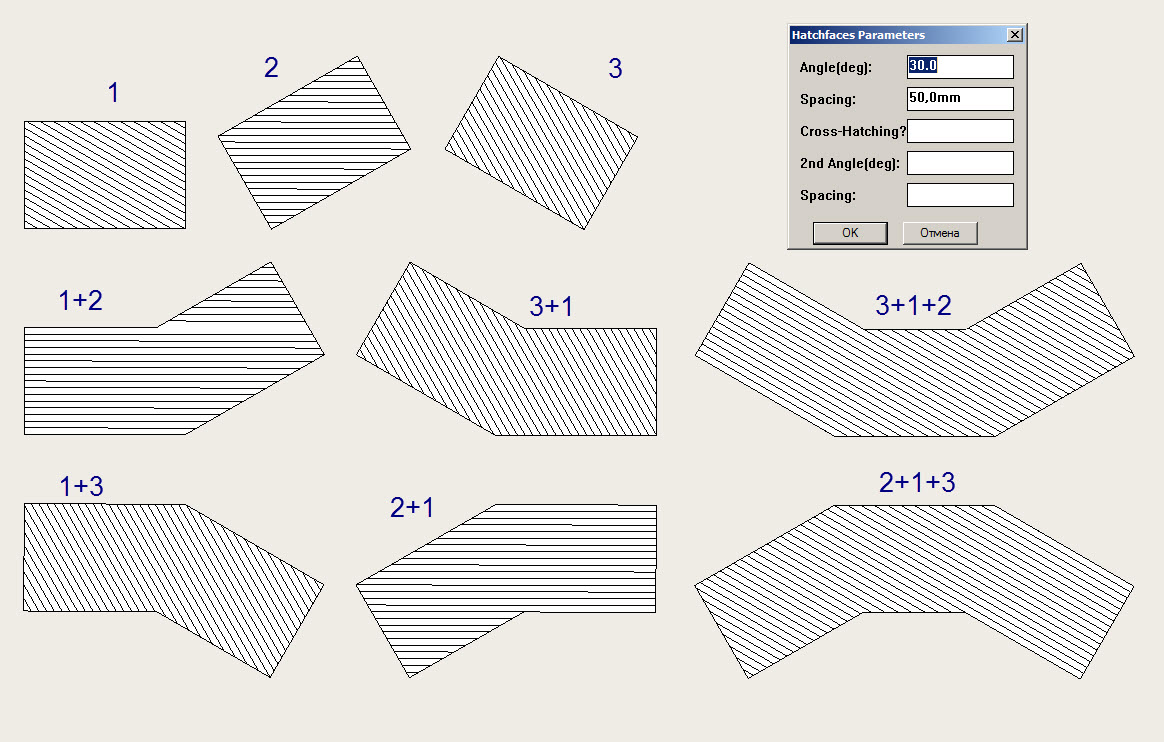
Unexpected results of hatching.
All hatches are made with the same distance and with the same angle.
Maybe is necessary to select not only the face, but also the baseline?
(And maybe the baseline can be anywhere in the drawing, not necessary on the face?)
-
Hmm interesting.. I get the same result. Very disturbing. This must be fixed I agree!
I was thinking of modifying TIG's script later on so it will copy lines in 2 directions, from center-> out. Or at least be aligned from center. Maybe that will take care of things. Although I have the feeling it has something to do with how the diagonal is created and vector comparison. Eg that it has to do with vertices 0 and 1 (vectorcreation). Depending of how the boundingbox is created, those points will be on different positions.
At the moment I'm trying to fix the crosshatching(having some difficulties), so I will look at this later.
Thank you Sergey for experimenting and notifying this!
-
Currently the hatching's rotation is calculated relative to the vector formed by the face's first edge - and this is clearly variable.
A consistent and simple way would be to make it relative the the X-axis that has been transformed to lie on the face.plane ??? -
At the moment the ;reference-edge' is actually the vector from the face's fist vertex to the second vertex.
This bound to be on the face.plane as all vertices are coplanar.
To make another vector to use instead you can make that vector and project it onto the face.plane and use that... So
p0=face.vertices[0].position p1=p0.clone p1.x=p1.x+1 p1=p1.project_to_plane(face.plane) vector=p0.vector_to(p1)
This projects the equivalent of a vector [1,0,0] onto the face's plane...
That vector can now be used to base the hatch angle upon... -
He he. This is bothering me badly. Most annoying.
One of my first ideas when I thought about this plugin was to let the user select from a scroll list, Front, Right, Left Back view etc, and have determined pt from bounds according to selection. That of course is not a flexible and smart solution. But maybe viable? Will be troublesome for in between angles.. It's not a good solution...@unknownuser said:
relative to the vector formed by the face's first edge
Oh, yeah that's right
@unknownuser said:
A consistent and simple way would be to make it relative the the X-axis that has been transformed to lie on the face.plane ???
Do you mean create edge first on X and move to face.plane?
Or maybe select a reference edge as Sergey idea?
-
Hmm, no? I must have gotten it wrong. Doesent work in Y,Z axis.
-
Genious TIG!
I think I got it right. It work for me in a few tests.
Like this, no?
pt=face.vertices[0].position
      p1=pt.clone
      p1.x=p1.x+1
      p1=p1.project_to_plane(face.plane)
      ve=pt.vector_to(p1)
      bb=face.bounds
      di=bb.diagonal
      po=pt.clone
I mean is that correct for an update, cause this problem is(was) irritating.
-
You need to trap for the case when the X-axis is parallel with the palne and then use another axis - i.e. offset the y instead of the x value of p1...
To do this get the n=face.normal and then use the alternative vector [offset in y] if n.x.abs==1 or n.z.abs==1
etc... -
Hmm I will try..
Where do you learn all these commands??
It feels like I'm missing some information source(exept from this forum).BTW won't there be a conflict of axes if one for ex. have a face rotated 45 degrees?
Hello! It looks like you're interested in this conversation, but you don't have an account yet.
Getting fed up of having to scroll through the same posts each visit? When you register for an account, you'll always come back to exactly where you were before, and choose to be notified of new replies (either via email, or push notification). You'll also be able to save bookmarks and upvote posts to show your appreciation to other community members.
With your input, this post could be even better 💗
Register Login


Advertisement