Question: Render reduction as camera pans out
-
The feature you are looking for is probably something that was created with a video processor. Win users can port a avi to Win Movie Maker to fade, etc.
-
Although you may be correct, as I don't know the name of the option they were using in the video, he kept expressing that even in the view settings while he was working in the file, the further away geometry was simplifying, not just blocking up or a bunch of little lines bunching up to look black etc.
-
What you are referring to is called level of detail (LOD), it's used by video games, as you move around, close objects are highly detailed, mid range objects less detailed, and far away objects may just be something as simple as a cube with a texture mapped to it. You can also model this way in SU, think about how your scene is gonna be setup, model objects that are close to the camera with lots of detail and less detail the farther away they are from the camera. There is no feature in SU to do that automatically. The best you could hope for is some kind of plugin, if it's even possible. You would probally have to make three models (high, mid, and low detail) of everything you wanted in your scenes and the plugin could replace objects based on camera distance but I don't know Ruby so like I said, don't even know if it's possible.
Mike
-
Hi Checker and all,
I am not sure what video you saw but there is TIG's MatrixProximity plugin with two, completely different features combined - one is similar to (or exactly) what you are after. It can set three different state of complexness for components (it's a per scene setting) and as you are approaching to something like this, the more detailed versions will be shown.
-
A feature that changed in SU7 was the rendering engine. It changed how the model degrades while zooming and panning. SU does change the level of detail while moving the camera, particularly in large models. Some, but not all Components will be rendered as wireframe. The engine overhaul allowed SU to feel more responsive for large models. Maybe this is what you remember.
But no, there isn't a feature to dynamically control the level of detail based on distance from camera; although it may not be impossible to create as a plug-in.
In addition to TIG's plug-in, thre is Fredo's GhostComp.
-
@gaieus said:
Hi Checker and all,
I am not sure what video you saw but there is TIG's MatrixProximity plugin
This sounds great!
I am a real noob, is there a tutorial on how to use this plugin? I know where to add it in the plugins folder, and how to activate it in SkU, but I have no idea after that - when I activate the proximity plugin, it has no visual change.
Does a tutorial exist?
I thank you greatly!
-
In the Ruby Library Depot there is a pdf file for it.
-
I've spent all day attempting to get the Proximity ruby to work, to no sucsess, the Matrix part worked the first time, but the Proximity one has baffled me!
The plugin doesn't error, I just don't know what I'm doing here.
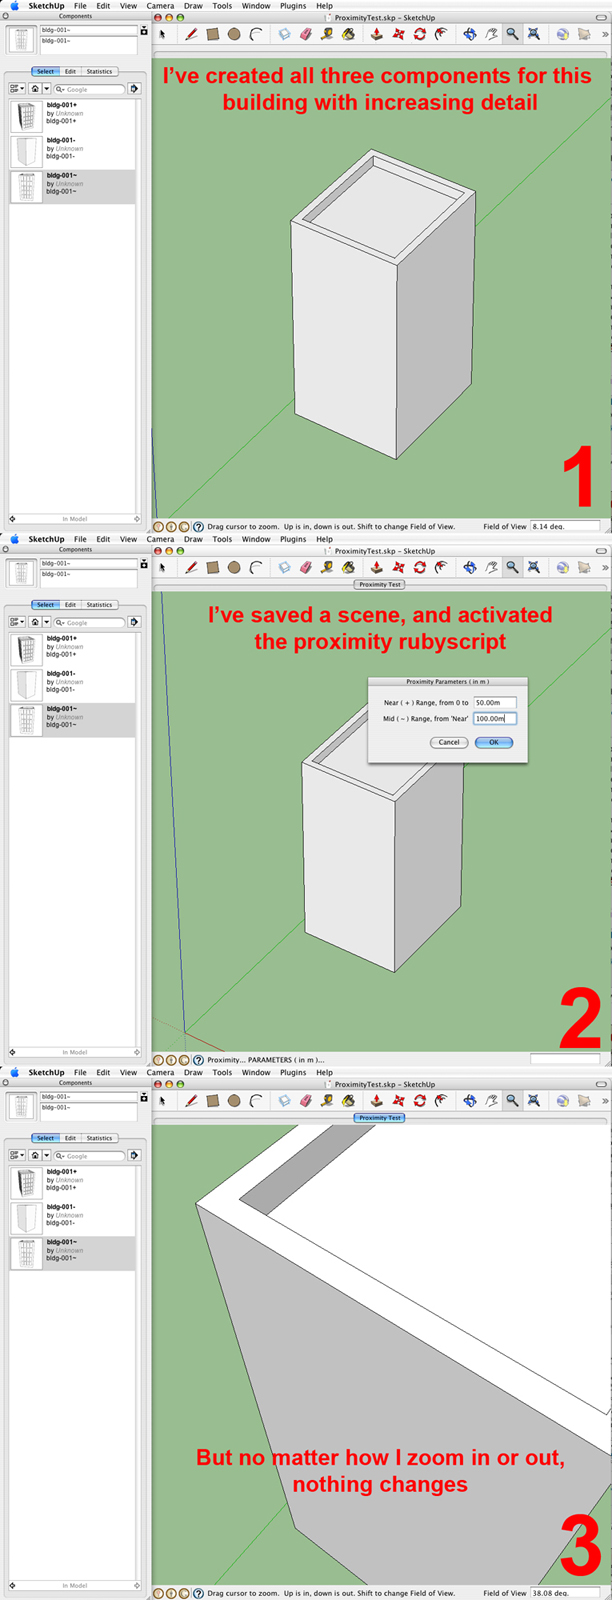
This is what I've done:
- I've created a folder on my hard drive called "Proximity Components"
- Within it I have 3 sketchup files.
- Each file is the same building at different levels of detail, and are labeled appropriately, ie
Bldg-001+.skp
Bldg-001~.skp
Bldg-001-.skp - Each of these files have no extra components, or layers or styles, and each have the same insert point and location (as they were built in one master file).
From there - I have NO idea what to do - I've tried making new document, and bringing in each of those components in register, each on a different layer, then running the Proximity script, but to no effect.
I've also tried making a 4th file, that has placed in register, on separate layers, each of those 3 components, and making a component file from that, and bringing that in in a brand new sketchup file - and still no results.
The .pdf file is not as explanatory as I need it to be I have read- and reread it, as I am such a noob (only 2 pages for the proximity part of the script) - I'm not sure where I am going wrong here.
I feel pretty frustrated and stupid at this point, can someone either tell me where I am going wrong, or do a youtube vid showing the correct way? I greatly apologize for my incompetence!
Thank you again!
-
'Proximity' uses the three versions of the component [+/~/-] [best if you have these three types loaded into the model's skp rather than get it to try and find them in another folder].
Place the simplest one[s] where you want them - there's less geometry etc in them and it's easier to do it with them - e.g. the 'Bldg-001-'[.skp] version.
Now position your camera where you want [probably save it as a Scene for later], run 'Proximity' and enter the two ranges for the three locations - i.e. foreground [Near +], middle-ground [Mid ~] etc - it should then swap out the 'Bldg-001-' for the more detailed 'Bldg-001~' in the middle-ground and very detailed version 'Bldg-001+' in the foreground - the extent of this swapping depends on the two 'ranges' you have set...
Here's the guide for the avoidance of doubt...MatrixProximityGuide.pdf -
Oh boy, I'm sorry, I'l have to continue to wear out my welcome.
Attached are screen shots I've taken of what I'm trying and still failing here.
I've tried and re-tried, and re-read the instructions, and tried again, and I'm still not getting anywhere.
Can you tell me what I am doing wrong here, or direct me to some same files, like the ones mentioned in the pdf, but that could not find?
Or would it help if I posted the components I've created?
Thank you again everyone, I appreciate it!

-
Proximity only makes the swap relative to the camera at the time that you run it.
It's intended for imaging from different scenes' views in turn - you need to re-run it each time.
Load the three components into a model [+/~/-].
Now, to see this effect, place three or more instances of the '-' components in a rough line, each progressively further away from the camera [save that camera's view as a Scene so you can go back to it after orbiting/zooming around]. Run Proximity using the Near [+] and Mid [~] settings so that some of the components will fall within each range.
The furthest component[s] will remain the '-' type, the nearest will be swapped to the '+' type, whilst the '~' type will now occupy the middle-ground.
Now orbit/zoom around and you will see that the components don't change with the camera - re-run Proximity to suit this new view-point and the swapping repeats, but this time it changes different instances as they are all differently placed relative to the camera.
It could be possible to make a new generation of tool - ProximityII - that you'd activate [and set] and it runs 'in the back-ground' - then as the camera changed the components would swap around to suit automatically [using a camera-observer ?] - but this would put a big load on the processing etc, but it might be useful for making 'animations' - you'd also need to be able to activate/deactivate PromimityII at will... This idea is not even on my list [yet].
Hope that clarifies things a bit more

-
I'm attaching my test sketchup file here (with all 3 types of components loaded in it), is there any way someone can tell if I am setting this file up incorrectly?
I am still unable to get this to work, and the most frustrating thing, is that it's one of the most powerful tools I've ever heard of, and it's just out of my grasp of understanding.
Can someone give this a shot and tell me where I am going wrong?
And just to be clear - when we speak of distance from the camera - I have been assuming that "Camera" means however we are looking at the model - THAT is the camera, meaning when I save a scene, the scene acts like a camera - as opposed to the "Camera tool" is that correct?
If you get it to work, please tell me what numbers you use as well.
My furthered apologies!
-
Proximity works fine for me... BUT you have made the whole model weirdly large. The blocks are 4000m high - that's tall - five times taller than the tallest building in the world !!!
So you'd need to enter Proximity ranges that are equally large.
To reset the model's 'scale' to something more sensible use the Tapemeasure tool and pick two points on the vertical block and enter the expected height - more like 40m ? and accept offer to rescale.
Now enter ranges for Proximity more in line with worldly dimensions...The 'Camera' is "what you are currently looking through" = i.e. the 'eye' of the screen... any View has a Camera - as does a Scene.
Try reworking your model [you also might need to rescale the components for use elsewhere ?] and try Proximity again...
-
You had me worried for a minute as I couldn't get it to work either !

Found what it was eventually - nothing to do with Proximity - it actually worked, but because your three component types have their axes/origins miles away from their geometry [a legacy from the rescaling ?] nothing got swapped at the expected ranges as everything was taken as being far far away...
To fix them do these steps [doing it in any other order will make life much more difficult, so please follow it carefully].
First Zoom so you can see the 'front row' of component instances.
Open the Component Browser window.
Select one '-' instance in the model and in the Component Browser hover your cursor over the '~' version's icon, right-click and 'replace-selected' - the select component will become the '~' type.
Repeat this for another '-' one and swap it for a '+' type.
Close the Component Browser window.
Now you have instances of the three types in a line.
Currently they all have their axes screwed up.
In the model Select an instance of a '-' one and right-click > 'Change Axes'...
Pick a corner of its geometry for the new axes/origin, and set the red direction in the red-axis and the green direction in the green-axis [the blue will auto-set to the blue-axis = 'up'].
Repeat with the instances of the '~' and '+' types, using the equivalent corner on their geometry etc.
Now all of your component definitions and instances will have sensibly located 'axes/origins'.NOW when you run Proximity it will work, because because it measures the distance from the camera's "eye" to each instance's insertion-point [which is a transformation of the axes/origin] and so it will now return sensible numbers, approximating to the 'target' dimensions you drew on the ground...
Enter any ranges within those targeted and you'll see the -/~/+ versions swap out to suit.
Try using Proximity with different ranges to see the effects they have.
Moving the camera and rerunning Proximity will of course give different swapping effects...
-
You are correct, that the scale was really wacky! Thank you for pointing it out to me!
I have corrected the scale, re-making each of the components to be around 15 meters tall (the approximate size for a 5 story tall building).
After that, still no success.
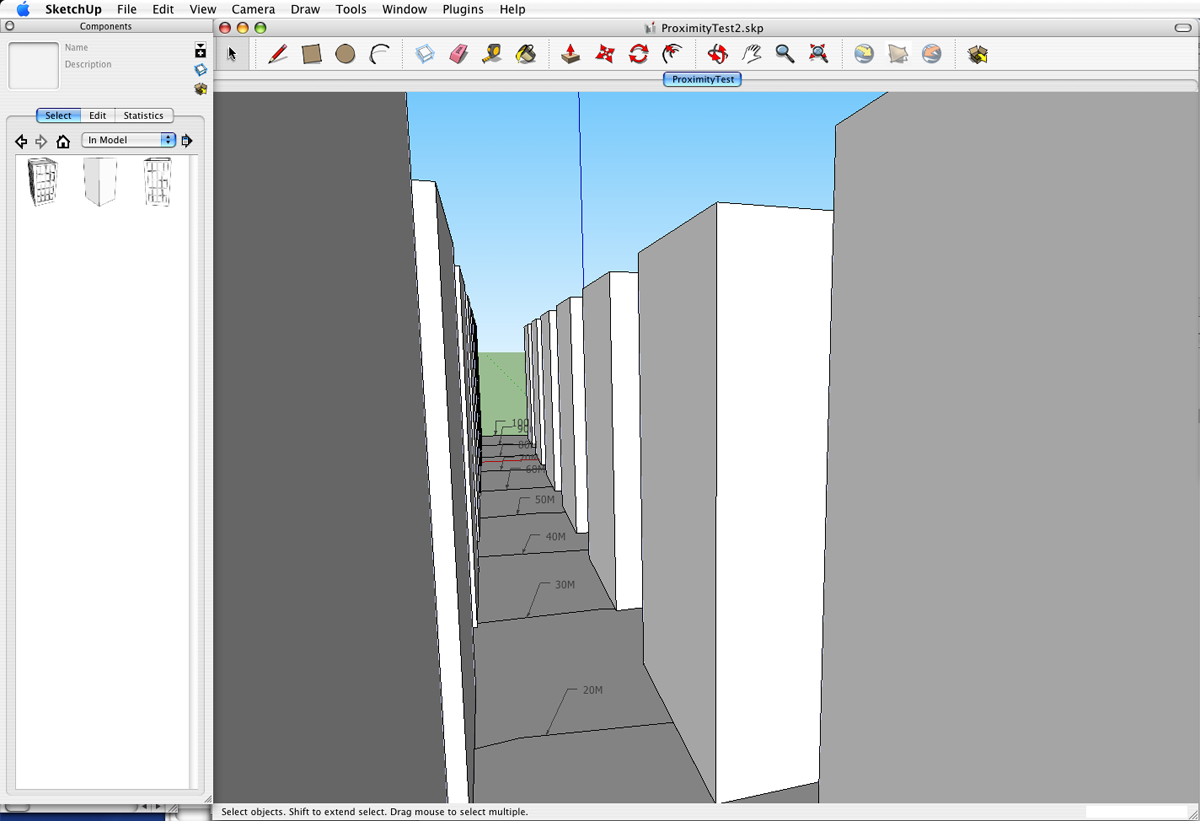
Undaunted, I created a viewable measuring distance guide, so I could see out from 0M to 100M from the camera, and no matter what numbers I input to the Proximity plugin - I still see no change.
I have tried this on my PC, using SKU6 Pro, and my Mac using SKU 6 and 7 (non- pro) and no difference, I just can not get the Proximity plug-in to work for me.
Some points of clarity here, these are my assumptions: Are my assumptions correct?
*Now that I have rebuilt the components, and the test file, that my models are to a reasonable scale, and should be usable for the Proximity plug-in.
*As soon as I enter the numbers, and hit OK, the close components should change in appearance immediately, I shouldn't have to activate anything else.
*I do NOT need to stack the components on top of each other ie. occupying the same footprint, instead only placing the "-" version of the component throughout.Please look at the files I've attached, the .png, is a screen shot of the file, with the measuring radius visible, and the second attachment is the sketchup file itself.
Please tell me if I have built this incorrectly, please any help would be great!
If you are getting this to work - please:
*Post the measurements you used to get the desired result
*Pose a screen shot, after the plugin has been successfully usedThank you all again!

-
I followed your instructions closely to no effect.
So I started from scratch thinking that I had screwed things up so much I may as well start over - building the components from scratch - everything from scratch, still no effect.
Attached is the brand new version, with reasonable insertion points and axises - nothing is working.
Please let me know if anything is wrong with the way this brand new file is built, and when you get it to work please post a screen shot of what it looked like when it worked, and the numbers you used to get the result.
Thank you again for your help TIG, I feel so frustrated and angry at myself for not grasping this it's hard to describe.
Edit: I just tried the Proximity plug in on yet another PC, running SU7, on Windows 7, still no effect.
-
The components now look fine.
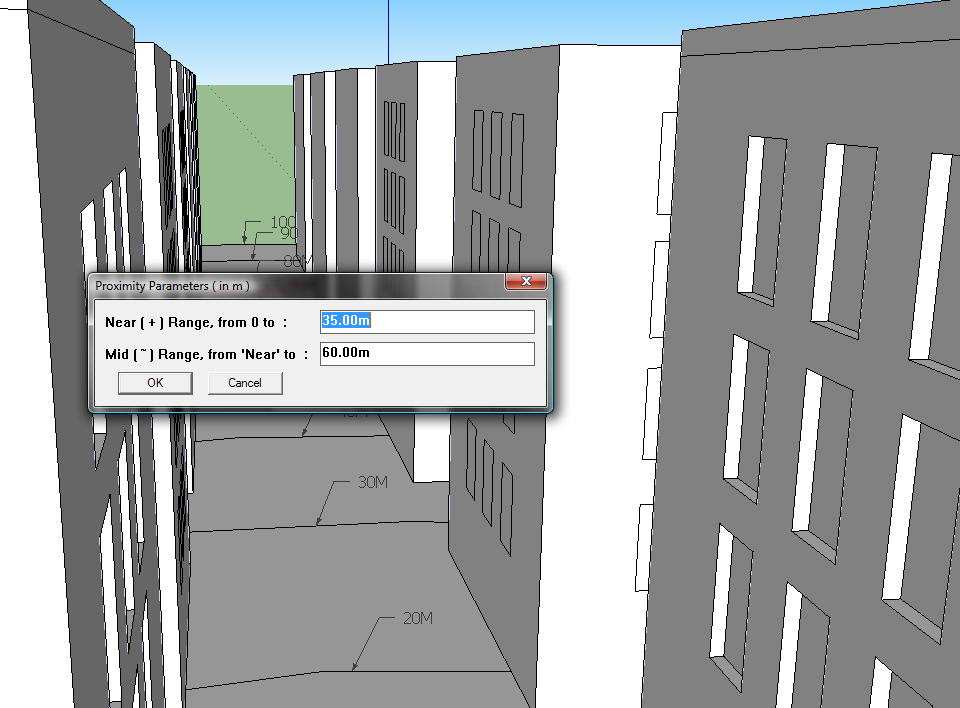
I simply ran Proximity with 35m and 60m and got the nearest ones as +, mid-range as ~ and the rest stayed as - types - I can't see the problem, though the range is a little off because the components axes/origin is at their rear face so you have to make mental adjustment for the block depth - the eye-to-axes/origin is what is used... and I'm not sure your eye is exactly over zero anyway ??


-
TIG - First off - again, I REALLY appreciate your immence patience! And thank you for taking the screen shot of my file ACTUALLY WORKING - it made my heart jump

Unfortunately I'm still getting no results, even though I just tested it on:
*****Windows 7, running SU 7 (free)
*****Windows XP, running SU 6 (Pro)
*****Mac OSx 10.4.11, SU 6 (free)
*****Mac OSx 10.4.11, SU 7 (free)I'm hoping I have an old / out of date plugin... is this the most recent version of the Matrix/Proximity plugin?
#     Version ; 1.0  21/11/05	First release.
#		1.6  20/12/05 Ditto - corrected...
#   1.7  09/02/08 Glitch with Proximity Components directory finding
#                 now fixed (Thanks to GreyHead)
Edit 1:
I see a comment in the Rubyscript itself that reads "require 'sketchup.rb'" And I looked in my plugin folder, and did not see a "sketchup.rb" - is this a file I need to find / download / place in the plugins folder? Is the "sketchup.rb" an essential file?EDIT 2:
Only the Mac tests had a folder called "Proximity Components" in the components folder with all three "-" "~" "+" components .skp files in it - I just want to to be thorough - NONE of the testing it working, but just in case that part is essential, just thought I'd add that note. -
One point at a time.
Works on very similar set ups for me. No version or OS problems are known.
v1.7 is the most recent.
Therequire 'sketchup.rb'is the standard call to load the Sketchup code first - in case it hasn't already loaded. Don't worry about where the file is the system will find it - don't move or copy it either [actually it's in found in the ../Tools/ folder which auto-loads rubies as well as from ../Plugins/].
Run it with the 'Ruby Console' open and see if you are getting error reports.
I used your SKP just as it came with the +/~/- versions loaded - the way Proximity works is IF it needs them but it can't find them pre-loaded into your model it looks into the ../Components/Proximity Components/ folder to load from there... It is a good idea to have that folder made - even if it's left empty - not finding it when the code builds its data set might throw an exception. The guidance notes do say to make it
To recap: make the ../Components/Proximity Components/ folder, but leave it empty.
Make sure you have the +/~/- versions in the skp.
Run Proximity and enter the same values as I used [35m and 60m] and you should get results similar to mine ???

-
-
Okay, I have created the correct (but empty) folders for both versions 6 (free) and 7 (free)
-
Still no effect
-
With Ruby Console open - running the script - I got this message
Error; #<NoMethodError; undefined method `+' for nil;NilClass>
/Library/Application Support/Google SketchUp 6/SketchUp/Plugins/MatrixProximity.rb;550;in `proximity'
/Library/Application Support/Google SketchUp 6/SketchUp/Plugins/MatrixProximity.rb;686
/Library/Application Support/Google SketchUp 6/SketchUp/Plugins/MatrixProximity.rb;550;in `call'
/Library/Application Support/Google SketchUp 6/SketchUp/Plugins/MatrixProximity.rb;550
Does this mean anything to you? Or is this a generic error?
I thank you again sir!
-
Advertisement


