Adding details in model
-
Hi guys,
I’m stuck at adding fine details for my model.
I’m very new to 3d modelling (first post here btw), and I’m not sure if you’re supposed to just draw lines over your models and fill them with colors or is there a way to do the detailing in an image editing program?Say, I want to draw facial features like the eyes, mouth and such, on my model of a head, how do I go about doing it?
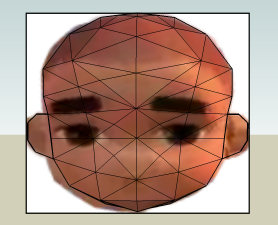
I know how to color the model as a whole, and laying out an image to a single face, but not to the whole model without tiling.Here is what I did as my first model.


I referenced it based on this image.

-
try this plugin
http://forums.sketchucation.com/viewtopic.php?f=180&t=11212
you might want to soften/smooth your model first
also try this plugin
http://forums.sketchucation.com/viewtopic.php?f=180&t=20781&p=174613&hilit=bulge#wrap
-
I would also delete half of the face and make the half face a component (press "G"). Then the tool and press CTRL to move over a copy of the half face. Then right click on the copy and choose Flip Along....try the red or green axis depending on how you are positioned. Then move the new half to line up with the original. This will allow you to model and sculpt only one side and the other side will change simultaneously. Plus you will have perfect symmetry.
-
@unknownuser said:
try this plugin
http://forums.sketchucation.com/viewtopic.php?f=180&t=11212
you might want to soften/smooth your model first
also try this plugin
http://forums.sketchucation.com/viewtopic.php?f=180&t=20781&p=174613&hilit=bulge#wrap
Thanks rclub24!
I'll try that plugin out
By the way, the model was made that way on purpose, so its easier for me to reconstruct it as a papermodel.That plugin looks great!
-
If you want a texture image, try this:
-
Use parallel perspective and make sure you have the view exactly from the front side.
-
As the model has no face parallel to the viewer, I suggest to insert a rectangle behind the model, that has the maximum dimensions of the model. Then make a screenshot.
-
The screenshot should have the maximum dimensions and show the outlines of the model. Then you can use an image editor to paste your reference image and stretch/distort/paint on it until it fits perfectly.
-
Import the image and paint it on the rectangle. Right click -> texture -> projected. With the sample tool (paint bucket + hold down alt key), click on the rectangle and apply this material to the model.
-
-
Thank you very much Aerilius!
That's just what I wanted!Now trying out your instructions

-
Sorry for double-posting.
Hi Aerilius,
I tried what you instructed me to do, but I'm having a little trouble with your 4th step.
When I tried applying the new texture over the model, nothing happened.
Is it because the model is a component?
I tried exploding it and apply the texture again, but this time, the painted images were in a mess.
What am I doing wrong?

-
Gakuto,
Make sure to follow these steps strictly:
- First of all, soften the edges on your model (right click > Soften and a dialog pops up wher you can slide the bar to the right until all visible edges get smooth)
- Import the image as texture and apply it on the (single!) face Aerilius suggested first. This will also enable you to scale it properly upon import.
- Now right click > Texture > Projected.
- Now sample the material (Alt+Paint bucket tool)
- yes, right click the component and > Edit (you cannot project a texture on a closed component/group).
- Paint.
-
@gaieus said:
Gakuto,
Make sure to follow these steps strictly:
- First of all, soften the edges on your model (right click > Soften and a dialog pops up wher you can slide the bar to the right until all visible edges get smooth)
- Import the image as texture and apply it on the (single!) face Aerilius suggested first. This will also enable you to scale it properly upon import.
- Now right click > Texture > Projected.
- Now sample the material (Alt+Paint bucket tool)
- yes, right click the component and > Edit (you cannot project a texture on a closed component/group).
- Paint.
I got it to work. Thanks guys!
I was worried to soften the edges of the model at first because I thought it would make the mesh finer.
Alls good now, thanks again! -
You can always unhide hidden geometry in the View menu and work on it as if it wasn't softened.


Hello! It looks like you're interested in this conversation, but you don't have an account yet.
Getting fed up of having to scroll through the same posts each visit? When you register for an account, you'll always come back to exactly where you were before, and choose to be notified of new replies (either via email, or push notification). You'll also be able to save bookmarks and upvote posts to show your appreciation to other community members.
With your input, this post could be even better 💗
Register Login


Advertisement