Invitation to the SketchUcation collection
-
kmz is the file type SU creates from a model for Google Earth. From SU you can only upload kmz files however on the front page of the WareHouse you can directly upload kmz files as well. But you cannot use them in SU later so unfortunately it would no be help for SU modelers.
-
The last 4 links take you to the same model.
-
Thanks for the help loading models to the 3d warehouse.
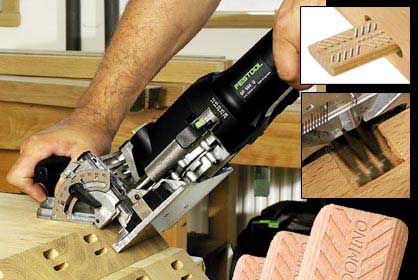
Here are the models I uploaded there are some that don't show the full joint detail as I have been using loose tenons and sometimes add this as I build in the shop. Otherwise all parts are components and to scale.
http://sketchup.google.com/3dwarehouse/details?mid=200fe2e2486a0ddf85c5f690e9252fc5
http://sketchup.google.com/3dwarehouse/details?mid=c9dd43888905630285c5f690e9252fc5
http://sketchup.google.com/3dwarehouse/details?mid=3357d112432da01b85c5f690e9252fc5
http://sketchup.google.com/3dwarehouse/details?mid=509d9d137fd7465a85c5f690e9252fc5
http://sketchup.google.com/3dwarehouse/details?mid=f006ed79465eb37a85c5f690e9252fc5
http://sketchup.google.com/3dwarehouse/details?mid=754372e400efa8a485c5f690e9252fc5Thanks for looking
Keith -
I fixed the links so all models are shown
Keith
-
I will have a look at these tomorrow.
-
Sheet music cabinet:
Sorry, but criteria 4 is "No overlapping solids".Have a look at the "side slats" component, it overlaps the side rail, the side slat and the post. Same thing with the shelves and the back.
Media Center:
Meets the model criteria, although I have a woodworking type question about the bottom rails. They seem to be mortise and mortise not mortise and tenon joints. Is that a mistake or do you put in a seperate piece of wood to fill both holes?Dresser:
It's a complex model with many pieces but what I looked at looked all good.Youth desk:
Same issues as the music cabinet, in the same locations too, side rail, side slat and legs.Night Stand:
At first the orbiting was weird, then I figured out you had the camera in parallel projection. There are gaps in the woodworking like between the bottom stetcher and the shelf but it meets the criteria.Queens size bed:
The foot board and head board overlap both the rails. It does not stop it being in the collection but I thought you would like to know some of the components don't have material on all faces, for example the ends and bottom of the side rails. -
You've become rather picky, Hazza!

-
@hazza said:
[b]Media Center:
Meets the model criteria, although I have a woodworking type question about the bottom rails. They seem to be mortise and mortise not mortise and tenon joints. Is that a mistake or do you put in a seperate piece of wood to fill both holes?Hazza, are you familiar with "loose tenon" joinery?


-
Thanks for lookig at the models. I had forgot that I omitted the slots for the slats in the models where the 1/4 panels sit in the rails and styes. I will remeber to include that in the future and will go back and fix the models.
Yes I have started to use loose tenon joints since I built a fixture that works with an old shop smith and works like a horizontal router so long parts are no longer a problem. (except my shop is narrow and crowded)
The gap in nightstand is intentional and required for seasonal wood movement as the shelf is solid wood.
I only use texture where visible from the front and sides most of the time to show the family what thier designed furniture will look like and to get the approval to build.
Keith
-
@gaieus said:
You've become rather picky, Hazza!

Yes and it's what is not accepted into the collection that sets the quailty. If I let that model slip in why not the next one. Then the next one that is slightly less quailty than that... etc etc.
@dave r said:
Hazza, are you familiar with "loose tenon" joinery?
No, that's why I asked. I am a SU modeler that does woodwork models, not a woodworker that does SU models.
I have no doubt in my mind that there is heaps of woodworking stuff I have never seen before. That's why I like detailed woodworking plans. I am able to follow the plans with no prior woodworking knowledge.
Now I am familiar with loose tenons... you learn something everyday.
@ktkoh said:
I will remeber to include that in the future and will go back and fix the models.
When you do let me know and I will add them to the collection.
-
@hazza said:
Yes and it's what is not accepted into the collection that sets the quailty. If I let that model slip in why not the next one. Then the next one that is slightly less quailty than that... etc etc.
Yes, I know exactly. I was just pulling your leg.

-
@gaieus said:
Yes, I know exactly. I was just pulling your leg.

Yeah I know you were but it was just in case others came across the thread and thought I WAS being too picky. I would have thought of a witty reply but my caffine system has too much blood in it.
-
I understand about standards and I am fine with you saying that the models need fixing to be included. That seems reasonable to me.
Keith
-
Heres my contribution.
http://sketchup.google.com/3dwarehouse/details?mid=72c2d871fba975c7d797e188153f356&prevstart=0With reference to woodgrain orientation, it always used to be a real pain, but now in su7 you can edit the image in pshop. Simply save the texture as a copy in su. Export it to your image editor, rotate the image 90 degrees and voila!
Baz
-
Nice chest you've got there, Baz.
I wouldn't want to have to fit those dividers though. Are you going to build it?
Hazza won't like it because the case isn't drawn as separate components.

-
@baz said:
Heres my contribution.
http://sketchup.google.com/3dwarehouse/details?mid=72c2d871fba975c7d797e188153f356&prevstart=0With reference to woodgrain orientation, it always used to be a real pain, but now in su7 you can edit the image in pshop. Simply save the texture as a copy in su. Export it to your image editor, rotate the image 90 degrees and voila!
Baz
I am drawing some cabinets to be made from sheet material in V7 and found this useful feature, and that is what I did at first BUT....
I then decided I wanted the model to work with the cutlist plugin (planning a whole kitchen) and found that to do it this way requires 2 images with different names, one for each material orientation, which causes Cutlist to show the board layout on 2 different sheets (one for each material) instead of one.
So I revisited the model and changed the axis for the parts which needed it (top, shelf and bottom) and this allowed me to use the same texture for all parts.
The cabinets are all created as Dynamic Components in V7 (for easy parametric re-sizing) and the alterations to the X, Y, Z sizing was easily done in the Components Attributes window once I changed the axis.
So if you are designing with a lot of cabinets (such as a kitchen) and are looking to use a cutlist output (either the plugin or a spreadsheet) the axis change is the way to go.
-
@dave r said:
Nice chest you've got there, Baz.
I wouldn't want to have to fit those dividers though. Are you going to build it?
Hazza won't like it because the case isn't drawn as separate components.

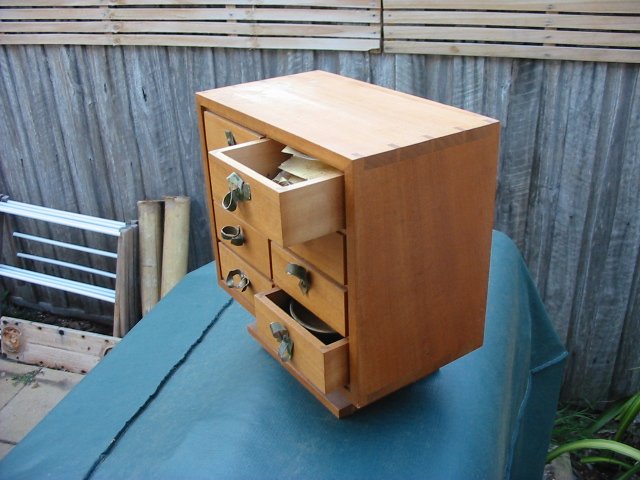
Thanks Dave, I actually made this many years ago as my 'masterpiece' (in the sense of the traditional apprentice/journeyman/master, guild system.) I cut each of those mitres on the dividers with a 'donkeys ear' shooting board, and they are a dry fit.
If you push a drawer closed firmly most of the rest slide open, I was pleased with that:)Not sure I understand about about your component comment re hazza?
Baz.
ps: sorry about the daggy photo, its the one I used for photomatching, all the good shots of this are on slide. (another job to get round to:(
-
Ah, the perfect piston fit drawers. You are indeed a master. Excellent work.
You didn't glue the dividers to each other? That's a neat arrangement.
Are you still doing cabinet work.
re: The component comment, The case sides, top and bottom are all one blob of geometry. Hazza's criteria is that every part you'd make in wood must be a separate component. I think your model is fine as it is.
-
@hazza said:
If I wanted to seperate it into 4 pieces so that I could take measurements I could not do so without many many hours of SU work.
Well twenty one minutes, anyway.


![min_chest_of_drawers[2].jpg](/uploads/imported_attachments/YCYI_min_chest_of_drawers2.jpg)
-
Advertisement


