@unknownuser said:
This looks great. Would you be able to control the amount of extra polygons created? The examples seem to go very high poly.
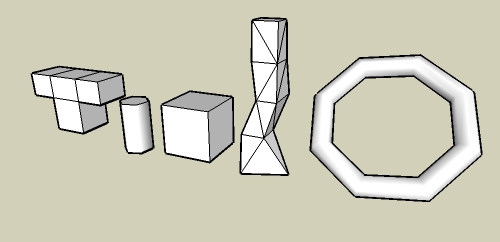
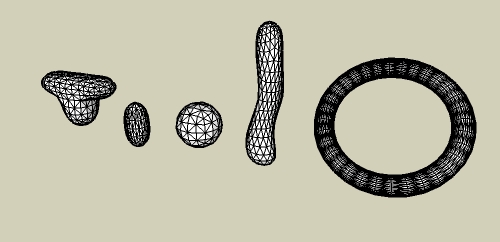
The examples shown are done with two smoothing iterations. One iteration may be adequate in many cases.
@unknownuser said:
This looks great. Would you be able to control the amount of extra polygons created? The examples seem to go very high poly.
The examples shown are done with two smoothing iterations. One iteration may be adequate in many cases.
Nice job modelhead! What version of Indigo are you using? How are you finding the SU to Indigo workflow? I am always looking for feedback to improve the plugin. There doesn't seem to be many Indigo users around here...yet.
Whaat
Does anyone want to take a crack at this?
I would love to see a 'sculpting' tool that works properly on all types of surfaces (not just horizontal). I am picturing something kind of like the push/pull tool combined with 'soft-selection' (like the current smoove tool works). I wonder if the recent 'Joint Push/pull' tool could be modified to do this?
I would work on it myself but I already have a few projects on the go.
Whaat
Thanks guys. That's just the info I needed.
The Ruby support on these forums is outstanding! Keep up the good work everybody! 
I thought there was a script that changed it so the selection tool was activated when SketchUp was started (like in SU5)
I am wondering, is it possible to activate a SketchUp tool (not a user-defined tool) using
a Ruby script? If so, how?
For example, I want to activate the PushPull tool with a Ruby script.
Thanks.
@gaieus said:
Hi Whaat,
Are those images already the result of the working script or just an illustration what you'd like to achieve?
In any case, it's just fantastic and looks really promising!
Thanks Gaieus,
The images are indeed the result of the current version of the script.
**Script is now available on Smustard.com
http://www.smustard.com/script/SubdivideAndSmooth**
I've been playing around with a new script idea lately. I am not aware of any existing script although I heard that RickW was working on a similar script at one point in time.
If I can perfect this script, I see a lot of potential merging the functionality with other Ruby scripts such as 'Free-form deformation balloon' (CPhillips) and 'Skin' (ArchitectBoy).
It seems like it would also be possible to use the same logic to subdivide and smooth geometry during the export process to a rendering app.
Whaat


Looks really nice! Here are few crits:
Your trees look great except for the one right in the middle. Too dark within the canopy. Are they rendered or done in photoshop? (looks rendered due to shadows on building). What are your material settings for the leaves?
The grass and sidewalk can be improved but it sounds like you're working on that as well. Looking forward to the finished job!
@solo said:
Are there any video tutorials? or setup screen shots?
There's three skippy tutorials (much better than video tutorials :esmile: )
if you follow the link below.
http://www.indigorenderer.com/joomla/forum/viewtopic.php?t=2317
Someone with your rendering experience and skill should pick up Indigo in no time. Some of the settings may not be completely intuitive (compared to say Podium) but I think once you go through the tutorials and take a look at some of the material presets, it will all make sense.
BTW, the tutorials are for SkIndigo 0.9.1 so make sure you are using the right version.
Looking forward to seeing some more Indigo renders from one the rendering masters :thup:
Cheers,
Whaat
You are correct. If you are using exit portals, Bidirectional path tracing is the most efficient method to use. I am surprised Bidir MLT is that much slower than Bidir PT when using exit portals (even though it's still much faster than not using exit portals).
I looked at my tutorials. You are right that the wording is a bit ambiguous. At least there is a 50-50 chance of the user getting it right!
Anssi,
A couple of suggestions to improve rendering speed.
You can adjust the exposure of your images with 'Violet', the Indigo tonemapper application if you have 'Save IGI' enabled. Just load the IGI file into 'Violet' (free download from Indigo website).
If you have more questions, ask away. Also, there's always someone willing to help you out on the Indigo forums. :esmile:
Regards,
Whaat
Hey kwistenbiebel,
Are those commercial models or available for free somewhere? Nice job BTW!
@anssi said:
What is meant by "thick glass"? Must it be two parallel faces close to each other, or must the sides be modelled too?
If you have a couple of minutes, you should check out the SkIndigo tutorials for version 0.9:
http://www.indigorenderer.com/joomla/forum/viewtopic.php?t=2317
They are interactive skippies. 'Thick Glass' would be glass that is modeled as a closed volume. I think for windows, you would not have to model the sides to get the correct result (not sure though). It is pretty easy just to push/pull your windows 1/2" in order model the window correctly. However, you can also avoid this step by using the 'Thin Glass' material. It works pretty well for windows but I would not use it for glassware. If you use 'Thin Glass' make sure the exponent (glossiness) is set to 1 million so you get near-perfect reflections. Lower values will result in a glossy appearance.
If you use the 'Glass' material preset, you will get perfect realistic glass, but the glass must have thickness.
I think your render was slow because of the high resolution and the large amount of windows that cause the light rays to keep bouncing back and forth. This is also the reason why materials that are completely white tend to stay noisy much longer (lots of light bouncing)
@anssi said:
Hi
I must be doing something wrong with Skindigo, or then everyone else has a supercomputer! My first interior test below, after rendering for nearly 30 hours. The result is still very grainy, and the renderer had reached only less than 90 samples/pixel by that time
Anssi
Wow, I am shocked! What computer are you using? What resolution are you rendering at?
I only have a single core AMD Athlon XP 2700. Judging by the complexity of your scene, it should be clean of noise in 4-6 hours if it was rendered on my system (if the resolution was the same size that you posted)
Here are some possible reaons why the scene is rendering extremely slow:
You may be using Path Tracing (PT) rendering method (slow for indirect light and glass). This type of scene should be rendered using Bidir MLT for better efficiency. Usually Bidir MLT is the best choice for almost any scene.
You may be using the glossy tranparent material type for your windows. Try using the Glass preset material. If you use this material, the windows must have thickness. If you are using the Thin Glass material type, try using an exponent value of 1 million for your window material
You have an excessive amount of glass in your scene. Even so, I would expect the render to be quicker.
You are rendering a very large resolution (eg. larger than your monitor size). If you are rendering large resolutions, you will want to be using a very powerful PC or use network rendering.
Before giving up on Indigo, I suggest you try rendering some other scenes to see if you get quicker results. Indigo is very comparable to Maxwell and Fryrender in terms of speed. Let me know how things turn out! 
Whaat
@dave r said:
Not bad fro someone who is just blundering around.
That's the beauty of Indigo. You don't need to know anything about rendering to get a really nice image. You just need a bit of patience.
:ewink:
Keep experimenting! The best way to learn about material settings is to take a look at the settings for the material presets included with SkIndigo. And, of course, using the new material preview feature.
I usually use the shiny plastic or dull plastic preset for most wood materials to give it a bit of shine.
Keep it up Dave!
@unknownuser said:
Great advise Whaat!! Thank you. I am going to try the UV tutorial again....I did have some success with it but not quite clear yet... I will see if I can find/make a night map. I was looking around yesterday for a tool to assist in making the environment maps but I have had no success yet.
Cheers!!
I wasn't referring to my own multiple UV set tutorial found on the Indigo website. You don't need to use multi-layered materials here. Just fix the texture position and scale for the wood grain using the right-click->position texture context menu.
In your particular scene, you could try creating a vertical plane behind the camera with an image of a sunset (or some other night scene). Then make that material an emitter by changing the material type to RGB Light or Blackbody light. The result probably won't be as nice as using a true environment map (because of the low dyanmic range of the image), but this is one way to get some nicer reflections in the windows.
nice render modelhead!
A couple of things: (some already mentioned)
The railing looks superb! Great job!
EDIT: also try adding another light off screen to the left to brighten up the dark foreground