sketchucation logo sketchucation
    • Login
    1. Home
    2. sketchyKev
    3. Posts
    Oops, your profile's looking a bit empty! To help us tailor your experience, please fill in key details like your SketchUp version, skill level, operating system, and more. Update and save your info on your profile page today!
    πŸ«› Lightbeans Update | Metallic and Roughness auto-applied in SketchUp 2025+ Download
    S
    Offline
    • Profile
    • Following 0
    • Followers 0
    • Topics 5
    • Posts 75
    • Groups 1

    Posts

    Recent Best Controversial
    • RE: New Hardware Speed Test & how to really speed it up!

      @hpnisse said:

      I did the test today, but today I had no other programs running in the background.
      So the result was the following:

      @unknownuser said:

      [list:n7i7csve]OpenGL ON

      Shadow on: ["Time", 3.912, "Frames", 60, "Fps", 15.3374233128834]

      Shadow off: ["Time", 1.054, "Frames", 60, "Fps", 56.9259962049336]

      OpenGL OFF

      Shadow on: ["Time", 60.347, "Frames", 60, "Fps", 0.994249921288548]

      Shadow off: ["Time", 24.993, "Frames", 60, "Fps", 2.4006721882127][/listβ­•n7i7csve]

      I even tried to hide the edges, but it made ​​minimal difference.
      In order to get exactly 60 frames, I used LazyScript and "endSim ()" command.

      Hi Hpnisse,

      That is more like what I thought your system would be capable of, you are really motoring now! You got nearly 57 fps with shadows off and I can only manage 18 fps with shadows off and no programs running in the background 😞

      Thanks for your contributions! πŸ˜„

      posted in Hardware
      S
      sketchyKev
    • RE: Jumpy doors and stuck faucets

      Hi Rick,

      I don't think I explained the bit about how to construct the cabinet doors using rectangular planks very well. It is probably better explained with an example. In this latest attachement, I have taken your original model and by constructing the right door in a different way it now works without having to rescale the model or change collision settings. The stiles and rails of the right hand hand door have been subdivided into simple rectangular shapes that have been individually grouped, which makes the physical shape more like the visual shape. When you run the simulation you will the black debug outlines of the doors. Have a look at the difference between the left and right doors. I have hidden the rest of the cabinet so you can see the doors clearly, but you can restore the model by enabling the "Carcase" layer. Right click on the doors and select SketchyPhysics/debug from the menu to turn off the black debug outline.


      sink4.skp

      posted in SketchyPhysics
      S
      sketchyKev
    • RE: Jumpy doors and stuck faucets

      Hi again Rick,

      Hpnisse did a good job with the faucets, but the problem with the door "extruding" itself away from the frame still remains. This is happening because the front facia panels of the door have been grouped with the structural elements at the back of the door. When you click on the door you can see the blue "bounding box" and this is the shape the physics engine sees which is different to what you see. I have fixed this in the attached file by setting all the parts surrounding the door to "ignore" and putting a white centre post for the door to shut against, that is set back so that it is clear of the door bounding box. You can select Edit/Unhide/All to put the yellowish centre post facia back in. The doors should be working perfectly now. When constructing cabinets try to make them as if they are made out of rectangular planks and make each plank a group before joining them in one large group. Any trims or unusual shapes should be set to "ignore" and "no collision" and grouped with the rest.

      Cheers,

      Kev.

      P.S. Please see the other hardware speed thread. Thanks for your contribution!


      sink3.skp

      posted in SketchyPhysics
      S
      sketchyKev
    • RE: New Hardware Speed Test & how to really speed it up!

      @hpnisse said:

      Hello!!
      I did the test as you described. And the result was the following:

      @unknownuser said:

      OpenGL ON

      Shadow off: ["Time", 2.377, "Frames", 64, "Fps", 26.9246949936895]

      Shadow on: ["Time", 5.117, "Frames", 65, "Fps", 12.702755520813]

      OpenGL OFF

      Shadow off: ["Time", 28.666, "Frames", 65, "Fps", 2.26749459289751]

      Shadow on: ["Time", 30.419, "Frames", 65, "Fps", 2.13682238074887]

      Hi Hpnisse,

      Thanks for getting the ball rolling. Very community spirited of you! πŸ˜„

      Your results are 50% faster than my system, but your system is obviously better, in fact I would have thought it would be even faster at a glance. I am curious why in another speed thread there was orders of magnitude differences in performance between systems, with some systems doing less than 2 fps and one mac achieving 120 fps! 😲 Hopefully we will get some more test results here and see what is going on.

      Thanks again!

      Kev.

      posted in Hardware
      S
      sketchyKev
    • RE: Calling all SketchyPhysics users.

      @unknownuser said:

      I checked it out with my system, hardware acc. off....3fps........on with shadows off....34fps....shadows on.....22fps

      Rick

      Hi RIck,

      That is good performance you have there with your system! So far you are the champion! Hpnisse only got 27 fps (shadows off) and 12.7 fps (shadows on) and he has a pretty decent CPU and card. Could you let us know what CPU/graphics card/OS you have and maybe post your result here --> http://forums.sketchucation.com/viewtopic.php?f=72&t=37045

      Don't worry about all the other details πŸ˜‰

      posted in SketchyPhysics
      S
      sketchyKev
    • RE: Door hinge servo not working

      @unknownuser said:

      Hav'n fun now

      You seem to really have got to grips with SketchyPhysics now. πŸ˜„

      Nice surprise in the model. 😲

      posted in SketchyPhysics
      S
      sketchyKev
    • RE: New Hardware Speed Test & how to really speed it up!

      Here is how to easily find and copy and paste your system information in Windows 7.

      (It took me while to figure it out πŸ˜’ )

      SystemScreen1.png

      SystemScreen2.png

      SystemScreen3.png

      If all that seems too much trouble or accessing your operating system details is different, just manually post the basic details such as:

      CPU model & speed:
      No of cores:
      Amount of memory:
      OS & SU version:
      Graphics Card model:

      That would still be very useful. πŸ˜„

      posted in Hardware
      S
      sketchyKev
    • Calling all SketchyPhysics users.

      Hi all,

      I have posted a hardware speed test in another sub-forum that requires SketchyPhysics to run. There has not been much response and I guess most Sketchup users do not have SketchyPhysics installed and cannot be bothered/ do not know how to install the the plugin. So if you already have the SketchyPhysics plugin installed please take a few minutes to pop over to http://forums.sketchucation.com/viewtopic.php?f=72&t=37045 and carry out a test and post the results! I would be very grateful and I think we would all benefit. πŸ˜„

      posted in SketchyPhysics
      S
      sketchyKev
    • RE: New Hardware Speed Test & how to really speed it up!

      @mitcorb said:

      Hi, sketchyKev:
      I notice your Display Adapter says nothing of OpenGL support, only DirectX. I am also given to understand that ATI cards are not necessarily first choice for Sketchup? However, I have also heard that lately the top graphics card producers have been working toward double compliance? (both OpenGL and DirectX).
      Can anyone clarify this confusion?

      Hi Mitcorb,

      I had heard similar things, but the test proves my ATI card really does benefit from selecting "OpenGL hardware acceleration". It may be that the latest SU supports Direct X hardware acceleration as well (just guessing). My PC is fairly modern, but "bargain basement" with the greatest savings probably being made in the graphics card department and is the weakest link in the system. I am thinking of getting a better card, so I am hoping people will post some test results here so that we can can find out what systems really motor along and what systems to avoid. The proof is in the pudding, so get testing and please share!

      Another myth in an older speed test thread is that SU does not take advantage of more than one core processor. These screenshots of the performance monitor in Windows Task Manager shows that Sketchup 8 is using at least two cores when the simulation is running:


      test2.png


      CoreTest.png

      posted in Hardware
      S
      sketchyKev
    • New Hardware Speed Test & how to really speed it up!

      I have found that switching on the OpenGL Hardware Acceleration option speeds up the real time speed of SU by up to 6 times! I am not sure if all systems can take advantage of this and thought it would be interesting to have this test so that we can find out what is the best system for running SU on.

      To run the test, download this model from the Sketchup Warehouse:

      Error 404 (Not Found)!!1

      favicon

      (sketchup.google.com)

      and you do not already have SketchPhysics installed you will need to download the latest version from here:

      Link Preview Image
      Google Code Archive - Long-term storage for Google Code Project Hosting.

      favicon

      (code.google.com)

      and install it to your Program Files/Google/Google SketchUp 8/Plugins folder.

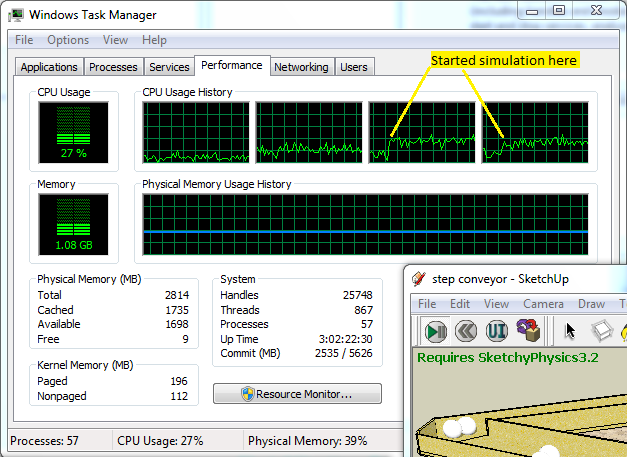
      To carry out a timed run, open the "Ruby Console" in the "Window" menu. Start the simulation running using the "play" button and let it run for about 60 frames (displayed at bottom left) and stop the simulation. The average frames per second will be shown in the ruby console. Turn shadows on and off in the "View" menu and turn hardware acceleration on and off in the "Window/Preferences/OpenGL" menu. Mine seams to be have been off by default and I am wondering how many other people have missed this easy way to speed their system up?

      My Test Results with Shadows "ON"

      Hardware Acceleration "OFF" 1.37 fps (Shadows not actually displayed)
      Hardware Acceleration "ON" 8.14 fps (Nearly 6X faster) (Shadows displayed)

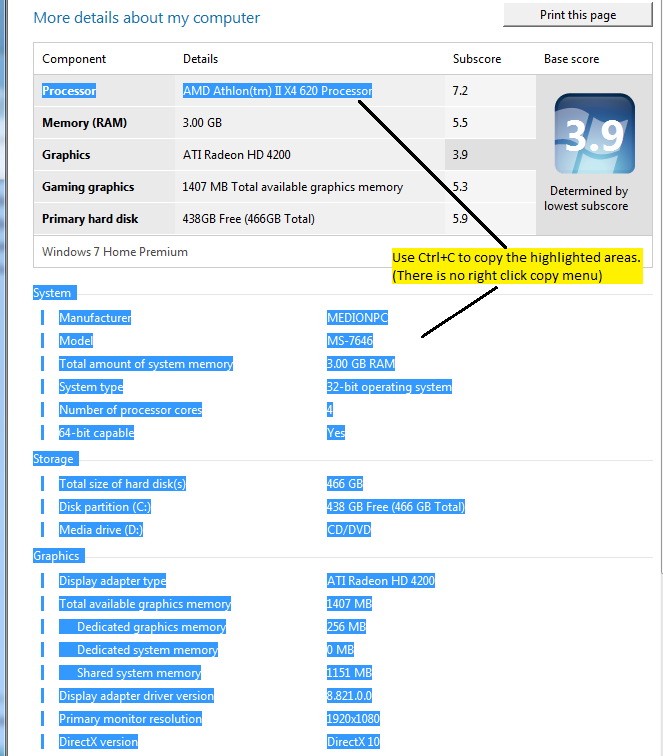
      This is my PC system spec:

      @unknownuser said:

      ================================================================================

      Processor AMD Athlon(tm) II X4 620 Processor 2.6 GHz

      System

      Manufacturer MEDIONPC
      Model MS-7646
      Total amount of system memory 3.00 GB RAM
      System type 32-bit operating system
      Number of processor cores 4
      64-bit capable Yes

      Storage

      Total size of hard disk(s) 466 GB
      Disk partition (C:) 438 GB Free (466 GB Total)
      Media drive (D:) CD/DVD

      Graphics

      Display adapter type ATI Radeon HD 4200
      Total available graphics memory 1407 MB
      Dedicated graphics memory 256 MB
      Dedicated system memory 0 MB
      Shared system memory 1151 MB
      Display adapter driver version 8.821.0.0
      Primary monitor resolution 1920x1080
      DirectX version DirectX 10

      ================================================================================

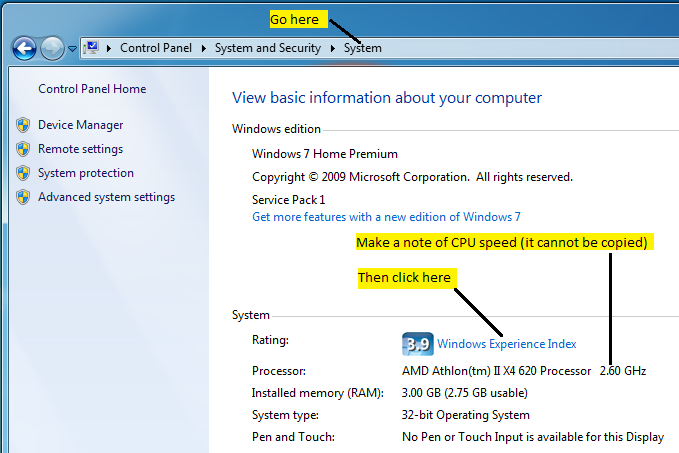
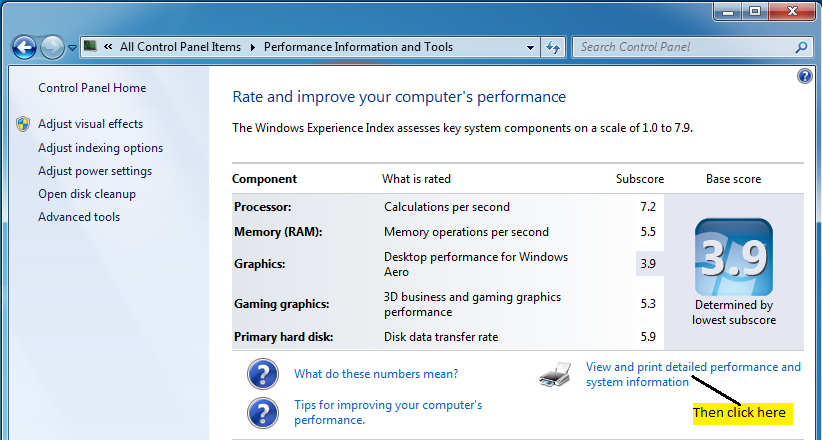
      All the information in the box above is basically copy and pasted from system information in the Windows Control Panel. (See my 3rd post in this thread for how to do this.) Just manually add your software details:

      Software

      WIndows 7 Home Premium - Service Pack 1 - 32 Bit
      Sketchup Ver 8.0.4811
      SketchyPhysics Ver 3.2

      P.S. I ran my test with the Sketchup window maximised to full-screen. To be consistent please do the same. I have found that with SU running in a quarter sized window it runs twice as fast as full-screen mode.

      posted in Hardware
      S
      sketchyKev
    • RE: How do i add items to a car from 3d Warehouse

      Hi again,

      I have just done a test and this slightly simpler method should work (in most cases):

      1. Right click on the car body and select "Explode" in the pop-up menu.

      2. Hold left-shift down and left-click on the roll cage.
        (All the car body parts and the roll cage should all be highlighted now.)

      3. Right-click on one of the selected parts and select "Make group".

      That should do it and the all the joints should still be functioning correctly if the model is not too complex and does not use ruby codes in the controllers.

      posted in SketchyPhysics
      S
      sketchyKev
    • RE: How do i add items to a car from 3d Warehouse

      Hi Lewis,

      First save your model to a new filename so you can always go back to the original model if things go wrong.

      Now click on the the User Interface "UI" button which is next to the physics play button and then click on the part you want to attach the roll cage to, presumably the car body. In the UI will be a list of joints that the body is connected to. Make a note of them. Click on the joint connector tool (Next to the UI button) and then click on the car body. The location of the joints connected to the car body will be highlighted in yellow. (Make sure you have the "Physics Joints" layer turned on in the Layer window.) Also in the UI will be a list of joints grouped with the car body under the heading "Internal". Make a note of these too. Now select the car body and explode it once. Using left shift and the left mouse button un-select all the joints grouped with the car body. Now use left shift left mouse button to select the roll cage along with the car body parts. Right click on the selected parts and select "Make Group". Now select the joints that you disconnected from the car body earlier along with the car body and "Make group" again. If you are lucky the various joints should still be connected. Check in the UI list again and click on the car body with the with joint connector tool to see if all is OK. If not, select the joint connector tool and click on the car body. Now use left ctrl and left mouse button to connect the joints again. You should be back to a working model. If you have done everything correctly, the list of joints in the "Connected" list and in the "Internal" list of the "UI" should be the same as when you started when you click on the car body/roll cage group.

      Let me know how you get on and if there is anything you do not get.

      Cheers,

      Kev.

      posted in SketchyPhysics
      S
      sketchyKev
    • RE: Door hinge servo not working

      @unknownuser said:

      One question, the original top door hinge has "+0.01" after the ("rightx"). I tried it with and without it and saw no difference. What is that for?

      The "+0.01" was necessary to make the door shut completly flush against the door frame (at least on my PC). You might need to look from above the door to see the difference. I figured since you make highly detailed models you would appreciate little details like that. πŸ˜‰

      @unknownuser said:

      PSS I just tried it with whole numbers....WOW....all kinds of "stuff" happens!

      Hinges and servos behave badly if asked to rotate more than 179 degrees in a given direction. Adding 1 to "rightx" changes the range of values from (0 to 1) to (1 to 2) which changes the range of movement from (min=-90 to max=90 degrees) to (min=90 to max=270 degrees).

      posted in SketchyPhysics
      S
      sketchyKev
    • RE: Door hinge servo not working

      @unknownuser said:

      Okay Kev, you're up...new challange...my door and catch work as I want, now I added a door knob which works great until I add collision to the group with the knob and knob hinge. I think it is just a matter of grouping the correct items, but I can't seem to get it right.
      Thanks,
      Rick

      Hi Rick,

      Your right. The knob was connected to the static white frame block preventing the knob moving with the door. I've connected the door to the knob hinge and that fixed the main problem.

      I have also added a bit of a door frame for the door to shut flush to, an extra hinge to make the whole structure a bit more rigid and tweaked some of the density and collision settings. Have a look at the attached file. It seems to work quite nicely now. (Left arrow button to open door and rotate handle.)

      Kev.

      P.S. The new door frame parts are in a new layer that you can turn off anytime πŸ˜‰


      DOOR7.skp

      posted in SketchyPhysics
      S
      sketchyKev
    • RE: UI Inspector

      I am unable to duplicate your problem. Maybe if you do the following it will give others here more information on how to solve your problem:

      Create a new file.
      In the Window drop down menu click on "Ruby Console".
      Again in the Window menu tick "Model Info", "Entity Info" and "Layers".
      In the "Model Info" menu select "Statistics" on the left.

      Create:
      A solid floor.
      A box on the floor.
      A slider joint on top of the box.

      Pretty much what you had before minus the sphere.

      The slider joint should still be selected and highlighted.
      Click on the "UI" inspector.
      Arrange the windows so all the text in the windows can be read, take a screen-shot and post it.

      Might help to take a screen-shot of the contents of your GoogleSketchup8/Plugins folder and post that too.

      posted in SketchyPhysics
      S
      sketchyKev
    • RE: Automated house model from height coordinates

      The "photo match" feature of Sketchup may help achieve the sort of thing you want to do (if you have a photo of the building).

      See this youtube video http://www.youtube.com/watch?v=fSuDoX8SPtU

      posted in Newbie Forum
      S
      sketchyKev
    • Flaw in SketchyPhysics gear joints

      The gear joints are supposed to make it easy to simulate gears in a complex model without having to model every tooth of every cog individually but they fail in this due to a flaw in their programming in SP 3.2

      I think the best way to demonstrate what I am talking about is with a working model. The attached model has an epicyclic sun/planet gear system. The middle system has individual teeth modelled to demonstrate how the physical system should work, The systems either side use gear joints to try and emulate what the middle "real" system does.

      Controls for the simulation:

      "R" key locks the red cylinder and Sun gear.
      "B" key locks the blue cylinder that carries the planet gears.
      "Spacebar" key releases both cylinders and allows all the cogs to free-wheel.

      Initially when the simulation is run the Sun wheel is locked and the green planet gears roll around the Sun wheel. The gear joint system on the right does a pretty good job of emulating this behaviour but the system on the left fails. When the blue planet gear carriers are locked, the gear joint system on the right fails to behave correctly.

      Anyway, there is no way to set up the gear joints so that they work in a dynamic system. This is only a 3 cog system which is hardly complex and the third planet gear is not essential as it is only there for balance. The problem with the gear joints is that they only consider the motion of the objects they are grouped with and not the motion of the objects they are connected to. If the gear joints take both objects they are jointed with into consideration (as the motor joints do) they would behave correctly. Is anyone here able to make a ruby script that correct this problem with gear joints?

      Secondly, would it be possible to make it so that that gear joints are more rigid than regular joints? This would stop the emulated gears getting out of sync so easily (due to flex in normal joints) and make the gear teeth appear to mesh correctly.

      If these corrections/adjustments to the gear joints were done, it would be possible to make fairly good simulations of complex gear systems, such as vehicle differential drives, with little effort in SketchyPhysics.

      πŸ˜„


      PlanetGear.skp

      posted in SketchyPhysics
      S
      sketchyKev
    • RE: Controlled car with game-steer ?

      There is free program called "glovepie" that allows you to use Wii controllers and Xbox 360 kinect controllers on your PC and with Sketchup.
      I think it will alow you to use your Logitech Driving Force GT gaming steering wheel too.

      Try these links for info:

      http://www.speksnk.org/foro/viewtopic.php?f=50&t=71983

      http://forums.podiumassault.com/index.php?action=printpage;topic=477.0

      http://glovepie.org/poiuytrewq.php

      http://glovepie.org/forum/

      posted in SketchyPhysics
      S
      sketchyKev
    • RE: Door hinge servo not working

      OK, I had a look at your model and there were a number of problems making it tend to crash.

      First attached file is with your original keyboard controllers but now nothing moves until you press the arrow keys.
      Have a look at the control codes to see how this is done.
      One problem that was causing glitches is the small size of the door latch. I solved this by increasing its density setting.
      The other problem is that the hole that the latch passes through does not really exist and SP sees the door as a solid rectangle.
      I solved that problem by making the edge of the door and the door knob status into "no collision" and "ignore".

      The second file uses the usual control sliders to control the door and the latch but they do not start moving until you move the sliders.
      The code prevents the door swinging in the opposite direction past the door frame so that it opens only one way.

      It might look like the door catch is moving when the door is opening, but this is just due to the centrifugal momentum of the piston which weighs a lot. It is not just symbolic!
      Overall it probably not worth animating the door latch as it such a small part and causes more problems than it worth.

      Hopefully the things I mentioned above will make your model less buggy and crash prone.


      DOOR3b.skp


      DOOR4b.skp

      posted in SketchyPhysics
      S
      sketchyKev
    • RE: SketchyPhysics3.2 (Dec 2)

      @robint said:

      hi all

      Im posting some models that illustrate some points and queries

      all comments gratefully received

      Robin

      For the first one (rotating cone) you can make the motor reversible by changing the controller code to (slider('motor8055')-0.5)*2

      Using that code the middle position of the slide control is off, full left turns one way and right turns the other way.

      For the second one, to create a lift capsule do this:

      Create a solid floor.
      Place a wheel capsule with built in hinge on the floor.
      Place a lift capsule with built in slider on the floor.
      Using the JCT click on the hinge joint, then ctrl-click on the slider.
      A menu pops up asking if you want to "Create a worm gear..". Click "OK".
      Run the simulation and turn the hinge capsule clockwise and the other capsule should rise.

      You can build a lift from scratch from components. Just make sure each joint is grouped with the moving objects and joint connected with something static before trying to make the worm gear connection.

      For the record a slider is not a piston with the accel and drag values set to zero. A piston with those values will not move.

      For the rotating box using a slide controller on a hinge, the program does not recognise a controller called "speed" so it has defaulted to servo behaviour. You can get the same behaviour from a servo by setting min=-180 and max=180. It is known that servos behave badly if you try to get them to complete full circles or more than one circle. There is no need to mess with the hinge controllers as servos and motors are provided.

      For the box on a spring, the spring is orientated vertically and does not allow sideways movement or rotation. When you try to drag the box the drag action defaults to horizontal movement. To pull the box up or down inline with the spring you need to hold left-shift on your keyboard while dragging with the left mouse button. Try the spring orientated sideways and it should work fine. The springs are on the stiff side so it is worth playing with the accel and damp settings.

      Hope that helps.

      posted in SketchyPhysics
      S
      sketchyKev
    • 1
    • 2
    • 3
    • 4
    • 3 / 4