sketchucation logo sketchucation
    • Login
    1. Home
    2. john Msrk Power
    3. Posts
    🛣️ Road Profile Builder | Generate roads, curbs and pavements easily Download
    J
    Offline
    • Profile
    • Following 0
    • Followers 0
    • Topics 4
    • Posts 14
    • Groups 1

    Posts

    Recent Best Controversial
    • RE: A Sketchup Testimonial

      It's funny after reading your comments, I remembered designing a table using SketchUp. I thought that the rounded corners had too small a radius when I drew it and I hastily made a new template in the shop with a larger radius. When I cut the new corners I realized that I had gotten a little too close to the apron! I have found that more often than not, if I make a mistake, it is usually because I have deviated from my design. Also, I find that designing with SketchUp allows me to look at the relationship of every part to each other and how modifying one component can alter the entire design. everything is interdependent!!

      Thanks for the complements on the finished product. I would find it really interesting to start a gallery of models and finished products. Maybe we can start a new thread?

      -John Mark

      posted in Woodworking
      J
      john Msrk Power
    • A Sketchup Testimonial

      I recently completed a project in which Sketchup was very helpful and I thought it might be interesting to share exactly how I used it, especially for those who are new to the forum and would like to see some of what Sketchup is capable of.

      I was commissioned by a customer to make a reproduction of an Oak hall tree made around 1890. A hall tree is a large piece of furniture placed in a hall near an exterior door which allows a place to hang hats and coats, as well as a bench for putting on and taking off shoes. This particular one had beautiful cast brass hooks and a bit of whimsy in its late Victorian design.

      The reproduction was going to differ from the original in two ways. The first was that it would be made from Walnut rather than Oak because the customer had a large quantity of old sawn Walnut. The second was a design modification. The original had a bench with turned legs below it. The reproduction was to have this area converted to a frame and panel storage box with a hinged lid in the seat. This would allow for extra storage and is commonly seen on other hall trees of the same vintage.

      When I set to reproducing the original I debated whether or not to model it in Sketchup. Why bother when I had the original in hand to take measurements from? I initially decided to draw the model so that I could design the joinery and see how it would interact with the rest of the model. I didn't want to cut tenons that would interfere with each other or produce weak spots in the joinery. I did stop short of a full rendering of the piece. I decided that I would make templates of appliques that were cut by a bandsaw and several other extraneous parts directly from the piece, because they did not directly relate to the initial design and also the modifications to the area below the seat.

      Once the model was rendered, I brought the laptop into the shop with me (an old one that could get a little dusty) and set to work. I found that my whole process for going about this project became very structured and ordered as a result of having the design in hand. In addition to the Sketchup program, I also used a couple of plugins to assist me.

      The cut list plug in allowed for an ordered list of dimensions to be produced which sped up the process of rough cutting all of the boards, as well as allowing me to better organize what wood came from what board, minimizing waste. In terms of measuring from the drawing, I found the Eclate-Deplace model explosion tool to be helpful in being able to access each individual component without having to copy it or drag it out of the model. Had I known about the full size template plug in, I might have modeled all of the appliques I spoke of earlier and printed templates to use.

      I could go on and on about this, but I guess that my point is that Sketch up has not only revolutionized the way I design furniture, but it has also helped to organize the way in which I execute these designs in the shop. I found myself constantly going from the saw to the laptop to check a measurement or look at how one component would interact with another. All of this made me work more efficiently and took all of the guess work out of the process. If anyone is interested I have posted several detailed posts on my blog showing how I made this hall tree. The blog address is http://www.johnmarkpower.blogspot.com.

      I have attached a few photos below. The first is of the original hall tree. The second is of the model. The third shows the reproduction hall tree and the last shows the original and the reproduction side by side. Thanks to all of the authors of this program, the authors of the plugins, And all of you ,especially Dave Richards, for the online guidance provided on this forum.
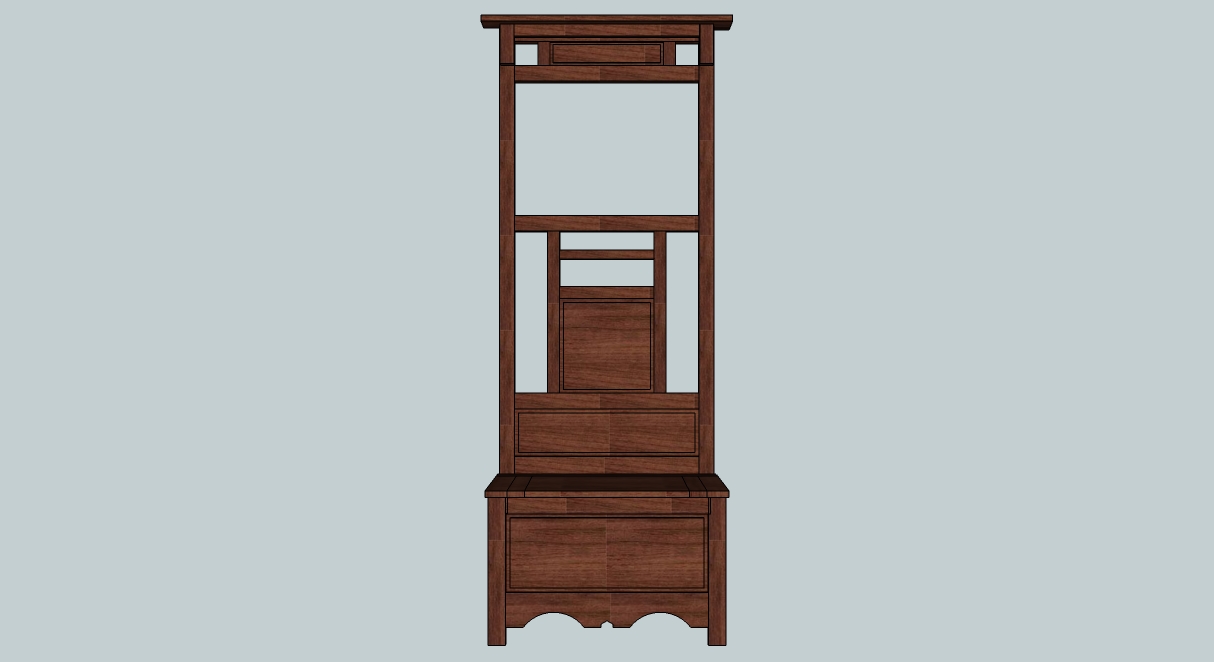

      • John Mark Power
        The Original Hall Tree
        The Model
        The Reproduction Hall Tree
        The Original and Reproduction
      posted in Woodworking
      J
      john Msrk Power
    • RE: Good Old (High) Boy

      Looks great! A lot of work went into this and I am impressed with the pulls. I am especially fond of highboys and it is nice to see one modeled. Good job!

      posted in Woodworking
      J
      john Msrk Power
    • RE: Full Size Patterns for Templates [Updated]

      Thanks Dave,
      The chair is a model of some chairs made locally in the 19th century. I have beeb drawing different examples in hopes of making some reproductions. The templates will be great when turning the posts and making the slats.

      -John Mark

      posted in Woodworking
      J
      john Msrk Power
    • RE: Full Size Patterns for Templates [Updated]

      Dave,

      Thanks as always. Exploding it seemed to solve the problem. The SKP File is a work in progress. I have attached a model that is more or less complete. Thank also for the info on multipe shadows. I will look for that post on this site or the click design build site.


      John Mount Chair 1 Bent Post with color.skp

      posted in Woodworking
      J
      john Msrk Power
    • RE: Full Size Patterns for Templates [Updated]

      Dave,
      Sorry for the delay. I had problems uploading the SKP file using mozilla and had to use explorer instead. I hope this helps and than you for your time and expertise.

      -John Mark


      John Mount Chair 1 Templates.skp

      posted in Woodworking
      J
      john Msrk Power
    • RE: Full Size Patterns for Templates [Updated]

      Dave,
      This looks like an extremely useful tool. However, I have installed it correctly I think and what I get is a blank sheet in Ghostview. Actually, I get the template isolated in my screen at the origin of the red and blue axis, I set the camera to parallel projection. Next I scroll down the tools menu until I find "gk Postscript plot" and click on it. The next pop up screen asks me for a paper size. There is no pop up screen explaining the markers. a second screen tells m the directory that the file has been saved in. I then go to that file and open it. It opens up the Ghostview program. I have attached a screen shot to this post of the results. If you or anyone else can help me solve my problem that would be great. Also, how did you get the double shadows seen in the image of the tilt top table? Is that a plugin as well? Thanks in advance for any help. Maybe I should try reinstalling everything. I did install Gk postscript plot first. Perhaps it was the order I installed the software.

      Thanks,

      John Mark


      untitled.JPG

      posted in Woodworking
      J
      john Msrk Power
    • RE: Extrusion Problem

      Thank you! I suspected this may be the issue but was unfamiliar with the scale tool. I successfully scaled the template up, extruded it, and brought it back to it's original size. Thank you very much for the advise and quick response! This is a wonderful forum!!!

      John Mark

      posted in Woodworking
      J
      john Msrk Power
    • Extrusion Problem

      Hello Again,
      I have just gotten one problem solved only to run into another. I am trying to extrude a rear post for a chair using the follow me tool. I drew the post profile on a rectangle and then erased the unwanted edges of the rectangle. I then drew a circle at the bottom of the post template to the diameter of the post, with the inside edge of the template at the center of the circle. I then used the follow me tool to select the template and extrude it along the edge of the circle. All looked good until I looked at the very top of the finial. The top point was missing!! I have tried to draw it independently as well as several other attempts and nothing seems to work. It looks really shoddy incomplete so I am looking for a little help if anyone has any answers. I have included the model and two screen shots. one of the post extruded and one that has a closeup of the final extruded with top section missing. Thanks again!!

      John Mark Power


      Lewis N. Hough Chair 1 Rear Post Template.skp


      Rear Post.jpg


      Finial.jpg

      posted in Woodworking
      J
      john Msrk Power
    • RE: A Question about FredoScale

      Thank you Jeff! This completely solved the problem. I am going to revisit the radial bending video on You tube to see if there is something I have forgotten, but in the meantime, This works beautifully! In addition, it doesn't mean redrawing components. I am particularly amazed that It left the scribe lines I put in intentionally. This is a wonderful program,isn't it? thanks again.

      P.S. I have attached a photo of the chair without the lines this time!

      John Mark Power


      John Warner Chair with bent back colored tilted.jpg

      posted in Woodworking
      J
      john Msrk Power
    • A Question about FredoScale

      Hello,
      I have been using FredoScale to bend rear posts and also backslats in models I am making of Ladderback chairs. The first time I used he plugin, I had no issues. Since then, every time I use the program to bend the slats I get a line down the middle. This is probably because I draw the slat completely (not half of the slat) and bend each side to the bend I need.When I try to go in and delete the line in the component, I delete more of the component than I want to. It is not to big of a deal, but it bugs me! I have uploaded the file so you all can look at it. I also have lines in the posts where there is a change in diameter. Can these be erased as well? Note: Some of the lines are intentionally put on as scribe lines to mark the stretcher placement. I am drawing from original chairs and want them to be as accurate as possible. Thanks for any help you might be able to provide! Any other comments on how to make the sketches better would be greatly appreciated!

      Thanks again,

      John Mark Power


      John Warner Chair with bent back colored tilted.skp

      posted in Woodworking
      J
      john Msrk Power
    • RE: Extrusion Problem

      Dave, I think I've got it now! Thank you for the added bit of advice and the tip on reversing the faces. This is a great site and I am grateful for everybody's input on the site. I'll be sure to post the completed table when it is done and hopefully the actual piece once it is built!

      -John Mark Power

      posted in Woodworking
      J
      john Msrk Power
    • RE: Extrusion Problem

      Thank you both for your quick responses. Dave, I decided to use your method,and you are right, thinking like a woodworker is extremely helpful. In fact, your method is the way I initially went about it, but I didn't know about the cutting plane. In fact, I still don't know about the cutting plane!. I understand the principle of it, but I can't seem to locate this tool and I also cannot find a tutorial on it. It looks like you used a measurement line to create the plane but I tried that and found I would delete the whole face, as I suspected. If you have time to elaborate a little on this process that would be great. I have read many of your posts on Sketchup and thank you for all of the fine work you do. thanks again for the help,

      John Mark Power

      posted in Woodworking
      J
      john Msrk Power
    • Extrusion Problem

      Hello all,
      I am new to sketchucation and this is my first post. I have designed a few pieces in Sketchup that have turned out pretty well. I am currently trying to design a table for a customer that has legs that are skewed inwards so that the span at the bottom is 24" and the span at the top is 18" between legs. the legs are 1 7/8 square. What I found I could do was to create the rectangle, draw out the guide lines as to where I wanted the top of the leg to be, extrude the leg, select the top face and move it into the new location where the guide ilnes intersect. This action would skew the leg in the direction I wanted. So far, no problem. Here is the catch.
      I also want to have a bead on the outer edge of the leg that has a 1/8" radius. What I did was to create a rectangle that was 1 7/8" square, then create a second rectangle that was 1/4" square pulling off of the outer corner towards the center. I then created a third rectangle within the second that was 1/8" square which gave me the center of my bead. I then used the circle tool to create a circle that was 1/8" in diameter. after that was accomplished, I erased the unnecessary lines to create my profile. Once everything was cleaned up,I tried to extrude my new shape and found it would only push/pull in a perpendicular direction. I could not skew the leg like I had previously done. I have tried several other methods and am tempted to draw the model without the bead, but I would like it to be as accurate as possible. I get similar results by using the follow me tool. Any suggestions? I can elaborate a little if I need to but to at least demonstrate the shape I have attached a PDF to this post which is a screen shot of the footprint. Thanks in advance and I am really enjoying the site!

      -John Mark Power

      P.S. The first thing I tried was to create the leg and extrude it, and then to skew it to the angle I wanted, however I had problems making the top and bottom of the leg level, and not perpendicular to the long faces of the leg. Thanks again!Problem #1.pdf

      posted in Woodworking
      J
      john Msrk Power
    • 1 / 1