Latest posts made by prokrastinator
-
RE: Component rotation clockwise and counter clockwiseposted in Dynamic Components
Nice work. This is definitely a better way of tackling your original question. I'm still not sure how you can achieve your second request of continuous motion until clicked again though.
-
RE: Component rotation clockwise and counter clockwiseposted in Dynamic Components
There are two values changing here, the 'counter' and the 'count_up_down'.
The 'counter' is controlled by the animatecustom command. It goes from 0 to 100 on the first click, then up to 200 on the next click, then back down to 100 and then back down to the starting 0.
An IF statement is written like this: =if(test, true answer, false answer)
If the 'counter' is between 0 and 100 (in other words less than or equal to 100), then the 'count_up_down' value copies (equals) the 'counter' value .
example: if the 'counter' is 10 then the 'count_up_down' is 10.
The 'count_up_down' value = 200 minus the 'counter' value if the 'counter' is between 101 and 200.
example: if the 'counter' is 145 then the 'count_up_down' is 200-145 = 55.
You can then use the 'count_up_down' value to drive the rotation.
-
RE: My first woodworking projectposted in Woodworking
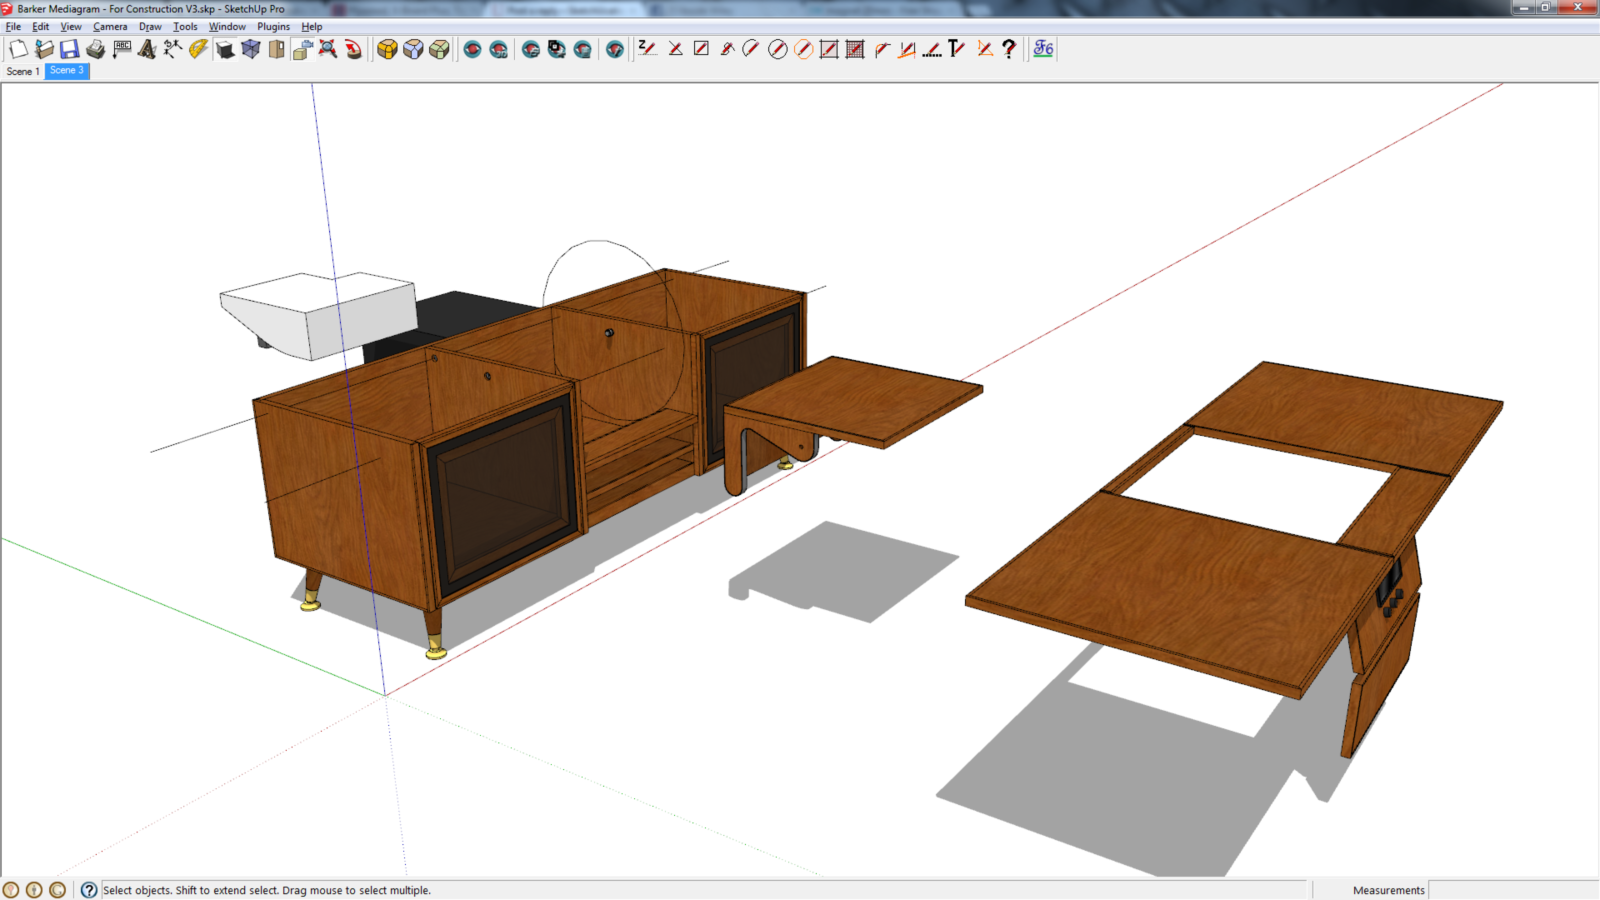
Things have been a little hectic, so not a whole lot of progress. Here is an updated, yet still in progress 'for construction' model. I have altered a few things, removed the false bottom below the projector, added speakers (thanks to CaljuCotcas on 3D Warehouse for already drawing them) and some airflow management for the HTPC rear fans. I still need to think about airflow for the projector and more cabling holes.
I'm not all that happy with my method of supporting the front panel when it is in its closed position. All I have is two small triangular stops, but I am struggling to come up with a better method that isn't in the way of the projector rotation.
I will keep plodding along and continue to update as I go.
-
RE: Component rotation clockwise and counter clockwiseposted in Dynamic Components
At first glance, I can't work out how to have the component spin infinitely until clicked again. My suggestion (based on your comment about a real tire) would be to investigate the SketchyPhysics plugin. There are a few small issues with it running with other plugins but overall it is a very useful tool. Note however, it will take some getting used to.
-
RE: My first woodworking projectposted in Woodworking
With next to no woodworking experience, Sketchup allows me play around with concepts and design variations at no cost but time. I'm not sure how you all coped before 3D modelling.
The side pieces don't have to be exactly like I have them but I do want them to be rounded for a gentler contact with the front panel (the circle in my model is the path of the rounded side). I guess the sides could be made up of 2 pieces, one for the pivot and another for the cam. The thin board between the cams is to hide the projector a bit and has to have a clearance gap for cables to pass through. I have some more ideas for this that I will work on a bit over the weekend (it's late Friday night here). This has been a very interesting and enlightening week.
-
RE: My first woodworking projectposted in Woodworking
Added some more edging. Re-worked the rotation with magnets for holding the front panel to the cam. Added skate bearings for the rotation (not sure that this is the best method, but I had to try something). Added locating magnets for the rotation open and closed.
I also did a little work on the doors but I'm not all that happy with it. I'm not sure what I want it to look like to be honest.
Barker Mediagram - For Construction V3.skp

-
RE: My first woodworking projectposted in Woodworking
The reason for the axis orientations being wrong is because I foolishly built the whole thing facing another direction. I guess this effects material orientation? Thanks for changing the the front to be easier to construct. What materials are all those front pieces made up of?
With the edging, I'm a little confused. I was researching and noticed that the standard single layer edging was just 0.6mm thick. I see that you've added 6mm thick edging. This is where I've been getting my info from:
In my lunch break today I'll add the bearings and have a think about the rotation. I've been toying with the idea of magnets for locking things into specific locations rather than locating pins. The inner and outer front panels is a clever idea for achieving the 2 functions of spring return and fully opened. I'll post my changes and concept sketches in a few hours.
-
RE: My first woodworking projectposted in Woodworking
Cheers Dave. The dark mesh does look good. Unfortunately my home theatre PC is black. The white was a nice touch though. I was actually thinking about skate bearings for the rotation. When there was a crank, the bearings would have been bigger but without it, there is no problem.
I'm not at my PC tonight so won't get a chance to look at your tweaks in detail for a few hours. Thanks again for all your help so far.