HDR (High Dynamic Range) Tutorial
-
I attempted to make this tutorial earlier, but Bridge refused to open for me saying i hadnt activated my licenses... Well damn it I didn't pay retail for CS2 to have Bridge not work. But i have it working now. A friend of mine who was at one point very involved in photography literally just showed me how to do this today.
I dont know how many of you guys know of this, or if anyone uses it or otherwise. I personally just found out about this.So now I will be putting together a tutorial on how to create HDR images from your renders as I am testing it out.
HDR, or High Dynamic Range imaging is a method of producing very striking photographs, or in our case, renders with a vast range of color that would normally be impossible to achieve with a single photograph.

The model I am using to produce the render was not made by me, but I found it on the Google Sketchup Warehouse. I thought it would make a good example so I imported it and added some lights in the obvious places (the wall fixtures). Note that nothing is finalized as it would be in a finished render, most notably being that the fixtures should look like they are lit up rather than just mysterious light emitting from them with no visible source.
Righto, to the tutorial...First things first, render your scene:

Yes I realize this scene is very dark.
Save the image as is (I did this in Kerkythea, I dont know how it works in other programs) then change the Exposure from 1.00 (assuming default settings) to 2.00 and save that image:

Set the exposure to 1.50, again, save the image:
Finally set the Exposure way down to .50 and save the resulting image:

Now you will have 4 images of varying exposure, it's time to convert them all to one nice HDR image.
Open up Adobe Bridge, navigate your way to where you saved the four images, and select them all.
Go to Tools > Photoshop > Merge to HDRThis will open Photoshop and it will do a little thinking. In my case I had an option come up that asked me to manually set the EV. I just set image 0 to 0, image 1 to 1 and so on then hit OK. If you get that prompt and don't do anything but hit ok, it will likely tell you there isn't enough Dynamic Range in your images. Took me a while to figure that one out.
If your image doesn't ask for this (or once you get past it) you will see the Merge to HDR screen, which looks something like this:

At this point your pretty much done, its a very simple process, and all thats left is to adjust your white point (you may not need to most of the time) and save it.
Be sure to set the bit depth to 32 Bit/Channel, because anything less and you start to lose some of the dynamic range you are trying to create.

This is the brightest exposure (left) next to the final HDR image (right). And yes this example looks like it was just lightened up. I tried it with a much larger set of images that I found on google somewhere and it worked alot better then.
While not the best example as this is a very dull scene, you should be able to see some of the details that have changed.
Some of you guys may be able to put this to MUCH better use in your renders and achieve something like the example above as you guys tend to have much more well planned lighting.Remember that the brightest version of the image will set the brightness of the final picture, I set the exposure in two of the images above 1 to take into account the darkness of the first render. You guys will want to render it at or slightly above your desired brightness and then create the rest of the images with lower exposures.
It can be done with as little as two image also, but the more the better.Feel free to tell me that you've been doing this for ages if you have been, I just thought I would give it a shot since its something I learned today. Maybe it will help another newbie out. And like I said, this is a bad example, but when applied to the right scenes it can bring out ALOT of detail. It seems to work best where there is alot of contrast between light and dark areas. Which there isnt very much of that in this example.
-
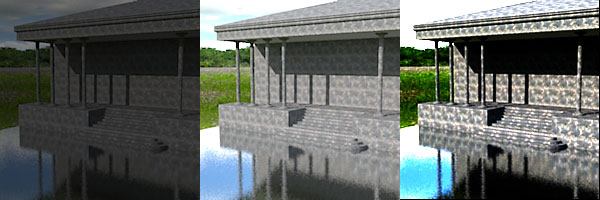
Here is another example which better shows how it looks. This is also after i figured out what effect the EV setting has on the image, generally the EV should match the ratio of the exposures. For example in this image the EV of the darker image is -1 while the brighter image is 0. This still isnt great, but im sure with some practice it would look alot better. The building just looks like high contrast, but the grass is a good example of what HDR does to colors. I would need to play around with it alot more to get the sky, grass, and building to match.
-
very useful tut, robert. thanks.
-
There are many much cheaper HDR tools than CS2. And most of them have much more options for how to increase and use the increased dynamic range. Photomatix, ArtizenHDR, EasyHDR, Helicon Filter and FDRTools are some of them. I use Helicon for standard dynamic range improvement and Artizen for spetacular effects.
poster-Maggy
-
Yeah i heard about some of those at work tonight, i was coming on here to list a couple of the ones you just mentioned. At least I got a "very nice" out of it :egrin:
Normally im horrible at these things... as you can tell im sure. My examples are poor, but thats because i dont have much experience with SU and Kerky. But it all works, and im curious to see what some of you guys can do with this method.
-
Thanks for Your time and a great tutorial Robert.
-
Hi Robert and all, great that you gave this tutorial Robert, but thought I could save you some time and pain... as KT already contains all 32bits of light info in the rendering if you don't save as a .jpg you won't lose it.

Instead of going thru all that trouble to export 3 different images w/ diff. exposures and merge them inside of Pshop... in KT, when you save the image, choose to save it in HDR format.

Now, to tonemap it, in Pshop go to Image>mode>16bit, this will allow you to now Tone Map your HDR.
%(#FF0000)[EDIT
But there's a better way, and it retains the 32bits of info...After you open the .hdr file in Photoshop CS+ go to Image>Adjust>Exposure]
see my HDR tonemapped using the Exposure control on the Beach_Probe.hdr here. using my old stand-by the "Beach_Probe.hdr"
This is by far the quickest, most direct, simplest, perfect real-time preview way I've found to tonemap an HDR. I have tried the other programs suggested on this forum, like PictureNAUT, but I like this way far better, as I can see the result in a perfect auto-preview in real time.
There may be better tonemapping proggies out there. My favorite WASPictureNAUT I have beta 2.11.
Also, If you just have a .jpg and didn't save the hdr or the 3 diff. exposure, you can tonemap a .jpg in Pshop CS with Image>Shadow/Highlights and Image>Exposure tools... these are really incredibly done and easy to use tools once you get used to them.
-
Hey, i just noticed you dont live far from me. I live in Racine, near the mall here.
Thanks, i guess that puts my six billion word essay to shame. But, its better to make a mistake and learn then sit on your butt and know nothing. Im gonna go give that a shot.
how exactly does tonemapping work? <- New to.... everything relating to this stuff.also why is it that i cant seem to copy an HDR image onto a new canvas without losing all that HDR goodness... But if i do a print screen it works and looks just the same? Thats what i did with my second example, the far right image is the HDR that i made in Photoshop and i couldnt copy an paste it so i just hit print screen and that worked fine. Is there a way to convert it to a jpg or png or whatever without losing the look of it?
-
Thanks Fletch, I took a look at PictureNaut before, when all there was (or all I could find) was a German beta. I CAN read German, more or less, but I really don't like it...
I've not yet tried the English version, still downloading, but it looks good on the site!Now hoping for a camera with built in HDR...
poster-Maggy
-
to save HDR in JPG, you must convert in Pshop image>mode>8bit
or in 16bit, save as png (bigger image, but more info)Hi Maggy! Long time no speak! How's our hero Van Nistelrooy doing?
I prefer PshopCS2 very very much to any free HDR workshop... but give it a shot.
I've been using Pshop since like v.1, so it's a bit easier for me. -
@fletch said:
Hi Maggy! Long time no speak! How's our hero Van Nistelrooy doing?
I prefer PshopCS2 very very much to any free HDR workshop... but give it a shot.
I've been using Pshop since like v.1, so it's a bit easier for me.van Nistelrooy is just doing what he does best, scoring.
Photoshop never had and probably will never have a user interface I can deal with
Photoshop never had and probably will never have a price tag I can deal with
And they try to serve too big a market, HDR is specialists stuff that HDR software handles best. Just like I've never seen a decent panorama stitched using no other software than Photoshop.
Professional photographers that I know, most of them do use Photoshop, but none can do without external programs and/or plugins that add up to the price of Photoshop. These same external programs and plugins function exactly the same in any .8b* compatible software.poster-Maggy
-
I enjoy watching Madrid very much... VN is really great to watch. Unfortunately for me, I've picked Barcelona as my fav spanish team
hmm... was confused by the panoramic stich comment. I stitch pans in Pshop all day long... no prob... but lately have enjoyed using Hugin(panotools front-end gui) for that... just cant get the auto point sift proggie to work and play nicely w/ it for some reason

-
Full 360/180 panos from Photoshop?? Including Zenith, Nadir, HDR, Ghost removal and so on?
Never tried Hugin. Use Autopano Pro, Autostitch, Enblend, Smartblend, a little good old Panotools (Dersch is still my Van Nistelrooy) and a little PTGui.poster-Maggy
-
Autostich is what I've been looking for... if it's as good as it claims... I'm going to try it now.
Thanks for the tip, Maggy! and, er... don't look now, but I think a cat is sucking your face. 8O
edit
so... I tried Autostich, and I feel like a COMPLETE IDIOT! Thanks "Maggy Van Nistelrooy", you are my new hero. It did just as good of a job in 3 minutes automatically what took me more than 2.5hrs manually in Pshop.
Hello! It looks like you're interested in this conversation, but you don't have an account yet.
Getting fed up of having to scroll through the same posts each visit? When you register for an account, you'll always come back to exactly where you were before, and choose to be notified of new replies (either via email, or push notification). You'll also be able to save bookmarks and upvote posts to show your appreciation to other community members.
With your input, this post could be even better 💗
Register Login


Advertisement