Medeek Door and Window
-
I know there are a lot of plugins out there that do this well and I am not really interested in competing against them.
I just want a simple door and window plugin that I can integrate tightly with my other plugins.
The window module will have the following options (subject to change):
- Window Type: Picture, Slider, Single Hung
- Frame Color
- Frame Width
- Frame Depth
- Glass Thickness
- Sash Width
- Sash Depth
- RO Gap
- Window Inset
- Nail Fin: Yes/No
- Nail Fin Length
12 Advanced Options: Yes/No
The global settings will allow the user to set up the defaults for all of these settings and others. The window location and size will be selected via three points with a preview vector showing the exterior facing direction in some sort of fashion.
I haven't thought through all of the advanced options yet but mullions will probably be one as well as other embellishments.
-
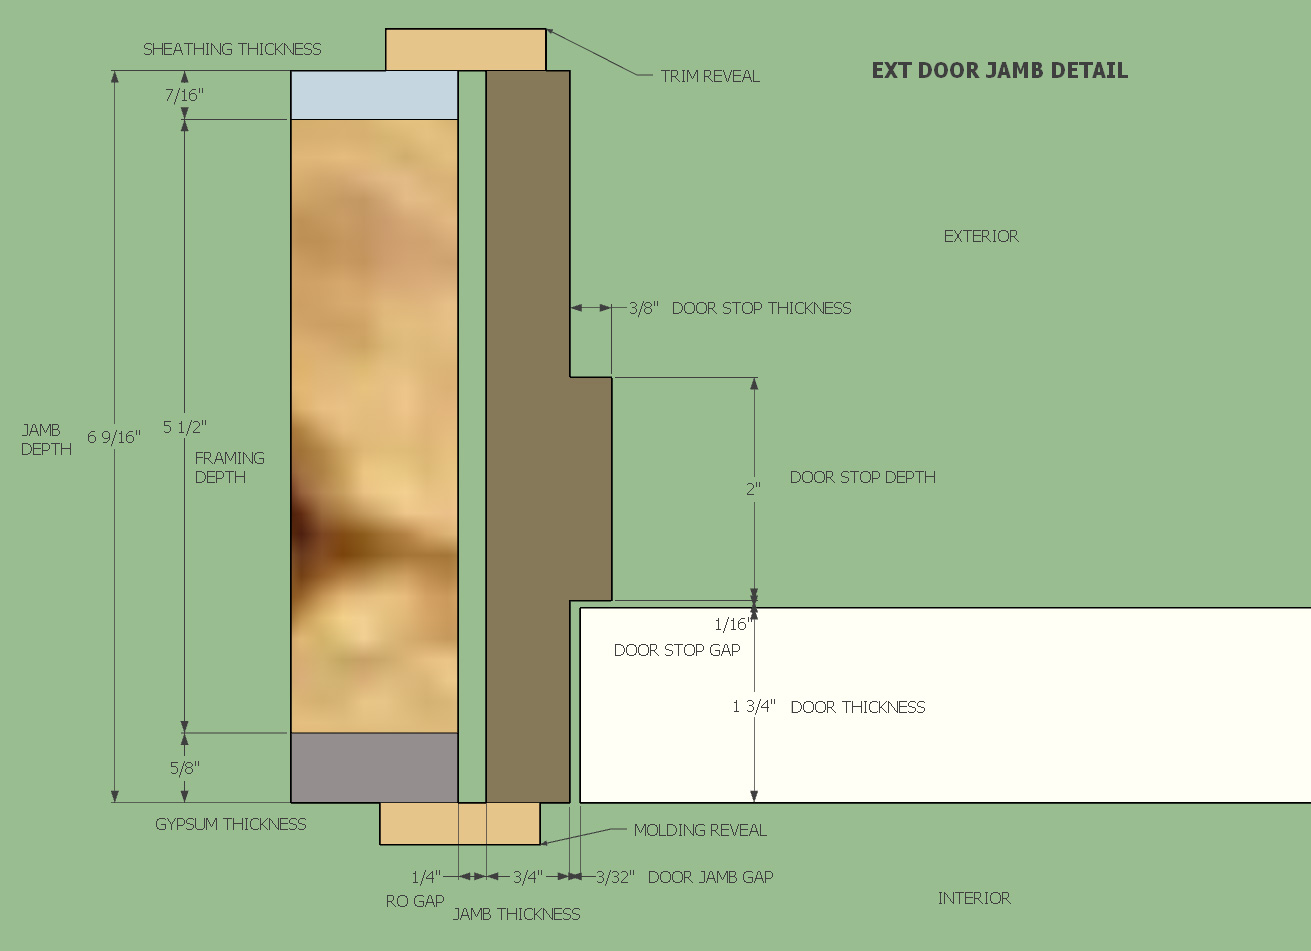
Doors get a bit more complicated. The placement of the door jamb within the rough opening depends on the sheathing thickness on both sides of the wall, or in more precise terms the jamb depth depends on the wall framing thickness (2x4, 2x6, 2x8 etc...), the sheathing thickness (OSB, Plywood, etc...) and the interior gypsum thickness. With an interior door the sheathing is usually gypsum on both sides of the wall.
A typical door jamb thickness is 3/4" with a 1/4" RO gap for shimming and squaring the door up on each side and at the top. The nominal door size is the door opening width from jamb to jamb not the actual door itself. The door width will be 3/16" of an inch less than the door opening width or nomimal size assuming a 3/32" reveal or gap for the door.
With an 1/8" gap between the top of the door and the jamb this leaves 7/8" between the sub floor and the bottom of the door assuming the RO height is 2" greater than the nominal door height.
For some exterior doors a taller threshold may be required so a RO height that is 2.25" to 2.5" greater than the nominal door height may be required.
Please weigh in if I am missing something here.
I'm am focusing specifically on standard prehung doors, sliding glass doors are a slightly different animal.
For a typical door there could be a whole host of parameters, I am thinking an html GUI would be the best with an SVG preview screen showing the door in elevation and a section detail for the jamb, threshold and header.
The door location and size would be determined by picking three points similar to the window so that any size of door could be specified for a given rough opening.
-
There are differences with exterior and interior door jambs. Usually exterior jambs are rabbeted whereas often interior jambs have door stop mouldings. Nowadays (Canada) interior jambs are often 5/8" thick and sometimes 3/4". Exterior jambs may also have a slit to receive weather stripping. Also exterior doors have a door sill whereas interior doors do not.
You can also add jamb extensions to both windows and doors when the wall thickness is greater than available standard door jambs.
-
I am very familiar with residential doors and not so much with commercial doors. As I'm thinking about door thresholds the fact that most commercial doors open to the outside changes the way the threshold will be configured.
-
For the love of God please do an extension whereby one can create an opening in a wall (masonry cavity wall for instance) that will also give you the option to create the geometry that heals the brickwork between the two skins and place PC lintols as well.
-
I'm not sure how far I will take this plugin, I was only intending to create a very simple plugin to integrate with the Wall and Truss plugins however I can see already that there is a need for a very robust and full featured window and door plugin.
The plugin logo will be:

The tool bar thus far:

-
Doors and windows( in terms of industry standards which it seems you are after) ARE indeed complicated and constantly changing. If you do houses you can repeatedly rework the schedules and framing dimensions based on the door style and manufacturer. I think you need to find what you think is most standard and stick with that, because, in the end it won't fit most actual doors and windows.
Typically I've seen designs for the nail fin being on the sheathing, then whatever the interior finish, it has to be worked to fit to the door. Many brands will have door jambs widths, which (with the nail fin on sheathing) bring the interior edge to a 5/8" thick dry walll on a 2x4 or 2x6 wall.
Then you have inswing and outswing.
For the most part we only use 2x6 walls, 1/2 plywood, and 5/8" drywall. But then if you end up with additional insulation, the detail might different. You also have different unit frame styles which include plaster or brick moulding
I like doors to be cutting components and easy to insert. If a plugin does the work, that's fine. I don't like using the component window if I can avoid it. I like them to be low poly (don't include hardware innards and screws). As long as they look OK from a a couple yards, they usually serve the purpose and don't have to absolutely anatomically correct. Are you hoping that these will be usable for detail sections. I doubt that's feasible. But maybe they'll be good for floor sections--Then you are into the open /closed / symbology complications.
What usually happens for me is that I design the doors and window components with the trim and styles for the project then insert them into the model. Then next project is usually different trim and style, and I might use the previous door and window as a basis to build the components again. Never actually just take some door and window I already have and plop it into a new house wall.
Same with construction details. What is a "standard" detail anyway? Never seems to apply.
-
Parameters for the door jamb detail:
-
Dynamic doors and windows
Flex Tools "system" appears to be a good complement to one's tool bag of plugins but a bit expensive at 99 Euro!
Some ideas for you to consider for your plugins

FlexTools - Go-to SketchUp Tool for Architects and Designers
Architects and 3D artists use FlexTools to generate SketchUp doors, windows and more, with exceptional levels of speed and control.

FlexTools (flextools.cc)
-
You have also Click Windows!

-
-
I like the two point entry of FlexTools versus the three point entry I was considering. I don't see any advantages to using three points when two points will work, thoughts?
I also like the idea of adding a separate (optional) window/door layer just for the 2D plan view, especially for doors. The layer would show a 2D representation of the door for your typical plan sets.
-
how does the two point entry work?
What I like is inserting windows and door of known (preset) and standardized (for the project anyway) sizes and styles. A good tool lets you reset during the process or even after, and offers standard sizes to choose from.
-
My 3pt windows plugin is meant to be super easy and quick to use. (Not very detailed though.)
How do you plan to get the dimensions of a window with just 2 clicks?
My idea was to avoid lots of settings to make the workflow fast.
First set the window setting of your choice and then click away. -
With a two point entry you start with the lower left corner and then click the upper right corner, similar to the rectangle tool.
If the wall openings already exist at the correct rough opening (RO) dimensions then your windows and doors will be the correct standard sizes.
For a typical 3068 door (36"x80") the RO size would need to be 38" by 82" (assuming a 7/8" threshold height or jamb leg height).
For windows the RO dimensions are typically the nominal dimensions, so the actual window dimensions are 1/2" less (height and width).
Since this may be best left to the user to decide I can setup another global option which will allow the user to toggle between two point or three point selection, not a big deal.
For both windows and doors I've decided that the preview screen needs to consist of five preview panels.
A front and rear elevation, showing the overall look of the door or window and other details such as trim, molding, door type, mullions, LH/RH, threshold.
Below that I will have a section details for: Head, Jamb and Sill.
The advanced options will allow for the placement of interior molding/casing with window stools, aprons etc... as each of these options are turned on the preview panes will be updated with the appropriate geometry and dimensions.
This may sound like overkill but I think it will allow the user to very precisely determine the design of the window/door and allow them to fully preview and predict what the plugin will produce.
Since some of these configurations involve a lot of parameters and know one wants to have to reset a bunch of parameters each time they load the plugin, I will implement three things:
1.) Each parameters default will be able to be set in the global settings.
2.) In a session the plugin will remember the parameters last used and will load these overiding the defaults.
3.) I will also implement a system whereby the user can store a given configuration of parameters and quickly load these up by selecting a saved configuration.This plugin will be tightly integrated with the new Wall Plugin and also with the Truss Plugin (dormers, gable walls for attic trusses), so that the parameters will flow between the plugins and update geometry accordingly.
-
@pixero said:
My 3pt windows plugin is meant to be super easy and quick to use. (Not very detailed though.)
How do you plan to get the dimensions of a window with just 2 clicks?
My idea was to avoid lots of settings to make the workflow fast.
First set the window setting of your choice and then click away.I was going to reference your plugin as a super-simple way to quickly add windows to a model. It's fantastic and fast for early-stage modelling when you just need representative windows to flesh out conceptual designs.
If Medeek's plugin uses a similar approach for sizing/placing windows, but with more detail in the produced components (and therefore more attributes to set), it could play a similar role for later design stages — especially if he implements a 2D layer as suggested... a great idea!
If you could set attributes that are saved as plugin defaults (vs each time you use it), then then the workflow could be just as fast as 3pt Window, once you've set it up.
My other suggestion was that casements are a must as a standard window type, and tilt-turn would also be very useful.
-
I like the stored parameters, But I'd also save the sizes. I don't want to manually make a 3080 door everytime. It's not going to be in increments, it's always going to 3080. Windows might be in increments of 2", but really for most projects there are only a few window sizes and those are plugged in repeatedly. Window head parameter would be nice, where you don't have to line up the window head each time. Actually door head too, so you don't have to set to the floor level, it automatically goes in at the correct place in relation to the floor. That's why I wondered what the 2 point placement was about. I wouln't use a tool that way, given the chance. Layout should be able to snap opening centers from a floor plan layout overlay OR use SU guides or offset from the end of walls.
-
@pbacot said:
I like the stored parameters, But I'd also save the sizes. I don't want to manually make a 3080 door everytime. It's not going to be in increments, it's always going to 3080. Windows might be in increments of 2", but really for most projects there are only a few window sizes and those are plugged in repeatedly. Window head parameter would be nice, where you don't have to line up the window head each time. Actually door head too, so you don't have to set to the floor level, it automatically goes in at the correct place in relation to the floor. That's why I wondered what the 2 point placement was about. I wouln't use a tool that way, given the chance. Layout should be able to snap opening centers from a floor plan layout overlay OR use SU guides or offset from the end of walls.
I see there are two different design methods here. My initial use for this plugin was to provide windows and doors into the rough openings created by the Wall Plugin. As such the positioning of the opening is set by the wall plugin and not by this plugin or module.
However, if you are using this plugin as stand alone then the ability to position the opening and set the RO size becomes important. Also the ability to cut holes in exsitin
Two different uses. I will need to give this more thought.
Hello! It looks like you're interested in this conversation, but you don't have an account yet.
Getting fed up of having to scroll through the same posts each visit? When you register for an account, you'll always come back to exactly where you were before, and choose to be notified of new replies (either via email, or push notification). You'll also be able to save bookmarks and upvote posts to show your appreciation to other community members.
With your input, this post could be even better 💗
Register Login


Advertisement