Medeek Wall Plugin
-
Per customer request the available sizes of Wide Flange Steel Beams will be increased to the following:
W8x10
W8x13
W8x15
W8x18
W8x21W10x12
W10x15
W10x17
W10x19W12x14
W12x16
W12x19
W12x22W14x22
W14x26
W14x30
W14x34W16x26
W16x31
W16x36
W16x40W18x35
W18x40
W18x46
W18x50W21x44
W21x50
W21x57
W21x62W24x55
W24x62
W24x68
W24x76 -
Version 0.9.9i - 11.10.2018
- Added angle iron (L) beams to the beam module.
- Added fillet radiuses to wide flange (W) and universal (UB) beams.
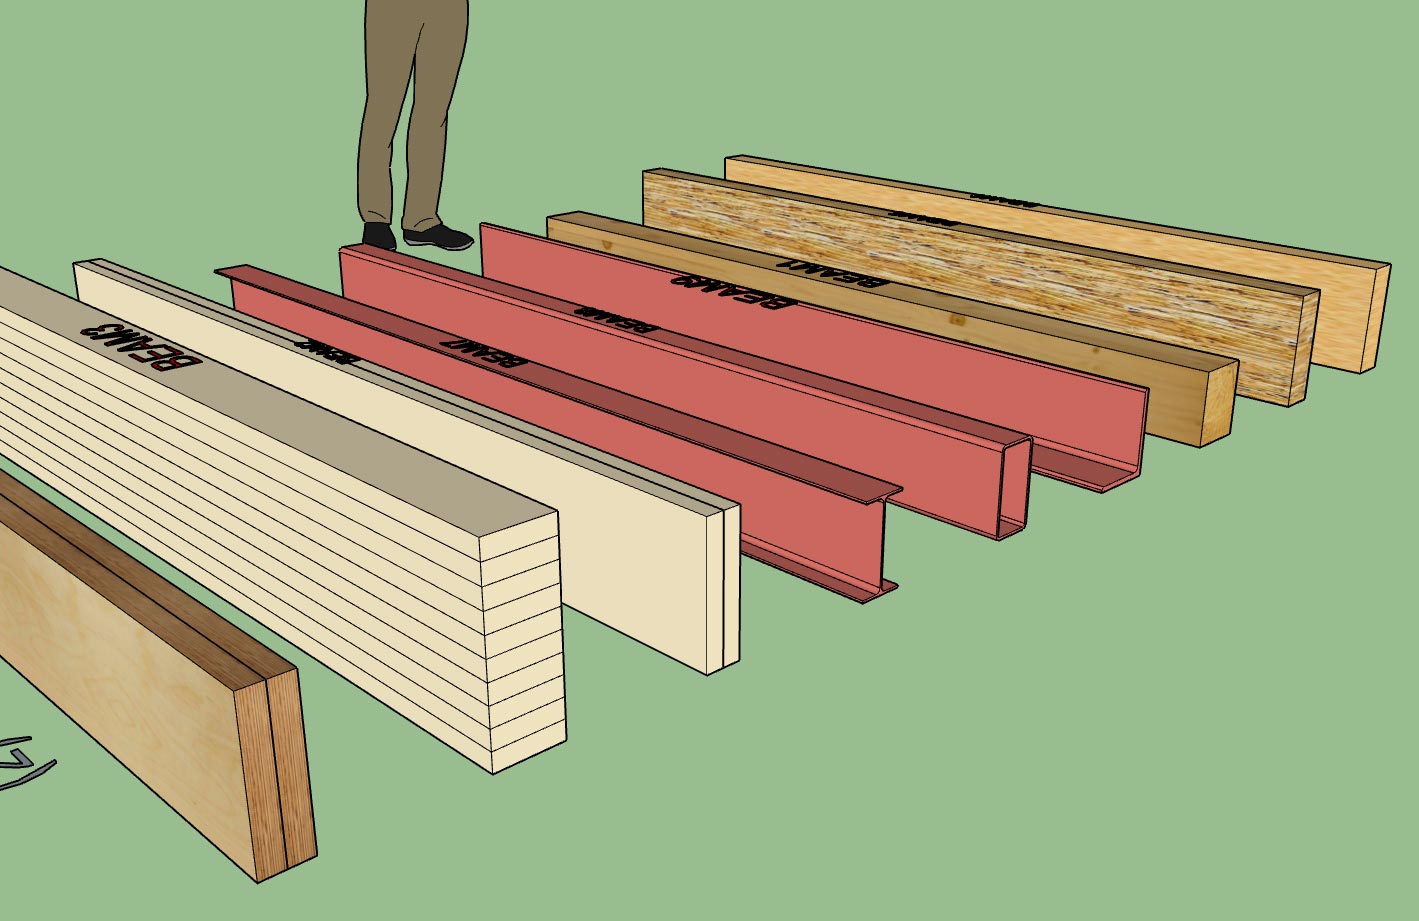
Nine different beam types with two series of wide flange beams (W and UB).

Aside from residential structures one could also use the beam module to create various structural steel assemblies, however that is not really the purpose or target audience for this module.
I added the fillets to the wide flange profiles per customer requests. The primary reason for including this information it to better predict and check bolt patterns that are on the web of the beam(s). Fillet radiuses are per the various standards.
I haven't take the time yet to add in the few hundred standard sizes from my steel manual but as time allows I will continue to populate these fields. Also if there is specific requests for sizes or series of beam types I will accommodate those requests.
View model here:

3D Warehouse
3D Warehouse is a website of searchable, pre-made 3D models that works seamlessly with SketchUp.
(3dwarehouse.sketchup.com)
-
I been thinking about putting on a weekly one hour webinar where I can demonstrate the latest features of the plugin and then take additional questions from the audience. Would there be any interest in this?
-
Version 0.9.9l - 11.16.2018
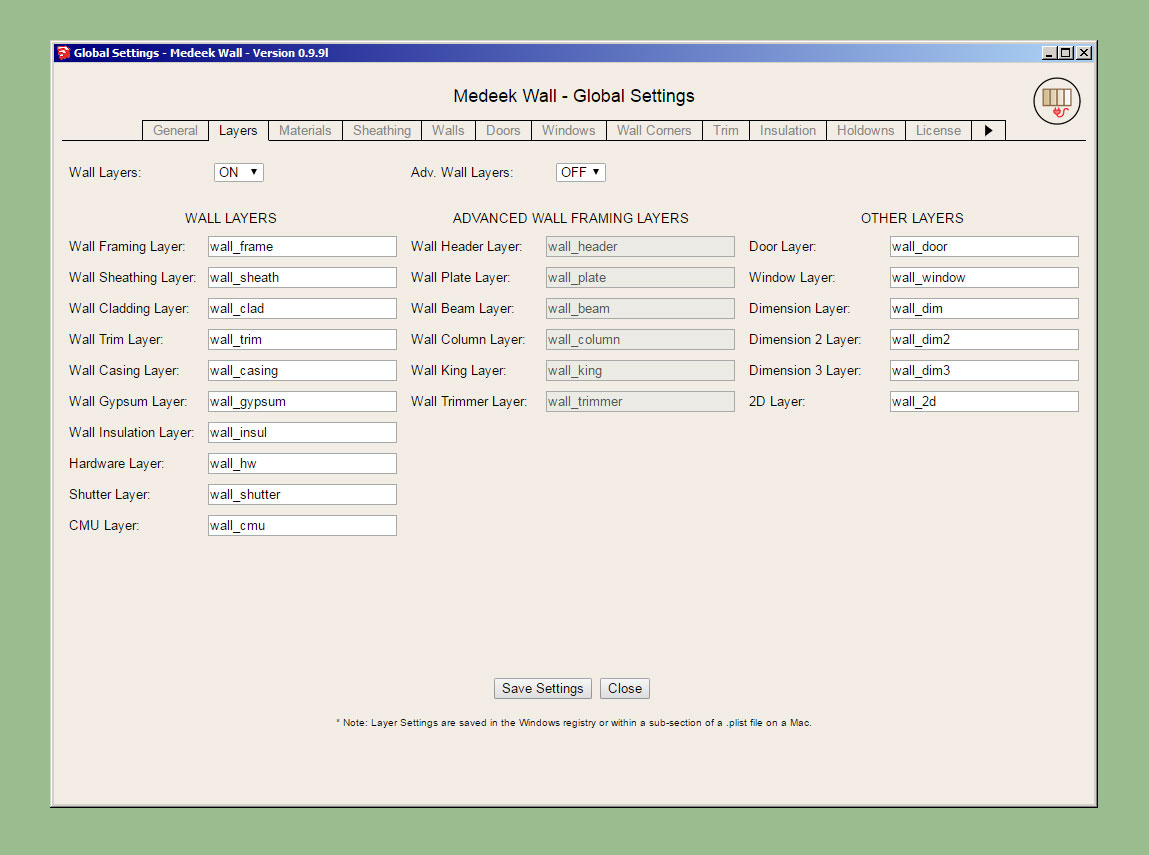
- Added an option to include 2D wall geometry in 3D modes (Framing, No Framing, CMU).
- Added an additional layer for 2D geometry.
- Added customizable colors for labels, 2D wall geometry, and 2D features (windows, doors, columns etc...)
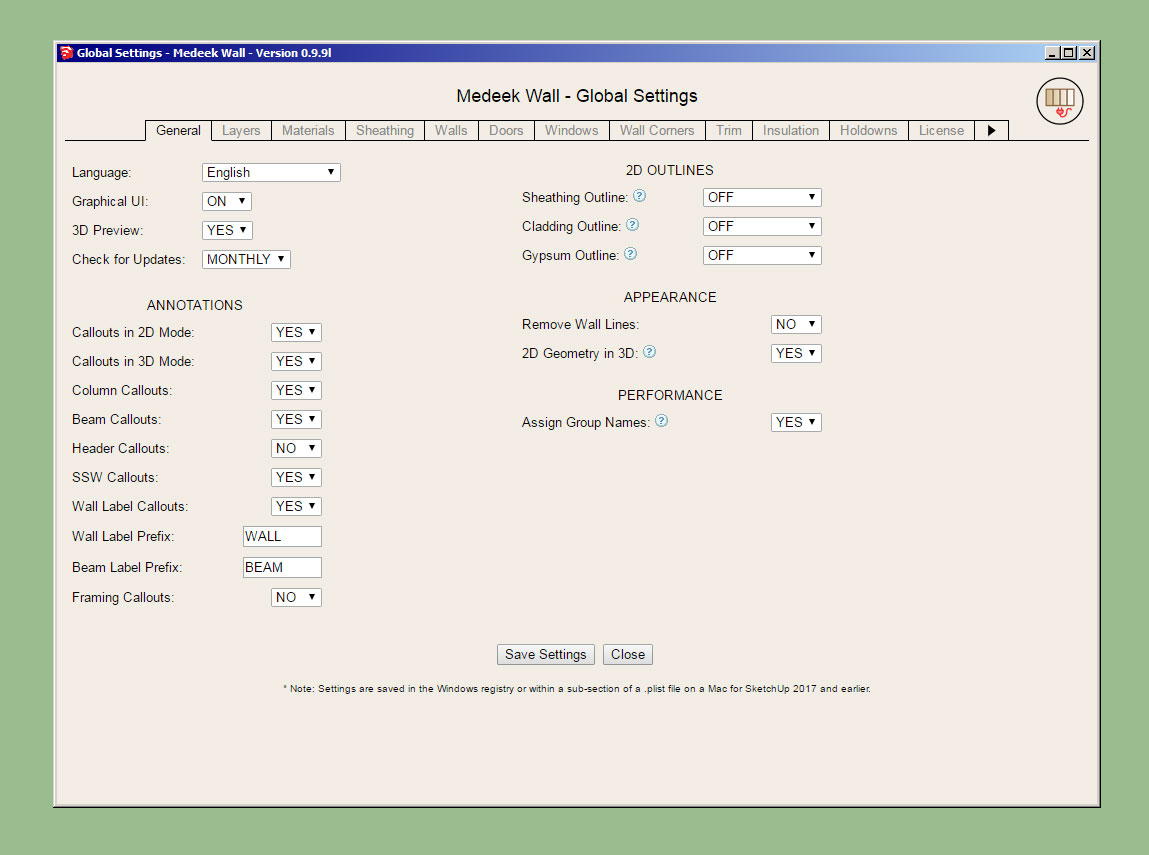
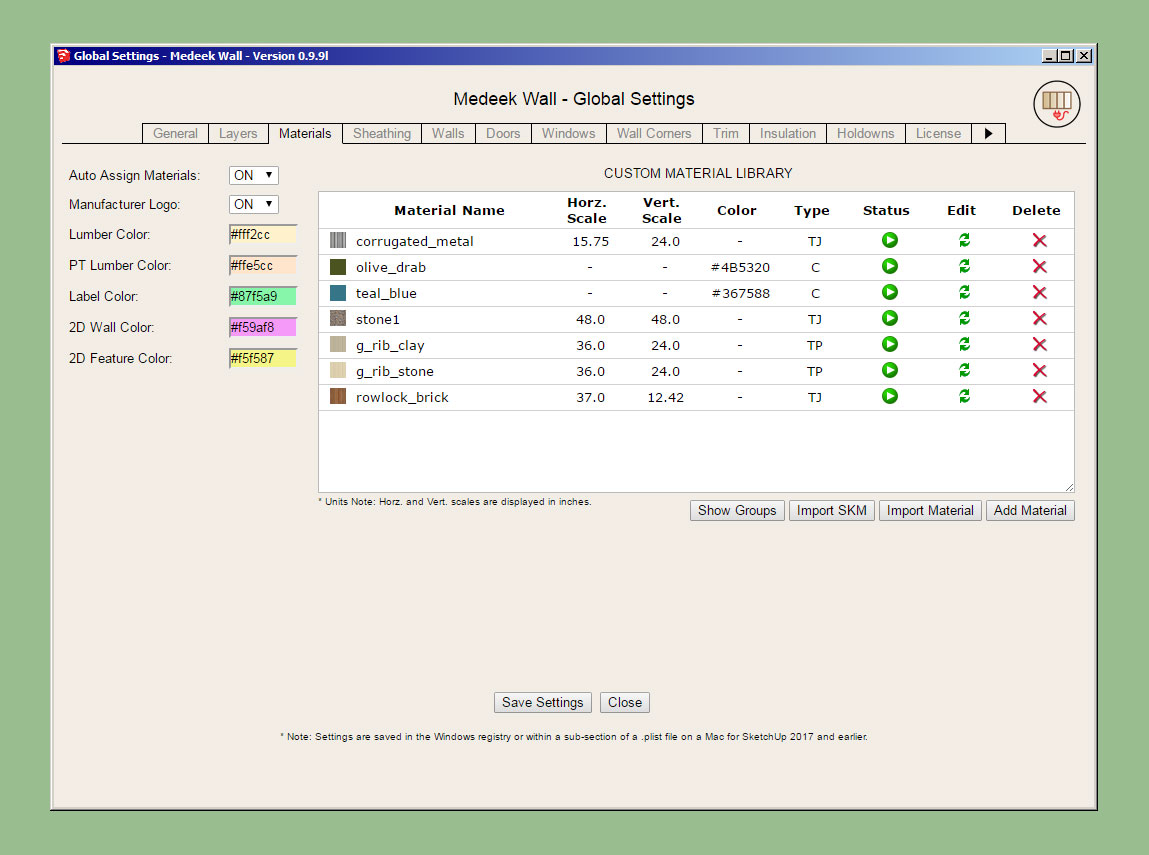
The custom colors for the labels, and 2D geometry is per a discussion with a client today. Hopefully this upgrade will help facilitate bringing the 2D geometry into layout for creating floor plans.
-
On a related note I just noticed John Brock's new book has been released:
Amazon.com: SketchUp for Builders: A Comprehensive Guide for Creating 3D Building Models Using SketchUp: 9781119484004: Brock, John G.: Books
Amazon.com: SketchUp for Builders: A Comprehensive Guide for Creating 3D Building Models Using SketchUp: 9781119484004: Brock, John G.: Books
(www.amazon.com)
I think this will be a seminal work on incorporating SketchUp into the residential design process. I've already gone ahead and pre-ordered my copy.
-
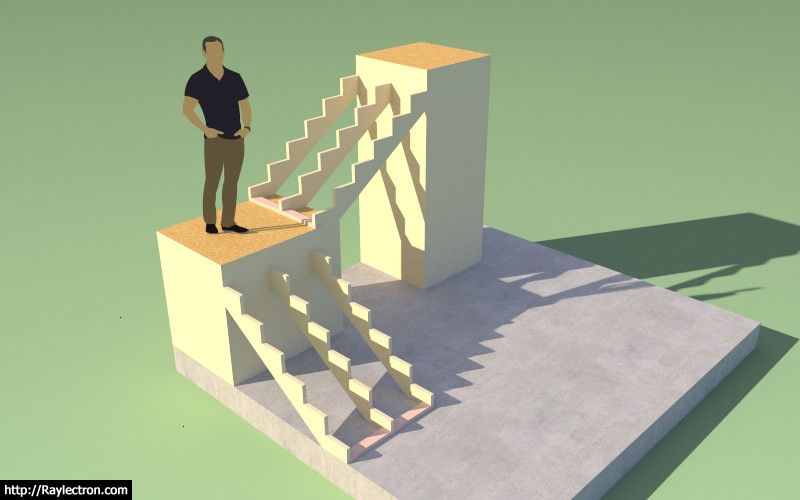
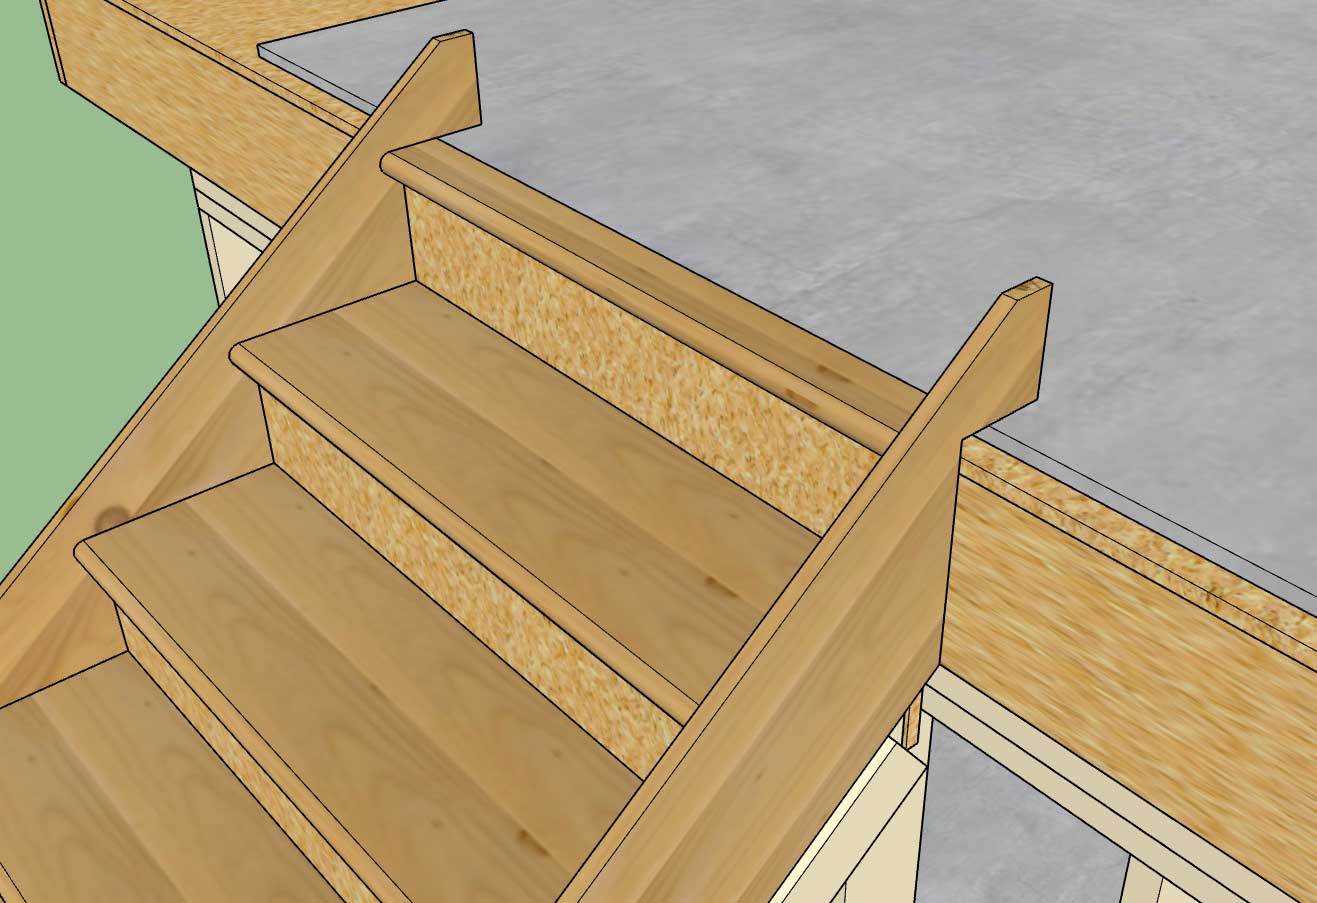
First look at the output of the Stair Module:
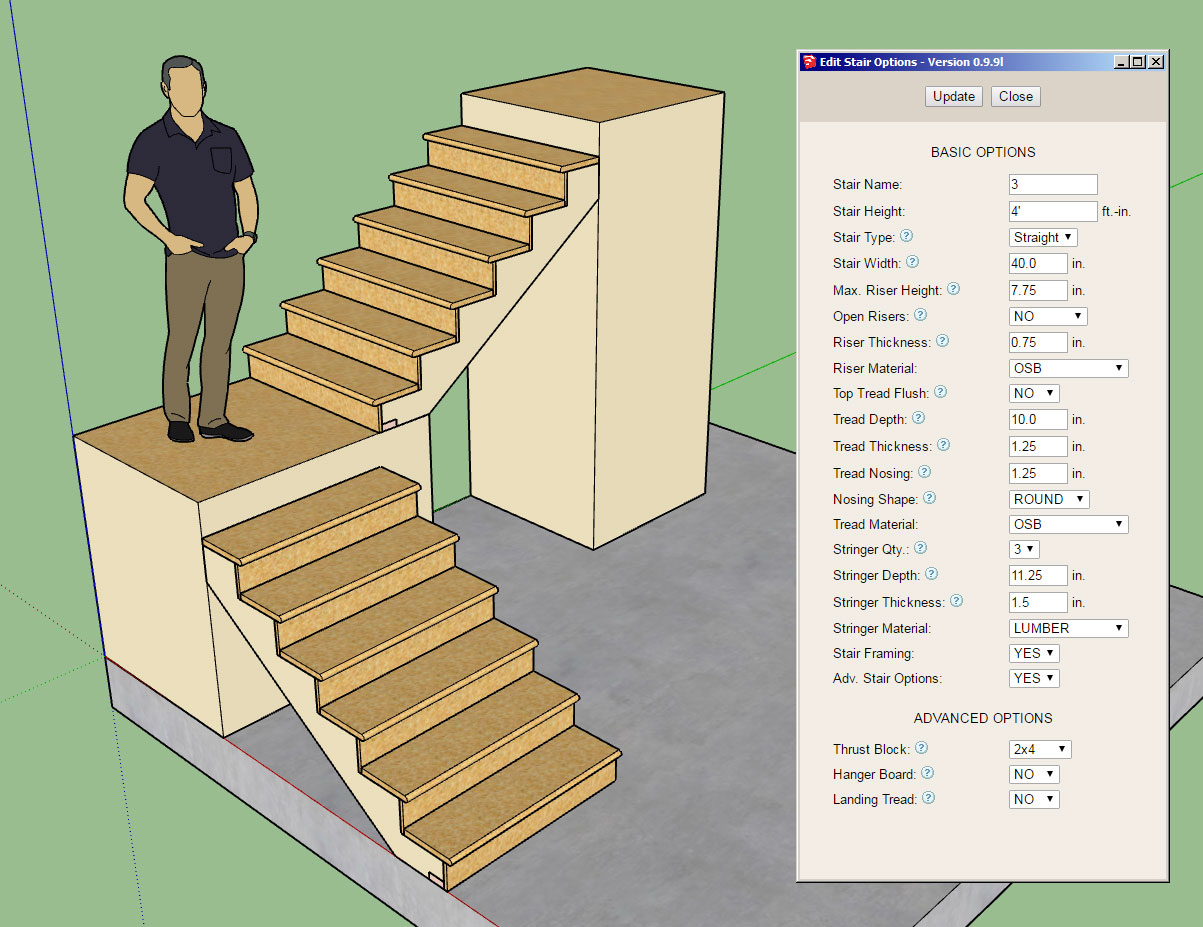
Note, that only straight runs of stairs will be available for now, however it is possible to create L and U shaped staircases just by combining straight runs as shown and framing in a landing.
View model here:
3D Warehouse
3D Warehouse is a website of searchable, pre-made 3D models that works seamlessly with SketchUp.
(3dwarehouse.sketchup.com)
I will probably need one more day to fine tune it completely and finish adding in the hanger board and landing tread advanced options.
Future advanced options will be landings, hand rails, skirt boards etc...
The stringer algorithm is really the core of the module and drives everything else. The logic was not nearly as complex as I initially thought it might be, regardless it was a blast to work through it and turn the math into reality.
-
Had to jump through a few hoops to get the materials/textures to all work out correctly but I'm pretty pleased with the way its coming together:
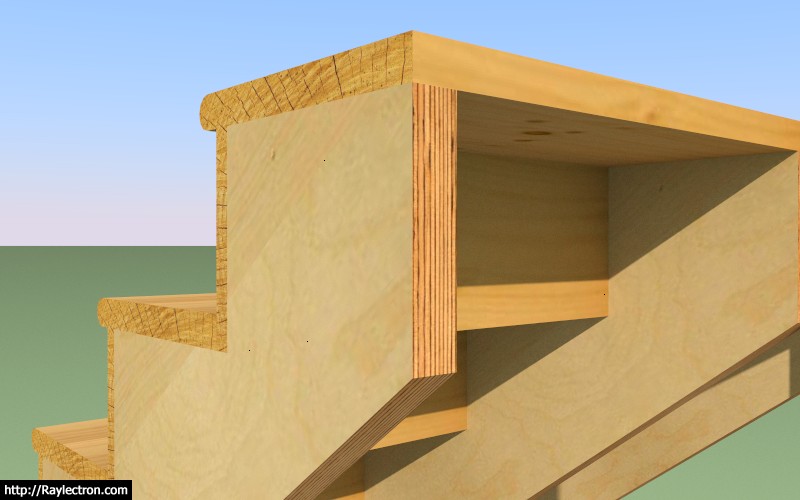
LVL stringers with timber (wood grain) risers and treads.
-
Wow! Looks great!
-
Version 0.9.9m - 11.21.2018
- Added the stair module (straight run only) with the following advanced options: thrust block, landing tread, hanger board.
Hanger Board and Landing Tread:
Landing Tread:
There are quite a few options with the stair module so I will need to make another tutorial video explaining the usage of these parameters. I have provided tool tips next to each option in the draw and edit menus to help explain what each is.
A few items with the draw tool:
1.) First select the top of the stairs location and then select a point for the bottom of the stairs. The preview wireframe should be fairly explanatory as to the location and geometry of the stairs that will be created.
2.) Once the first point is selected you can lock to an orthogonal axis (0, 45, 90, 135 deg.) or direction by repeatedly clicking the "Ctrl" key.
3.) Once the first point is selected you can also toggle the placement of the stairs by repeatedly clicking the down arrow. The justification is: Center, Left, or Right.
4.) As with the other HTML draw menus, you update/change your parameters and then click the Update button to make them live. You can leave the menu open while drawing your stairs. Hitting the space bar will exit the tool, hitting the ESC key will reset the tool.
With the draw and edit menus you will notice that for the tread and riser material you also have the option of utilizing materials found in your custom library. The stringer material is limited to certain specific material types (at least for now).
This is a completely new module so I expect there may be some minor issues and additional features that will be requested.
I still need to create the global settings tab for the stairs so that default parameters can be set for each option. However, it is not critical to the function of the module.
-
Honestly, another plugin with plugin on this one. I could have added it to the Truss Plugin or even separated it out as its own plugin, for now though it will live within the Wall Plugin. The code base is logically separated from the rest of the plugin so moving it would be a non-issue if the time comes.
I think you use this module once and you will never go back to manually creating stairs or laying out stringers again. I know I certainly won't. The automation afforded by the API is stroke of genius, with it almost anything can be created. At some point I really want to try out my artificial life experiment that I've been mulling about for a while now.
-
After some excellent feedback this morning I am considering adding in additional options for side spacers, gypsum gap, and skirt boards.
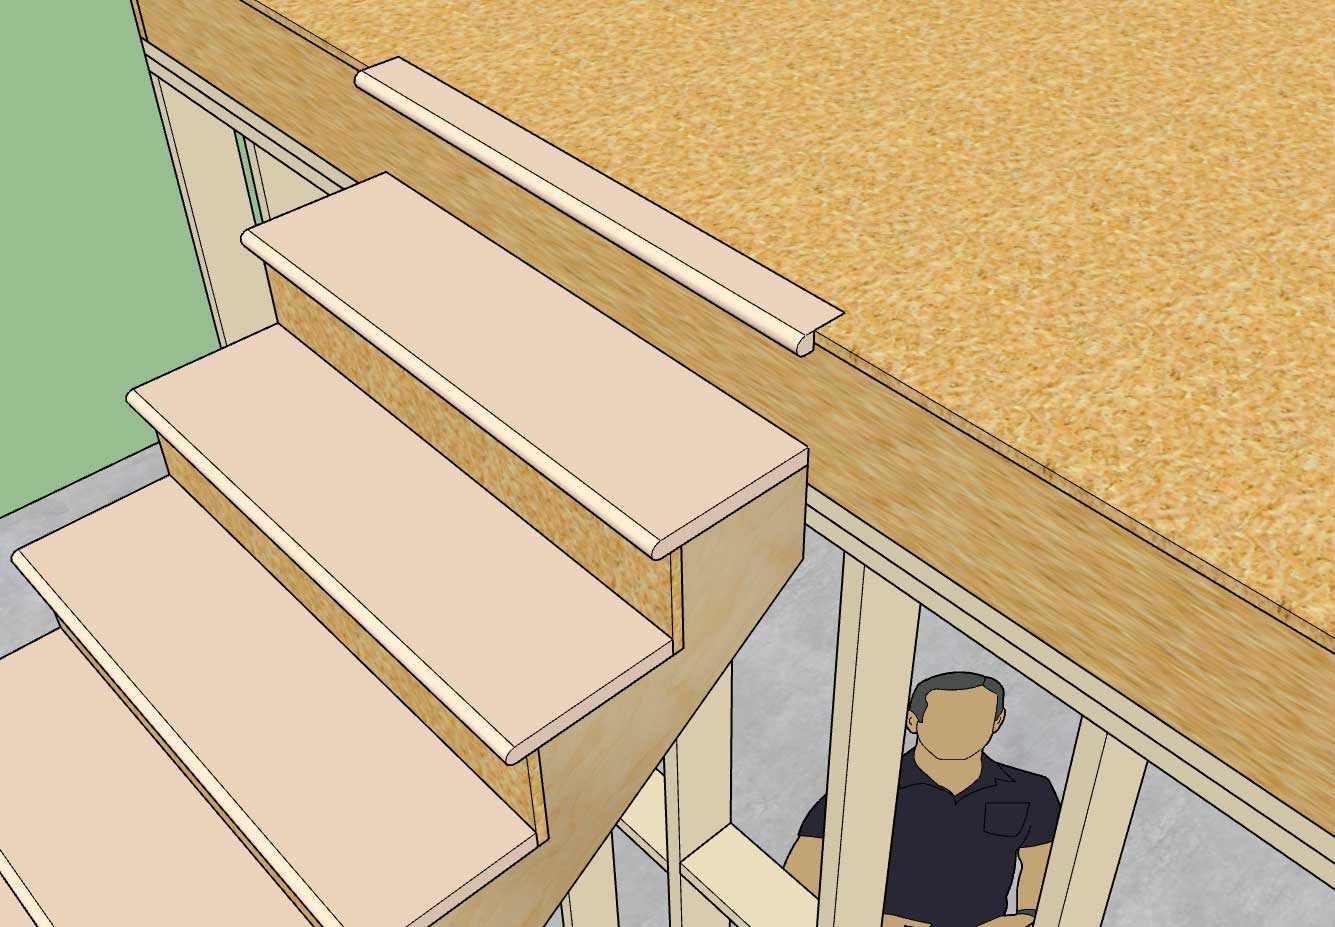
Everything is fairly straight forward except for the skirt boards. The question arises on how to best terminate the skirt, see image below:

-
I'm not sure if my scribbling is readable but the bottom diagrams try to explain possible configurations and parameters for the skirt board(s):

I think I can reduce the skirt board configuration down to three parameters:
- Terminal Height Top
- Terminal Length Top
- Terminal Height Bottom
-
The diagrams were not very legible so I created a few details to explain the skirt board end configurations:
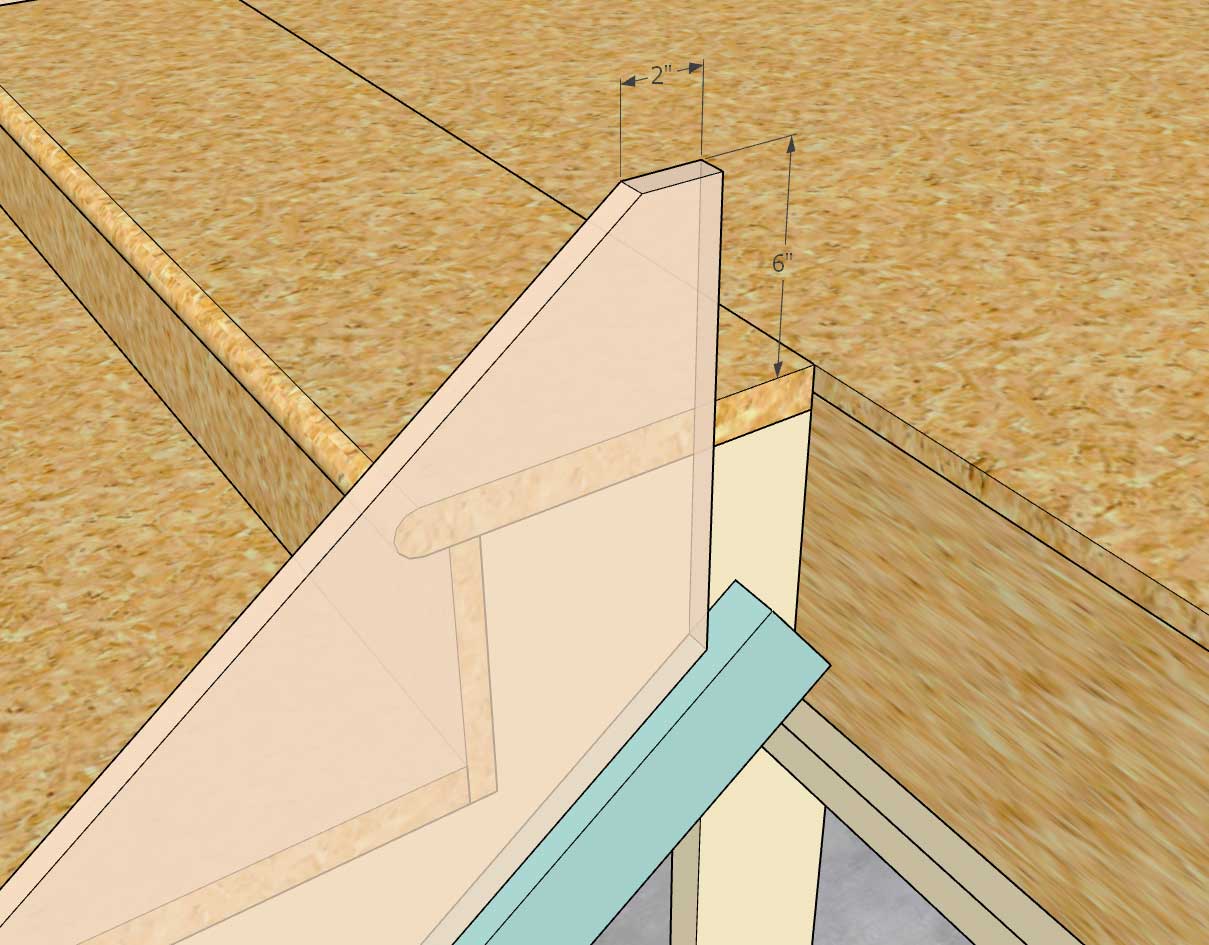
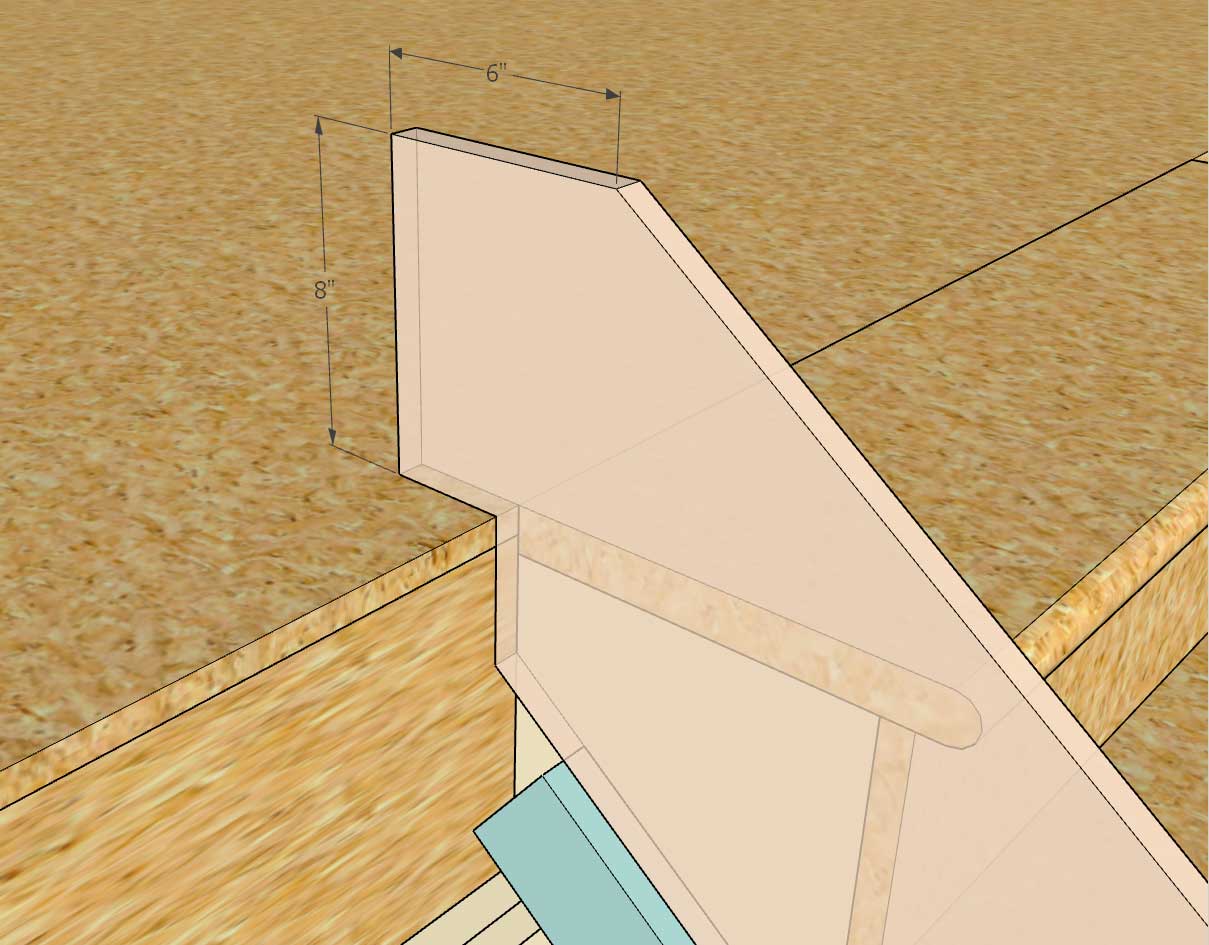
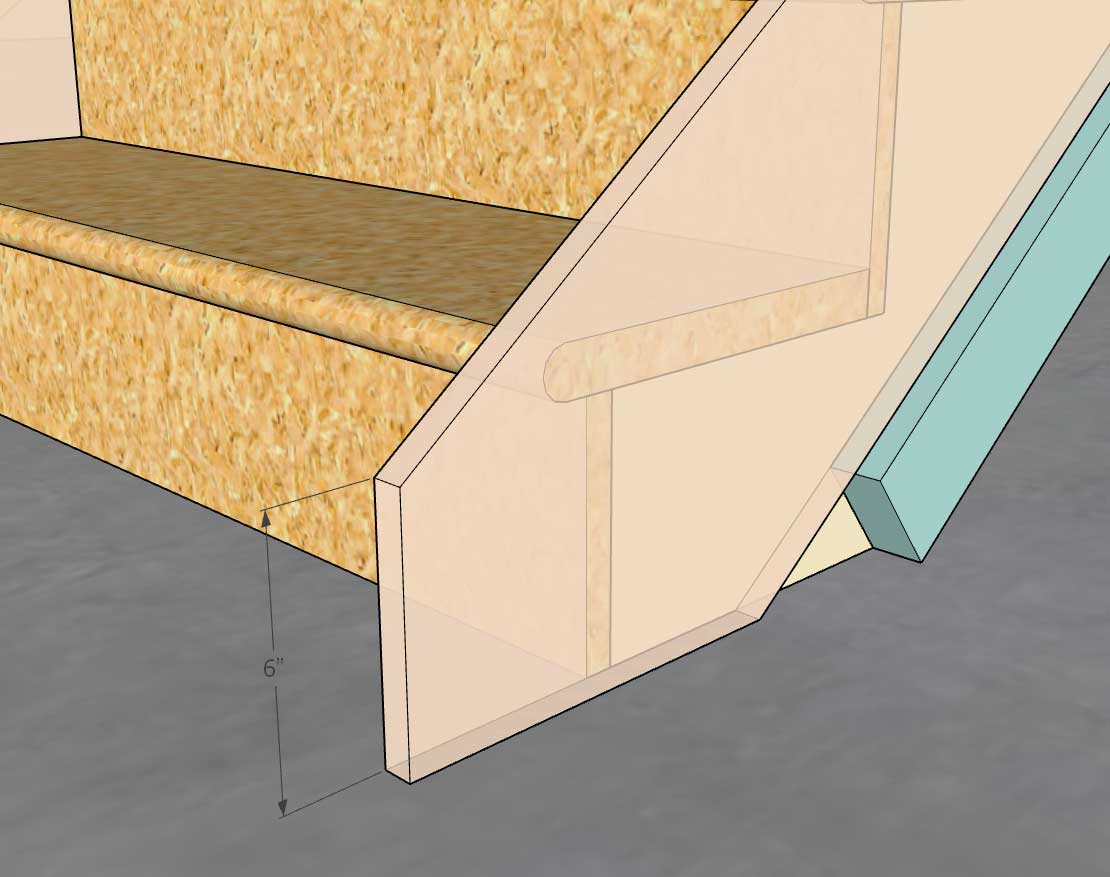
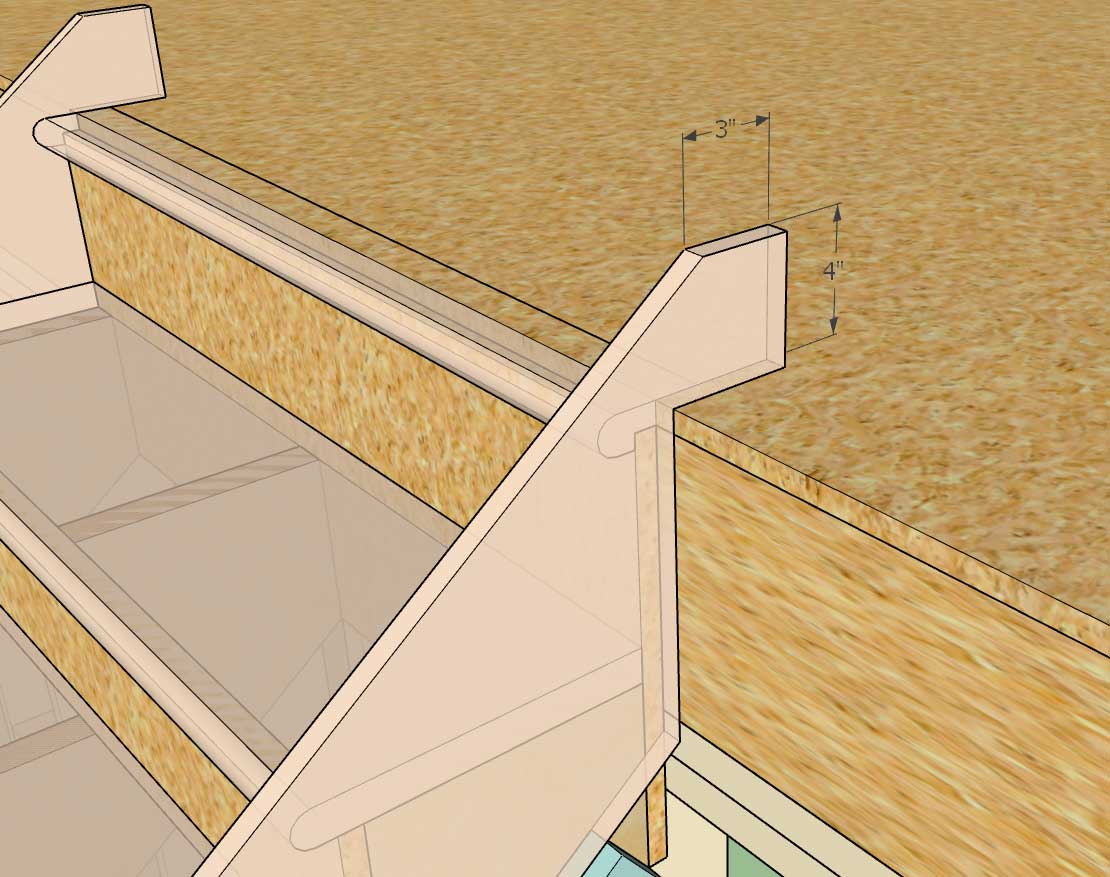
If these terminations look good I will begin adding in the logic to create them.
-
Some feedback on the other forum with regards to additional height requirements if a finished floor is installed has introduced some complications. I have given this some extra thought and my observations are thus:
1.) Where wall-to-wall carpet is being installed the way I have it laid out seems to be correct.
2.) The first point you select to position the stairs is the "Finished Floor" height. So if you need an extra 3/4" for a tile or wood flooring you would select a point that is 3/4" higher than the sub-floor. However, if the skirt boards are supposed to be installed prior to the final flooring then this would not be quite correct since they (their horizontal cut) would need drop 3/4" so that they meet the top landings subfloor.
3.) Similar sort of issue at the bottom of the stairs but slightly different. In this case the stringers will rest on the sub-floor, the bottom tread needs an extra 3/4" of rise, and the skirt boards will probably rest on the sub-floor/slab as well.
Question: Will the skirt boards always rest on the sub-floor or should they rest on the finished floor?
Conclusion: I need to add two extra parameters to the module to account for an additional thickness due to finished floors being installed. Since the finished floor on each level may be a different height (or carpet) we need a separate parameter for top and bottom. If I include a finished floor offset, the correct way to select the points for the stairs would be sub-floor to sub-floor.
- FF Offset Top (default to zero or 3/4"?)
- FF Offset Bottom (default to zero or 3/4"?)
P.S.
In addition to the three parameters for the skirt boards mentions above:
- Terminal Height Top
- Terminal Length Top
- Terminal Height Bottom
I will also need to include an offset parameter for the skirt boards since we can't be sure that the designer will want to install the skirt board directly onto the sub-floor (it might rest on the finished floor). Actually these parameters should be simple YES or NO parameters (with the offset equal to the finished floor offset from the parameters above) but there may exist a situation where the skirt board may be slightly lifted off of the finish floor so they each need to have a dimension associated with them.
- (Skirt) FF Offset Top (default to zero)
- (Skirt) FF Offset Bottom (default to zero)
-
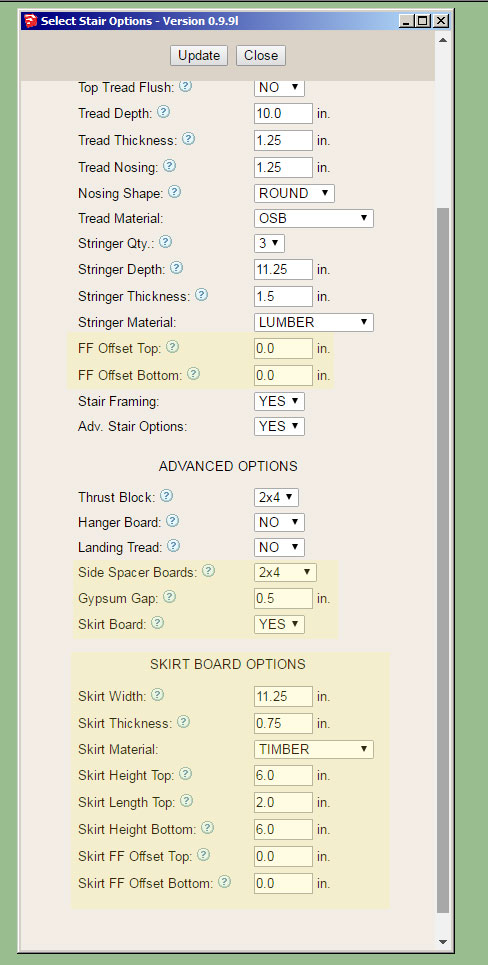
The highlighted yellow areas are the new additions to the stair menus (draw/edit):
-
yes Shemas are indispensable when you have such list of item!

-
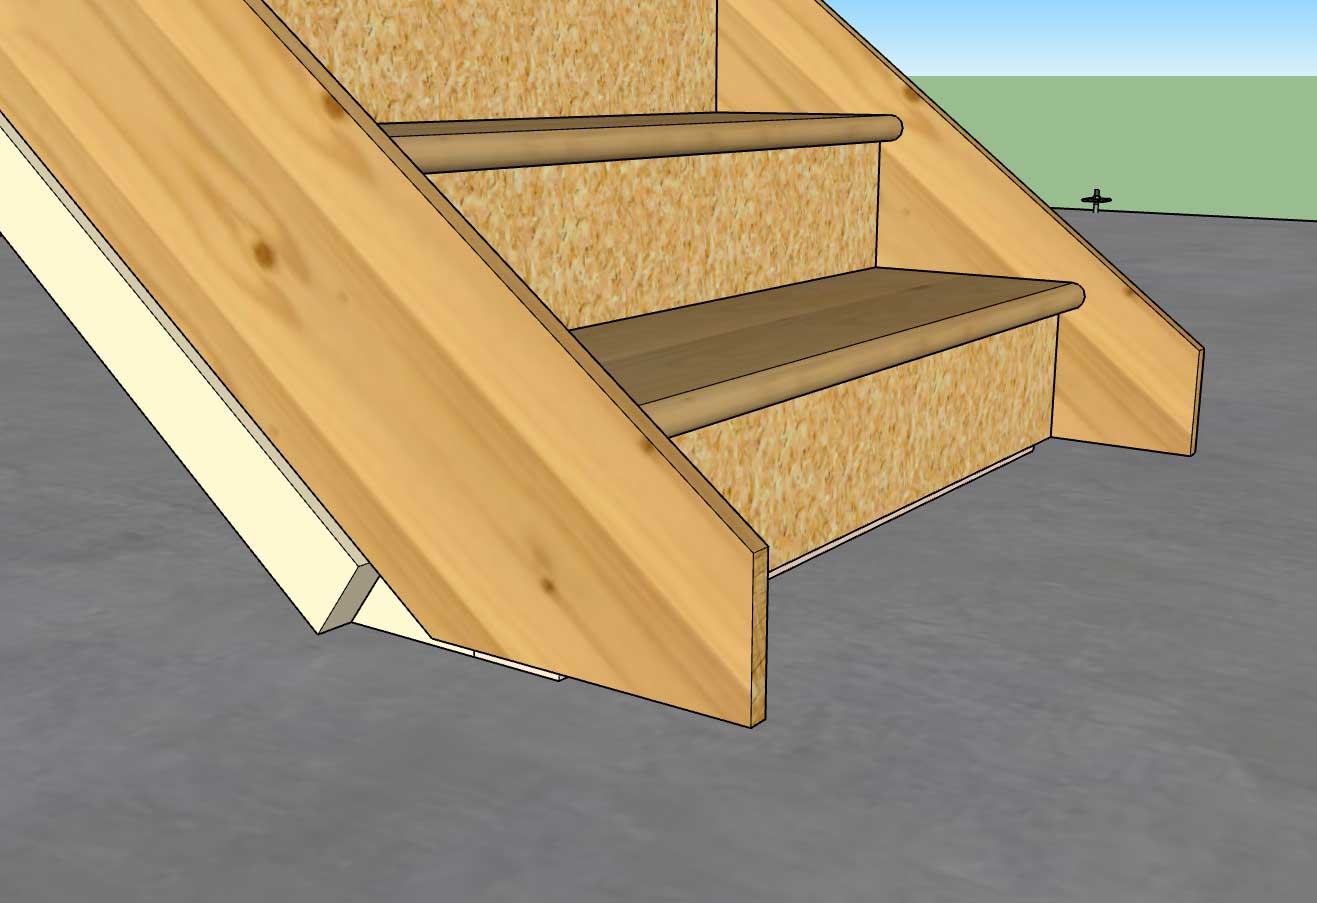
Here is a situation where the finished floor is 2" off of the bottom sub-floor (slab):
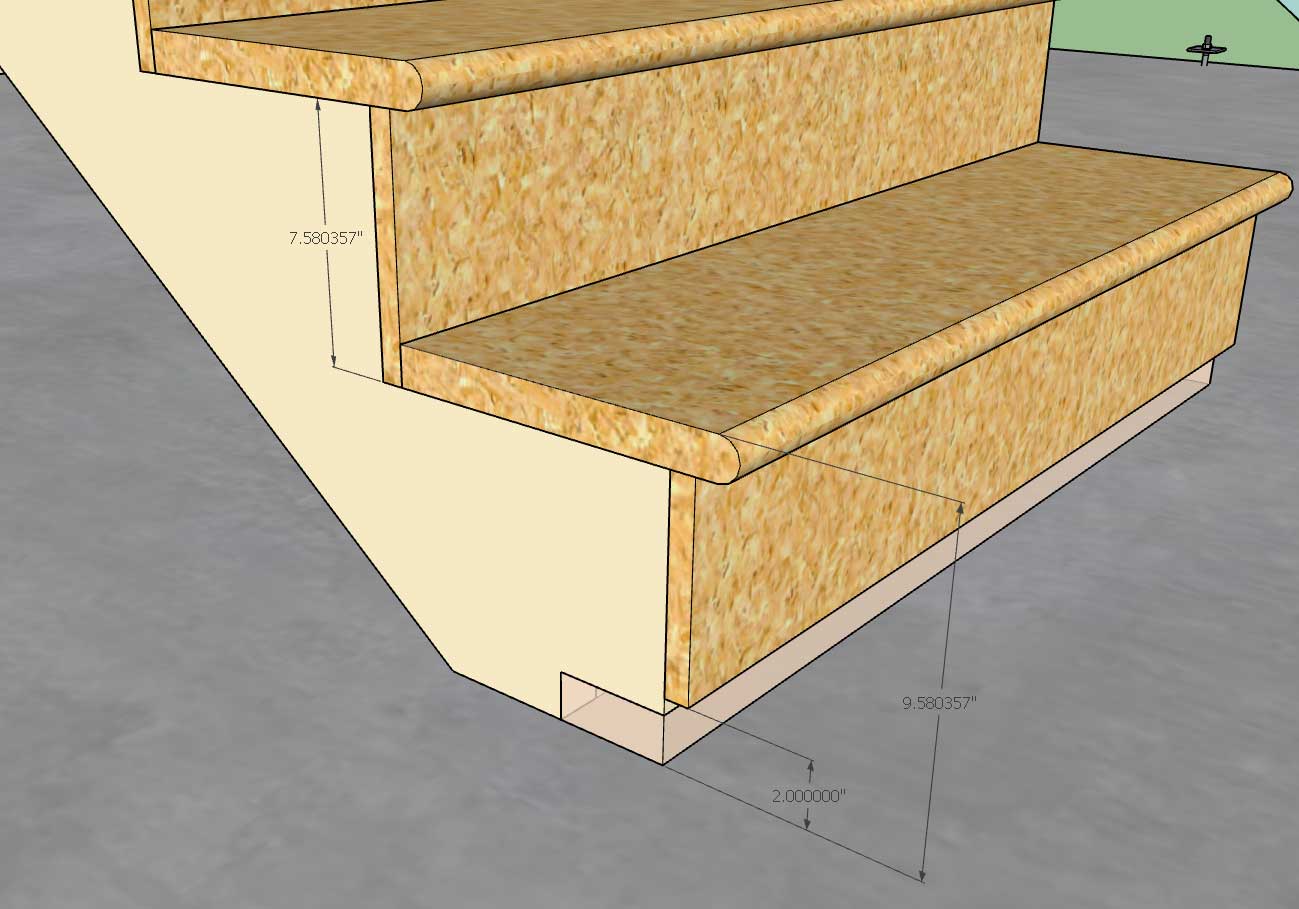
Note that the riser heights are correct and that the bottom riser has an additional 2" added to its height. The question I have is what to do with the riser board itself on this bottom tread?
I've shown it in the configuration where the finished floor can be applied underneath the riser board however is it more common just to extend the riser board to the bottom of the stringer so that it rests on the sub-floor or slab?
-
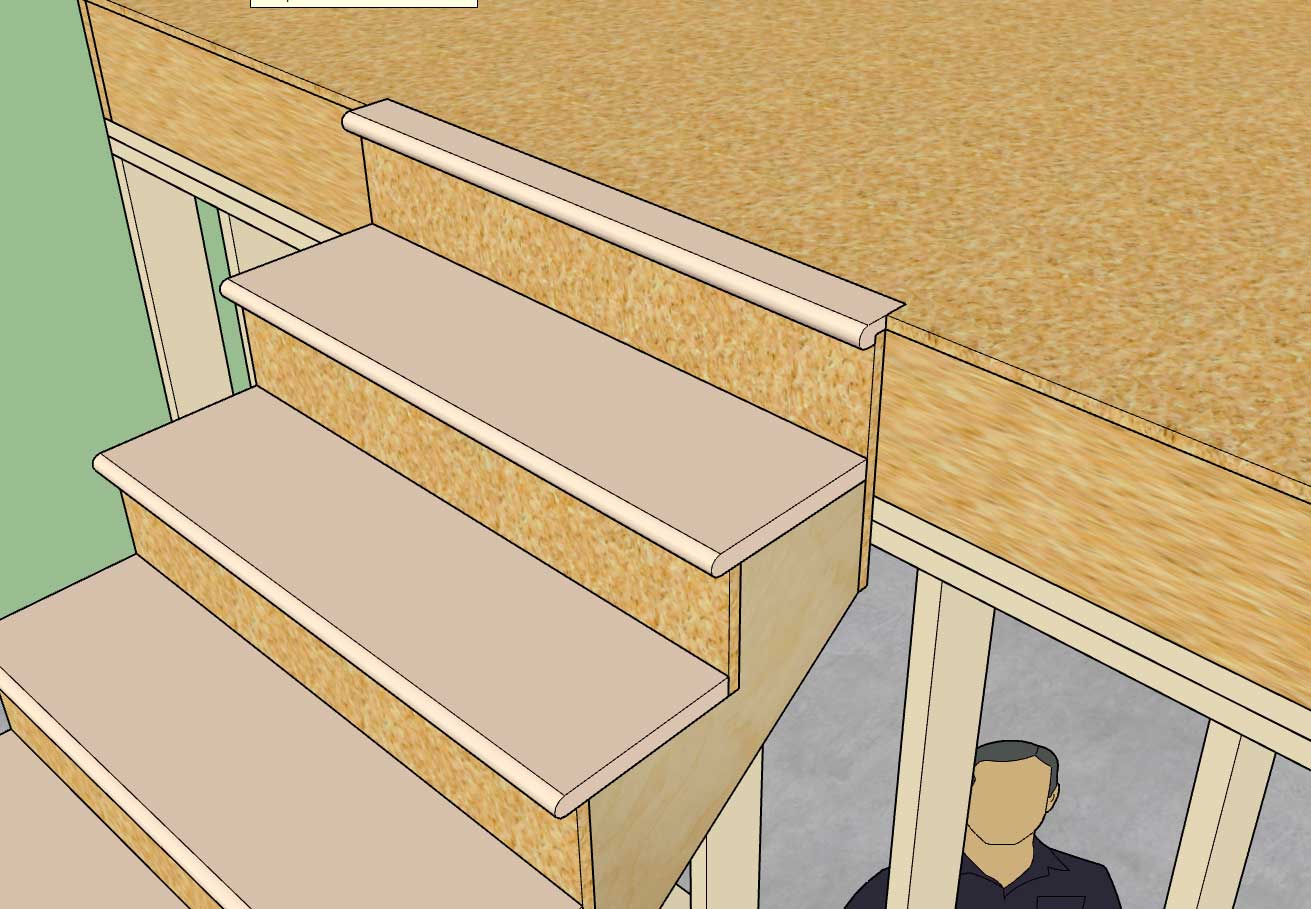
Looks like I've got the finished floor offsets for top and bottom working correctly and also the side spacers:
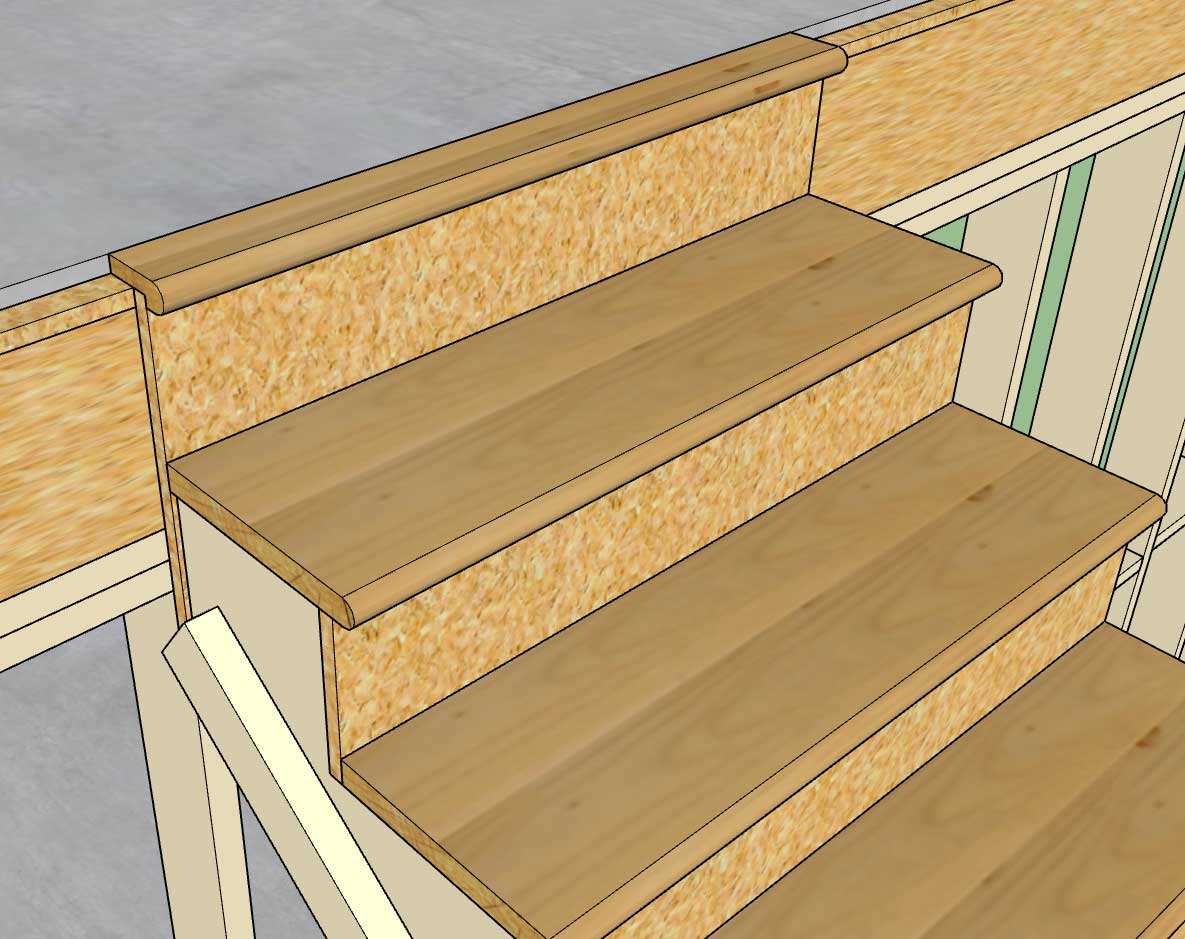
Note the overhang of the tread and risers, the gap is either just the gypsum gap or gypsum gap + skirt thickness.
The way it is setup now, you will want to specify the top and bottom points on the sub-floor.
-
Version 0.9.9n - 11.25.2018
- Added the following options to the stair module: side spacers, skirt boards, finished floor offsets.
When selecting the points to define the stairs you will want to pick sub-floor to sub-floor now that the finished floor offsets are enabled. Stairs created in version 0.9.9m are not backward compatible with this latest version as I have made too many updates and improvements to the code.
Keep sending in your ideas on how to make this module better.
I will be moving back to work on the gable wall module and giving this one a rest for a while unless there is an unresolved bug or critical fix that needs attention. I have a separate "todo" list just for this module. Open sided staircases is something I will have to do some more study on:
-
On a related note I am wondering what the best text book on stair construction is that is out there. I am not looking for traditional designs or methods per say but would like to have a practical text that covers modern methods and materials. I would like the stair module to handle 80-90% of most stair designs that are utilized in your typical mid-range homes.
The elaborate mansions with their spiraling and flaring staircases are probably beyond the scope of the stair module at this time. If that type of staircase is required I would strongly suggest more specialized stair plugins such as Garry Kernan's Stair Maker.


Advertisement