Medeek Wall Plugin
-
@medeek said:
@juju said:
Can windows and doors please be contained in a separate extension altogether?
Once I enable the ability to insert doors and windows into any generic walls then this request makes more sense. However, when a new customer purchases the Wall plugin the Window and Door plugin should also be automatically included (what good are walls if you don't have the tools to create openings in them).
For now it will remain bundled with the Wall plugin however in the future I may split it out into a separate plugin. When a new user purchases the Wall plugin it will also include a license to the Window and Door plugin.
Fair enough, but I (as do many others) use different dedicated extensions for Doors & Windows. If one can disable the functionality (and associated menu icons) without compromising the extension, I suppose it is all good.
-
Version 1.2.9 - 02.28.2020
- Addressed the issue where upgrading the plugin would delete custom materials, custom headers and wall presets. These items are now stored outside of the plugin sub-folder.
The good news with this update, is that unlike some of the other recent updates, it will not affect compatibility. The somewhat bad news is that I have not yet tested it with MacOS, but in theory it should work perfectly, I am waiting with bated breath.
This is one those under-the-hood updates that does not appear to be very exciting however that fact that updating the plugin will no longer erase your custom materials, headers and wall presets is actually a pretty big deal. I am hoping this update will ultimately decrease a lot of my tech support calls and emails, I think it will make a difference.
Now I just need to apply this same fix to the Truss, Foundation and Electrical plugins...
-
Just to offer a few more details on this latest update.
When you first install the plugin or upgrade it any existing plugin folder is removed during the uninstall and recreated during the install. The following sub-folders are created with the new .rbz file:
- library_headers
- library_mats
- presets
These contain the default headers, materials and presets (none) that come with the plugin as it ships.
The first time you run the plugin it then creates a sub-folder here (on windows, Mac is similar but slightly different path):
C:\Users%Username%\AppData\Roaming\Medeek\2017\medeek_wall_ext
Notice the year in the full path, this will of course depend on which version of SU you are installing the plugin into. The plugin then looks into this folder for the three sub-folders listed above, if it can't find them it copies the default folders and their contents from the plugin folder to the "AppData" folder. This is where the working folders actually exist for these settings, and when you add new materials etc... this is where the modifications and additions are made.
When you upgrade the plugin the plugin folder is removed and recreated however the sub-folder in AppData is retained. If the new installation then finds these sub-folder already existing it does not attempt to recreate them and hence your settings are retained.
Each different version of SketchUp (ie. 2017, 2018, 2019 and 2020) will all have their own separate sub-folder and parameters assuming you've installed the plugins into these separate SU installations. One can easily duplicate parameters by copying and pasting the "medeek_wall_ext" sub-folder between the SU version folders if required. I may include a tool for automating that (migration wizard) if there is enough demand for it.
-
The Beams/Columns toolbar will now include two additional icons:

- Draw Post
- Edit Post
In order to differentiate between in-wall columns and free standing columns I will be using the term "post" to refer to the latter and simply "column" to refer to the former.
The new post or free standing column module is actually relatively simple so I thought I would knock it out this weekend since there has been some demand for it recently. The basic concepts and configurations will be as shown before in a previous thread:

Each color denotes a unique material that can be specified by the user. Hopefully this should give enough flexibility when it comes to wrapping free standing columns.
Even though it requires more upfront work on my end I think I would like to setup the post selection similar to the custom header library so that the user can preconfigure various post sizes and materials. This feature will be made available within the global settings.
P.S. Tomorrow is the last day before the 2020 price increases takes affect.
-
Here are the parameters for the Post Module:
BASIC OPTIONS:
Post Type:
Post Size:
Lumber Species:
Grade:
Post Ply Qty.:
Pressure Treated: Yes/No
Post Rotation:
Adv. Post Options: Yes/NoADVANCED OPTIONS:
Wrap: Yes/No
Wainscot: Yes/No
Cap: Yes/No
Base: Yes/No
Astragal: Yes/NoWRAP OPTIONS:
Wrap Thickness:
Wrap Air Gap:
Wrap Material:WAINSCOT OPTIONS:
Wainscot Thickness:
Wainscot Air Gap:
Wainscot Height:
Wainscot Material:Wainscot Ledge: Yes/No
Ledge Depth:
Ledge Overhang:
Ledge Material:CAP OPTIONS:
Cap Thickness:
Cap Depth:
Cap Material:BASE OPTIONS:
Base Thickness:
Base Depth:
Base Material:ASTRAGAL OPTIONS:
Astragal Thickness:
Astragal Depth:
Astragal Height:
Astragal Material:The basic options will be very similar to the beam module with the option for steel columns as well as wood (eg. lumber, timber, SCL, glulam).
-
Version 1.3.0 - 03.07.2020
- Fixed a critical bug with custom materials that was caused by the change in the location of the plugin's data sub-folder.
*** CRITICAL BUG FIX ***
If you recently downloaded version 1.2.9 of the plugin then you will want to upgrade to this version to resolve an issue with custom materials in the Material Library. I highly suggest that everyone upgrade to this latest release at your earliest convenience. -
I've been thinking about how to best handle levels or floors of a structure lately. I'm thinking about assigning an additional parameter (that can be user edited) which assigns a given wall assembly to a particular user defined level or floor. Another way of handling this is in conjunction with layer assignment. Everyone's workflow is a little different so I think it is important that if I provide certain options I make them truly optional. In other words the layer assignment tool could optionally assign the assemblies to a particular layer/tag.
As a side note SU 2020 now calls layers -> tags. I'm not really happy with that change, I don't see why the word layer or layers was a bad or incorrect term within the context of SketchUp. Honestly, tags is even more confusing in my opinion. For now I will not be changing my terminology within the plugin, I will still be calling them layers, everyone knows what I'm talking about. If the term "tags" actually sticks then in a year or so I may consider updating my terminology, but I'm going to let this one percolate for a while.
-
First look at the HTML draw menu for the Post module:

This module is relatively simple however since there are so many advanced options there is still quite a bit of coding to do.
-
Version 1.3.1 - 03.15.2020
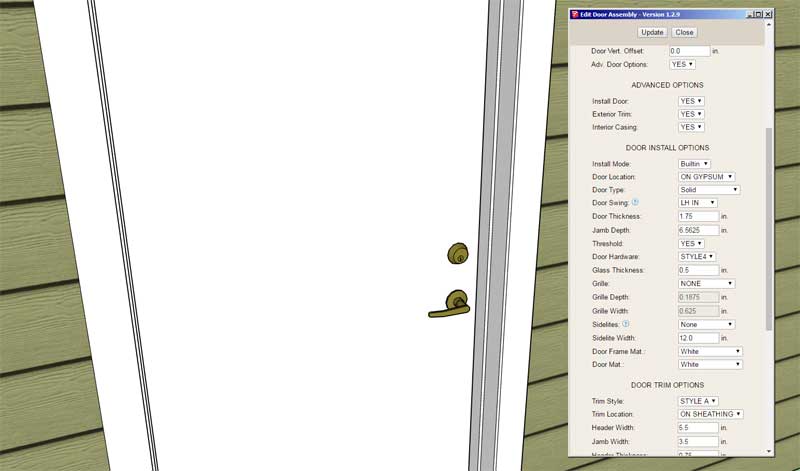
- Added a "Style4" door hardware option (Lever & Deadbolt) to the door module.
- Fixed a bug with the door opening tool for man doors.
-
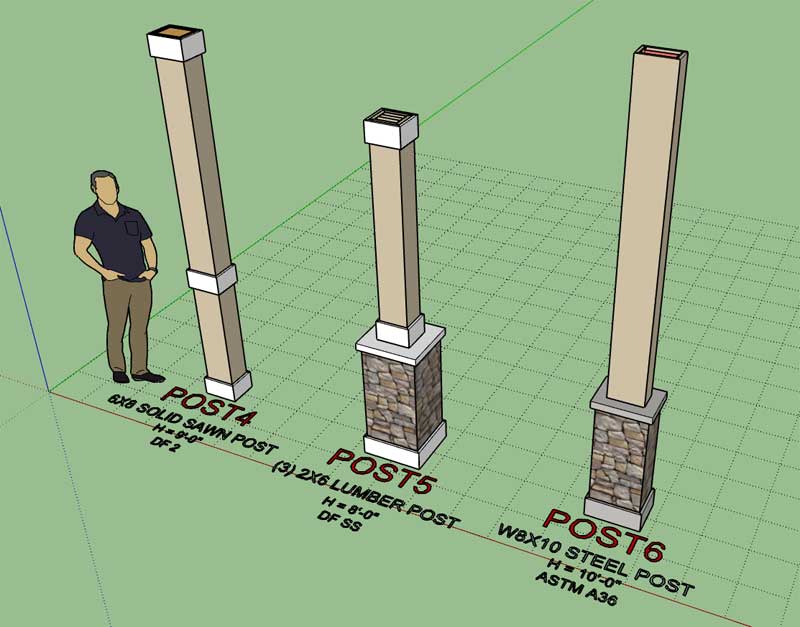
First look at some posts created with the Post module:

The basic module is up and running I just need to spend a few more hours on the advanced options (ie. wrap, wainscot, base, cap and astragal) and then this module will be a welcome addition to the plugin.
View model here:
3D Warehouse
3D Warehouse is a website of searchable, pre-made 3D models that works seamlessly with SketchUp.
(3dwarehouse.sketchup.com)
-
Version 1.3.2 - 03.31.2020
- Added the ability to draw and edit free standing columns with the Beams/Column Toolset.
View model here:
3D Warehouse
3D Warehouse is a website of searchable, pre-made 3D models that works seamlessly with SketchUp.
(3dwarehouse.sketchup.com)
-
Version 1.3.2b - 04.02.2020
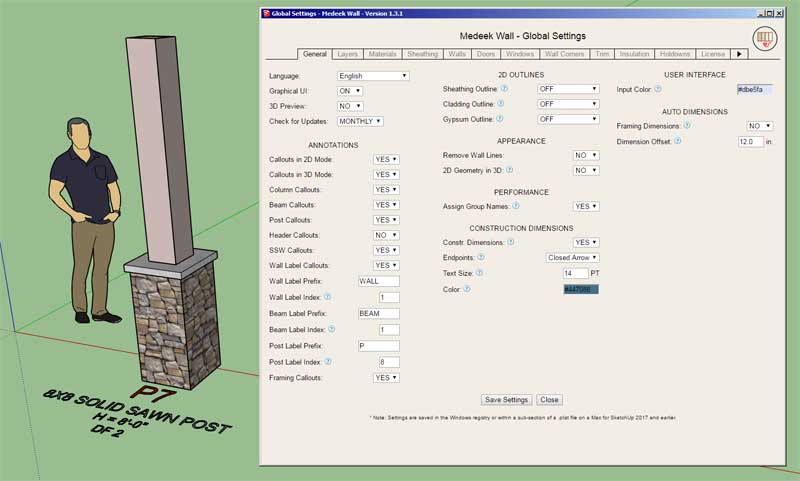
- Added an indexing parameter for posts to the General tab of the global settings.
- Added the built-in materials (red brick) for post wrap and wainscot and (concrete) for post ledges.
- Added labels and callouts for all post types.
I've also switched to the new .rbe encryption method for the plugin which effectively prevents it from running on SketchUp 2015 or earlier. I was more than content to stick with the .rbs encryption method but the SketchUp extension signing page has removed this encryption method and only the .rbe method is currently offered.
-
Tutorial 10 - Posts (14:24 min.)
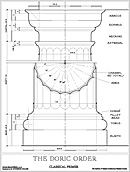
Round or Greek/Roman columns would also be a nice addition to this module but I'm not entirely sure on the construction or geometry of them. They typically have a gradual taper and then the top (capital) always has some interesting geometry (Doric, Ionic, Corinthian):


-
Yeah, the classical orders are pretty involved. But people now buy columns and install them with little regard to the details or proportions. Some will be happy with what you can come up with in a parametric plugin, but others will probably just find or model their own version. You'll find Corinthian and composite columns most challenging with the floral details and required poly count. Good for you, if you going to tackle this as well!
-
I'm always up for a bit of a challenge so after digging around on the internet for awhile and reading some documents provided by some of my mentors here is what I have for classical columns:
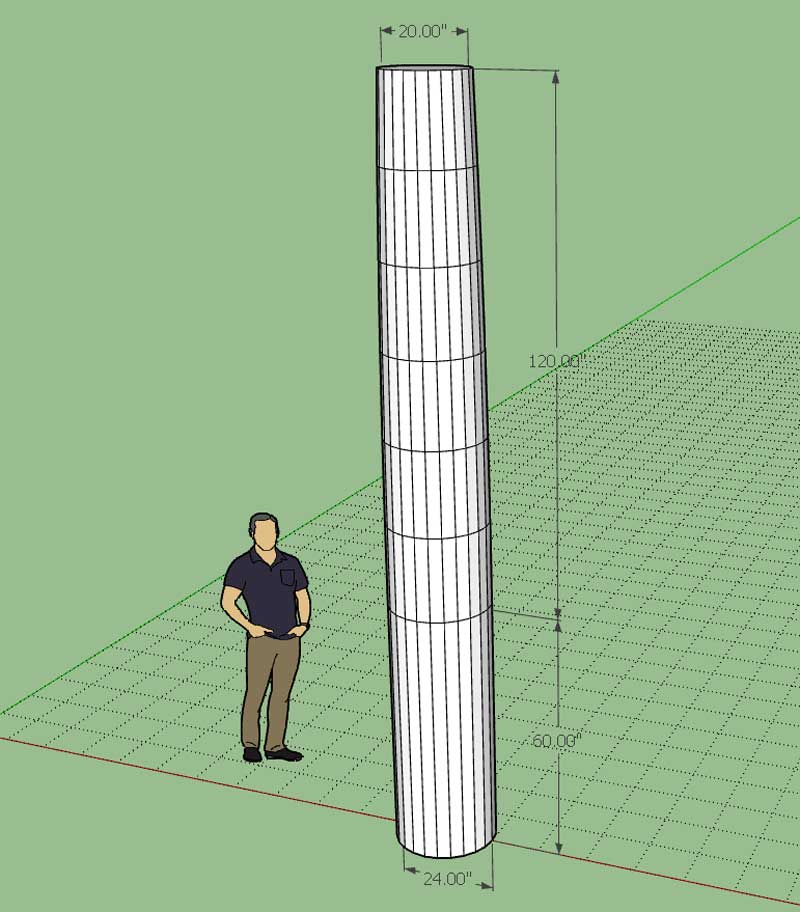
1.) The diminution ratio seems to be 5/6 for most columns that are 15ft of less. I will label this ratio as "m".
2.) There is a height to diameter ratio however I think I should leave it up to the user to specify whatever diameter they chose for any particular height however I could suggest the classical (recommended) diameter for a given height.
3.) If we let the base diameter be "d" then the entasis radial difference "E" is given by:
E = d(1-m)/2.4.) Let h = height of the shaft. The entasis (or diminution) begins at a height of 1/3h. The entasis is not a linear reduction in diameter but rather follows a curved profile with the radius of curvature tangent to the lower cylindrical portion of the shaft.
5.) The radius of the entasis curvature is given by r[sub:3w5bl8ej]e[/sub:3w5bl8ej] = 2h[sup:3w5bl8ej]2[/sup:3w5bl8ej]/9E + E/2.
6.) The angle of the sweep of the arc is given by theta = asin(2h/3r[sub:3w5bl8ej]e[/sub:3w5bl8ej])
The above derivation and observations should then give me enough information to be able to properly draw the shaft of any classical column. The base and capital however are a whole nother story.
-
For the base and capital of a classical column I think it would be easiest just to pre-model some standard configurations and then have the plugin insert the components rather than try to draw them from scratch. Since both of these elements are merely a function of the column diameter the plugin can easily scale them to the correct size upon insertion... problem solved.
Now I just need some decent (but low poly) ionic and corinthian capitals, if such a thing is possible.
-
Sometimes people leave the base off so you might consider that, especially for Tuscan column.
-
I will provide an additional option called the “classical option”.
This will allow for classical (round) columns, the parameters will initially be:
Classical Order: Tuscan, Doric, Ionic, Corinthian, Composite
Diameter: (12" default)
Capital: Yes/No
Base: Yes/No
Material:At some point I should also provide the option for a fluted column and additional parameters for a pedestal. Yes, this is a bit of a rabbit hole, but really not as deep as initially thought it might be. I’ll start simple first and then incrementally add more features as requested.
I’m making the assumption that all of these classical columns are non-structural (ie. FRP) so the standard wood or steel posts will still be drawn/installed inside of the classical column.
-
First look at a classical column with the updated menu items:

The diminution/entasis is the correct 5/6 ratio and it follows an arc/curve tangent to the lower cylindrical section of the column. I've created the arc with eight segments which seems to be more than adequate (could probably get away with six). I have my own smoothing routine so the tangent edge at the 1/3 point on the column is not shown.
Now I just need to come up with some proper bases and capitals for the different orders and we will have some classical columns available.
I could hollow out the interior but I don't see a big need for that since each manufacturer is going to have their own wall thickness, and it just adds to the overall polycount. Comments or thoughts?
I suppose I could make the diminution ratio also user driven but for now I'll just hardcode in the 5/6 ratio since this seems to be the most common.
-
First look at a Doric Column with both the capital and base enabled:

To my knowledge this is the only SketchUp plugin that allows one to parametrically create classical columns, I'm pretty excited about this.
The components utilized for the capital and base are within the components sub-folder of the plugin and can easily be replaced with a users own file if so desired.
For my geometry I've been studying the references and drawings found on this site:
This website has very detailed explanations and drawings of the various orders, which I have found to be extremely helpful.
The Ionic, Corinthian and Composite capitals are very intricate and complex 3D geometries. I'm not even going to attempt to draw those myself, even though I can program plugins my modeling skills are just not up to par. I think I can rely on the 3D warehouse and some of you power users to point me in the right direction as to what would be the most accurate and low poly model that I can incorporate into the plugin for each of these orders.
View model here:
3D Warehouse
3D Warehouse is a website of searchable, pre-made 3D models that works seamlessly with SketchUp.
(3dwarehouse.sketchup.com)
Advertisement

