sketchucation logo sketchucation
    • Login
    ℹ️ Licensed Extensions | FredoBatch, ElevationProfile, FredoSketch, LayOps, MatSim and Pic2Shape will require license from Sept 1st More Info

    Medeek Wall Plugin

    Scheduled Pinned Locked Moved Plugins
    1.5k Posts 27 Posters 991.0k Views 26 Watching
    Loading More Posts
    • Oldest to Newest
    • Newest to Oldest
    • Most Votes
    Reply
    • Reply as topic
    Log in to reply
    This topic has been deleted. Only users with topic management privileges can see it.
    • medeekM Offline
      medeek
      last edited by

      I been thinking about putting on a weekly one hour webinar where I can demonstrate the latest features of the plugin and then take additional questions from the audience. Would there be any interest in this?

      Nathaniel P. Wilkerson PE
      Medeek Engineering Inc
      design.medeek.com

      1 Reply Last reply Reply Quote 0
      • medeekM Offline
        medeek
        last edited by

        Version 0.9.9l - 11.16.2018

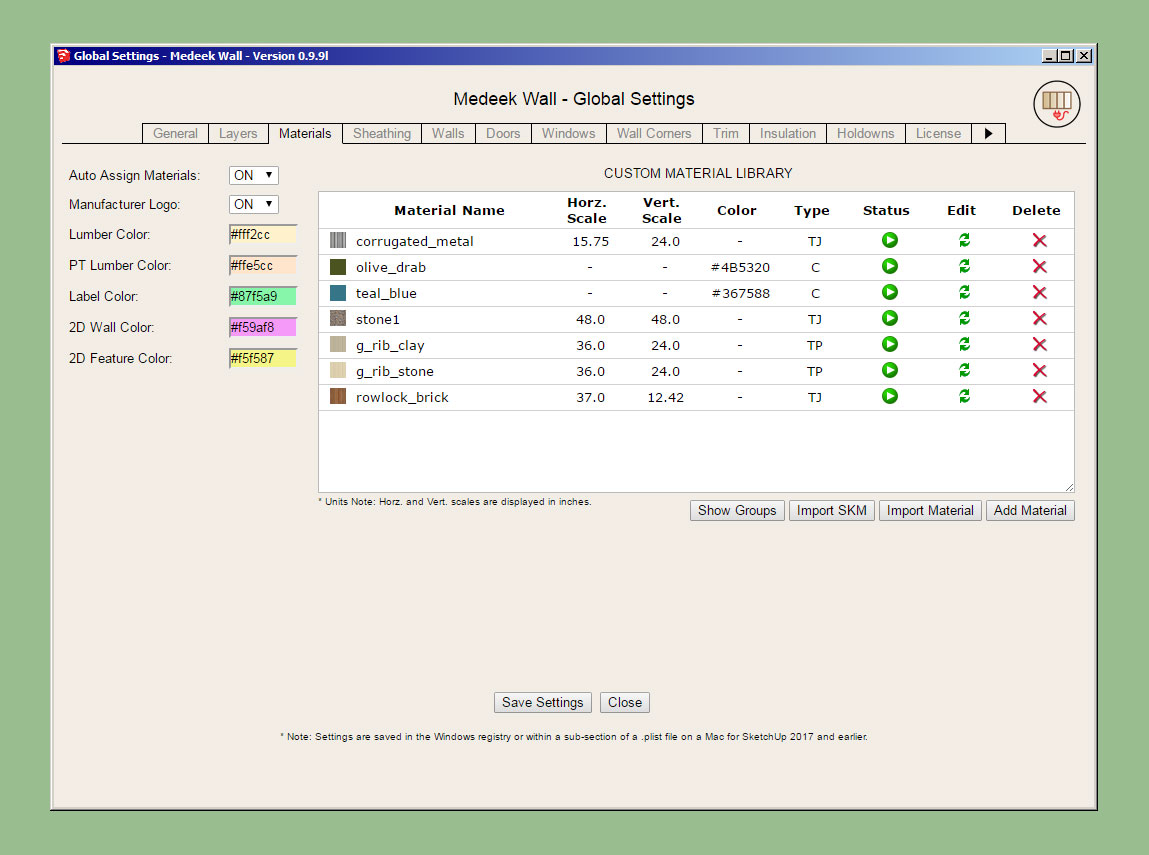
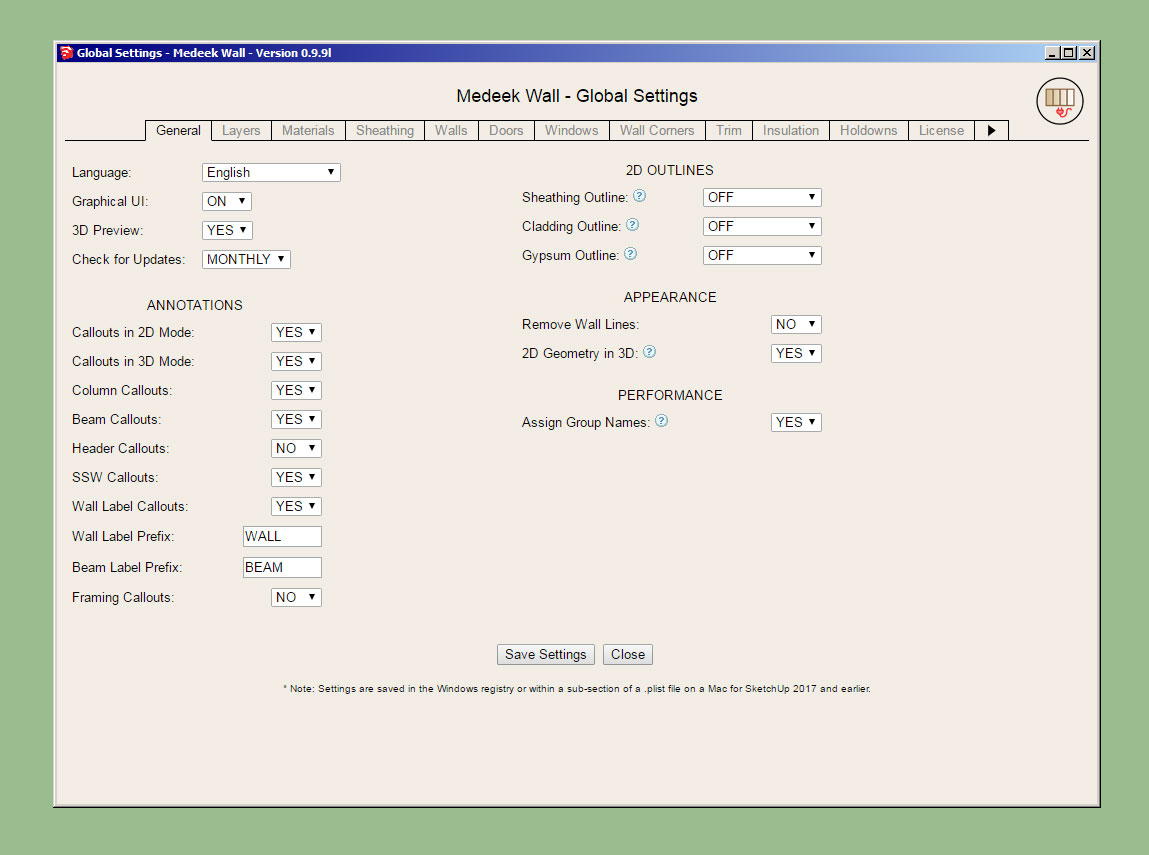
        • Added an option to include 2D wall geometry in 3D modes (Framing, No Framing, CMU).
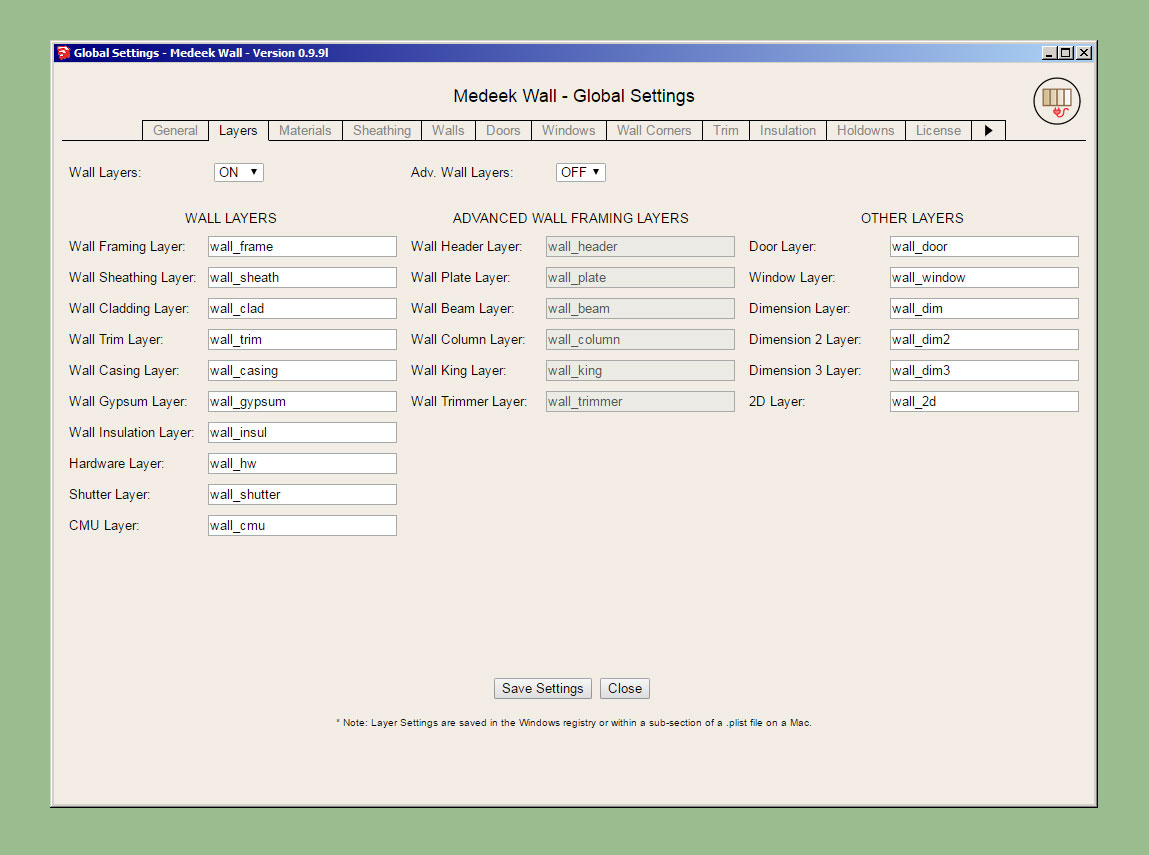
        • Added an additional layer for 2D geometry.
        • Added customizable colors for labels, 2D wall geometry, and 2D features (windows, doors, columns etc...)
        http://design.medeek.com/resources/images/wall_su280_800.jpg

        http://design.medeek.com/resources/images/wall_su281_800.jpg

        http://design.medeek.com/resources/images/wall_su282_800.jpg

        The custom colors for the labels, and 2D geometry is per a discussion with a client today. Hopefully this upgrade will help facilitate bringing the 2D geometry into layout for creating floor plans.

        Nathaniel P. Wilkerson PE
        Medeek Engineering Inc
        design.medeek.com

        1 Reply Last reply Reply Quote 0
        • medeekM Offline
          medeek
          last edited by

          On a related note I just noticed John Brock's new book has been released:

          Amazon.com

          favicon

          (www.amazon.com)

          I think this will be a seminal work on incorporating SketchUp into the residential design process. I've already gone ahead and pre-ordered my copy.

          Nathaniel P. Wilkerson PE
          Medeek Engineering Inc
          design.medeek.com

          1 Reply Last reply Reply Quote 0
          • medeekM Offline
            medeek
            last edited by

            First look at the output of the Stair Module:
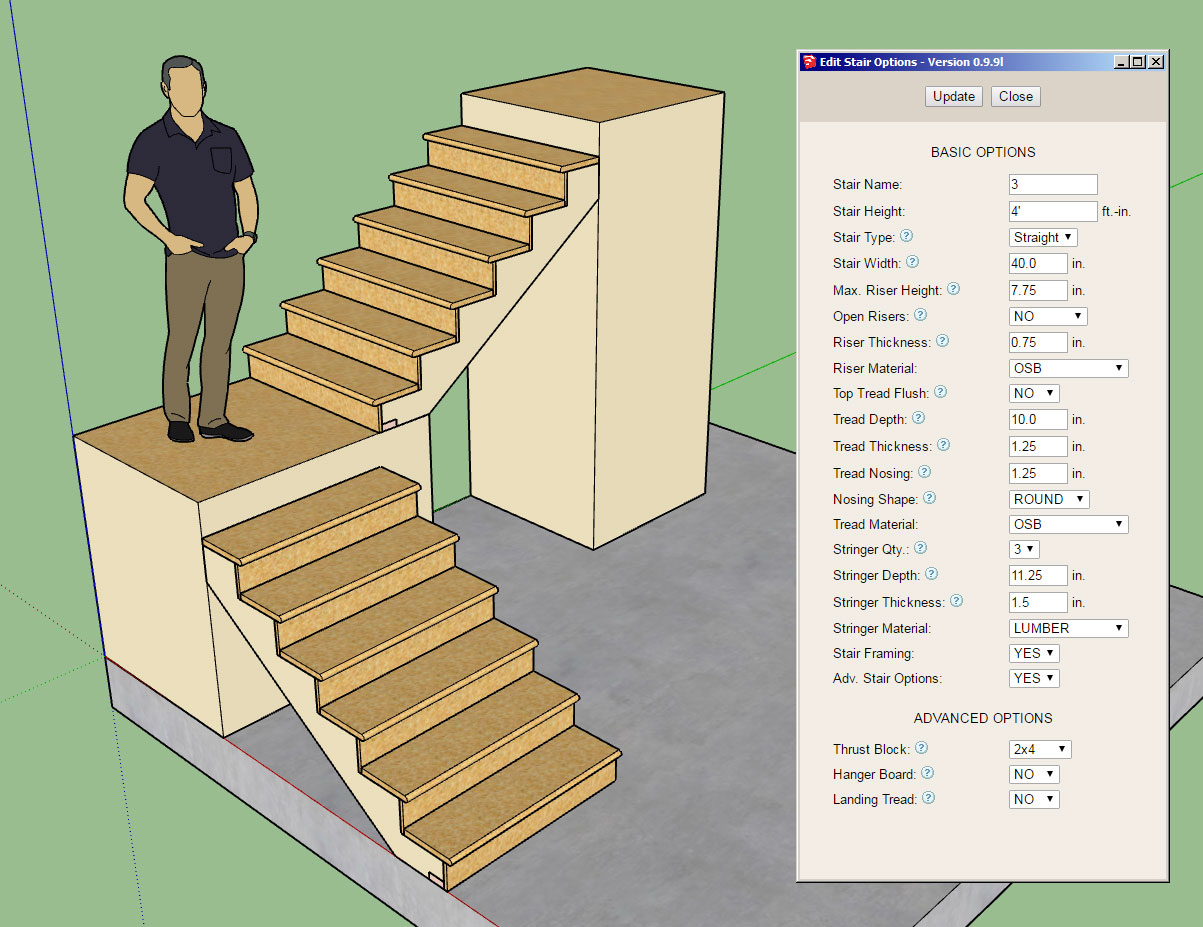
            http://design.medeek.com/resources/images/wall_su283_800.jpg

            Note, that only straight runs of stairs will be available for now, however it is possible to create L and U shaped staircases just by combining straight runs as shown and framing in a landing.

            View model here:

            Link Preview Image
            3D Warehouse

            3D Warehouse is a website of searchable, pre-made 3D models that works seamlessly with SketchUp.

            favicon

            (3dwarehouse.sketchup.com)

            I will probably need one more day to fine tune it completely and finish adding in the hanger board and landing tread advanced options.

            Future advanced options will be landings, hand rails, skirt boards etc...

            The stringer algorithm is really the core of the module and drives everything else. The logic was not nearly as complex as I initially thought it might be, regardless it was a blast to work through it and turn the math into reality.
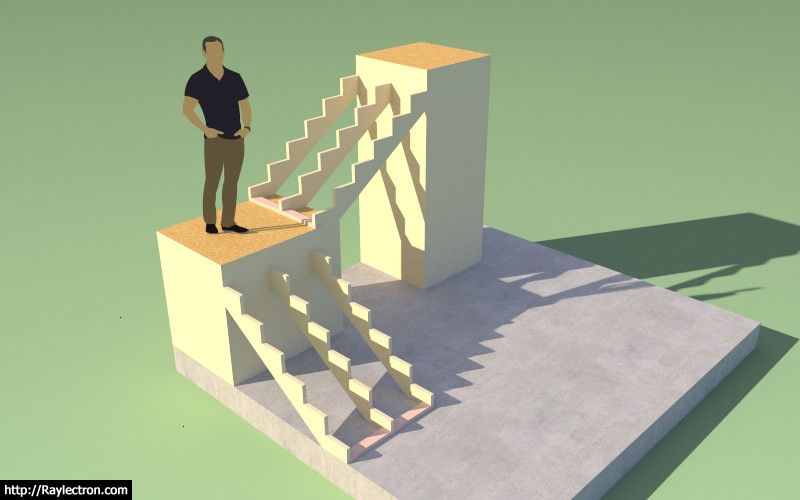
            http://design.medeek.com/resources/images/wall_su284_800.jpg

            Nathaniel P. Wilkerson PE
            Medeek Engineering Inc
            design.medeek.com

            1 Reply Last reply Reply Quote 0
            • medeekM Offline
              medeek
              last edited by

              Had to jump through a few hoops to get the materials/textures to all work out correctly but I'm pretty pleased with the way its coming together:
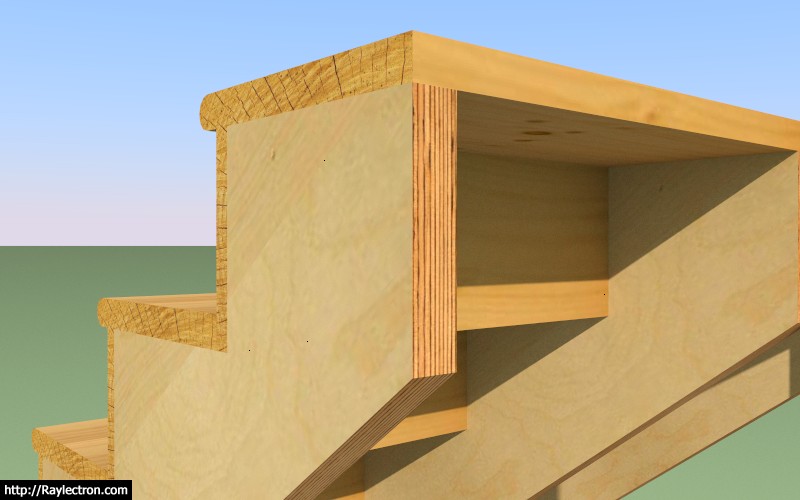
              http://design.medeek.com/resources/images/wall_su285_800.jpg

              LVL stringers with timber (wood grain) risers and treads.

              Nathaniel P. Wilkerson PE
              Medeek Engineering Inc
              design.medeek.com

              1 Reply Last reply Reply Quote 0
              • pbacotP Offline
                pbacot
                last edited by

                Wow! Looks great!

                MacOSX MojaveSketchUp Pro v19 Twilight v2 Thea v3 PowerCADD

                1 Reply Last reply Reply Quote 0
                • medeekM Offline
                  medeek
                  last edited by

                  Version 0.9.9m - 11.21.2018

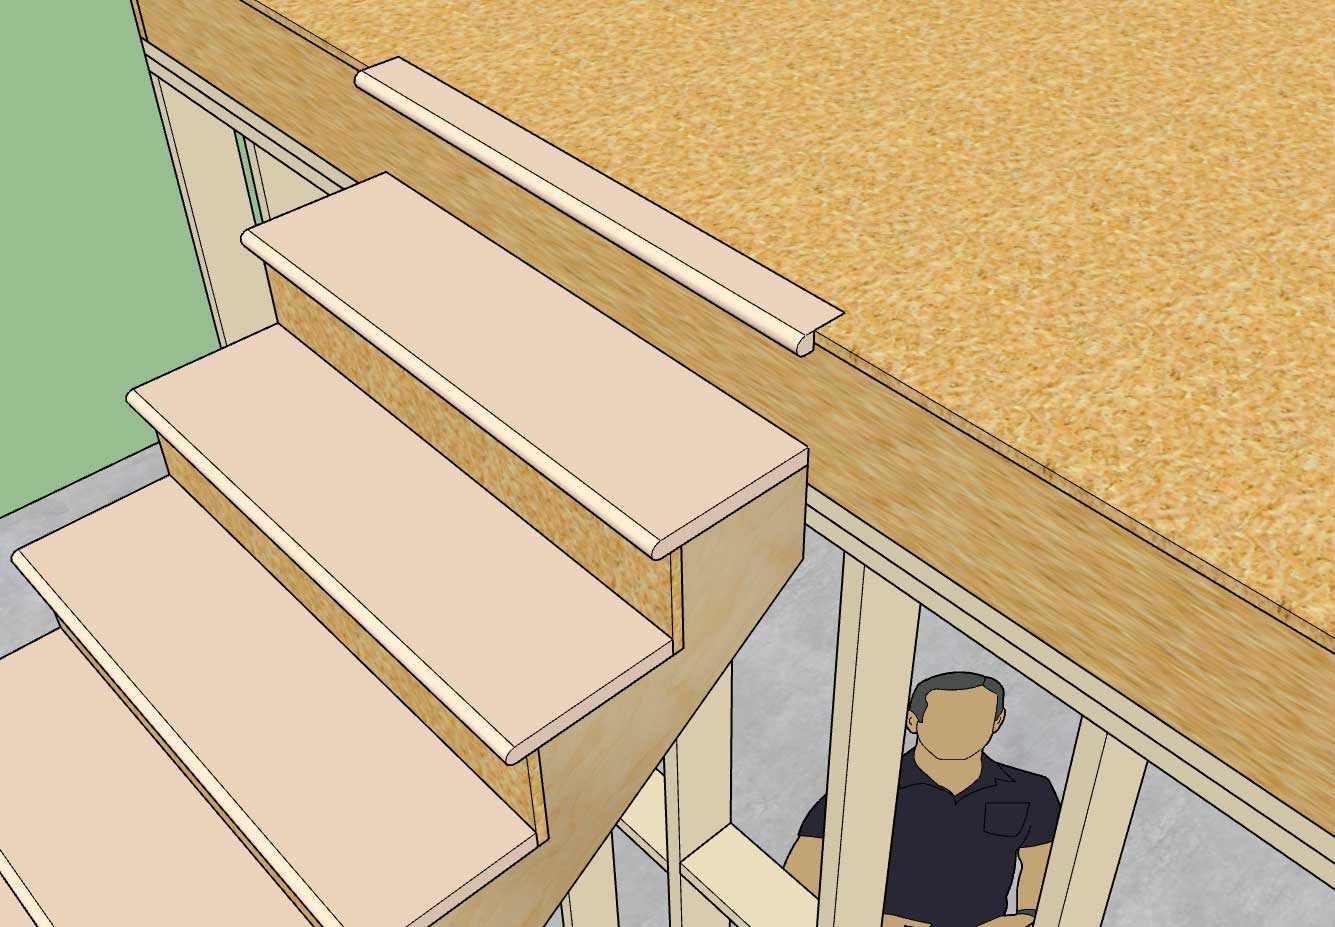
                  • Added the stair module (straight run only) with the following advanced options: thrust block, landing tread, hanger board.

                  Hanger Board and Landing Tread:
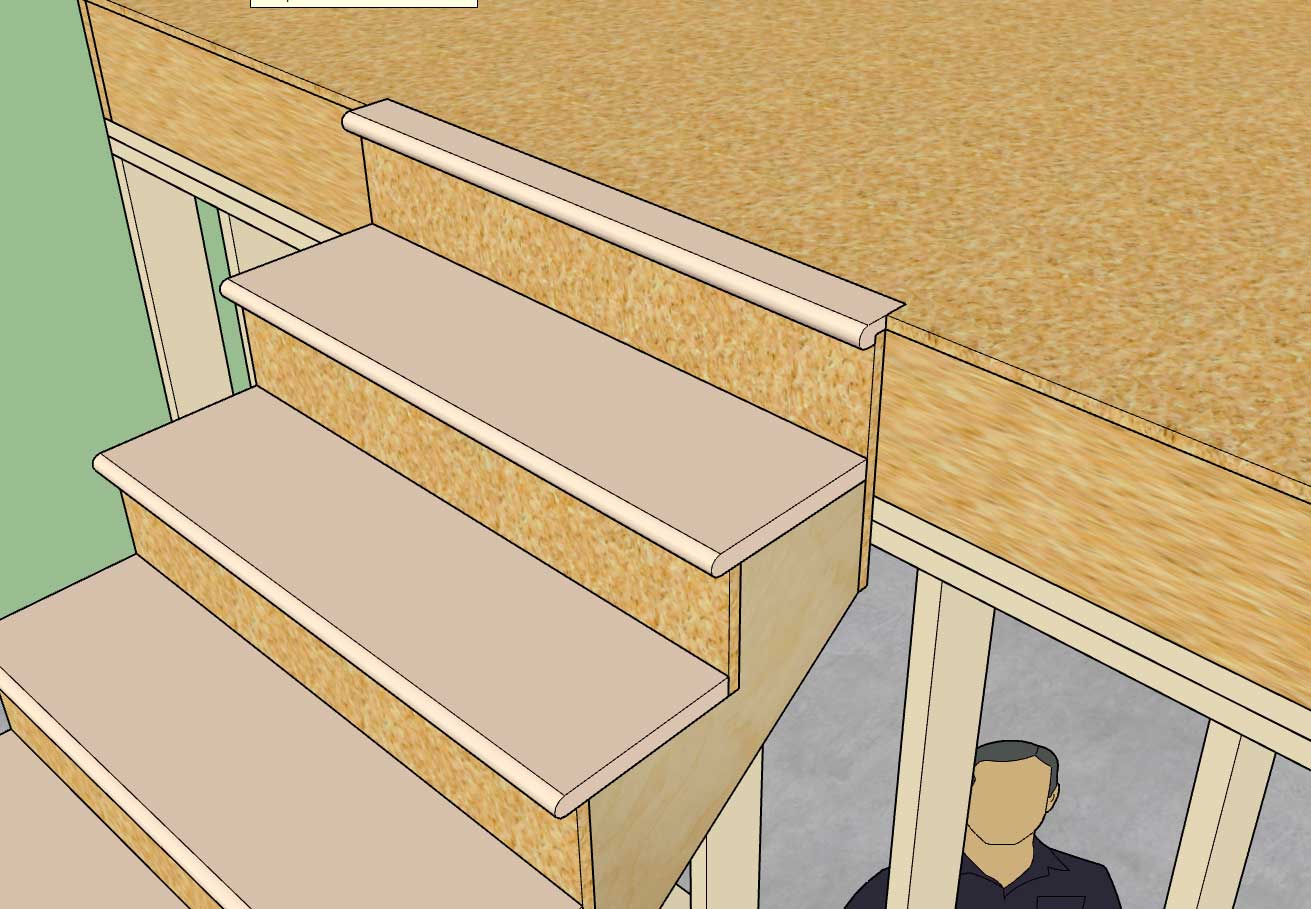
                  http://design.medeek.com/resources/images/wall_su287_800.jpg

                  Landing Tread:

                  http://design.medeek.com/resources/images/wall_su286_800.jpg

                  There are quite a few options with the stair module so I will need to make another tutorial video explaining the usage of these parameters. I have provided tool tips next to each option in the draw and edit menus to help explain what each is.

                  A few items with the draw tool:

                  1.) First select the top of the stairs location and then select a point for the bottom of the stairs. The preview wireframe should be fairly explanatory as to the location and geometry of the stairs that will be created.

                  2.) Once the first point is selected you can lock to an orthogonal axis (0, 45, 90, 135 deg.) or direction by repeatedly clicking the "Ctrl" key.

                  3.) Once the first point is selected you can also toggle the placement of the stairs by repeatedly clicking the down arrow. The justification is: Center, Left, or Right.

                  4.) As with the other HTML draw menus, you update/change your parameters and then click the Update button to make them live. You can leave the menu open while drawing your stairs. Hitting the space bar will exit the tool, hitting the ESC key will reset the tool.

                  With the draw and edit menus you will notice that for the tread and riser material you also have the option of utilizing materials found in your custom library. The stringer material is limited to certain specific material types (at least for now).

                  This is a completely new module so I expect there may be some minor issues and additional features that will be requested.

                  I still need to create the global settings tab for the stairs so that default parameters can be set for each option. However, it is not critical to the function of the module.

                  Nathaniel P. Wilkerson PE
                  Medeek Engineering Inc
                  design.medeek.com

                  1 Reply Last reply Reply Quote 0
                  • medeekM Offline
                    medeek
                    last edited by

                    Honestly, another plugin with plugin on this one. I could have added it to the Truss Plugin or even separated it out as its own plugin, for now though it will live within the Wall Plugin. The code base is logically separated from the rest of the plugin so moving it would be a non-issue if the time comes.

                    I think you use this module once and you will never go back to manually creating stairs or laying out stringers again. I know I certainly won't. The automation afforded by the API is stroke of genius, with it almost anything can be created. At some point I really want to try out my artificial life experiment that I've been mulling about for a while now.

                    Nathaniel P. Wilkerson PE
                    Medeek Engineering Inc
                    design.medeek.com

                    1 Reply Last reply Reply Quote 0
                    • medeekM Offline
                      medeek
                      last edited by

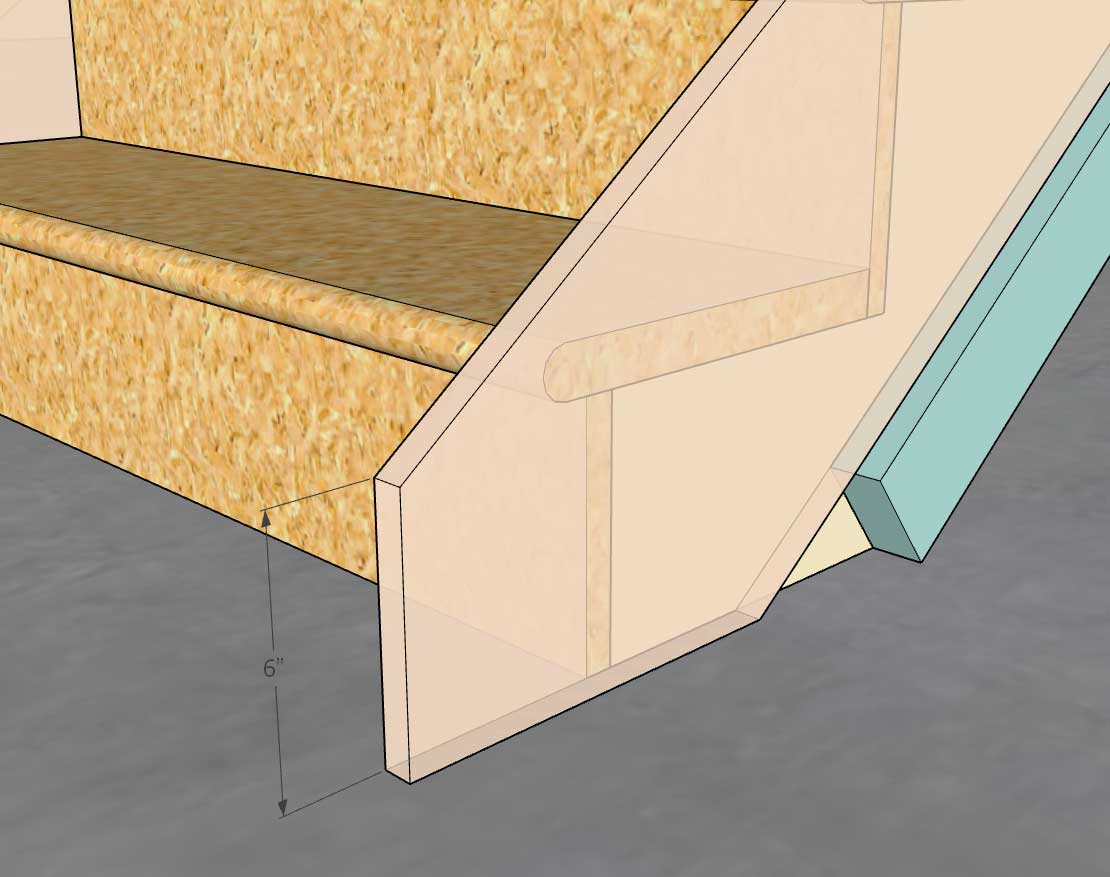
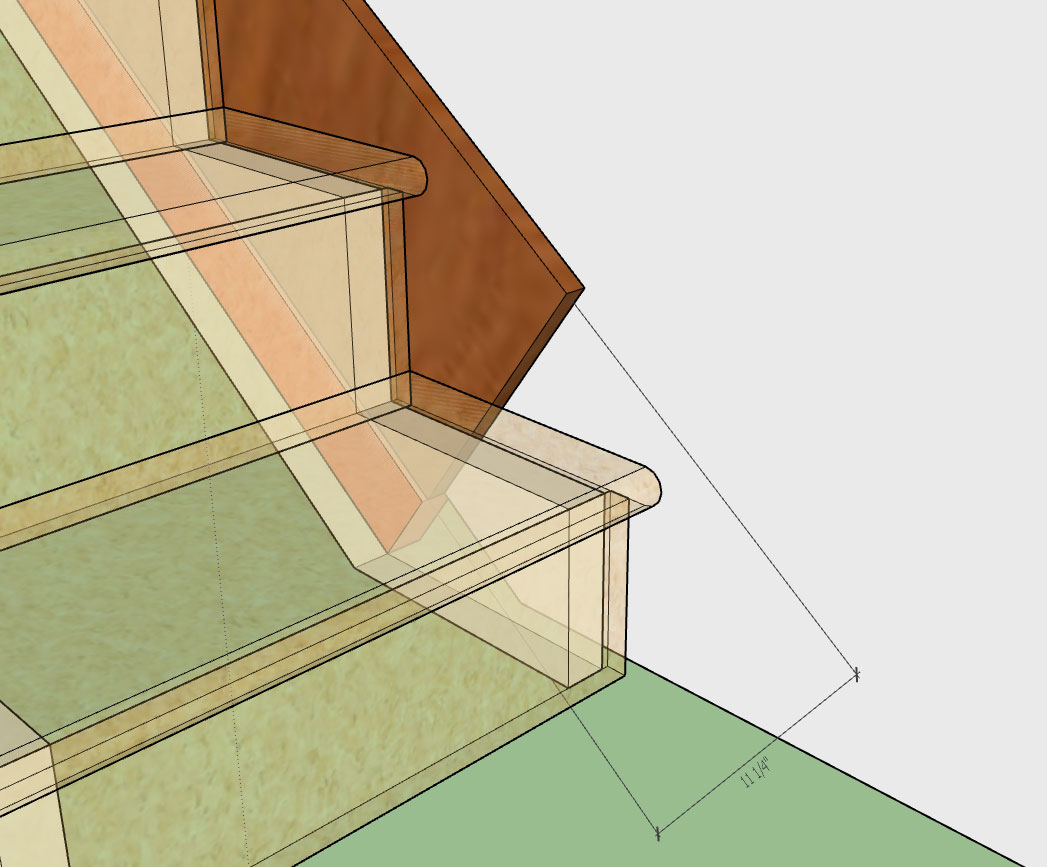
                      After some excellent feedback this morning I am considering adding in additional options for side spacers, gypsum gap, and skirt boards.

                      Everything is fairly straight forward except for the skirt boards. The question arises on how to best terminate the skirt, see image below:
                      http://design.medeek.com/resources/images/wall_su288_800.jpg

                      Nathaniel P. Wilkerson PE
                      Medeek Engineering Inc
                      design.medeek.com

                      1 Reply Last reply Reply Quote 0
                      • medeekM Offline
                        medeek
                        last edited by

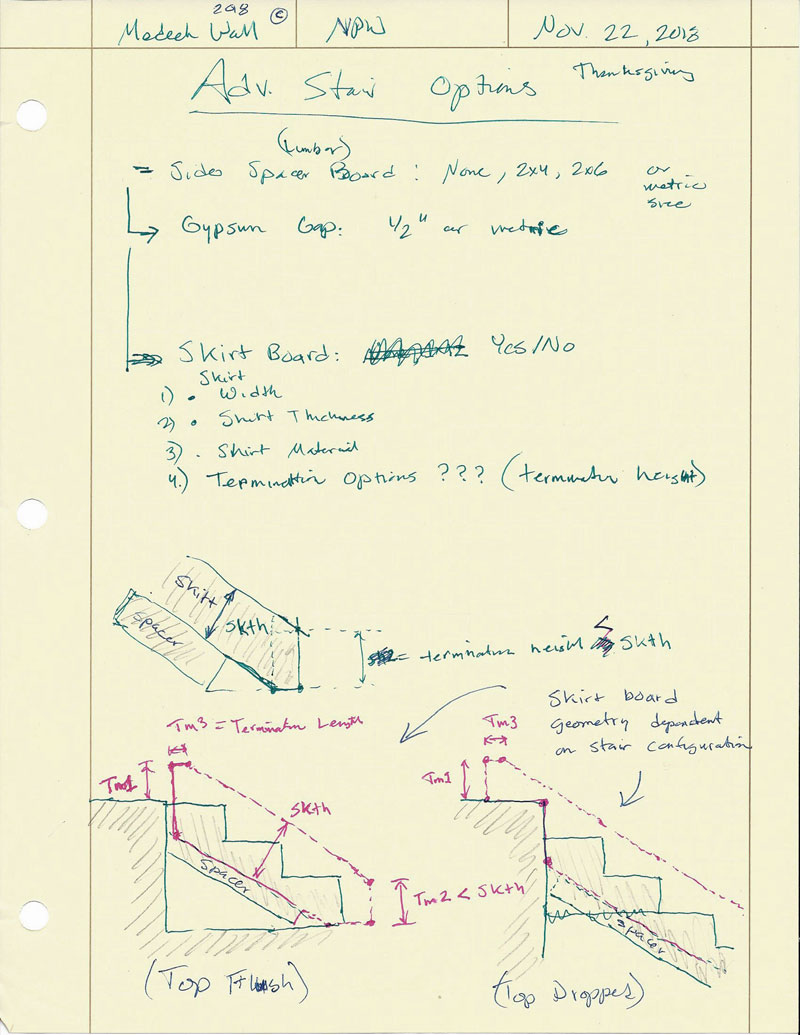
                        I'm not sure if my scribbling is readable but the bottom diagrams try to explain possible configurations and parameters for the skirt board(s):
                        http://design.medeek.com/resources/wallplugin/STAIR_SKIRT_BOARDS_800.jpg

                        I think I can reduce the skirt board configuration down to three parameters:

                        • Terminal Height Top
                        • Terminal Length Top
                        • Terminal Height Bottom

                        Nathaniel P. Wilkerson PE
                        Medeek Engineering Inc
                        design.medeek.com

                        1 Reply Last reply Reply Quote 0
                        • medeekM Offline
                          medeek
                          last edited by

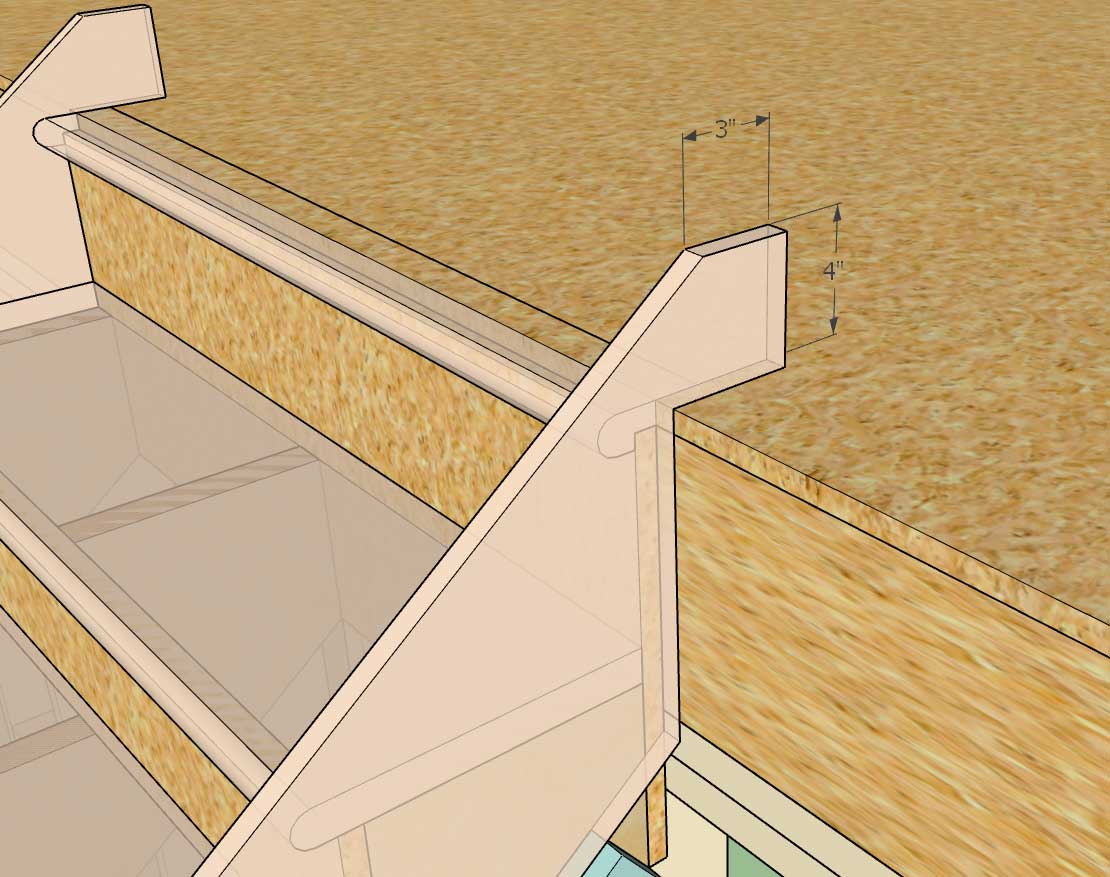
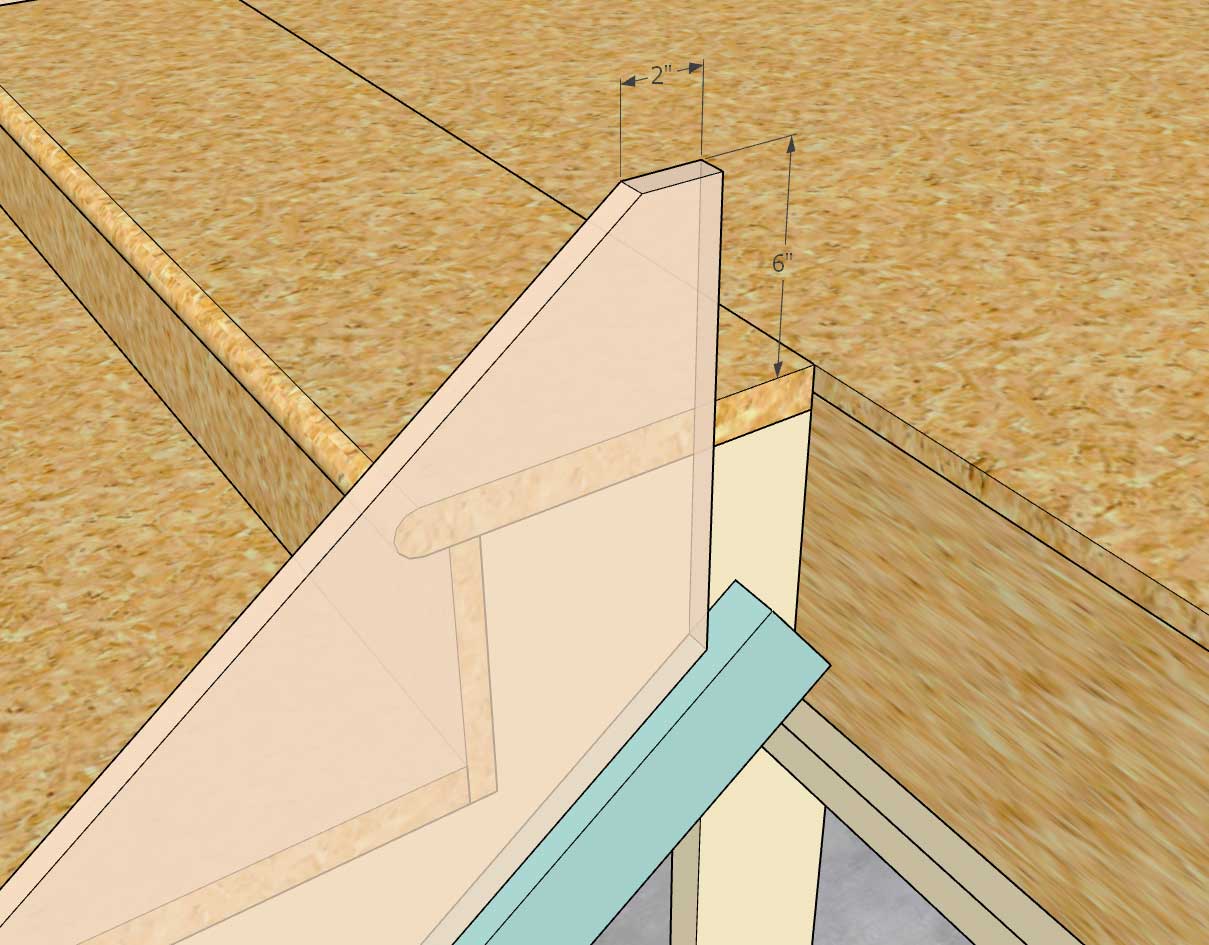
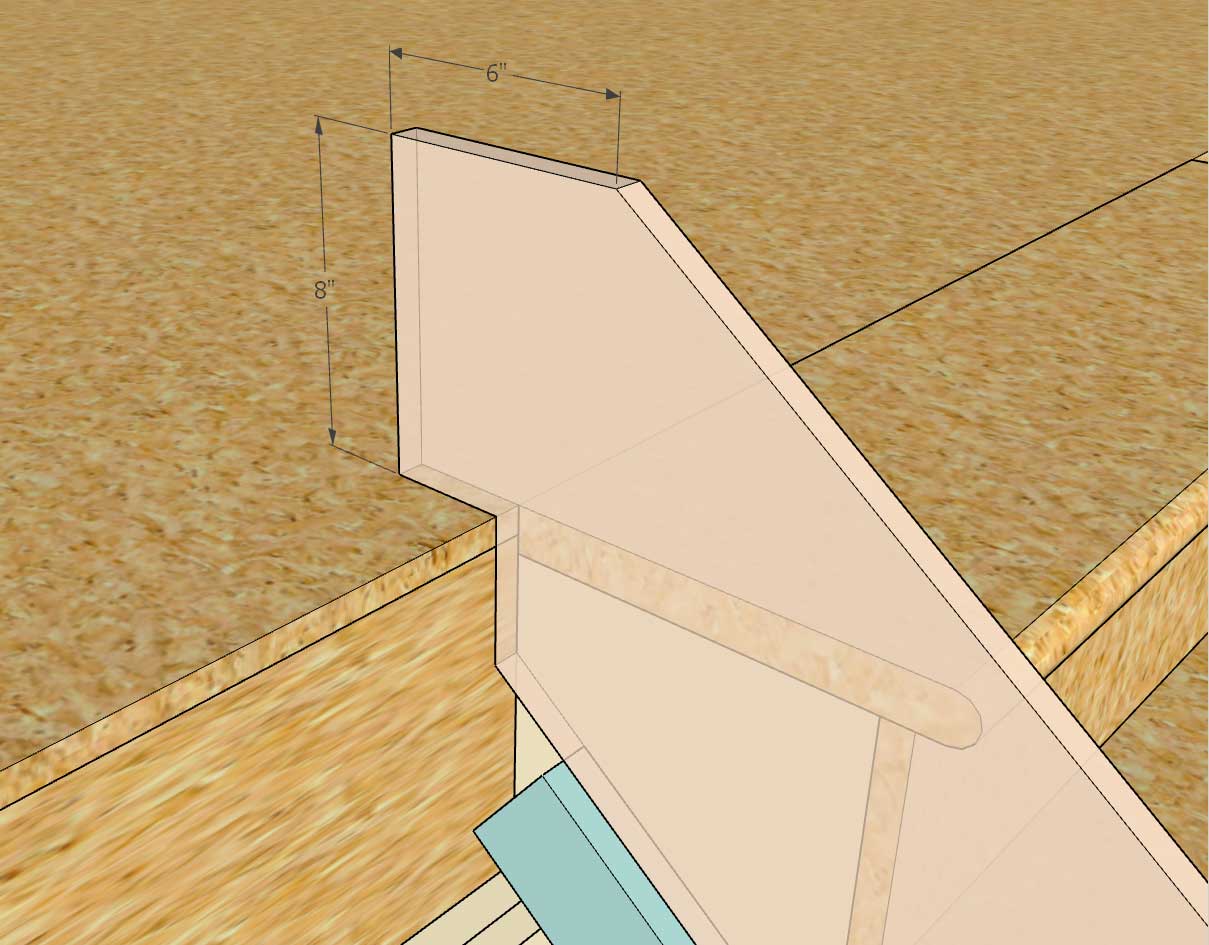
                          The diagrams were not very legible so I created a few details to explain the skirt board end configurations:
                          http://design.medeek.com/resources/images/wall_su289_800.jpg

                          http://design.medeek.com/resources/images/wall_su290_800.jpg

                          http://design.medeek.com/resources/images/wall_su291_800.jpg

                          http://design.medeek.com/resources/images/wall_su292_800.jpg

                          If these terminations look good I will begin adding in the logic to create them.

                          Nathaniel P. Wilkerson PE
                          Medeek Engineering Inc
                          design.medeek.com

                          1 Reply Last reply Reply Quote 0
                          • medeekM Offline
                            medeek
                            last edited by

                            Some feedback on the other forum with regards to additional height requirements if a finished floor is installed has introduced some complications. I have given this some extra thought and my observations are thus:

                            1.) Where wall-to-wall carpet is being installed the way I have it laid out seems to be correct.

                            2.) The first point you select to position the stairs is the "Finished Floor" height. So if you need an extra 3/4" for a tile or wood flooring you would select a point that is 3/4" higher than the sub-floor. However, if the skirt boards are supposed to be installed prior to the final flooring then this would not be quite correct since they (their horizontal cut) would need drop 3/4" so that they meet the top landings subfloor.

                            3.) Similar sort of issue at the bottom of the stairs but slightly different. In this case the stringers will rest on the sub-floor, the bottom tread needs an extra 3/4" of rise, and the skirt boards will probably rest on the sub-floor/slab as well.

                            Question: Will the skirt boards always rest on the sub-floor or should they rest on the finished floor?

                            Conclusion: I need to add two extra parameters to the module to account for an additional thickness due to finished floors being installed. Since the finished floor on each level may be a different height (or carpet) we need a separate parameter for top and bottom. If I include a finished floor offset, the correct way to select the points for the stairs would be sub-floor to sub-floor.

                            • FF Offset Top (default to zero or 3/4"?)
                            • FF Offset Bottom (default to zero or 3/4"?)

                            P.S.

                            In addition to the three parameters for the skirt boards mentions above:

                            • Terminal Height Top
                            • Terminal Length Top
                            • Terminal Height Bottom

                            I will also need to include an offset parameter for the skirt boards since we can't be sure that the designer will want to install the skirt board directly onto the sub-floor (it might rest on the finished floor). Actually these parameters should be simple YES or NO parameters (with the offset equal to the finished floor offset from the parameters above) but there may exist a situation where the skirt board may be slightly lifted off of the finish floor so they each need to have a dimension associated with them.

                            • (Skirt) FF Offset Top (default to zero)
                            • (Skirt) FF Offset Bottom (default to zero)

                            Nathaniel P. Wilkerson PE
                            Medeek Engineering Inc
                            design.medeek.com

                            1 Reply Last reply Reply Quote 0
                            • medeekM Offline
                              medeek
                              last edited by

                              The highlighted yellow areas are the new additions to the stair menus (draw/edit):
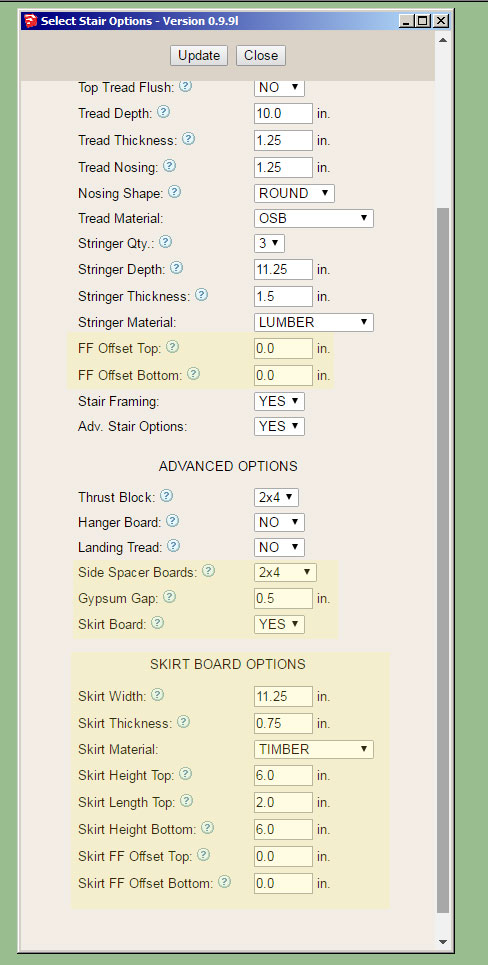
                              http://design.medeek.com/resources/images/wall_su293_800.jpg

                              Nathaniel P. Wilkerson PE
                              Medeek Engineering Inc
                              design.medeek.com

                              1 Reply Last reply Reply Quote 0
                              • pilouP Offline
                                pilou
                                last edited by

                                yes Shemas are indispensable when you have such list of item! 😄

                                schema.jpg

                                Frenchy Pilou
                                Is beautiful that please without concept!
                                My Little site :)

                                1 Reply Last reply Reply Quote 0
                                • medeekM Offline
                                  medeek
                                  last edited by

                                  Here is a situation where the finished floor is 2" off of the bottom sub-floor (slab):
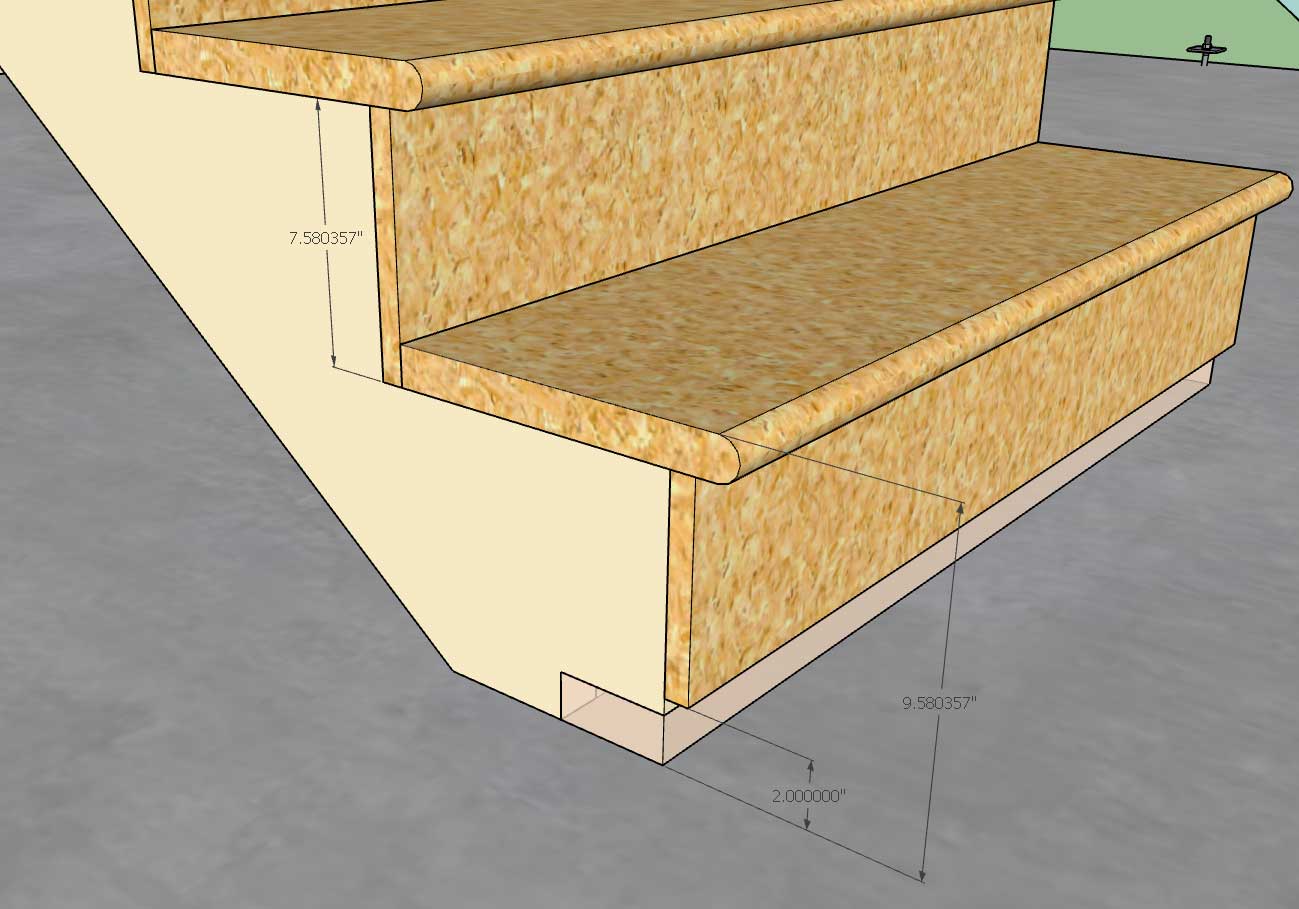
                                  http://design.medeek.com/resources/images/wall_su294_800.jpg

                                  Note that the riser heights are correct and that the bottom riser has an additional 2" added to its height. The question I have is what to do with the riser board itself on this bottom tread?

                                  I've shown it in the configuration where the finished floor can be applied underneath the riser board however is it more common just to extend the riser board to the bottom of the stringer so that it rests on the sub-floor or slab?

                                  Nathaniel P. Wilkerson PE
                                  Medeek Engineering Inc
                                  design.medeek.com

                                  1 Reply Last reply Reply Quote 0
                                  • medeekM Offline
                                    medeek
                                    last edited by

                                    Looks like I've got the finished floor offsets for top and bottom working correctly and also the side spacers:
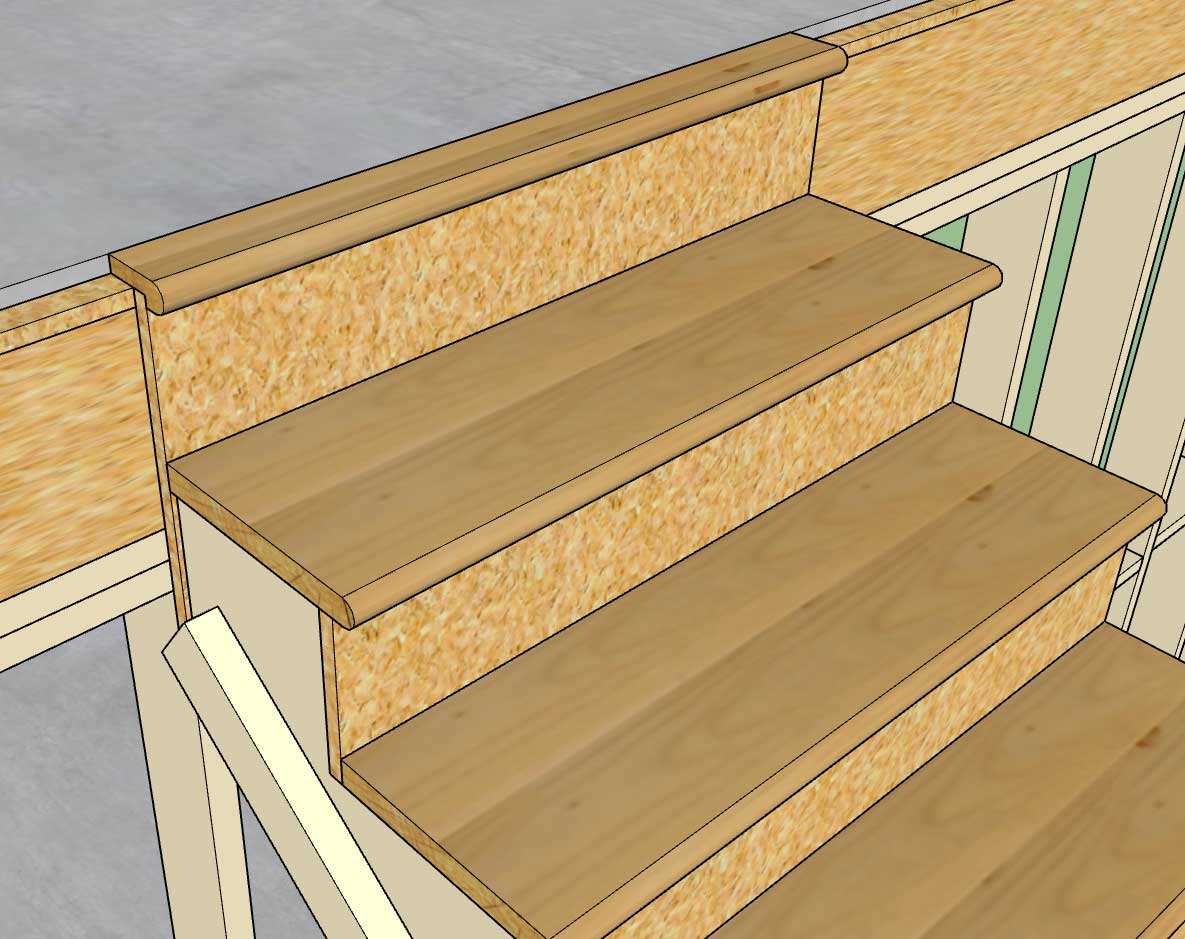
                                    http://design.medeek.com/resources/images/wall_su295_800.jpg

                                    Note the overhang of the tread and risers, the gap is either just the gypsum gap or gypsum gap + skirt thickness.

                                    The way it is setup now, you will want to specify the top and bottom points on the sub-floor.

                                    Nathaniel P. Wilkerson PE
                                    Medeek Engineering Inc
                                    design.medeek.com

                                    1 Reply Last reply Reply Quote 0
                                    • medeekM Offline
                                      medeek
                                      last edited by

                                      Version 0.9.9n - 11.25.2018

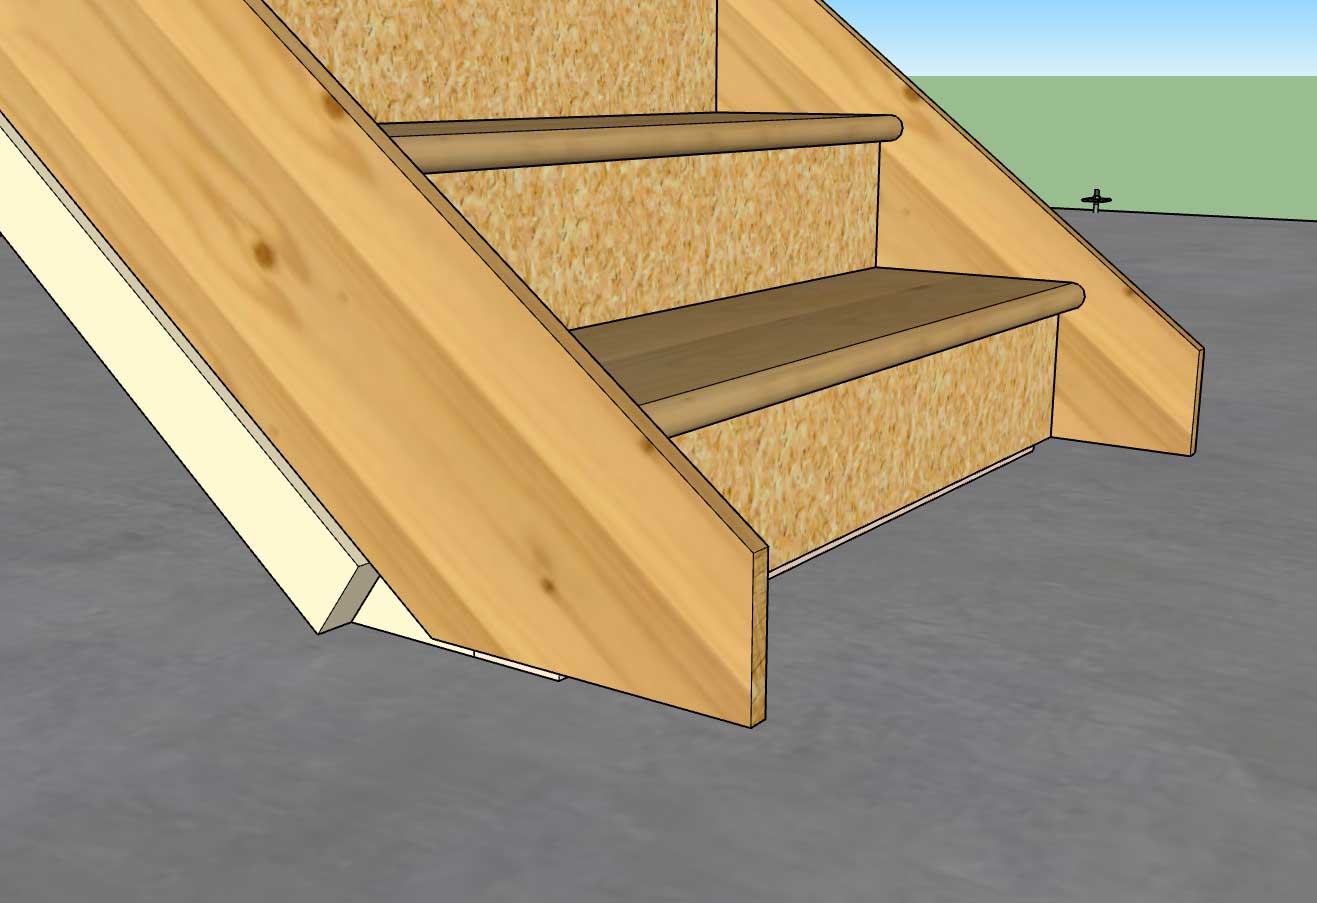
                                      • Added the following options to the stair module: side spacers, skirt boards, finished floor offsets.
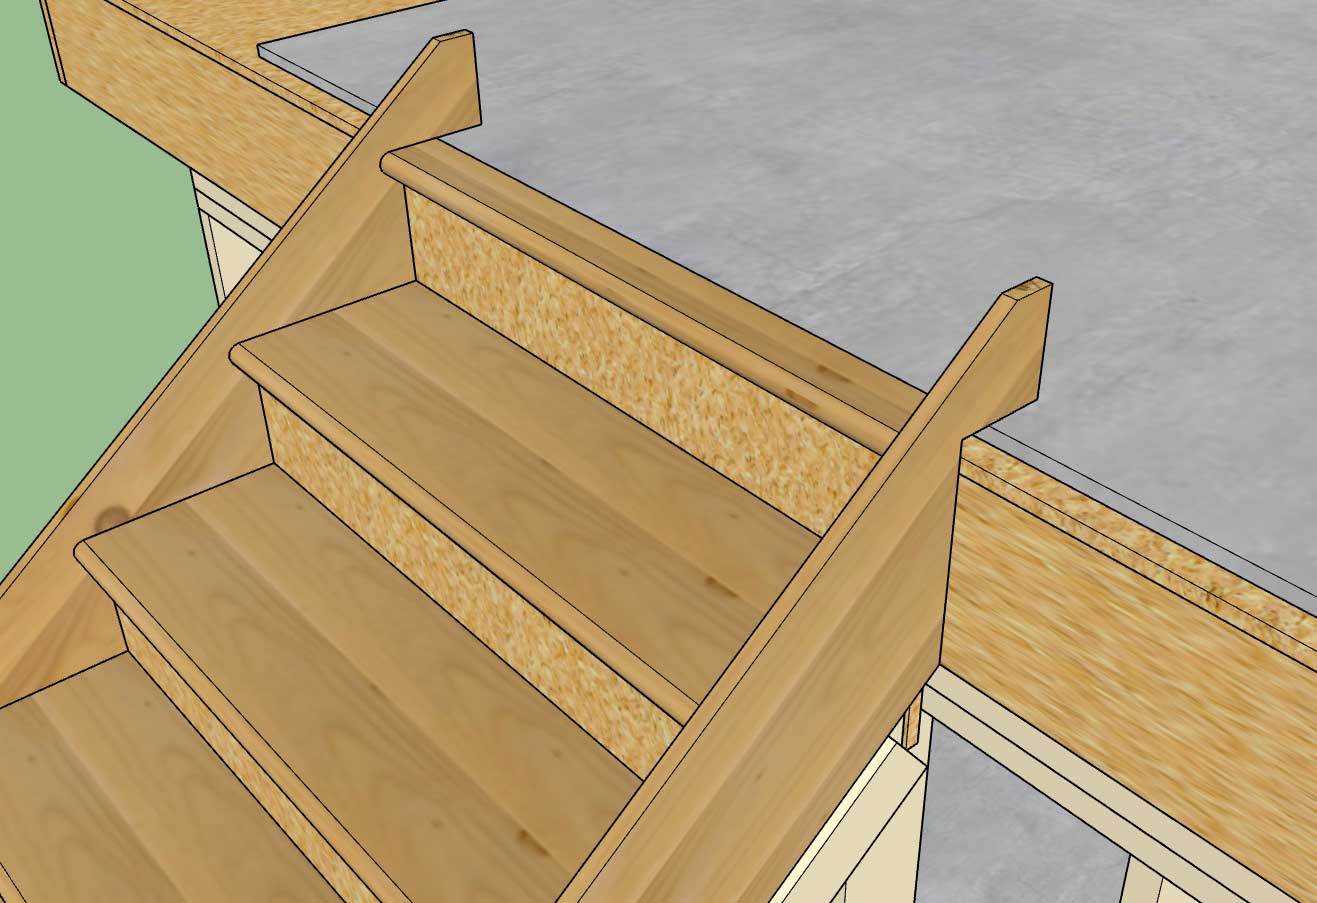
                                      http://design.medeek.com/resources/images/wall_su298_800.jpg

                                      http://design.medeek.com/resources/images/wall_su297_800.jpg

                                      When selecting the points to define the stairs you will want to pick sub-floor to sub-floor now that the finished floor offsets are enabled. Stairs created in version 0.9.9m are not backward compatible with this latest version as I have made too many updates and improvements to the code.

                                      Keep sending in your ideas on how to make this module better.

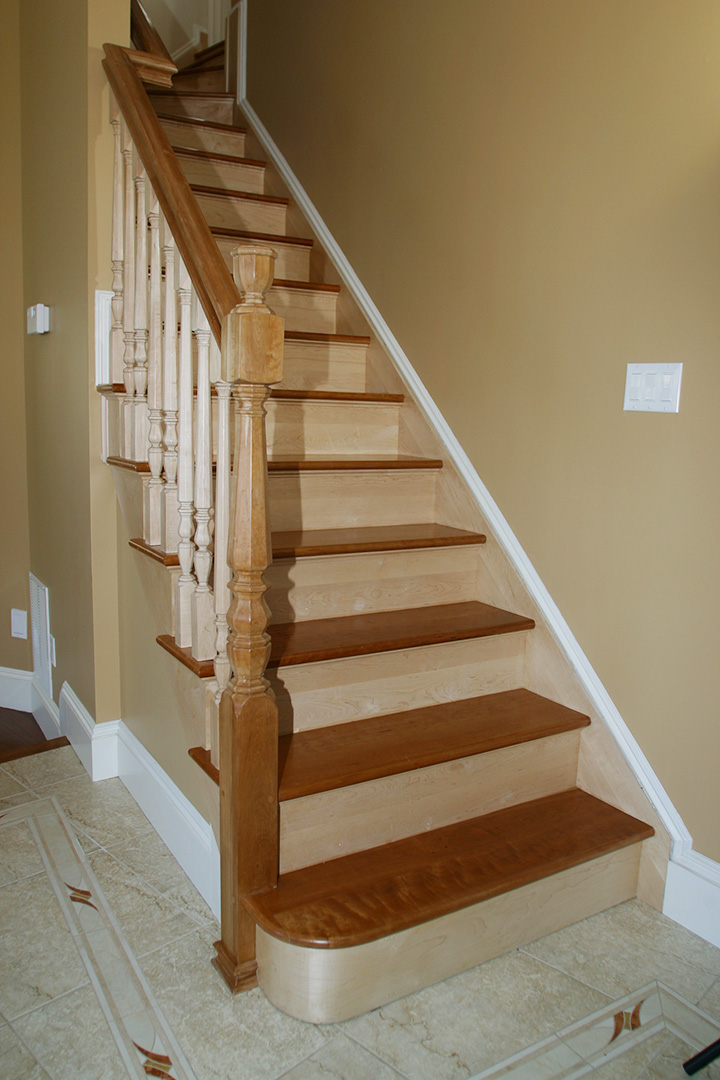
                                      I will be moving back to work on the gable wall module and giving this one a rest for a while unless there is an unresolved bug or critical fix that needs attention. I have a separate "todo" list just for this module. Open sided staircases is something I will have to do some more study on:
                                      2-6.jpg

                                      Nathaniel P. Wilkerson PE
                                      Medeek Engineering Inc
                                      design.medeek.com

                                      1 Reply Last reply Reply Quote 0
                                      • medeekM Offline
                                        medeek
                                        last edited by

                                        On a related note I am wondering what the best text book on stair construction is that is out there. I am not looking for traditional designs or methods per say but would like to have a practical text that covers modern methods and materials. I would like the stair module to handle 80-90% of most stair designs that are utilized in your typical mid-range homes.

                                        The elaborate mansions with their spiraling and flaring staircases are probably beyond the scope of the stair module at this time. If that type of staircase is required I would strongly suggest more specialized stair plugins such as Garry Kernan's Stair Maker.

                                        Nathaniel P. Wilkerson PE
                                        Medeek Engineering Inc
                                        design.medeek.com

                                        1 Reply Last reply Reply Quote 0
                                        • medeekM Offline
                                          medeek
                                          last edited by

                                          Version 0.9.9o - 11.26.2018

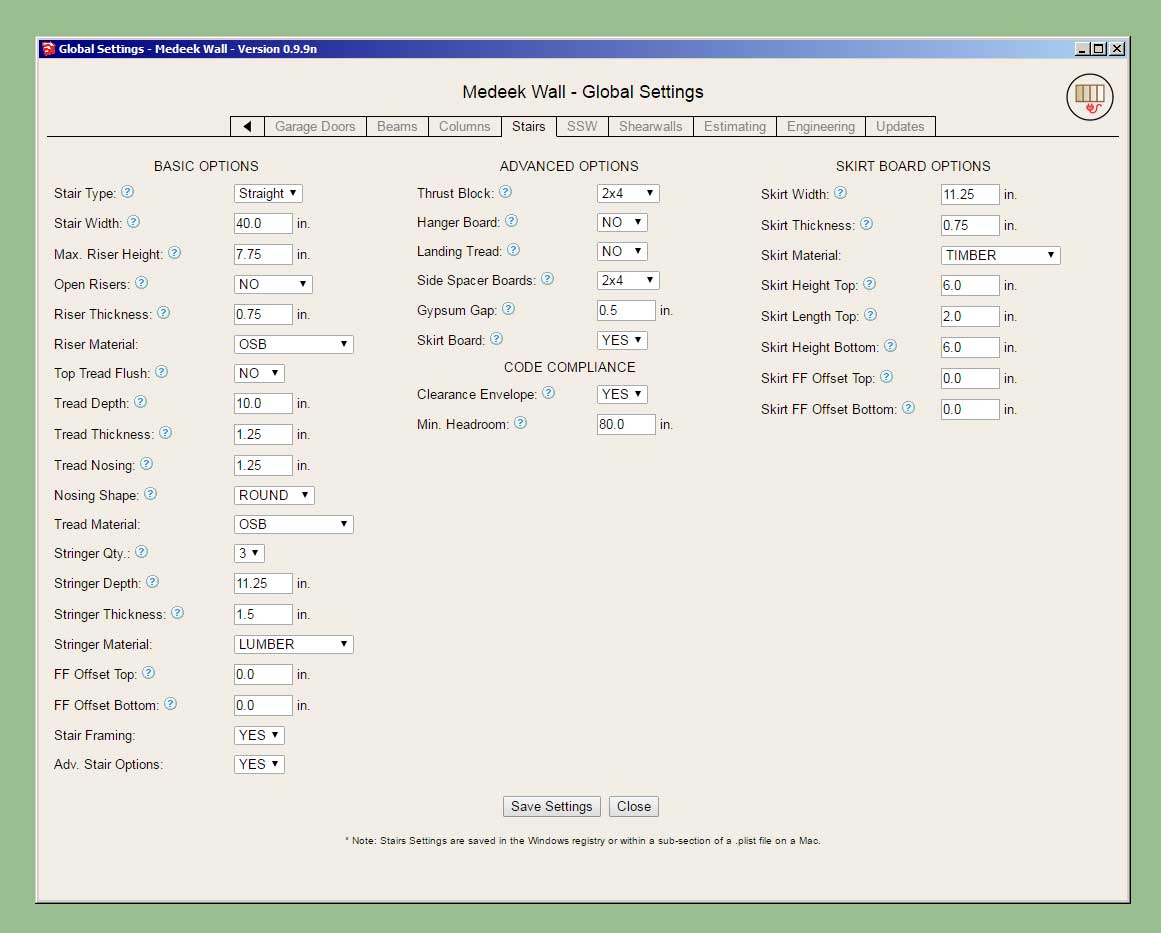
                                          • Completed the Stairs tab within the global settings.
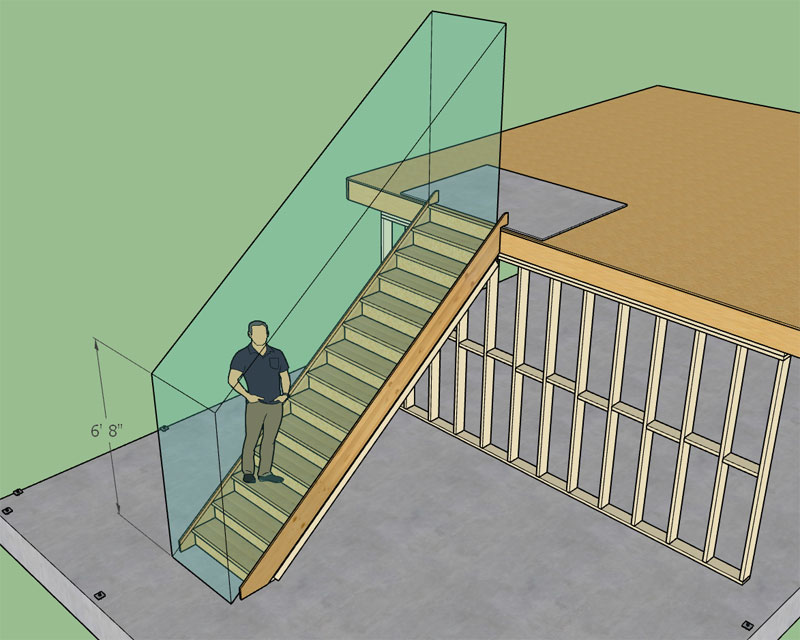
                                          • Added the ability to draw a "Clearance Envelope" with an additional global parameter for specifying the minimum headroom.
                                          • Added a Building Code layer and an Engineering layer to the Layers tab of the global settings.
                                          http://design.medeek.com/resources/images/wall_su301_800.jpg

                                          http://design.medeek.com/resources/images/wall_su302_800.jpg

                                          The clearance envelope (if enabled) is placed on the "code" layer. For future reference all code related items and warnings will be placed on this layer. The engineering layer will be used for engineering callouts, warnings and other related items.

                                          The envelope is placed exactly and if the nosing is rounded then the envelope is translated a specific amount so that the tread line is tangent to the nosing. If anyone is interested the horizontal translation is given by this expression:

                                          x_trans = r/tan(theta) - r/sin(theta) + r

                                          where:

                                          r = radius of the bullnose or 1/2 tread thickness.
                                          theta = angle of stringer from the horizontal

                                          Hopefully the clearance envelope is useful to designers who want to check that their framed openings for their staircases are code compliant.

                                          Nathaniel P. Wilkerson PE
                                          Medeek Engineering Inc
                                          design.medeek.com

                                          1 Reply Last reply Reply Quote 0
                                          • jujuJ Offline
                                            juju
                                            last edited by

                                            it looks like you'll be running out of alphabet before you run out of enthusiasm

                                            Save the Earth, it's the only planet with chocolate.

                                            1 Reply Last reply Reply Quote 0
                                            • 1
                                            • 2
                                            • 34
                                            • 35
                                            • 36
                                            • 37
                                            • 38
                                            • 73
                                            • 74
                                            • 36 / 74
                                            • First post
                                              Last post
                                            Buy SketchPlus
                                            Buy SUbD
                                            Buy WrapR
                                            Buy eBook
                                            Buy Modelur
                                            Buy Vertex Tools
                                            Buy SketchCuisine
                                            Buy FormFonts

                                            Advertisement