Adding and deleting colors
-
Hi, I'm pretty new at sketchup using 2013.
I'm drawing up the floor plan to my house with the plan to take it to the city and apply for a building permit.
Ive got the lines drawn, dimensions in place but am having challenges with colors.
some of my walls (rectangles) are pre colored. I'm not able to undo these colors and I'm not able to color in others.
ie the city wants to know what walls contain fireproofing. If I could color them it would make it easy.
as it is now when I play with paint bucket I can change some colors of some areas that filled in with color when I was drawing the walls.does any of this make sense?:)
-
A picture (or the model) would help us to help you...
Maybe a hint: If you group a wall and assigned colors to the faces while editing, you will not be able to change the visible color from outside the group.
-
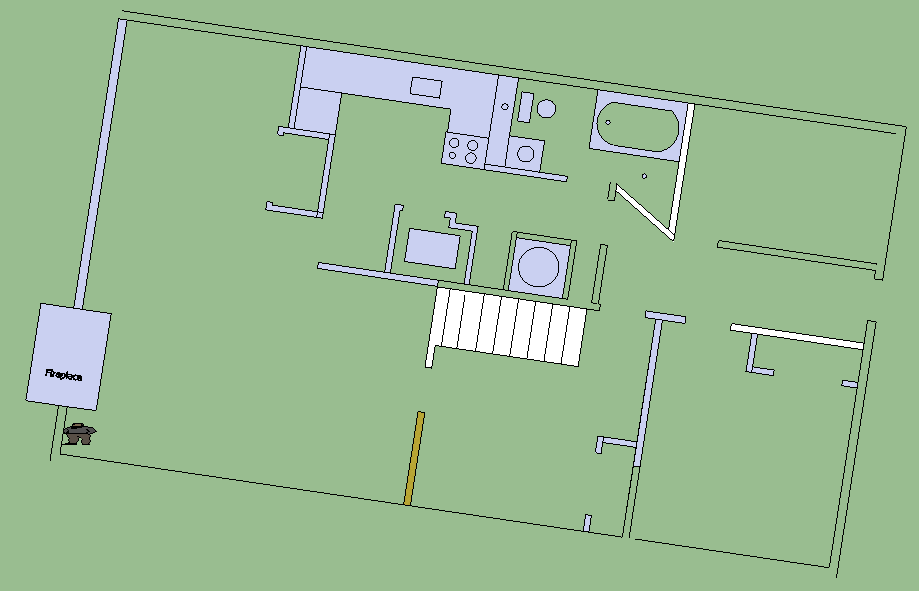
Some of your "walls" are white which is the front face color. Some of them are blue which indicates the faces are reversed and some of them aren't filled--due to incomplete coplanar loops--so they have no faces at all.

You've managed to get the cart before the horse.
Draw all of the edges required for the walls before you begin to add details like appliances and fixtures or dimensions. then make the walls a component or group so the other stuff doesn't stick to them. Make your appliances, fixtures and cabinets components, too, so they don;t stick to each other. It may be you can find many of those things you need to added to your basement as component in the 3D Warehouse which you can download and insert rather than drawing them.
-
Hi Dave
cart before the horse! not unusual for me
sounds like it may be easiest to start over?
I will have to figure out what components are which I expect I can get in tutorials?
I gather just taking off the dimensions etc will probably be just as much work as starting over as I'm bound to miss something along the way.ERic
@dave r said:
Some of your "walls" are white which is the front face color. Some of them are blue which indicates the faces are reversed and some of them aren't filled--due to incomplete coplanar loops--so they have no faces at all.
[attachment=1:1mbozlcp]<!-- ia1 -->walls.png<!-- ia1 -->[/attachment:1mbozlcp][attachment=0:1mbozlcp]<!-- ia0 -->walls.png<!-- ia0 -->[/attachment:1mbozlcp]
You've managed to get the cart before the horse.
Draw all of the edges required for the walls before you begin to add details like appliances and fixtures or dimensions. then make the walls a component or group so the other stuff doesn't stick to them. Make your appliances, fixtures and cabinets components, too, so they don;t stick to each other. It may be you can find many of those things you need to added to your basement as component in the 3D Warehouse which you can download and insert rather than drawing them.
-
Eric, in a nutshell, making a component (or group) of the walls is akin to wrapping them up in Saran wrap. You can see them but the "wrapper" protects them from being modified and protects other geometry from being affected by that geometry inside the wrapper. If you do need to make changes to the contents of the component/group, you open it for editing and do your thing. Think adding a slice of cheese to a sandwich wrapped in the cling wrap.
It may actually be better to start over in this case. You have some parallel nearly coincident lines in a few places. Shoot for a single face for all connected walls. No lines crossing from one side of the wall to the other. If you plan to make the walls 3D at some point, this will make it a lot easier.
It'll go faster next time, too.
-
HI, you were correct in that I had to complete my lines.
I was able to fix it up without redrawing.
thanks@dave r said:
Eric, in a nutshell, making a component (or group) of the walls is akin to wrapping them up in Saran wrap. You can see them but the "wrapper" protects them from being modified and protects other geometry from being affected by that geometry inside the wrapper. If you do need to make changes to the contents of the component/group, you open it for editing and do your thing. Think adding a slice of cheese to a sandwich wrapped in the cling wrap.
It may actually be better to start over in this case. You have some parallel nearly coincident lines in a few places. Shoot for a single face for all connected walls. No lines crossing from one side of the wall to the other. If you plan to make the walls 3D at some point, this will make it a lot easier.
It'll go faster next time, too.
Hello! It looks like you're interested in this conversation, but you don't have an account yet.
Getting fed up of having to scroll through the same posts each visit? When you register for an account, you'll always come back to exactly where you were before, and choose to be notified of new replies (either via email, or push notification). You'll also be able to save bookmarks and upvote posts to show your appreciation to other community members.
With your input, this post could be even better 💗
Register Login


Advertisement