Need Help Patchng a Complex Hole
-
Hello,
I know that with simple surfaces you can patch up a hole by using the draw tool.
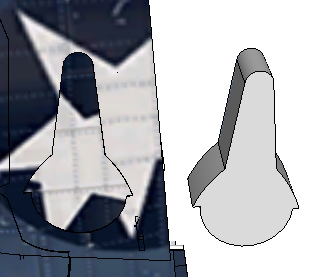
But that method doesn't seem to work for this particular situation. The image below shows the underside of an airplane wing. I had cut out a wheel well using the die on the right-hand side of the image (making it a group, plunging it into the wing, and using intersect faces with model to create an outline of the wheel well, which I then erased). By the way, the surface of the wing shown is slightly curved, which, no doubt, complicates the situation.
Now I find I need to reposition the wheel well, which means I have to first patch up the old well. I tried creating a duplicate of the part that had been taken out to make the wheel well, and then fitting it back into that space. That's what you see on the left-hand side of the image: the lines show the outline of the wheel well.
But I'm afraid the lines will continue to show up. It's almost impossible to manually line up the filler piece with the hole without some gaps.
My preference would be to somehow fill in the well (hole) so that the lines would disappear.
By the way, the texturing is just rough texturing for test purposes; not what the final texturing will look like.
Any suggestions?
-
You have 2 choices.
- CURVILOFT the hole using the skinning tool. Select the perimeter contour of the hole and click the green checkmark. Gives you a group of the best curved surface it can find.
Besides, if you are drawing airplanes, Curviloft is indispensable, especially for fairings, wingtips, canopies, nacelles, fuselages, wings and empanage. In fact; the whole airplane.
- Using the wheel well door skin group, place it in its proper closed position. Edit the door by deleting all the well perimeter lines, but NOT the lines defining the shape of the curve. Best to make all lines hard for this, or you may lose some curve points.
Then edit the wing skin and remove all well perimeter lines as you did the door. Again, make any curve defining lines hard first.
Explode the door skin group. Join vertices to form the missing surface triangles. It is far easier to delete "broken" lines and replacing them, rather than trying to join a very tiny gap. That part of the surface should be identical to the original. Then make all the lines soft and smooth.
-
Is someone drawing a HellCat?
-
Re:"Is someone drawing a HellCat?"
Yes. You obviously know your airplanes. I'm adapting a model I downloaded from the 3D Warehouse. Working on a wing-fold animation to use with an already-existing X-Plane Hellcat in the X-Plane.org community, with the author's permission.
That's probably more info than you were looking for.
Bill
-
Thanks, JGB, for reminding me of Curviloft. I've used it for other things but not this. It worked great. Your second solution was beyond my current skill level.
Bill
Hello! It looks like you're interested in this conversation, but you don't have an account yet.
Getting fed up of having to scroll through the same posts each visit? When you register for an account, you'll always come back to exactly where you were before, and choose to be notified of new replies (either via email, or push notification). You'll also be able to save bookmarks and upvote posts to show your appreciation to other community members.
With your input, this post could be even better 💗
Register Login


Advertisement