Creating ribs...?
-
I do this sort of thing a fair bit, and without Curviloft, I'd still be trying to finish the first one.
But here are a few tips on what I've learned so far.
When CL creates a bad surface, most usually it is because A) too many vertices, B) Doing too big a surface in 1 go and C) Not enough curve guidance.
A) Cut back on the vertices. Instead of the usual 24 segment circles, use 12. And by all means, try to keep the segment count on opposite sides of a contour the same, and evenly spaced. Not usually possible. When there are big differences, CL will create a very high poly count mesh.
It tries to connect opposite points in parallel curves to the sides of the contours. That will create a myriad of extra lines and new vertices on the contour, and this is very difficult to clean up if you want to reduce the line count.B) Do big surfaces in 2 or more sections, using common contour lines. Do not explode the CL groups till you are done and satisfied. This makes it easier to redo or modify a section, and you can be sure adjacent sections are formed from the same contour lines.
After CL does its thing and you explode it, the contour would almost always have many more segments than before, making the next surface that much more complex. Also, making several sections prevents any complex surface from influencing the next, like at the intersection of the windshield to the body sides and nose of the Huey.C) If your contour makes significantly big changes, and B) didn't help much, then you need to add additional contour control lines between the original contours, and do them as separate sections.
I will first make the surface, that does not form the way I want. Then, I will draw a new contour line midway along a curve that is what I want, using the bad curve as a guide. Then I delete the bad CL surface and CL the section as 2 sections. This will almost always give you the desired end result. When happy, explode everything.I cannot live without Curviloft, in spite of it's (very) few warts.

-
hey joel..
a lot of what you say up there is true but there's more to it than "don't do big surfaces -- break them down into smaller sections using more curve definitions" [/paraphrase]
generally, you want to make the surface as big and singular as possible..
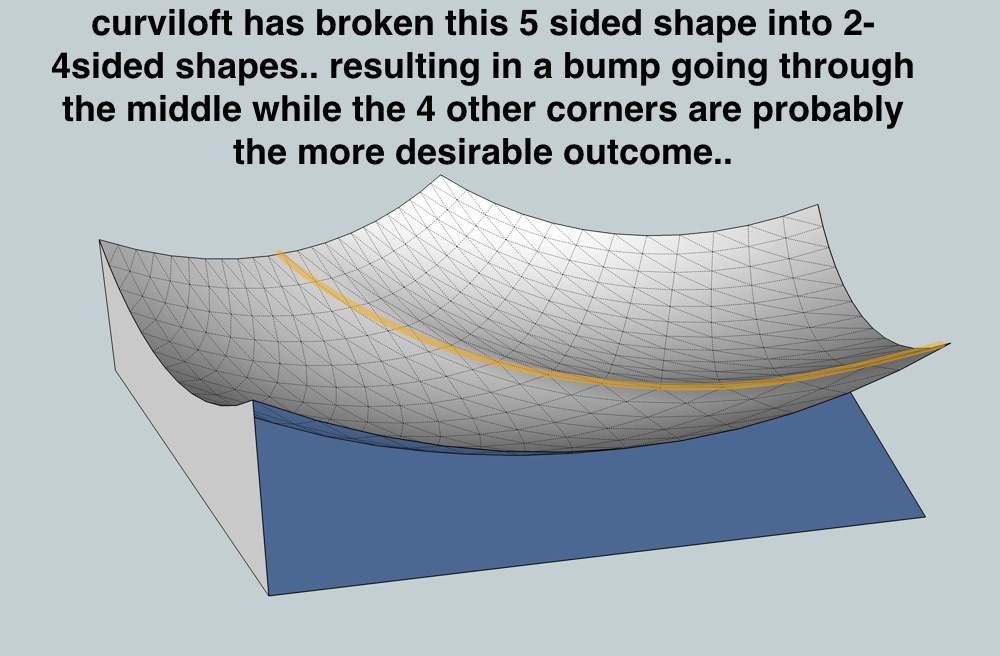
but, i suspect the problems you encounter don't actually have anything to do with the size of the surface, it's that you're trying to give curviloft more than 4 sides..
you can't define a surface with more than 4 sides.. (this isn't just with cuviloft.. i'm talking in general)..
and since cuviloft isn't a patching type of tool (i.e.- resulting surface will go through all of your edges, even if there are more than 4.. but the surface itself is larger and 4 sided.. just cut away.. )
....it's not a patch tool so it's going to break the surface down into 4 sided sections and deal with them individually..(which is sort of neat that it will do this.. other curve network commands i've seen won't even work if you try to give them more than 4 edges.. but with curviloft, i feel it's necessary to understand that unless you're using 4 edges, you're more likely than not going to be left with undesirable results)..some pics..
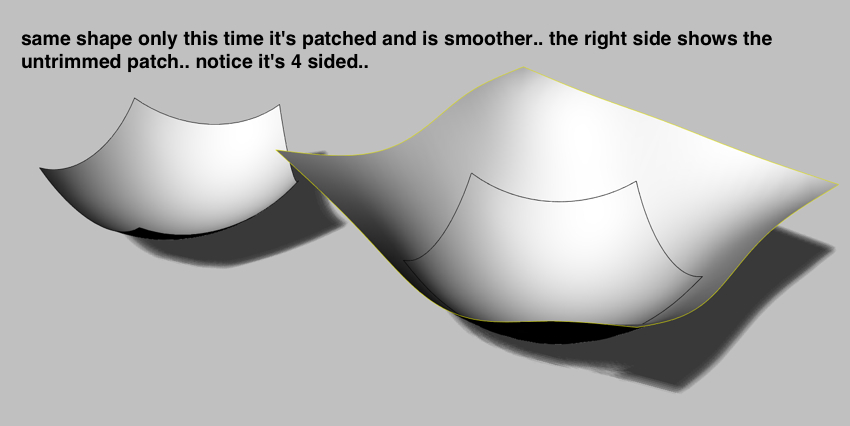
now, while patching may look like the better choice, it's not really.. you don't have much control over the surface it creates other than it will pass through all the edges and allow for some stiffness control..
the 'real' way to do it is by defining your surface(s) with 4 edge curves.. the way you should be doing it with curviloft.. as you will be able to much better define the resulting shapes.. for the arc/pentagon example, you should manually create the curve bisecting the shape to required/desired spec..that said, with an app like sketchup which is mainly going to be used for previz in these types of circumstances, a patch tool might be highly welcome because it will infact easily&quickly get a surface in there which is going to look nice and smooth etc.. just don't go in there and try to pull any measurements off the thing

[edit-- actually, we already have somewhat of a 'patch' tool in sketchup and that is soap skin& bubble.. but another thing to notice with that tool, it's all about laying a grid over all your curves.. it's thinking in a 4 sided surface stateofmind then trims away the borders.]..
-
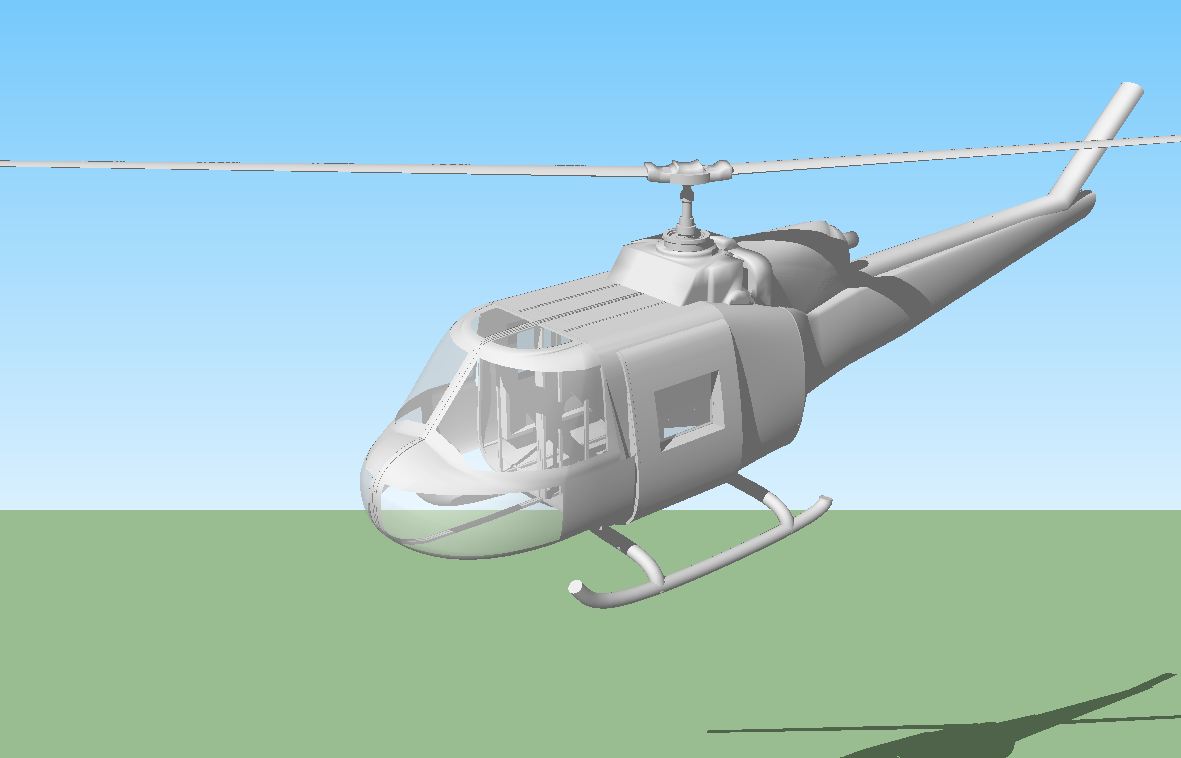
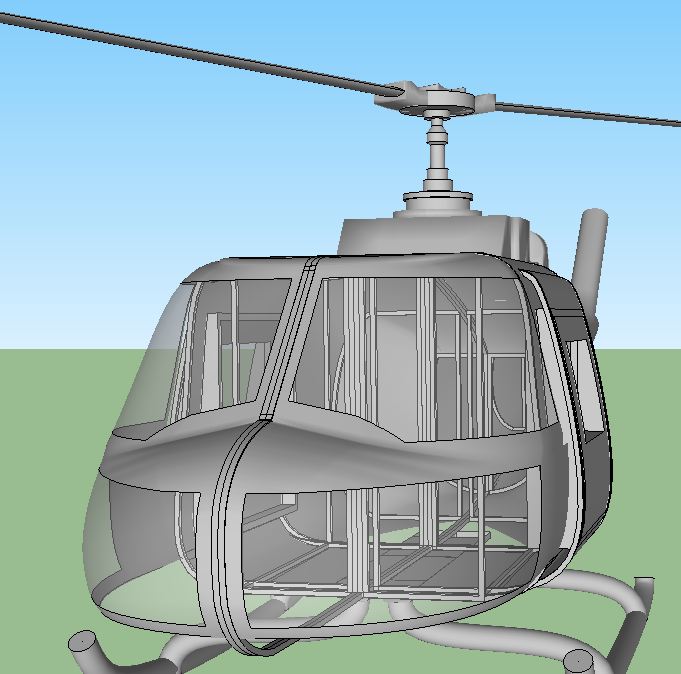
You got me curious about this so I had a bang at it. I don't have Curviloft installed on this computer so this was done with Tigs extrude tools and Bezier as the only plug ins.
-

-
Jeff
You twigged a realization.
 It may not be just big surfaces, but as you say, having more than 4 sides. Airplane fairings and shapes usually have more than 4 defining edge contours. And they tend to be big, so, I assumed it was the complex size, rather than the 4+ sides. In fact when I think about the last "big one" I did, I had to reduce it to 2 big quad and 1 tri-sided perimeters, so what you said holds true, and is something I need to consider next "big" shape.
As for patching, I still use CL to fix formed ridges and excess lines that CL may produce. I judiciously delete the offending sections from the overall surface, forming quad sided perimeters and CL the hole. It almost always produces a better shape, just as your example shows.
I also spend quite some effort in first reducing the perimeter segment count, getting rid of tiny or divided straight lines with a single line. That too, makes for a cleaner surface.
I do this a lot, because the vast majority of fairing perimeters are formed by intersecting one or more curved defining surface(s) through the aircraft skin. Intersect produces a lot of tiny fragments and gaps when the intersection lies very close to a vertex or a nearly parallel line.
-
@box said:
You got me curious about this so I had a bang at it. I don't have Curviloft installed on this computer so this was done with Tigs extrude tools and Bezier as the only plug ins.
Pretty much the way it was done B4 Curviloft!!
And how long did it take you to do this?? (nice work though
)CL can reduce the time spent on creating complex surfaces by a factor of 10 or (way)more.
Plus, it is so easy to scrap a bad surface, tweak the perimeter and hit go to fix something.
Way back B4 CL, I spent hours getting a fairing (almost) right. A design tweak forced a redraw of that fairing, that took almost as long to redo as original. A second design tweak also forced a scrap of that fairing and 2 others, BUT with CL, all 3 were fixed in less than 10 minutes, and were smoother fairings as well.
-
Took about 2 hours. Three episodes of star trek voyager.
I'm not sure I see any great benefit of using CL over extrusion tools.
I simply made the various sections of what would be the actual framing of the helicopter, as if you were going to build it in real life. Then took the relevant edges of the various framing sections and skinned it with Extrude edges by rail. The skinning was the fastest part. As an added bonus you get a nice structural framework rather than just a skin.
-
You gave up 3 episodes of ST Voyager to do this


Now that is dedication to SU.

Seriously, what pluggin is that?
-
Seems it's this
@unknownuser said:
I don't have Curviloft installed on this computer so this was done with Tigs extrude tools and Bezier as the only plug ins.
-
-
@box said:
@jgb said:
You gave up 3 episodes of ST Voyager to do this
No no not at all, one eye on model one eye on seven of nine.
@jgb said:
Seriously, what pluggin is that?
Tig's extrusion tools can be found here.
Two things wrong with your excuse......
-
You can't do 3D with only one eye.

-
Only one eye on her???? What is wrong with you

-
Hello! It looks like you're interested in this conversation, but you don't have an account yet.
Getting fed up of having to scroll through the same posts each visit? When you register for an account, you'll always come back to exactly where you were before, and choose to be notified of new replies (either via email, or push notification). You'll also be able to save bookmarks and upvote posts to show your appreciation to other community members.
With your input, this post could be even better 💗
Register Login


Advertisement