Please Help
-
Hi Everyone!
This is my first post on these forums and Im also quite new to SketchUp. I currently getting to grips with it and Im attempting to design a patio for my garden.
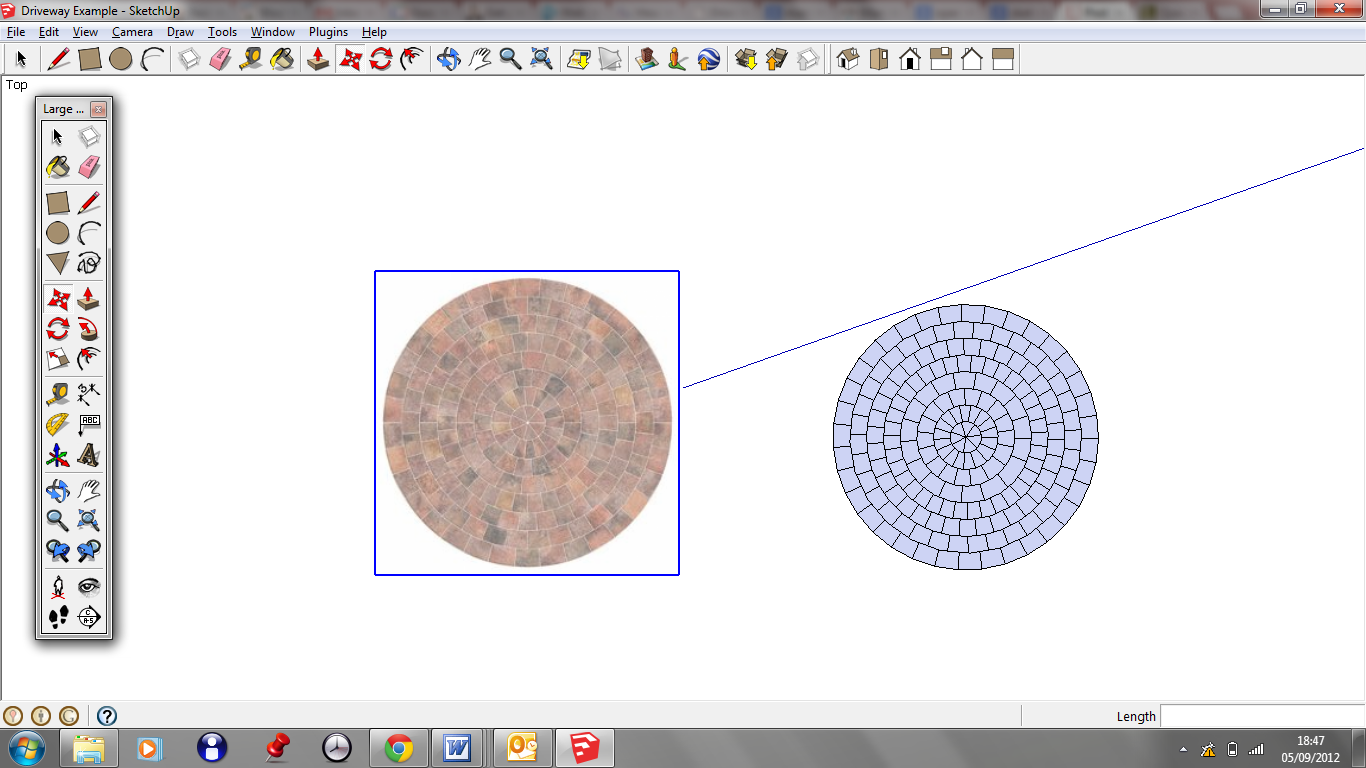
For the patio I am going to have a circle feature and my question is regarding this particular cicle. I have created the circle in sketchup and have drawn every brick involved in the circle on SketchUp without a problem and its worked out fine. However I am now trying to colour in the patio circle and have imported the image of the exact patio circle im going to install in my garden. Basically my question is, is there a way to overlap the picture into my model??
Please see the attached screen shot to better illustrate what I have already done and what I want to do.
Many Thanks for any replies in advance
Will
-
Create 1 circular face that overlays the patio, and assign the image file as the material for that face.
-
If the brick layout is showing in the image you may not like the result. you may want to use just a simple seamless tiled material without the layout.
-
@dan rathbun said:
Create 1 circular face that overlays the patio, and assign the image file as the material for that face.
Thanks for your reply Dan. How do I go about doing this if you dont mind? Ive had a go myself but couldnt seem to work it out. All I want is for that image to be represented in the model I created.
Thanks mate
-
insert or import or drag and drop you image into the scene. right click on the image. choose use as material. the material will now be loaded into the material browser. now you may use the paint bucket to apply the material to your surface.
-
@krisidious said:
insert or import or drag and drop you image into the scene. right click on the image. choose use as material. the material will now be loaded into the material browser. now you may use the paint bucket to apply the material to your surface.
Hi Krisidious. I have tried doing this but as the image is square (see above attachment) when I apply the material to the surface, I get bits of white from the edges of the picture. Im trying to figure a way around it, but have been unsuccessful so far
-
selc ltd,
You can also take the image you brought into the model already and drape it directly onto the geometry you have created.
I quickly created a video for you showing how to do it. http://screencast.com/t/GYgECBqW
Here are the steps used in the video
-
Determine size of your patio
-
Import your texture as an image
-
Scale your texture to the proper size :: created a group first and then changed the size of the image within the group only
-
Positioned the image above the patio geometry in the correct XY
-
Exploded the image which creates a "Projected" texture
-
Sampled the image texture from above and applied it to the selected patio geometry.
-
As a bonus, I also used the image texture to create the patio without the individual brick edge work
I hope this helps
Cheers
CMD -
-
@cmd said:
selc ltd,
You can also take the image you brought into the model already and drape it directly onto the geometry you have created.
I quickly created a video for you showing how to do it. http://screencast.com/t/GYgECBqW
Here are the steps used in the video
-
Determine size of your patio
-
Import your texture as an image
-
Scale your texture to the proper size :: created a group first and then changed the size of the image within the group only
-
Positioned the image above the patio geometry in the correct XY
-
Exploded the image which creates a "Projected" texture
-
Sampled the image texture from above and applied it to the selected patio geometry.
-
As a bonus, I also used the image texture to create the patio without the individual brick edge work
I hope this helps
Cheers
CMDHi Cmd,
Wow thank you so much for that cmd! I followed your video and I have sorted it now. On reflection I think I wasted my time building the scale model because the bit you showed at the end of the video looks a lot better than the model and only takes seconds to complete. Thank you again for your help I really appreciate it!

-
Hello! It looks like you're interested in this conversation, but you don't have an account yet.
Getting fed up of having to scroll through the same posts each visit? When you register for an account, you'll always come back to exactly where you were before, and choose to be notified of new replies (either via email, or push notification). You'll also be able to save bookmarks and upvote posts to show your appreciation to other community members.
With your input, this post could be even better 💗
Register Login


Advertisement