Export 2D Image to CorelDraw for electronic cut
-
Hi guys, i have suitcase project made in sketchup, i would like to export determined 2d Image (15 inch x 8 inch) to corel dral keeping all corrects dimensions to vinyl eletronic cut, its possible, what software i need to use ? Only SketchUp or some extra software ? Please help me with it, thanks
-
SketchUp on windows exports images at 72dpi which means that if you want a 15"x8" image at this resolution, it should be exported at 1080x576 pixels. Now if you want some higher (print) resolution (300 dpi is a generally accepted resolution for fine prints), you need to export a 4,500 x 2,400 pixel large image from SketchUp.
-
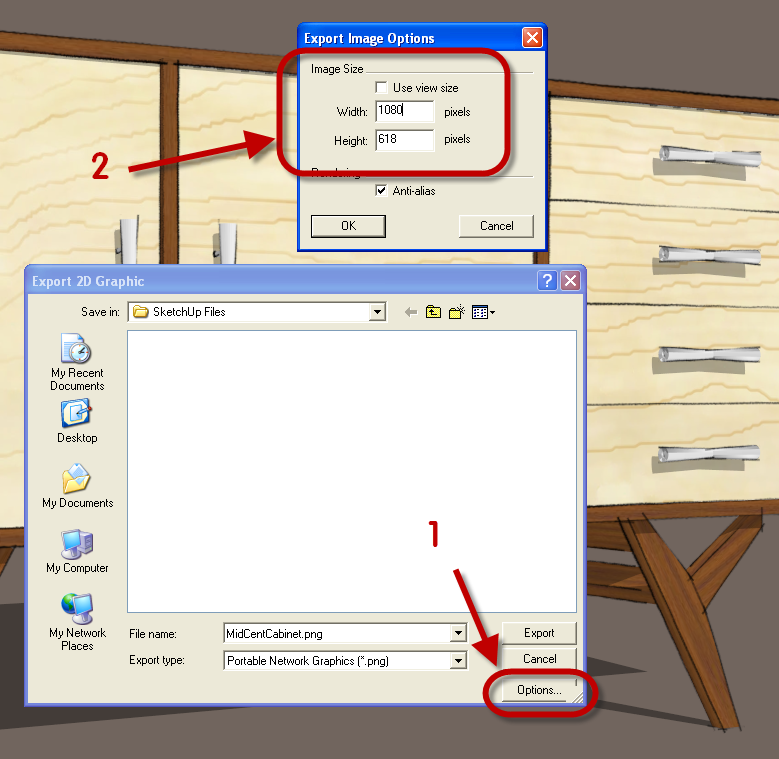
To flesh out Csaba's remarks, After clicking on File>Export>2D Graphic, click on Options. Untick Use View Size and type in the desired dimensions in pixels. As you can see in my screen shot, I entered 1080 for the width. Based on the proportions of the drawing window, that makes the height 618 pixels. To meet your size requirement, you would have to crop a few pixels off the height of the exported image. This is easily done in your image editor by changing the canvas size. You could screw around with changing the drawing window size but it would be a lot easier to just edit the image after export. Depending on the proportions of your drawing window and where you can tolerate the cropping, you might choose to set the height and let the width follow along and then crop the width instead of the height

-
Printing in SU is like being on MSDOS in 1985
-
That may be but this isn't about printing in SU.
-
Hi There,
You may be able to do what you want using only SU by exporting an AutoCAD .dwg file - but only if you have the 'Pro' version, SU 'Free' does not have this feature.
To make the export work correctly...- Your model units must be inches or millimetres (maybe metres is possible in newer Corel versions?)
- In SU, turn off perspective with the menu item 'Camera -> Parallel Projection'
- Using the 'little house' menu bar, select one of the standard orthographic views (top, front, left, etc...)
- Now export the file (Export -> 2D Graphic), selecting the AutoCAD .dwg format.
- Now import this file into Corel - after selecting the file a pop-up window will appear. Choose the units to match your SU model, and make sure that the "Reduce Nodes" option is NOT ticked. Place the drawing by just hitting 'Enter' - if you try to place it with the mouse, the scale will be changed.
- Use Corel's 'Weld' and 'Close Curves' tools to tidy up the imported drawing (shapes will be made of many individual lines that are not joined together).
Take care when cleaning up the drawing in Corel - for 3D objects you will often get many superimposed lines in the imported file. I find that it is sometimes simpler to use the import only as a guide for 'tracing' new Corel geometry (for making true vector curves etc.).
If you are using the free Sketchup version, you may be able to use the 'SVG export' plugin from FlightOfIdeas - but this only exports individual faces, so there will be much more work to re-construct the drawing.
Advertisement


