Shape on the curve surface
-
[off:23ye8z2z]
@cleaner said:Sorry I have some pictures too large, I thought that there was a script on the forum, which reduces them to the default size.
You can either attach an image straight here (best solution as the forum software will create a clickabe thumbnailwhich loads easier) or use the
[XXL-img]
tag (I have now edited your post with this tag: it also "shrinks" the image to fit in and makes it clickable although it's still the original size so may load slower)[/off:23ye8z2z] -
@cleaner said:
Thanks I will try. If that doesn't work, I see that there is a tool "shape on surface" and I will try with that. It seems that dome is made of ordinary metal sheet (tin), if I understand the question.
No I didn't succeed, because it seems there is not one, but several areas, as seen from the picture with hidden geometry on.
[xxl-img:1c3vk9op]http://i191.photobucket.com/albums/z126/ser_cleaner/1bcba3fa.jpg[/xxl-img:1c3vk9op]
Sorry I have some pictures too large, I thought that there was a script on the forum, which reduces them to the default size.
Cleaner-- post just the spire model and the image and maybe someone can figure it out. I don't see the problem from your description. Peter
-
Thx Gaieus, I will follow your instructions in the future.
As pbacot advised, here are just attached only the top of the tower, with the (material) ornaments that I want to apply to the dome.
-
Peter loves challenges, showed us - this can be done with SketchUp, if you do not have an appropriate image or materials. Thanks
As I said I did not like the dome, so I revised it today. Now it looks like in reality.
[xxl-img:365gifsb]http://i191.photobucket.com/albums/z126/ser_cleaner/32b2fc65.jpg[/xxl-img:365gifsb]
But when I wanted to put a picture of this ornament as projected material, didn't turn out well, as you can see.
[xxl-img:365gifsb]http://i191.photobucket.com/albums/z126/ser_cleaner/3e88c730.png[/xxl-img:365gifsb]
This is the best thing I could do it,
[xxl-img:365gifsb]http://i191.photobucket.com/albums/z126/ser_cleaner/dd9fa0e0.jpg[/xxl-img:365gifsb]
I colored in using only the closest shade of color. Is there a way to do it properly? And a background image is too dark and I don't know how to brighten. I apologize for my English.
-
I tried, but I don't know how to use follow me arc tool. Can not be using both at once - "follow me" toggle "arc" tool. I turned on hidden geometry, and instead "follow me" I used the "line" tool to get the required shape. Then I turned off hidden geometry and used the "joint push pull" tool, but as you can see that tool just make a hole.
[xxl-img:1my17ov0]http://i191.photobucket.com/albums/z126/ser_cleaner/684090de.png[/xxl-img:1my17ov0]
-
Thanks to the generous help of pbacot, I am bringing to the end my 3D model of the church.
[xxl-img:2wksb6gk]http://i191.photobucket.com/albums/z126/ser_cleaner/eeb449d6.jpg[/xxl-img:2wksb6gk]
I need a little polished roof with tile materials. The default roof tiles model from SU does not look nice. I looked in the 3D warehouse, but there is no such form
[xxl-img:2wksb6gk]http://i191.photobucket.com/albums/z126/ser_cleaner/f9787533.jpg[/xxl-img:2wksb6gk]
and I am certainly not able to crop an appropriate segment. This is not good [xxl-img:2wksb6gk]http://i191.photobucket.com/albums/z126/ser_cleaner/5b596b41.jpg[/xxl-img:2wksb6gk]
Could you please help me, where to find this model of tile?
-
Here are some hints...
If I were you, I would do what's said under the "alternatively" text at the bottom. Move the face with the projected texture into a component, project it correctly and then just copy the component around.The biggest issue here is that you are out of axis alignment completely. How on earth did you end up this way? (Are you working from a GE snapshot by any chance?)
-
@pbacot said:
...OK Gai, I confess, I don't know why one should project from the image, and not just apply the texture with the bucket, then call it "projected" in this case. I think I know what the difference in results is in general.
It will always depend on which facet you click on to "start projecting". To make sure you can fully control the orientation and direction of projection, it is often good to carefully place a face with the material on before you set it projected.
And besides, Cleaner had already made that piece projected on the face (or imported it as image and exploded? - which would result in the same anyway)(And as it seems, I did not really take care of the original look of the spiral just the task in that particular file).
-
Cleaner,
See it can be done by the method I noted. Be sure that after positioning the texture on ONE face , you set it as "projected" under context menu/texture/projected. Then sample, turn hidden geo off, and apply to the whole curved face.
Below, I found the image was not large enough, so in GIMP I expanded it by copying and blending around the original. I didn't really make quite it large enough it seems. You can position and size the image again if you want. Let me know if this works for you or if you need help modifying the texture further. (You have to repeat for all sides. Sample the texture from the same single face you positioned it on and apply to a single face each side to repeat).
Positioning textures this "native" way is difficult for images like this. You may want to learn to use Fredo's "Thru-paint" plugin.
Peter
EDIT: I saw Gai's message just now. I applied the texture in each case INSIDE the group, by editing the group. If this were a component (four sides of spire) we'd be done now... Might be easier to copy the group four times, if sizes are accurate, rather than texture with SU native tools.)
EDIT-EDIT: OK Gai, I confess, I don't know why one should project from the image, and not just apply the texture with the bucket, then call it "projected" in this case. I think I know what the difference in results is in general.
-
Cleaner, Here's a large texture to work with. I see the emblem is actually lower on the dome, so you need more texture above it. Peter
-
Thanks guys for the suggestions, still you need to understand me - I am a beginner, this is my first model I ever made. I didn't know that the projected texture can't be applied to a component or group. Model is not in the axis because I oriented to the Google Earth snippet. Now I see that it should first make a model, and after that turn it.
-
@cleaner said:
I didn't know that the projected texture can't be applied to a component or group.
That's why I told you. I guess you came here for these "nuances"
@cleaner said:
Model is not in the axis because I oriented to the Google Earth snippet.
That's what I guessed:
@gaieus said:(Are you working from a GE snapshot by any chance?)
@cleaner said:
Now I see that it should first make a model, and after that turn it.
That's one way. You can also go to Tools > Axes and then modify your working axis system (place and align it to whatever you want) and from now on, the axes will nicely align to your model and vice versa. Note that for certain operations, the original world axes will still have priority.
-
Thank you Gaieus for very helpful comments and suggestions. I finally finished model, and it certainly wouldn't have been possible if I hadn't have help from pbacot, and Massimo, Thanks again people. Unfortunately for GE I will have to create a simpler model
-
So now tell us where it is (there are lots of these late Baroque churches here where I live)
-
Nice work.
-
Bravo Cleaner! Very nice. Great to see it all together!
You might try a view in Two Point Perspective (under Camera).
Peter
-
The church is located in the northern part (of the much criticized) Serbia, a small village called Ostojicevo(45.889009N, 20.167232E)
@gaieus said:
:thumb:
So now tell us where it is (there are lots of these late Baroque churches here where I live)
Now I felt bad for not being able to display in Google Earth, and I have no good pictures to make a simpler model.
-
Is that a (or rather "the") Pravoslav Church there? I see a Roman Catholic church, too but that's some boring, neogothic one.
@cleaner said:
Now I felt bad for not being able to display in Google Earth, and I have no good pictures to make a simpler model.
Have you uploaded it to the 3D Warehouse at all? Sometimes they allow some more complex (and not photo textured) models to go when otherwise there's noting around.
[off:3hnvk2b0]
@cleaner said:...much criticized Serbia...
Ah well... a hundred years ago Hungary was at least as much criticized exactly there... This is not a political forum (fortunately).[/off:3hnvk2b0]
-
I did the 3D model of the Orthodox Church. In this village there is a Roman Catholic church, which I think is also pretty. Yes I have uploaded my model to the 3DWarehause, and from them I received a reply that the model is too complex to be announced at GE.
@gaieus said:
This is not a political forum (fortunately).
Yes, fortunately. Well you said -
Ah, St Nicholas church! (Interestingly, the Hungarian name of the village is also St Nicholas). Anyway...
- You can draw simply rectangles to represent the sides (and other faces) of the church and use TIG's super drape plugin to then drape the linework of the different architectural elements onto these rectangles. This plugin will also "drape" the materials (in your case simple colours of course).
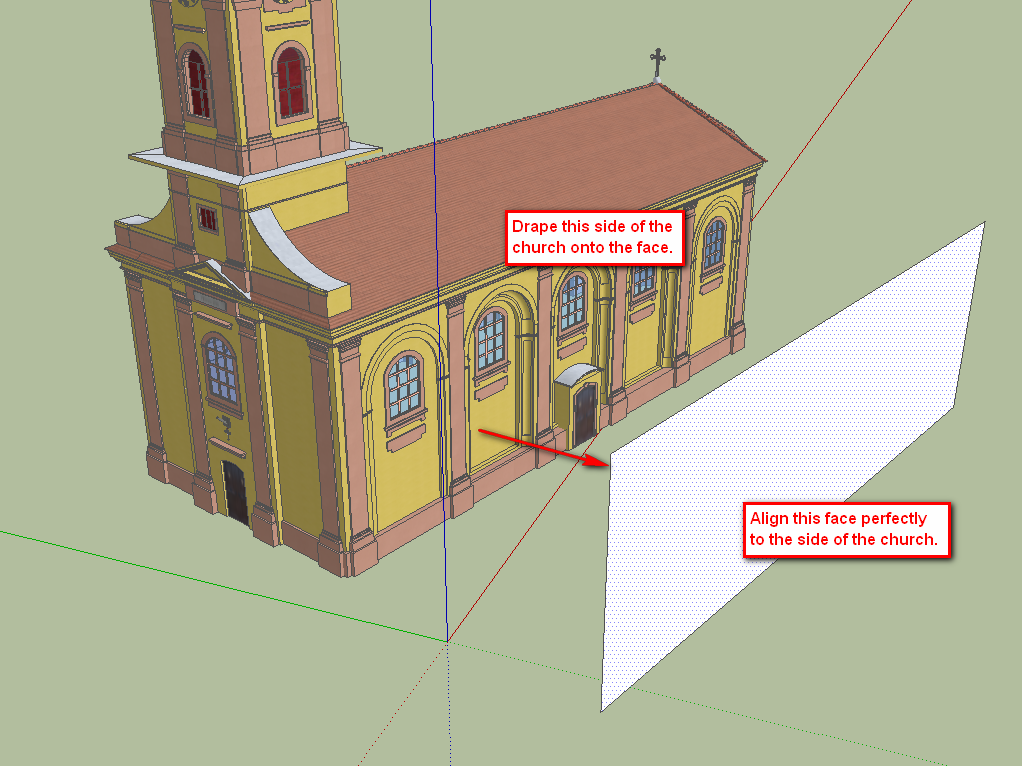
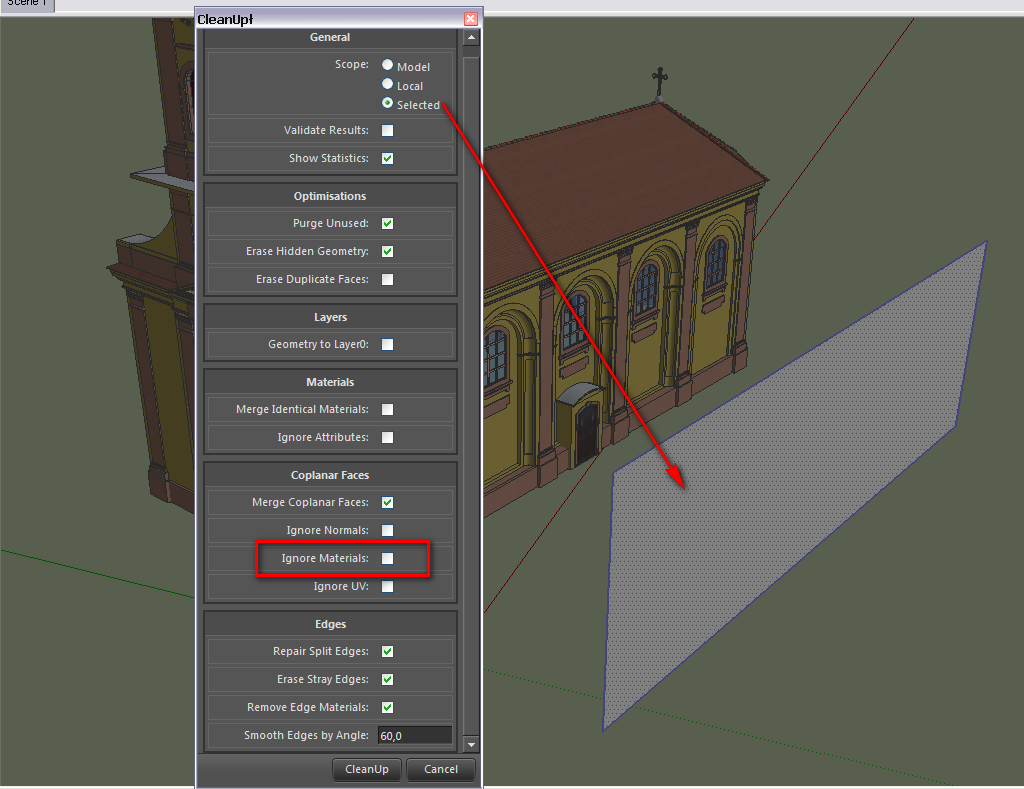
Note that according to TIG's description (and also as the native drape tool works), "The draped group must be above the 2nd group..." so you will need to rotate the whole thing (church and face together) to do this - and as many times as needed.- Next step is to use TT's CleanUp plugin to get rid of any unneeded edges on these faces. (Examine the installation instruction carefully as this plugin needs an additional plugin library to install). Use it only on a selection (the newly draped face) and make sure NOT to ignore materials (otherwise it will erase all edges.
- Now select one of the faces on the face, right click on it and > Make unique texture. It will pop up a dialog asking what the desired size should be - just okay it as you can edit this texture image later.
- Now select all the facets again > right click > combine textures. It will ask if you want to remove dividing edges - yes. Now you ended up with a single face - a side of the church with an image material on it. If you right click again, you can even edit it in an external image editor of your choice, adjust colours, add dirt here and there, resize the image (about 1 cm on the church should be some 1-2 pixels in the image so that Google likes it) and when you save, it will automatically reload in your model.
Set your favourite image editor under Window > Preferences > Applications.
But first of all, select all the current church and group it otherwise you will end up with a mess (I really wonder why you did not use components here - I see you are an extremely enthusiastic modeller and made a beautiful job with this church but components would have made your job much easier - okay,later on with components).
Advertisement