Organic roof design drawing question
-
Hello,
I 've found this picture on the internet and as an excercise I would like to draw it but
I've tried to make in sketchup and fail to make it.I use curviloft and artisan but... no succes.
Can anybody give me some advise how to make this ?
To make it a bit more difficult I would like to have the curving ends on the ground smaller than those in the air.
And is there a way to make "egg shapes" holes in the roof following the slope ?thx for the reactions.

-
-
To make egg-shaped holes make a flat circle scale it about its center until it's egg-shaped.
Pushpull it into a long cylinder.
Group [or make a component of] it.
Move it to where you want the hole, so it's penetrating thorough the roof mesh.
Select the roof mesh you want the hole in and use Intersect with Model.
This will form the egg-shaped ring on the mesh.
Erase that face to form a hole.If you have made a roof with real 'thickness' - top and bottom faces - and you want to punch a hole right through it....
Make the similar grouped cylinder.
Move the cylinder into place so it penetrates both roof surfaces.
This time Edit the cylinder [double-click] and select and Reverse its curved surface.
While the surface is still selected use Intersect with Model.
There will be lines made where it intersects the top/bottom surfaces of the roof.
Erase the unwanted parts of the cylinder, leaving the ring where it is within the roof's volume.
Now exit the edit and Select the group and Explode it.
It will merge with the roof's surfaces/
Erase the faces on the top/bottom surfaces to leave a hole with a 'lining'...
[Note: by reversing the cylinder's face it is correctly oriented for being part of the roof] -
Hello,
thx for the fast answer, but what do you mean by line divide by 6 ? Can you weld lines in sketchup or is this a plug in ?
What if the ("roofs" end (high middle part) is not horizontal ? you've got then a part of a "moebius ring"- a twisted, curvy roof.
-
@kong-cept said:
Hello,
thx for the fast answer, but what do you mean by line divide by 6 ? Can you weld lines in sketchup or is this a plug in ?
What if the ("roofs" end (high middle part) is not horizontal ? you've got then a part of a "moebius ring"- a twisted, curvy roof.Divideis a native function - select a Line and right-click context-menuDivide, move the cursor to change the number of parts or type in a number + <enter> [e.g. 6].
The now divided edge segments remain selected.
Getweld.rbfrom http://www.Smustard.com.
This almost indispensable tool takes a selection of connected edges and makes them into a Curve - even it they are in a 'straight' alignment.
Several tools, including my EEby... ones, need 'Curves' to be selected.
Arc and Circles are a special type of Curve that has a center/radius/plane/normal etc.
There are 3rd party tools to make Bezier and similar curves, but any suitably joined edges can be made into a Curve - even works in 3d [using weld].
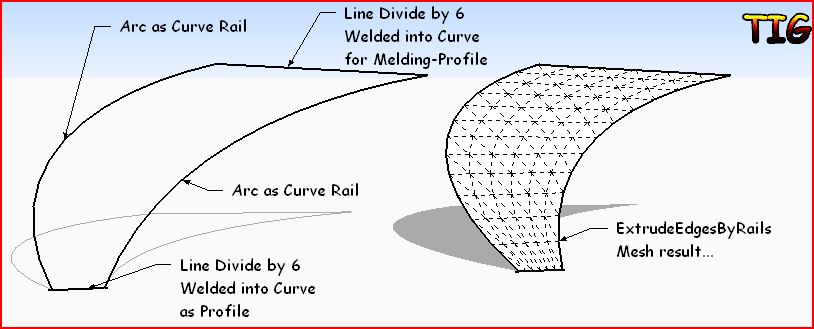
So for EEbyRails you need two, three or four*** Curves - a Profile, Rail1 and Rail2*** and a Melding-Profile*** [i.e. ***you can re-pick some of these within the tool's limitations].
In the quick mesh example I made with EEbyRails I used two welded lines divided into 6 segments as the profiles and two Scaled/Rotated Arcs for the side rails.
If you don't want the start and end edges to align horizontally its easy enough to rotate them - either before making the mesh or afterwards [if View>Hidden-Geometry is OFF when you twist one selected start/end set of edges the whole meshed surface will distort to suit...] It's up to you to decide on the 3d-forms you'll make - with either horizontal start and end, or some other more exotic twisted shapes. the two rails can also be any forms you like, provided they are 'Curves'...

-
See the videos under cuviloft for ideas. You can make the roof easily.
See the first overall video second example. Stitches single lines together thereby defining the plane.
Hello! It looks like you're interested in this conversation, but you don't have an account yet.
Getting fed up of having to scroll through the same posts each visit? When you register for an account, you'll always come back to exactly where you were before, and choose to be notified of new replies (either via email, or push notification). You'll also be able to save bookmarks and upvote posts to show your appreciation to other community members.
With your input, this post could be even better 💗
Register Login


Advertisement