Need help fixing material on imported obj (TIG's rb))
-
Hi!
not exactly a newbie in SU but it's the first time I had to import a mesh... and facing this issue.I've imported the thatched roof (modeled outside SU on a geometric SU reference) using TIG's OBJimport script (great, btw)
to make it short I tried several export settings (and even 3ds format) an this is the best I can get (see attached image).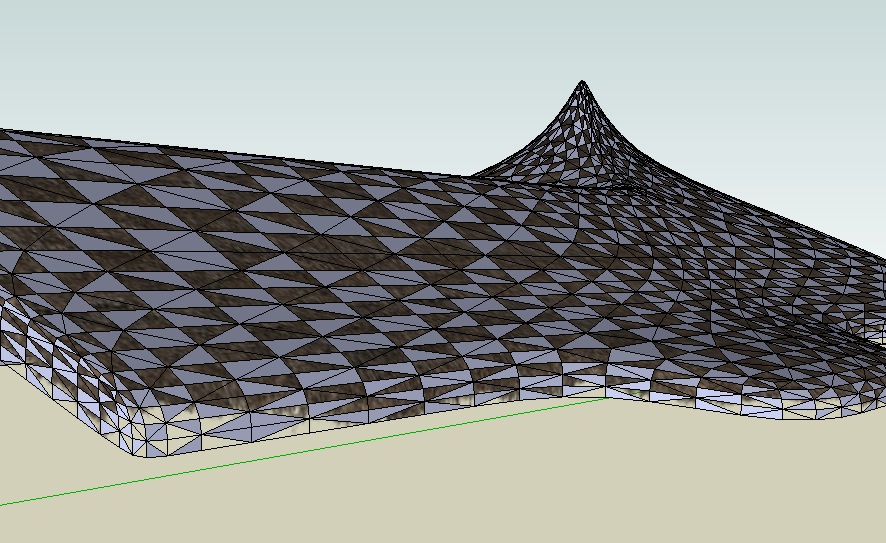
as you can see the mesh has been triangulated by the exporter and there's a material issue (the grey tris have the right material and UVs on the back). I'm wondering if there's a quick way to fix it...
I tried with no luck several techniques (included inverting faces, a line of code suggested by TIG in a thread I cannot find anymore - which actually places material on both sides but loosing UVs and this is a custom painted material/UVs with alpha - etc...)
any help very appreciated (file can be downloaded here http://dl.dropbox.com/u/2029627/ThRoof.skp.zip - ~9Mb)...
thank you in advance,
Alessandro -
Hi Alessandro.
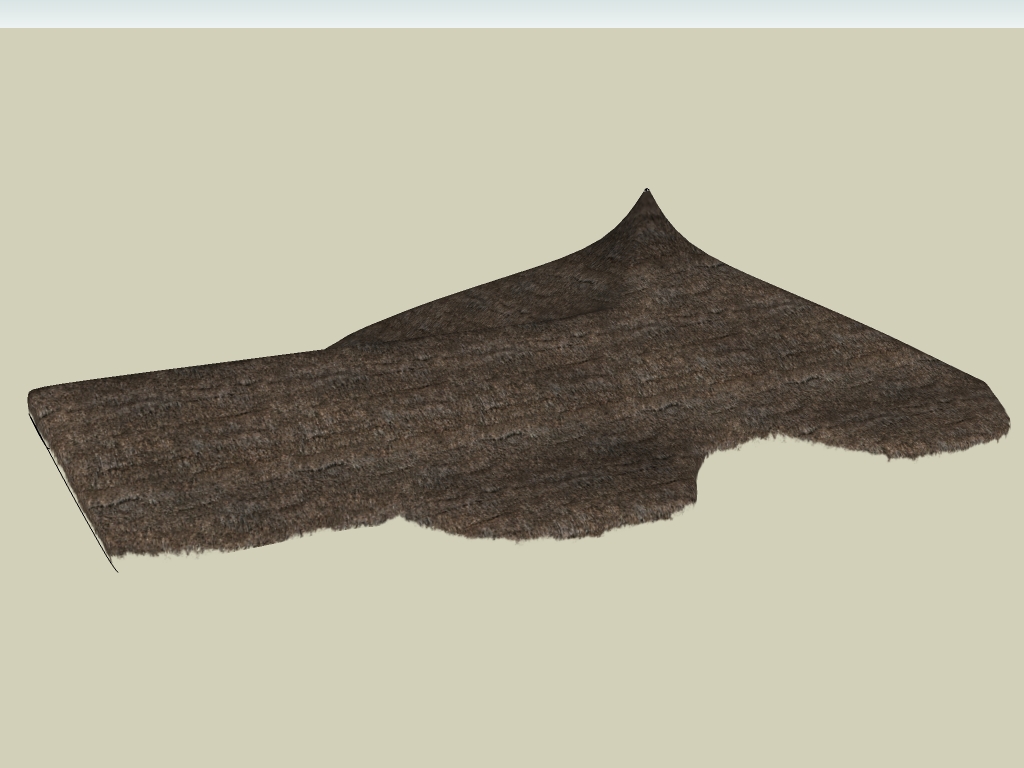
It's a mess. The mapping has been completely lost in SU. There is a way to fix it...without going back to your mapping program...but it's a little tricky.Firstly draw a large rectangle at the side of the roof. Reverse it so that it is front face up. Now, from the material browser, paint the roof texture onto this rectangle. It will paint very small. In the edit tab of Materials, adjust the size to about 16m...so it is about the right size for the roof, then right-click the surface and choose Texture > Projected from the context menu. Now group the rectangle and place it cutting through your roof, near the bottom.
Scale the rectangle so that it is large enough to cover the entire roof, then sample the texture on it (Alt+Paint Tool) and paint it onto the roof. This will cover your roof in a reasonably decent-looking thatch...but it will not have the transparent fringe around the edge.
You now have two choices:- Either you can make a separate image which is just a long strip of thatch with a transparent fringe...then paint that all around the edge.
- OR. You can rotate a copy of your existing roof texture (on the rectangle) onto one end, then sample and paint that all around the edge.
You can see that I have done one end of the roof like this. But you can also see that it would look better if you straightened the edges of the thatch a little more in the image first...not only to make the edges straighter, but also more horizontal/vertical.
-
Well, Alan beat me but my solution is diferent anyway (and I believe more efficient, too)

Here is TT's UV Toolkit.
http://forums.sketchucation.com/viewtopic.php?t=18992Install the plugin then restart SU. Then these are the steps:
- Open the group and select all
(Ctrl+A on a PC - find it out on your Mac )
) - Go to Plugins > UV Toolkit > Frontface material to backface.
(This will seemingly fix your material issue already and if you do not want to "leave" SU with your model, it's already fine however if you go to Monochrome mode, you will see that your mesh is still chequered with front and back faces so go on...) - Now select all again, go to Plugins > UV Toolkit > Remember UV.
- Now go to monochrome, right click on a correctly oriented, white front face > "Orient faces" from the context menu.
(Each face will be nicely oriented now displaying the white faces outside) - Go back to shaded with textures mode just to see (to your horror
 ) that a bunch of faces are now not textured at all.
 - Never mind, select all again > Plugins > UV Toolkit > Restore UV.

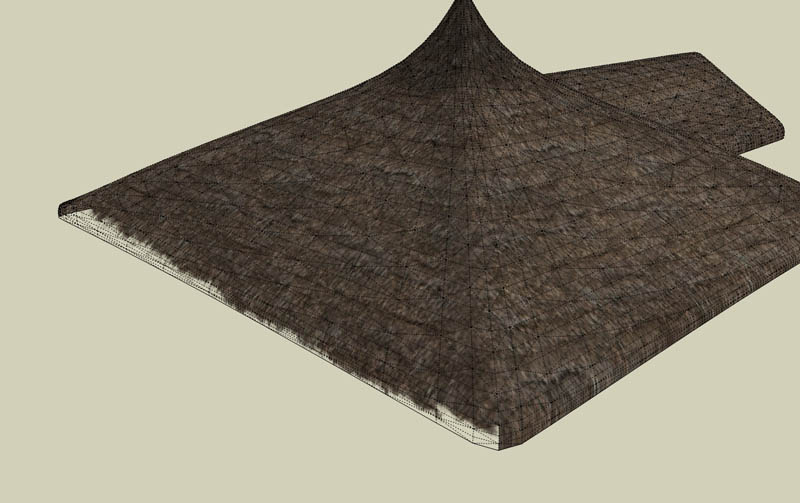
Here are two shots how it should look like textured and monochrome (edges softened)
- Open the group and select all
-
If you want, I can quickly upload the model to DP for you. I am not sure why it would not work with 7.1 (maybe TT has released an even newer version of his plugin?).
Edit: uploaded to DB - check your PM
-
Alan and Gaieus,
first a big thank you for stopping by and answering so quickly...so I tried Gaieus suggestion (yep, I'm a lazy man) and almost got it sorted. I have to admit I had TT UVtoolkit(2) installed already but haven't noticed it could do this kind of trick too (that's the price for having too many plugins, I'm afraid...)
so I accurately followed the instructions and everything went fine to point 4.
unfortunately after Orient Faces some of the tris become transparent and Restoring previous saved UVs doesn't change anything (yes I have payed attention to selections too). I'm wondering if this may depend on my current version of SU (7.1.6859 free) or some plugin incompatibility because the file is exactly the same you used...however, as Gaieus said, step 2 does the trick for what I need here (just a correct visualization inside SU to arrange the model accordingly - the thatched roof is already set up in my rendering app waiting for the rest of the model).
that said I'm the kind of 3d guy who doesn't like to know there are flipped normals in his model, even if nobody knows or sees, so I will investigate further (probably after the deadline delivery...)thank you again guys, your help has been amazingly useful
cheers,
Alessandro -
just a quick note to say I've already answered Gaieus in PM...
(didn't wanna seem unpolite )
)
Hello! It looks like you're interested in this conversation, but you don't have an account yet.
Getting fed up of having to scroll through the same posts each visit? When you register for an account, you'll always come back to exactly where you were before, and choose to be notified of new replies (either via email, or push notification). You'll also be able to save bookmarks and upvote posts to show your appreciation to other community members.
With your input, this post could be even better 💗
Register Login


Advertisement