Import .eps File for Use with Push-Pull Tool?
-
OK
Now we see the problem!
This is a very pixelated image...
Many, many separate areas of solid 'text'.
It will take hours for ImageTrimmer to try and make all of the separated areas and it'll probably fail anyway because the single pixel 'lines' will return as empty areas - its limitation...
You are trying to do something in Sketchup that is virtually impossible...
WHY do you want to make a 3D representation of the Declaration of Independence anyway - it was originally a 2d written document ??I don't quite understand where you are coming from or where you are going ???
What would your ideal final product look like - word-pictures please.......

-
We have something in mind, but I'd prefer not to describe it on a public forum.
 I really appreciate your help. If I just take "We the People" and clean it up, do you think ImageTrimmer might work on that?
 -
@vikr said:
We have something in mind, but I'd prefer not to describe it on a public forum.
I really appreciate your help. If I just take "We the People" and clean it up, do you think ImageTrimmer might work on that?In your image manipulation app scale it up so there are no single pixel width black areas - ImageTrimmer needs at least 2 pixels for it to take an area as 'solid' - this is because it finds solid areas in the image 'by pixel', if an area is one pixel wide when it makes a face to take that part of the image as a material it will make two edges that are effectively coincident: therefore there is no face just an edge, and any un-faced edges are removed from the final result.
-
I've produced a new file (attached) which I believe has removed all the 1-pixel-width edges. Should this file work? I've been running ImageTrimmer on it for about 45 minutes with no visible results so far.
-
@vikr said:
I've produced a new file (attached) which I believe has removed all the 1-pixel-width edges. Should this file work? I've been running ImageTrimmer on it for about 45 minutes with no visible results so far.
For me it scanned the Pixels and made the 'Edges' png in ~1.5 minutes BUT slowed to a crawl at ~25% on making the edges...
I looked at the ImageTrimmer Edges png and saw many many holes and 'missing parts'.
On looking at the original png I see that there is not just the completely transparent white background BUT many individual 'grey' pixels in the letters themselves that have some transparency. The tool takes all opaque pixels as 'solid' and any with transparency as 'void'. You can easily fix this in your image processing app, by selecting all of the letters using the paint bucket to make them solid opaque black. Alternatively flatten the image to remove transparency then select all of the white areas and delete them so these become 100% transparent - then any 'grey' pixels will also be solid.
I attached 'fixed' version but urge you to see how to do this yourself.
With the corrected image it still takes ~9 minutes to process but only 10 secs to 'simplify' - reducing the edges from ~15500+ to ~500+ !!
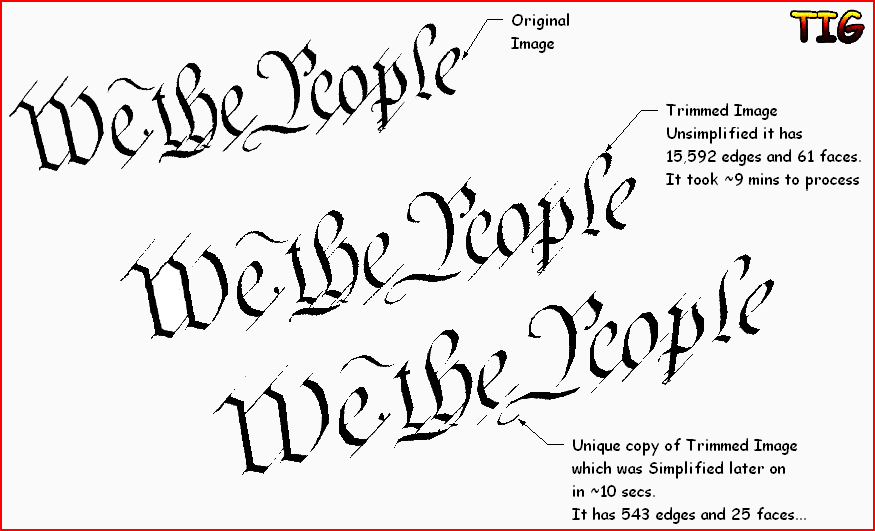 WeThePeople.skp
Please note I have updated the ImageTrimmer tool and will be posting it shortly. As a result of testing your image I have spotted a minor improvement in the simplifier code that will help you to avoid error messages later on...
EDIT: See here http://forums.sketchucation.com/viewtopic.php?p=303761#p303761 -
When I hover over the text with the push-pull tool, the face is not selected. The push-pull tool shows the red circle with the diagonal line through it. Is there a way to use the push-pull tool on the text?
-
Hi Vik,
The 3D Text (I guess that's what you mean) comes in as a group (or component?) You need to edit a component/group in order to use the PushPull on the individual faces. Double click on it and it will be accessible to PP.
-
You need to either explode or edit the component so you can PushPull the faces. It's also best to have Hidden Geometry ON...
 WeThePeople.zip
 -
This is really great. On my system I'm seeing an odd pattern on the sides of one of the W faces when I pull it. It seems to show the rest of the text. I'm attaching an SU file. How do I get it to look the way it looks in your demo file?
-
-
I switched off the color/texturing by changing it to 'MonoChrome Mode'.
In fact, you probably need to select all inside the group and paint it with the 'default material' for simplicity... [I was dong a quick hack!]
The 'image' texture is only useful in this case to get the edges to trim and isn't needed thereafter [it's different if it were say an image of person with clothes, features etc...]. So 'remove' the material and edit/pushpull etc, then repaint the faces later with whatever color you want - using 'black' initially makes it difficult to see what you are doing so that's why I chose 'MonoChrome Mode'... -
Okay, great. Thanks very much for coding this great script.
-
I'm using ImageTrimmer on a new image, and it looks like I still have a bit to learn in order to use it correctly. I thought I'd gotten rid of all the non-black pixels, but I guess there must still be some. A few questions:
- You mentioned that you'd looked at the ImageTrimmer Edges files and spotted the bad pixels. Where can I find the ImageTrimmer Edges files?
- Do I need to apply a texture to the .png image in SU before using ImageTrimmer?
The image is attached.
-
VikR
Here's a working version...
Your PNG was pretty much OK - Black and Transparent... BUT it had loads of unneeded blank areas.
I cropped it to suit = it's < 1/4 size and processed > 16 times faster!
I did a bit of manual tidying as there were some missing pixels on thin parts etc...
The Edges files etc are in the TrimmedImages folder IF you elect NOT to delete it!
To use ImageTrimmer select a suitably prepared Image and run ImageTrimmer - that's all
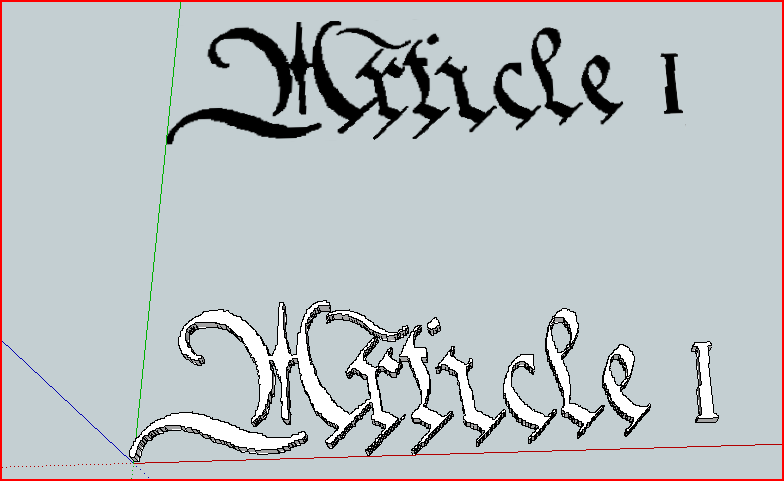 Article1.zip
 -
I clicked on the top image - the all-black imported png - in the "Article 1" .skp file you provided. I ran ImageTrimmer. It's been running for 40 minutes now with no visible results. I'm running on a 2-month-old 2.4 GHz Intel Core 2 Duo MacBook Pro with 4GB of ram. Could I be missing something?
-
@vikr said:
I clicked on the top image - the all-black imported png - in the "Article 1" .skp file you provided. I ran ImageTrimmer. It's been running for 40 minutes now with no visible results. I'm running on a 2-month-old 2.4 GHz Intel Core 2 Duo MacBook Pro with 4GB of ram. Could I be missing something?
It should take <1 minute to complete,
It should take only a few seconds to make a component of this simplicity [even if you don't have proper access rights to the ../Plugins/SKMtools folder/contents [should be 'full'] and/or the folder containing the SKP itself]... it should time out after 1 minute of it not starting to make the png file with the jar!
Kill it and start again...
Move the TrimmedImages folder from the SKP's folder.
Check if there are any png files in it that were made about the start of the process...
Start again...
What messages do you get in the Status Bar before it 'sticks' ?
What messages do you get in the Ruby Console [open it before running ImageTrimmer] - if any ?
Can you run other java/jar files on your Mac ?
Is there a from.ini and to.ini file in ../Plugins/SKMtools folder - if so what does the text in them say ?
If it's the paths to the TrimmedImages folder with the SKP [with file names] and there's a file called 'Article I.png' [or similar] in the ini file and also in the folder, then move all other files out of it, then double click on the jar file called EdgeDetector.jar in the SKMtools folder - do you get error messages or does it make the 'Article I[Edged].png' file ?
If it's making that then the glitch is in the processing...This is most puzzling as I processed that image as I sent you within minutes on a rubbish old PC with Vista [SUp v8]
-
I did the following:
- Set permissions for Plugins and all included files and folders to read/write/execute for everyone (had been read/write/execute for my account only)
- Checked for images made about the start of the process - found one - "Article_I.png" - opened it in PhotoShop - it seemed to be identical to the png we are working on.
- Moved all TrimmedImages folders to the trash
- Copied the latest Article I.skip file to its own folder on the desktop and opened it in SU
- Opened Ruby Console
- Clicked the imported .png image in SU
- Started ImageTrimmer
- Waited a bit
- Status bar message: "ImageTrimmer: Making 'Edges' files - please wait..."
- Ruby console messages: aha! There's an error message:
Error; #<Errno;;ENOENT; No such file or directory - /Users/myUserName/Desktop/imagesToProcess/TrimmedImages/C__Users_TIG_Desktop_Article_I[Edges].dat>
/Users/myUserName/Library/Application Support/Google SketchUp 8/SketchUp/Plugins/SKMtools/ImageTrimmer.rb;233;in `readlines'
/Users/myUserName/Library/Application Support/Google SketchUp 8/SketchUp/Plugins/SKMtools/ImageTrimmer.rb;233;in `make_edges'
/Users/myUserName/Library/Application Support/Google SketchUp 8/SketchUp/Plugins/SKMtools/ImageTrimmer.rb;186;in `process_image'
/Users/myUserName/Library/Application Support/Google SketchUp 8/SketchUp/Plugins/SKMtools/ImageTrimmer.rb;163;in `initialize'
/Users/myUserName/Library/Application Support/Google SketchUp 8/SketchUp/Plugins/SKMtools/ImageTrimmer.rb;760;in `new'
/Users/myUserName/Library/Application Support/Google SketchUp 8/SketchUp/Plugins/SKMtools/ImageTrimmer.rb;760
No file named "C__Users_TIG_Desktop_Article_I[Edges].dat" is found in the TrimmedImages folder. There is one file in there at this time, called "C__Users_TIG_Desktop_Article_I.png".
from.ini contains:
/Users/myUserName/Desktop/imagesToProcess/TrimmedImages/C__Users_TIG_Desktop_Article_I.pngto.ini contains:
/Users/myUserName/Desktop/imagesToProcess/TrimmedImages/C__Users_TIG_Desktop_Article_I- Ran EdgeDetector.jar - it worked! It added to files to the TrimmedImages folder:
C__Users_TIG_Desktop_Article_I[Edges].dat
C__Users_TIG_Desktop_Article_I[Edges].png
I'm a coder myself (although not yet a Ruby coder) - I'm used to working with error messages. What does this tell us? Can I change something?
-
I wanted to see if I could rule out Mac vs. PC issues, so I launched Windows in Parallels, a Windows emulator for Mac. I installed Sketchup on Windows and the SKMTools plugin. I moved the Article_1.skp file to My Documents, and ran ImageTrimmer. Here is the output from the Ruby Console:
Error; #<Errno;;ENOENT; No such file or directory - C;\Users\Administrator\Documents\TrimmedImages\Article_I[Edges].dat> C;/Program Files (x86)/Google/Google SketchUp 8/Plugins/SKMtools/ImageTrimmer.rb;233;in `readlines' C;/Program Files (x86)/Google/Google SketchUp 8/Plugins/SKMtools/ImageTrimmer.rb;233;in `make_edges' C;/Program Files (x86)/Google/Google SketchUp 8/Plugins/SKMtools/ImageTrimmer.rb;186;in `process_image' -
@vikr said:
I wanted to see if I could rule out Mac vs. PC issues, so I launched Windows in Parallels, a Windows emulator for Mac. I installed Sketchup on Windows and the SKMTools plugin. I moved the Article_1.skp file to My Documents, and ran ImageTrimmer. Here is the output from the Ruby Console:
Error; #<Errno;;ENOENT; No such file or directory - C;\Users\Administrator\Documents\TrimmedImages\Article_I[Edges].dat>
> C;/Program Files (x86)/Google/Google SketchUp 8/Plugins/SKMtools/ImageTrimmer.rb;233;in `readlines'
> C;/Program Files (x86)/Google/Google SketchUp 8/Plugins/SKMtools/ImageTrimmer.rb;233;in `make_edges'
> C;/Program Files (x86)/Google/Google SketchUp 8/Plugins/SKMtools/ImageTrimmer.rb;186;in `process_image'
So for some reason you aren't getting the jar file to fire and make the Article_I[Edges].dat file ??? Is there a Article_I[Edges].dpng file getting made ????
Did you check access rights to the ../Plugins/SKMtools folder and its contents were set as I explained ? -
@unknownuser said:
So for some reason you aren't getting the jar file to fire and make the Article_I[Edges].dat file ??? Is there a Article_I[Edges].dpng file getting made ????
Did you check access rights to the ../Plugins/SKMtools folder and its contents were set as I explained ?Yes - when I run ImageTrimmer from inside SU, it appears the jar file doesn't fire. As I noted in the post before last, there is no [Edges] file in the TrimmedImages folder after running ImageTrimmer. However, if I double-click the EdgeDetector.jar file, it works correctly, and the following two files are created:
C__Users_TIG_Desktop_Article_I[Edges].dat
C__Users_TIG_Desktop_Article_I[Edges].pngI have checked the access rights per your post.
Hello! It looks like you're interested in this conversation, but you don't have an account yet.
Getting fed up of having to scroll through the same posts each visit? When you register for an account, you'll always come back to exactly where you were before, and choose to be notified of new replies (either via email, or push notification). You'll also be able to save bookmarks and upvote posts to show your appreciation to other community members.
With your input, this post could be even better 💗
Register Login


Advertisement