Applying 2D surface to circle?
-
Hi.
Im trying to "fold" a plain surface around a circle, I can do it manually, but would love it can be done automatic...
I need to apply the attached illustration "Surface" to the "Shape".
Would love if someone could figure out how I can draw the shape first, and then apply it to a circle or fold it around a circle.I could always make one circle, and then scale it down to fit the top.
The alternative is drawing the shape, dividing it with some lines and folding it around a circle with fixed intervals (360deg/24sides=15deg per "fold")


-
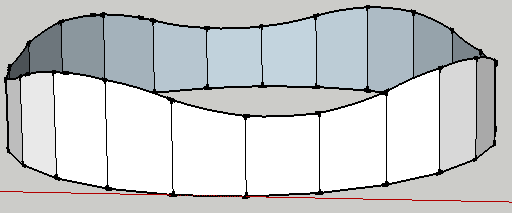
Divided the shape and rotated in 24 times, 15 deg. each time..
Would still like an automated solution, as it gets a bit more tedious if you bend it 48 times and find out the shape is a bit wrong.. Of course it could be divided into 2, 4 or more parts, but that would also require some extra work..
Any solutions?
-
Don't know if this is what you're looking for, but...
Draw a 1/2 view of the cone using the radii of the smaller and larger circles and the altitude of the cone. Now draw a circle centered at the apex of the of the pattern, delete the surface of the circle, then select the circle. Now get your follow-me tool and click on your pattern.
-
@carlsen said:
Divided the shape and rotated in 24 times, 15 deg. each time..
Would still like an automated solution, as it gets a bit more tedious if you bend it 48 times and find out the shape is a bit wrong.. Of course it could be divided into 2, 4 or more parts, but that would also require some extra work..
Any solutions?
Sorry I am the dense one but have some questions:
- The OP says 2d surface to circle but given a circle has zero height this is not possible
 ;
; - I see a shape which is a truncated right cone but also a shape which is a cylinder with a sinusoidal modulated height. Is this latter intended to show an applied surface material on the cone having this type of variation. If so what type of variation is wanted in terms spacing and does the period of the modulation change as it goes up the slope of the cone or stay the same.It must change What is the spacing Or is the intended variation radial of the cone surface like groves etc? ;
- What if any limitations are applied to the cone in terms of base vs frustum dia and its height. IE can the frustrum dia go to nearly zero ?
Sorry, as you can tell dense here Is this even close to your concept http://sketchup.google.com/3dwarehouse/details?mid=259f036e12f9eea59f30f02514717f00
- The OP says 2d surface to circle but given a circle has zero height this is not possible
-
Carlsen
See this link for concept of what I think you want but need to hear from you http://sketchup.google.com/3dwarehouse/details?mid=24a74ef603a753e19f30f02514717f00.
The cone is like a stack of pancakes with decreasing dias. It was drawn using a story stick divided using the line tool divide option 1/10 the height for each step . Each face of the stack was created by staring a new face when the staring circle was extruded up to next step( hit ctrl), the edge at each step was scaled based on the radius at that level on the story stick ( used the entity info box for that to make the cone. The surface png in your original OP was the used to create the texture, see this link for that http://www.youtube.com/watch?v=AVYYdWYRqrg&feature=channel ( watch the video all the way the part you want occurs late).
This is just a concept and once you decided on a final geometry then it can be refined
Hope this maybe remotely close to what you are looking for
Hello! It looks like you're interested in this conversation, but you don't have an account yet.
Getting fed up of having to scroll through the same posts each visit? When you register for an account, you'll always come back to exactly where you were before, and choose to be notified of new replies (either via email, or push notification). You'll also be able to save bookmarks and upvote posts to show your appreciation to other community members.
With your input, this post could be even better 💗
Register Login


Advertisement