sketchucation logo sketchucation
    • 登入
    ℹ️ Licensed Extensions | FredoBatch, ElevationProfile, FredoSketch, LayOps, MatSim and Pic2Shape will require license from Sept 1st More Info

    [Plugin] Hole Punching Tool

    已排程 已置頂 已鎖定 已移動 Plugins
    200 貼文 43 Posters 219.8k 瀏覽 43 Watching
    正在載入更多貼文
    • 從舊到新
    • 從新到舊
    • 最多點贊
    回覆
    • 在新貼文中回覆
    登入後回覆
    此主題已被刪除。只有擁有主題管理權限的使用者可以查看。
    • TIGT 離線
      TIG Moderator
      最後由 編輯

      (c) TIG 2017
      Permission to use, copy, modify, and distribute this software for
      any purpose and without fee is hereby granted, provided the above
      copyright notice appear in all copies.

      THIS SOFTWARE IS PROVIDED "AS IS" AND WITHOUT ANY EXPRESS OR
      IMPLIED WARRANTIES, INCLUDING, WITHOUT LIMITATION, THE IMPLIED
      WARRANTIES OF MERCHANTABILITY AND FITNESS FOR A PARTICULAR PURPOSE.


      [flash=600,338:mnqzu4cg]http://www.youtube.com/v/G_5yc1-Hqo8[/flash:mnqzu4cg]
      Script:

      #HolePunchTool.rb

      it belongs in the ../Plugins/ folder...

      From v1.6 it also requires 'deBabelizer.rb' in the ../Plugins/ folder and
      any required locale lingvo files in the ../Plugins/TIGtools sub-folder...
      e.g. #HolePunchToolEN-US.lingvo, #HolePunchToolFR.lingvo etc...


      Overview:

      This script adds a new tool for glued/cutting component-instances.
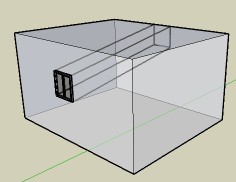
      It allows them to punch linked 3D holes through the faces of double-skinned walls/roofs etc.
      It is accessed through the right-click context-menu 'Hole Punching...' sub-menu, which offers various items depending on the current Selection.


      For the tool's Usage instructions etc and Download/AutoInstall the latest version from the SCF PluginStore...
      http://sketchucation.com/resources/pluginstore?pln=HolePunchTool

      TIG

      1 條回覆 最後回覆 回覆 引用 0
      • KrisidiousK 離線
        Krisidious
        最後由 編輯

        when I download the ruby it names it... "%23HolePunchTool.rb" should I change this to "#HolePunchTool.rb" or does it not matter?

        By: Kristoff Rand
        Home DesignerUnique House Plans

        1 條回覆 最後回覆 回覆 引用 0
        • TIGT 離線
          TIG Moderator
          最後由 編輯

          Works fine for me - it simply downloads with its original name. 😕
          What browser are you using?
          How did you 'save' it ?
          It's not so important... it has the # at the start of its name so that it loads very early and therefore it puts its sub-menu near the top of the context-menu items.
          I suggest you rename it with the #. 😒

          TIG

          1 條回覆 最後回覆 回覆 引用 0
          • KrisidiousK 離線
            Krisidious
            最後由 編輯

            I'm using Chrome... I just clicked the link to download.

            I believe %23 is the symbol code for the # symbol. I think when some browsers follow a link they convert symbols to their native code.

            anyway thanks for the plugin Tig..,. I coulda used this like 5 years ago... I'll bill you for all the lost hours of work. you just shaved like 1 minute off every window I've ever made.

            By: Kristoff Rand
            Home DesignerUnique House Plans

            1 條回覆 最後回覆 回覆 引用 0
            • pilouP 離線
              pilou
              最後由 編輯

              Maybe there is Punch hole in the center of the Milky way 😉

              Frenchy Pilou
              Is beautiful that please without concept!
              My Little site :)

              1 條回覆 最後回覆 回覆 引用 0
              • pilouP 離線
                pilou
                最後由 編輯

                Does it possible to have an Set Angle in context menu?
                angle.jpg

                Frenchy Pilou
                Is beautiful that please without concept!
                My Little site :)

                1 條回覆 最後回覆 回覆 引用 0
                • TIGT 離線
                  TIG Moderator
                  最後由 編輯

                  Pilou... explain a little more...
                  I guess you want to have a punched hole that isn't square to the wall's face !
                  It wouldn't be easy...

                  However, you can easily mimic it...
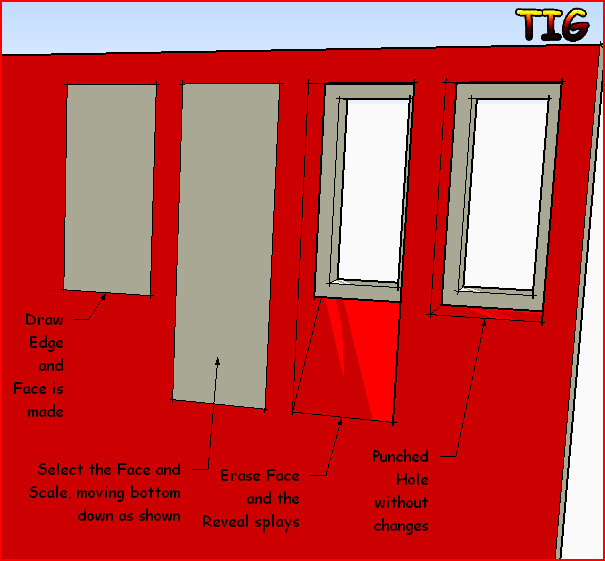
                  First make a HolePunch and then draw over an Edge of the inner punched-hole so it forms a Face, now select just that Face and Move that Face to where you want and it [or you can Scale it to change one or more of its Edges] - the reveals' geometry will adjust to suit the inner-hole's new location or shape, then you can Erase just the Face and you have your distorted punched hole/reveals. This geometry will still auto-Select with the punching component-instance and it will move/delete with it etc etc...

                  TIG

                  1 條回覆 最後回覆 回覆 引用 0
                  • R 離線
                    rv1974
                    最後由 編輯

                    Hi Tig!
                    Coud you take a look at attachment. The script actually ungluesthe windows


                    nopunch.skp

                    1 條回覆 最後回覆 回覆 引用 0
                    • TIGT 離線
                      TIG Moderator
                      最後由 編輯

                      @rv1974

                      The problem is that the instance is exactly the same 'depth' as the wall - see the Ruby Console for its errors - I can probably trap for that easily... watch for updates...

                      TIG

                      1 條回覆 最後回覆 回覆 引用 0
                      • pilouP 離線
                        pilou
                        最後由 編輯

                        @unknownuser said:

                        I guess you want to have a punched hole that isn't square to the wall's face !

                        no no, a square (rectangle) at the start and end 😉
                        At least any form ! In fact that is a push pull inclined (multiple, if you have some components 😉
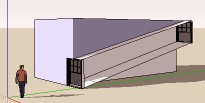
                        angle2.jpg

                        Frenchy Pilou
                        Is beautiful that please without concept!
                        My Little site :)

                        1 條回覆 最後回覆 回覆 引用 0
                        • TIGT 離線
                          TIG Moderator
                          最後由 編輯

                          Pilou...

                          Do what I said...
                          Form a Face over the inner-hole by over-drawing an Edge.
                          Select just the Face.
                          Move the Face.
                          Select the Face and Delete it.
                          The hole/reveals are now 'sloping' in 3D.

                          To make 'splayed' reveals you can Scale the Face before Deleting it...Capture.PNG

                          TIG

                          1 條回覆 最後回覆 回覆 引用 0
                          • TIGT 離線
                            TIG Moderator
                            最後由 編輯

                            Following some feedback...
                            Here's v1.1 http://forums.sketchucation.com/viewtopic.php?p=271170#p271170
                            Components exactly matching wall-depth glitch fixed.
                            Zero depth in dialog trapped.
                            🤓

                            TIG

                            1 條回覆 最後回覆 回覆 引用 0
                            • pilouP 離線
                              pilou
                              最後由 編輯

                              Ah yes, seems thas was also a video about this tricky tips 👍
                              But all that is very "manual" 😄
                              Automatic is more pleasant 😉

                              It's was this one ☀
                              [flash=480,385:344mybyx]http://www.youtube.com/v/_ALbktAE9C8?fs=1&hl[/flash:344mybyx]

                              Frenchy Pilou
                              Is beautiful that please without concept!
                              My Little site :)

                              1 條回覆 最後回覆 回覆 引用 0
                              • pilouP 離線
                                pilou
                                最後由 編輯

                                Why don't put by default infinite depth, and just set depth if wanted? 😉

                                Frenchy Pilou
                                Is beautiful that please without concept!
                                My Little site :)

                                1 條回覆 最後回覆 回覆 引用 0
                                • david_hD 離線
                                  david_h
                                  最後由 編輯

                                  So far. . .so good.

                                  Thanks TIG.

                                  D

                                  If I make it look easy...It is probably easy

                                  1 條回覆 最後回覆 回覆 引用 0
                                  • TIGT 離線
                                    TIG Moderator
                                    最後由 編輯

                                    @unknownuser said:

                                    Why don't put by default infinite depth, and just set depth if wanted? 😉

                                    Because if there were no 'inner-face' to the wall how would it know when to stop extruding the reveals ?
                                    You could add say 1000m as the maximum punch depth and this would be remembered in the model... BUT then if there were ever a wall with no inner-face you'll get v_e_r_y deep reveals ! The 20"/500mm default seems a reasonable depth to start off with ?

                                    TIG

                                    1 條回覆 最後回覆 回覆 引用 0
                                    • EarthMoverE 離線
                                      EarthMover
                                      最後由 編輯

                                      Is it only supposed to punch a hole if the punch depth matches the wall thickness exactly? If I put in a depth greater than the wall thickness, I get no punch....is this correct?

                                      BTW - Thanks TIG for finishing this up and publishing!


                                      Hole punch.jpg

                                      3D Artist at Clearstory 3D Imaging
                                      Guide Tool at Winning With Sketchup
                                      Content Creator at Skapeup

                                      1 條回覆 最後回覆 回覆 引用 0
                                      • pilouP 離線
                                        pilou
                                        最後由 編輯

                                        @unknownuser said:

                                        Because if there were no 'inner-face' to the wall how would it know when to stop extruding the reveals ?

                                        Cousin Component Punch punches all the volume without to know the size? 😉

                                        @unknownuser said:

                                        then if there were ever a wall with no inner-face

                                        don't launch the script ❓

                                        Frenchy Pilou
                                        Is beautiful that please without concept!
                                        My Little site :)

                                        1 條回覆 最後回覆 回覆 引用 0
                                        • TIGT 離線
                                          TIG Moderator
                                          最後由 編輯

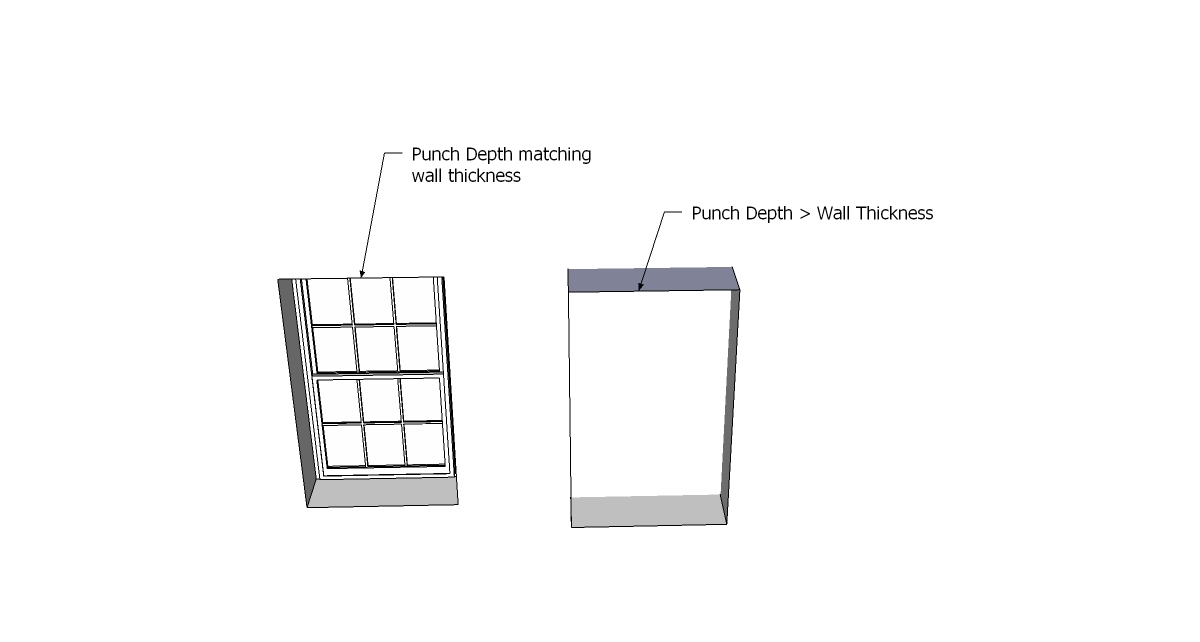
                                          The way it works is you set the maximum punched depth [the default is 20"/500mm, but you can permanently change it for that model at any time] - just decide on a value knowing that all your various wall thicknesses are probably always less than that.
                                          The holes are them punched to match the actual wall thickness, IF it's =20" or less [the hole's reveals also match the inner-face material/layer] - BUT if you have a one-face wall [or a very thick wall] then the reveal depth is made as the maximum =20" [and the reveals then match the outer-face material/layer].

                                          The code that checks for the inner-face is still not perfect - but I am sleeping on it...
                                          Currently a 'ray' is cast internally from the front-face, centered on the cutting-component instance, until it finds a suitable face that's parallel and facing the right way. If there isn't one it then uses the default reveal size... It's currently possible to trip it up if your component also has a face/edge exactly on the center and at the same distance from the front-face as the real candidate for the inner-face - the ray can mistakenly find that instead of the required face and so it misses it and 'defaults the reveal depth... I suspect this is your case ???
                                          It is possible to test in other ways - for let's say faces' planes and points being 'on' them at the correct 'thickness'... so I just need to think up some better coding solutions - maybe tomorrow - I'm tired now........... 🤓

                                          TIG

                                          1 條回覆 最後回覆 回覆 引用 0
                                          • EarthMoverE 離線
                                            EarthMover
                                            最後由 編輯

                                            For me, the raytest seems to miss the parallel wall in every case where my depth is greater than the wall thickness. I'm just using generic SU windows to test, but also tried with simple shape components I made myself to be sure there was no line in the direct center. Every time it seems to be punching through to the bounds of the punch depth. No worries though, I typically offset my walls to the same thickness, so I can just math the punch depth with that and all is well. Overall, it's a great solution for an age old ruby puzzler. 👍

                                            3D Artist at Clearstory 3D Imaging
                                            Guide Tool at Winning With Sketchup
                                            Content Creator at Skapeup

                                            1 條回覆 最後回覆 回覆 引用 0
                                            • 1
                                            • 2
                                            • 3
                                            • 4
                                            • 5
                                            • 9
                                            • 10
                                            • 1 / 10
                                            • 第一個貼文
                                              最後的貼文
                                            Buy SketchPlus
                                            Buy SUbD
                                            Buy WrapR
                                            Buy eBook
                                            Buy Modelur
                                            Buy Vertex Tools
                                            Buy SketchCuisine
                                            Buy FormFonts

                                            Advertisement