[Tutorial] How to use layered materials in Kerkythea
-
In this tutorial I want to show how the layered material system in Kerkythea can be used. Maybe not all materials here are physically perfect and there might be much more that I haven't found out in Kerkythea.
Layered materials allow- to reduce a tiling effect on a texture by adding more variation
- to combine materials: car paint material + water material => waterdrops on car surface
- to make complex materials that look for example old, dirty or more natural and that otherwise would require immense texture sizes
1. Click on the menu item "Settings" -> "Materials...". Double-click on a material and the Material Editor will open.
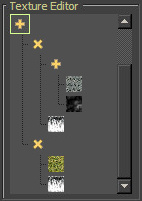
2. If you click on the diffuse part of the material (or ambient and all others), there appears a + in the texture editor section on the bottom. When you right click on it, it is possible to add a colour, texture or a procedural or layers:
+ additive layer: All materials after the + will be overlaid by adding them. The result will be very bright, so to keep it physically correct, the weights should sum up to not more than 1.000 (for example one material 0.4 + one with 0.6)
x mask layer: All materials after the x will be multiplied. The multiplication works according the following scheme: white(1) * black(0) = black(0), white(1) * white(1) = white(1)
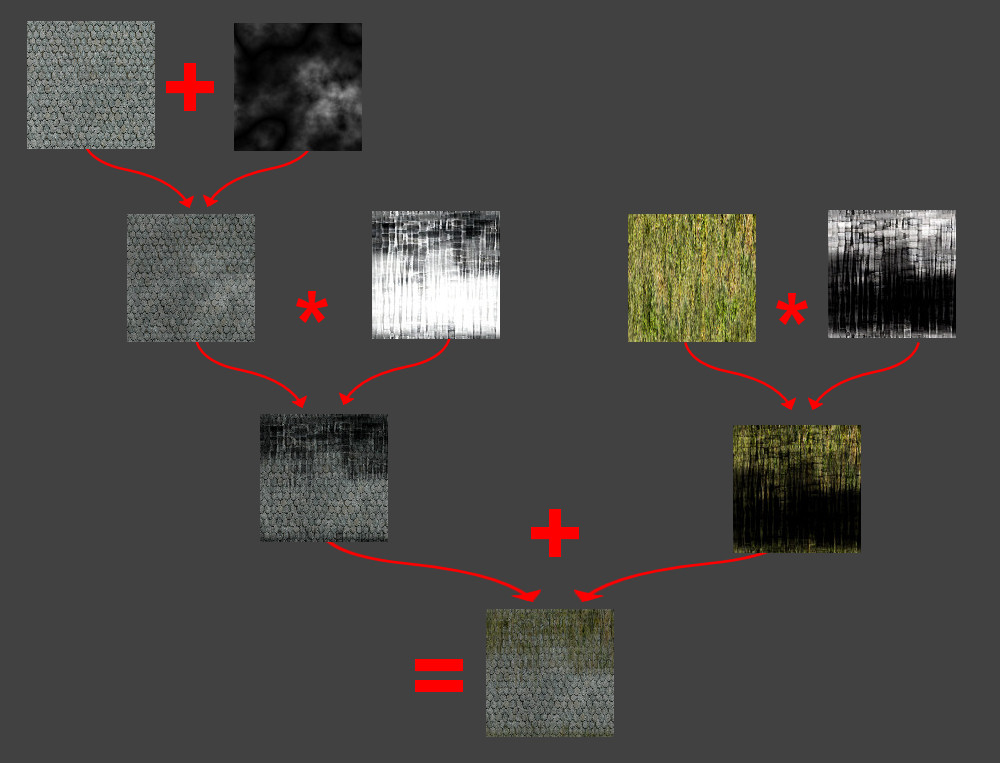
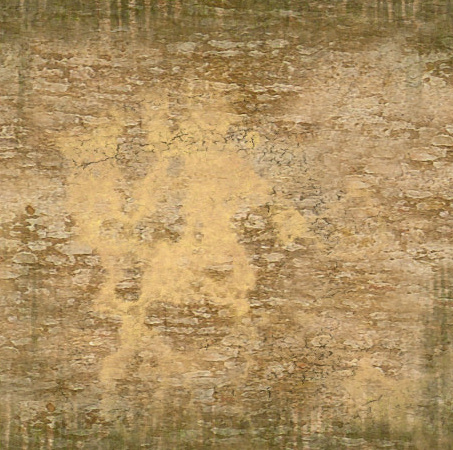
Here, you don't have to care about weights, because the maximum will remain 1.000.3. This way, I made this slate roof for my Limburg monastery model.
First, I laid a "windy texture" procedural with a weight of 0.1 over the slate texture (weight 0.9).
Then I multiplied it with a mask so that some areas will be blackened where the mosses should appear.
For the moss texture, I used the same mask, but I check the checkbox "inverted"
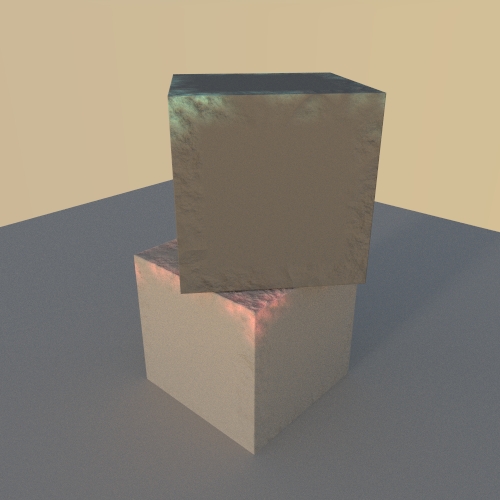
4. If you use the "wireframe" procedural for your mask, you can apply a different material for the border areas of a face. The wireframe procedural can also differ between inner and outer edges (check "hard inner edges"). This way it is possible to apply a different type of dirt around windows than on the borders of the wall.
Unfortunately, the options in Kerkythea are limited and the wireframe procedural can not selectively use only the upper edges of a face (or lower edges).
5. Here is a Kerkythea material pack which contains most materials from the Limburg monastery model.
http://rapidshare.com/files/333424289/Limburg.mat.zip
It requires some additional procedurals that can be downloaded on the Kerkythea website -
Wow Aerilius, that's very useful tutorial
 Thank You!
 -
Yes, Aerilius, thanks for all this. My problem is always that whatever I can see while doing it (and understanding what is happening why) is always easier - this is like modelling in SU - "what you see is what you get".
In KT however - no matter I did read a lot of tutorials and frequented the forums - it is not like that and many times it is a trial and error to achieve what you want.
Thanks for the material pack, too - it will also be very useful to dig into them to see (and try to understand) what is happening and why.
I think the material editor of KT is so powerful that only a fraction of users get around its complexity.
-
Nice tutorial about KT texture editor (note there is also material layers in KT. KT has separate material and texture layer systems). Missing synthesis layer - that would make the tutorial complete... About wireframe procedural and upper/lower edge, if you combine that with a procedural ramp as a mask you can limit it's affect only to upper or lower edges.
-
Yes thank you for this. I have been working a lot with Kerkythea,and I find that I am slowly starting to be able to take advantage of some of it's power. This just really helps to fill in one of the blanks I have been working on.
I am in awe of your work, as well.
THX -
Here is a quick example of procedural ramp as mask. btw if you in procedural textures, don't forget to get Procedural Textures by Chris Hegarty (Windows).
-
@aerilius said:
In this tutorial I want to show how the layered material system in Kerkythea can be used. Maybe not all materials here are physically perfect and there might be much more that I haven't found out in Kerkythea.
Layered materials allow- to reduce a tiling effect on a texture by adding more variation
- to combine materials: car paint material + water material => waterdrops on car surface
- to make complex materials that look for example old, dirty or more natural and that otherwise would require immense texture sizes
1. Click on the menu item "Settings" -> "Materials...". Double-click on a material and the Material Editor will open.
2. If you click on the diffuse part of the material (or ambient and all others), there appears a + in the texture editor section on the bottom. When you right click on it, it is possible to add a colour, texture or a procedural or layers:
+ additive layer: All materials after the + will be overlaid by adding them. The result will be very bright, so to keep it physically correct, the weights should sum up to not more than 1.000 (for example one material 0.4 + one with 0.6)
x mask layer: All materials after the x will be multiplied. The multiplication works according the following scheme: white(1) * black(0) = black(0), white(1) * white(1) = white(1)
Here, you don't have to care about weights, because the maximum will remain 1.000.3. This way, I made this slate roof for my Limburg monastery model.
[attachment=2:bbsl1616]<!-- ia2 -->layered_materials1.jpg<!-- ia2 -->[/attachment:bbsl1616]
First, I laid a "windy texture" procedural with a weight of 0.1 over the slate texture (weight 0.9).
Then I multiplied it with a mask so that some areas will be blackened where the mosses should appear.
For the moss texture, I used the same mask, but I check the checkbox "inverted"
[attachment=1:bbsl1616]<!-- ia1 -->layered_materials2.jpg<!-- ia1 -->[/attachment:bbsl1616]4. If you use the "wireframe" procedural for your mask, you can apply a different material for the border areas of a face. The wireframe procedural can also differ between inner and outer edges (check "hard inner edges"). This way it is possible to apply a different type of dirt around windows than on the borders of the wall.
[attachment=0:bbsl1616]<!-- ia0 -->layered_wall.jpg<!-- ia0 -->[/attachment:bbsl1616]Unfortunately, the options in Kerkythea are limited and the wireframe procedural can not selectively use only the upper edges of a face (or lower edges).
5. Here is a Kerkythea material pack which contains most materials from the Limburg monastery model.
http://rapidshare.com/files/333424289/Limburg.mat.zip
It requires some additional procedurals that can be downloaded on the Kerkythea websiteBut how did you get the dirt to the wireframe procedurals???
perhaps you tried it already.... but isn't it possible to mask the wireframe procedural and mask it with the ramp procedural. -
-
Thanks for sharing this.
Very clear explanation, great result!
Material editor has taken me a long time to get to grips with (im certainly not saying i have got it yet, in fact this post shows me how far i have to go) but it is EXTREMELY rewarding. Many thanks again
-
FYI: Your avatar is an ape, not a monkey.

@dale said:
Yes thank you for this. I have been working a lot with Kerkythea,and I find that I am slowly starting to be able to take advantage of some of it's power. This just really helps to fill in one of the blanks I have been working on.
I am in awe of your work, as well.
THX -
@aerilius said:
.. Here is a Kerkythea material pack which contains most materials from the Limburg monastery model.
http://rapidshare.com/files/333424289/Limburg.mat.zip
...thanks for sharing your GREAT work Aerilius!
Hello! It looks like you're interested in this conversation, but you don't have an account yet.
Getting fed up of having to scroll through the same posts each visit? When you register for an account, you'll always come back to exactly where you were before, and choose to be notified of new replies (either via email, or push notification). You'll also be able to save bookmarks and upvote posts to show your appreciation to other community members.
With your input, this post could be even better 💗
Register Login


Advertisement