Help Me Draw A Dome [TUTORIAL]
-
Hi Gai
I'm stuck again.
I did the following.
- I selected my entire sketch, Right Click and selected Make Group
- I then managed to place my rotation tool at the origin along the blue axis and rotated the entire sketch whereby the seam seperating 2 pieces was exactly on the red axis.
- I then selected the 2 pieces sharing the red axis and then right clicked it and selected make unique.
- I then managed to select the top 2 pieces and hide it.
- After hiding the top pieces, I selected the 2 pieces on the inner dome and right click > Make Unique.
- I then turned on the visibility of the component axes.
I am currently stuck at this stage. It seems that my inner dome is not aligned properly for some reason.
I have attached the file.In the interim, I have downloaded the file you attached in your last post. While assisting me in resolving this problem, I'm sure we can go ahead and continue. I can always try to resolve my sketch later.
Look forward to hearing from you
Thanks
Regards
D0me
-
Well, it seems that you either skipped the step when we aligned the component axes (see a couple of posts above) or maybe accidentally went on modelling with a version prior to that (I also have like a dozen of different versions with different stages of the model). Or maybe you played around with the reload function and incidentally reloaded an older version of the inner dome component? Who knows - in the component browser it is also upside down like before.
The outer dome components have the axes aligned correctly.
I also noticed that you hid the geometry inside the outer dome components, not the components themselves (this is of course not a problem but you need to remember this when you want to unhide it).
Now you can do two things
- Do that step (again) when we aligned the axes
- use my version and don't tell the teacher.

-
Probably missed out a step somewhere along the line.
Anyways, once we complete this excercise, I will be doing an exam (Completely redo the dome with a totally different height and diameter). It's good that my mistakes are pointed out now. I will be sure to not make these mistakes on the recap.
For now, we can use your version (Pass me your version under the table while the teacher is not looking)

-
@d0me said:
(Pass me your version under the table while the teacher is not looking)
Okay, it's at the bottom of this post:
http://forums.sketchucation.com/viewtopic.php?p=215353#p215353

Now have you been thinking about the possible wall thickness of your "entrance"?
Well, it's not dead necessary - all depends on the shape (if it has some visible "framing" from outside maybe) -
I think the wall thickness can be the same as the entire dome which is 3 Inches.
-
Okay, some preparation if you excuse me...
I noticed that I have also screwed up my version a bit (dunno when) and we actually have three unique instances of the outer dome - instead of just the two we need. If you right click on the #1 version (that's the unique one) in the component browser and "Select instances", it will highlight three and the Entity info also says there are three of them (the left one in the picture should be the original version of the component)
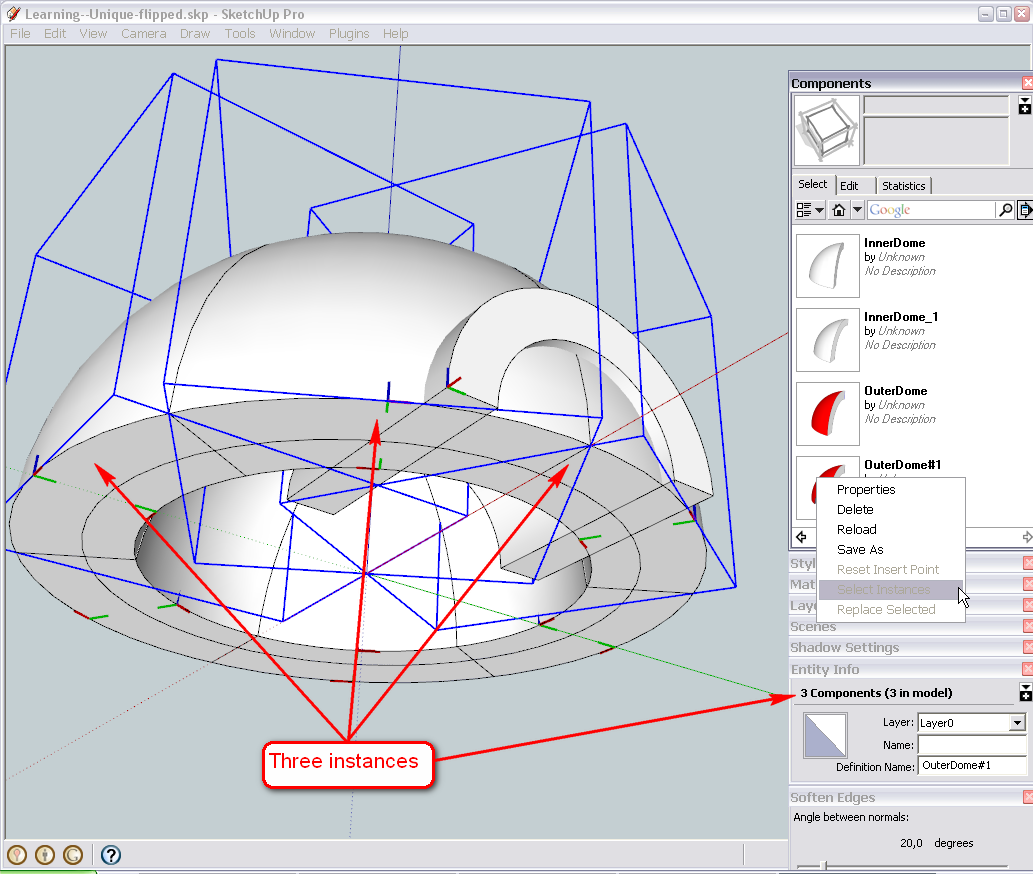
So select this left one, right click the "should be" one in the component browser and "Replace selected". Sorry for the extra hassle (but in case you need this for later, a good tip I hope).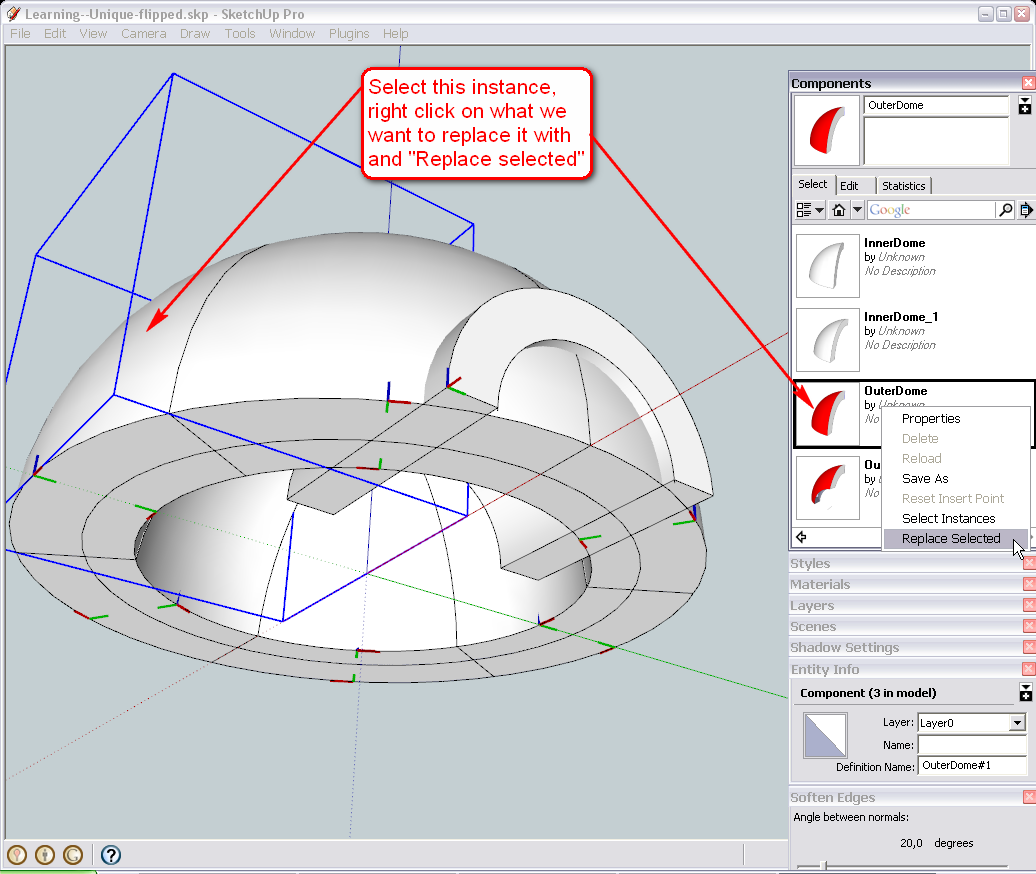
Now let's start our entrance by first drawing a 18" long line on the green axis with the line tool (it could be anywhere actually - it was quite arbitrary that I started it at that endpoint on the seam). You can type 18 and hit Enter as usually.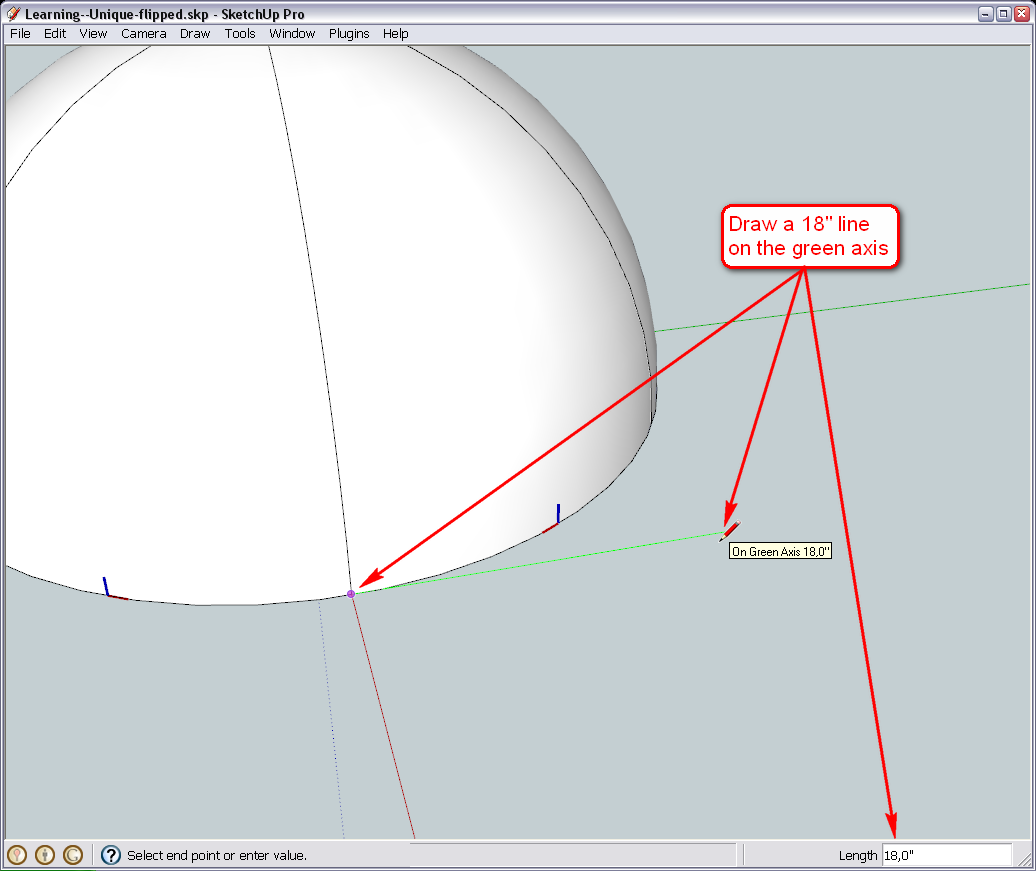
Now select the line then pick the Move tool (we haven't used it yet I believe) and grab the line at its Midpoint (midpoints give this cyan inference when not grouped).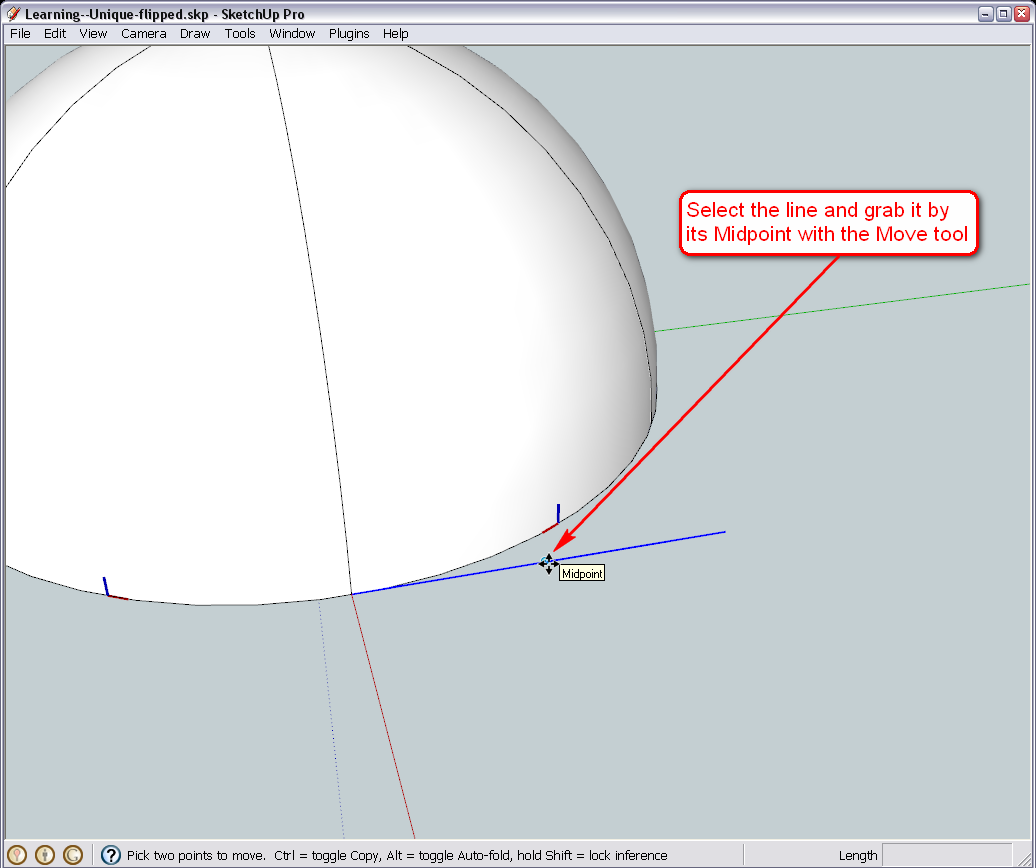
Move it too the seam so that it will be exactly in the "middle" in front of our igloo.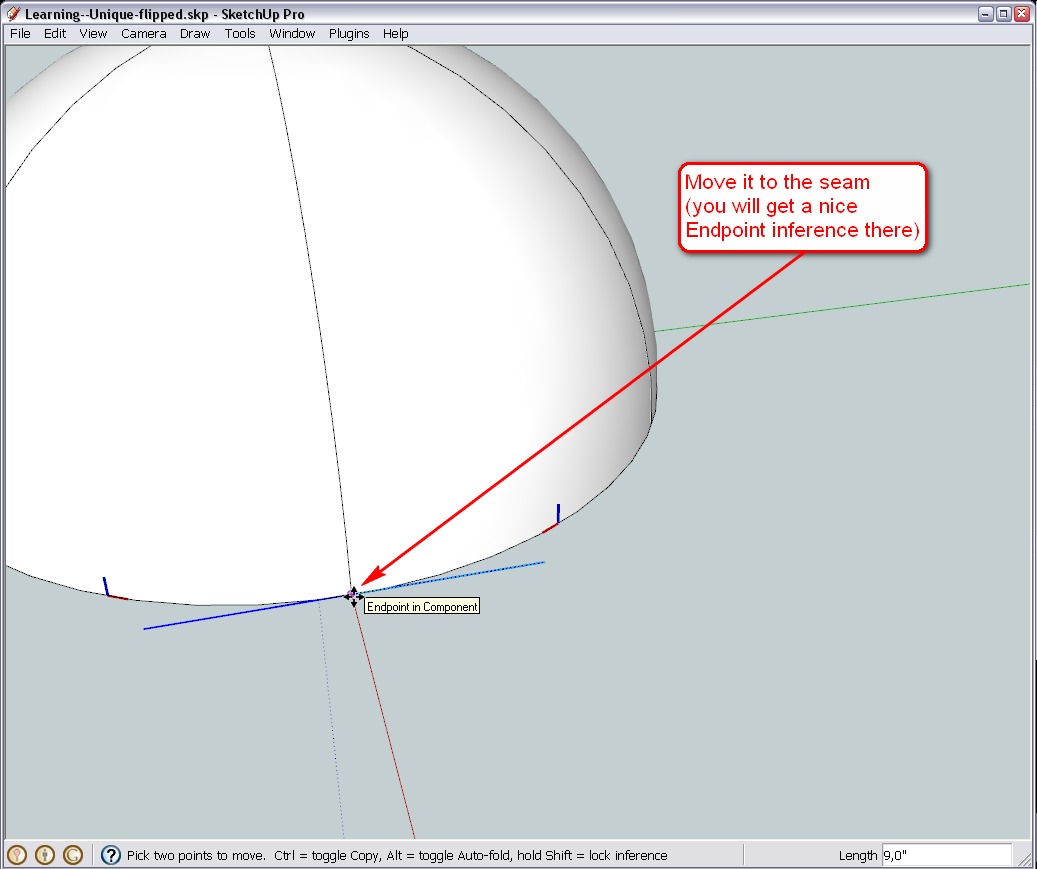
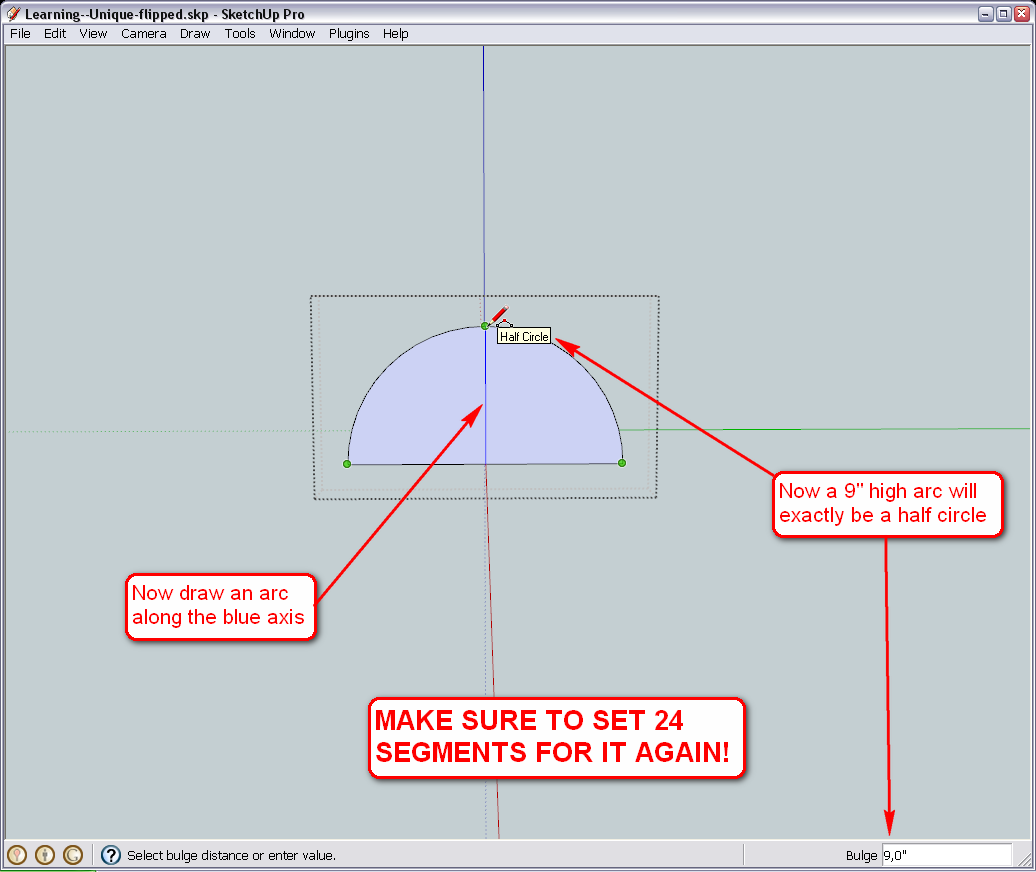
Now something important (to make things more comfortable later); select the line if it is not selected any more, go to the Edit menu and Make it a group (for some reason, when only one entity is selected, you cannot group it from the right click/context menu - same with components). We need this to let us hide the rest of the model with our Ctrl+H custom shortcut.Now double click on the group, pick the Arc tool and make sure you are using 24 segments again (type 24s and hit Enter) then make your arc on the blue axis. If you cannot have the blue axis inference because the arc wants to snap to every single endpoint in your igloo model, press Ctrl+H to hide the igloo (this is why we grouped it at the above, early stage). In this case a 9" arc will be a Half circle for which we get a nice inference tooltip.
Finally, pick the PushPull tool and extrude your tunnel through the whole structure. Now it doesn't matter how long you extrude it just make sure that the whole face on the other side be in the dome.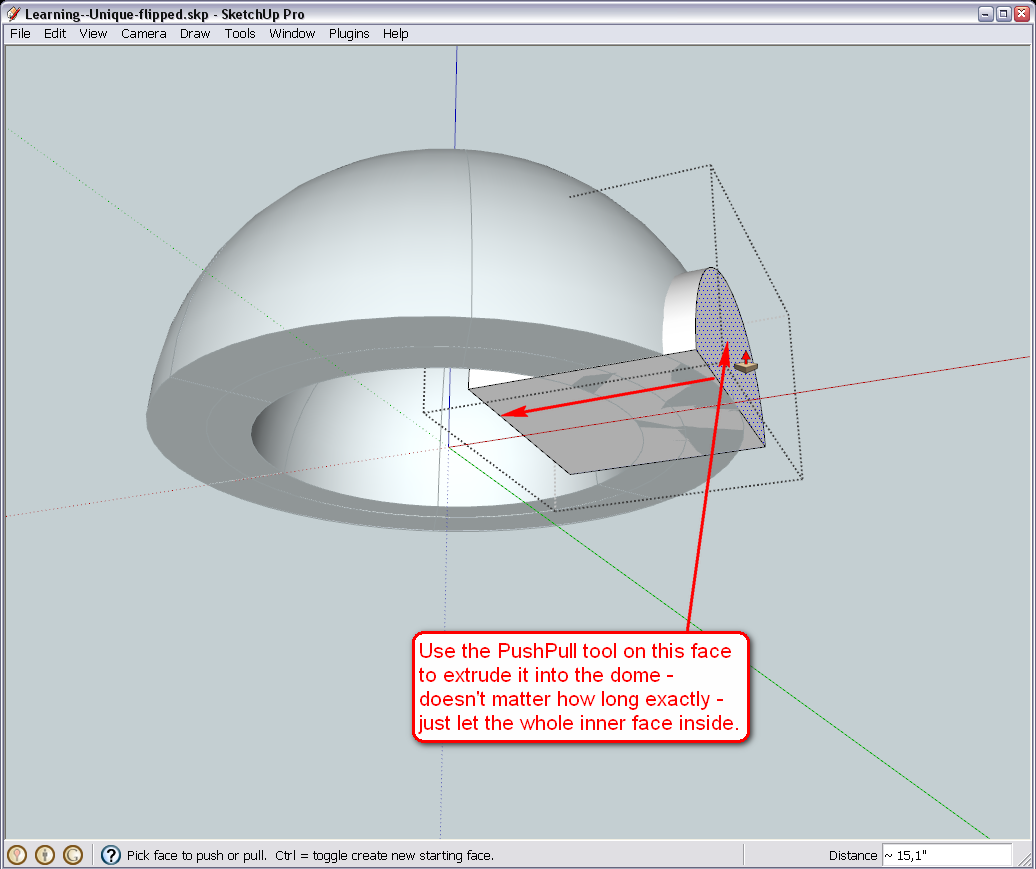
Next step will be some offsetting to make thickness and intersecting the whole thing.
Back to deleting spammers in the Admin panel...

-
Hi Gai
SU Has some super cool features especially that Push/Pull tool
I think I'm on track thanks to your version of the file (Shhhhhh!!! don't let Gaieus (Teacher) hear that)

Where to next, Sir?
-
Okay, everything seems to be fine now.
Let's make the tunnel now. There are two ways and we'll also see the differences between them.
To make that 3" thickness, we will first use the Offset tool
When you do not select anything but hover over a face, it will autoselect all and offset all the perimeters. There are problems with this tool at certain extremities (try to offset the whole face by 3"!) and as far as I know, ThomThom is contemplating on a plugin that would do a better job.
Now we will only offset the arc however so select it first, start using the tool to offset it inwards then type 3" and hit Enter.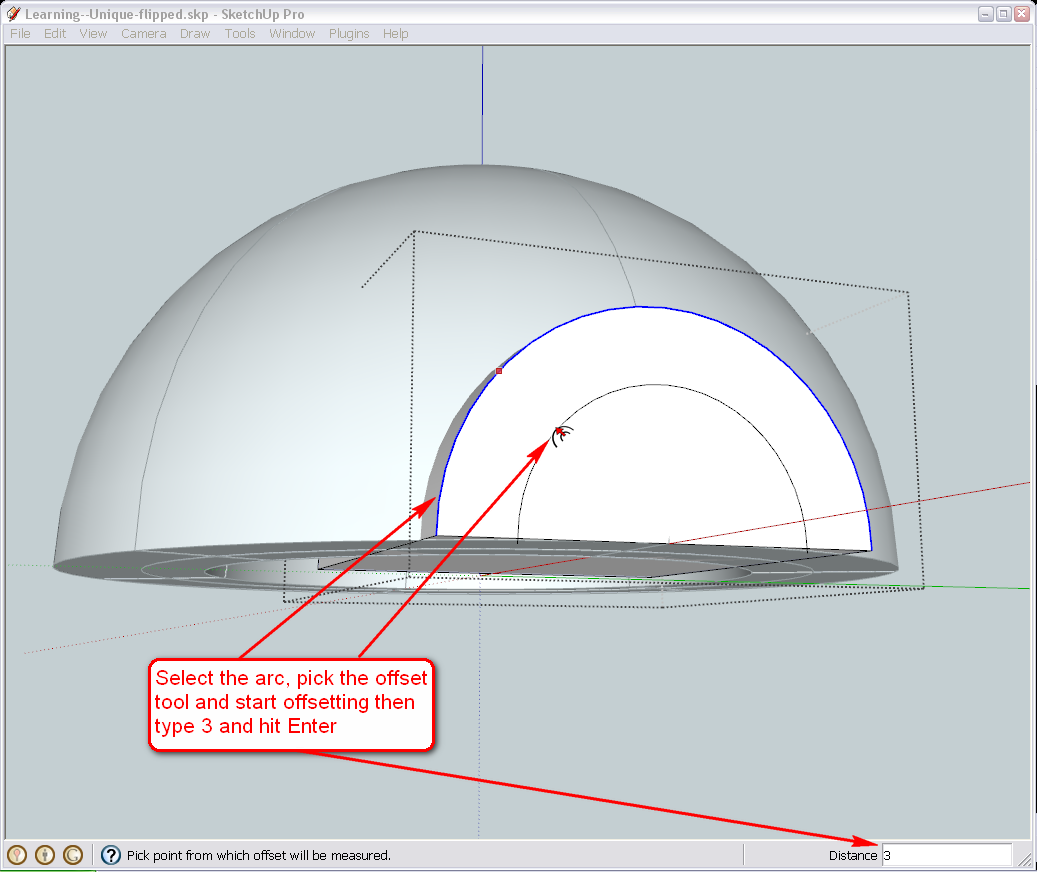
Now if we take a closer look, we'll see that the Offset tool did not make a precise job - but this is of course only due to our arc being segmented and the last segment only "theoretically" tangent to the vertical.
If we set our units precision to more decimals, it will even display the inaccuracy (otherwise it would say ~3"). If you wish, we can keep this as it will nopt affect our drawing detrimentally (is that a good word here? English is not my native tongue)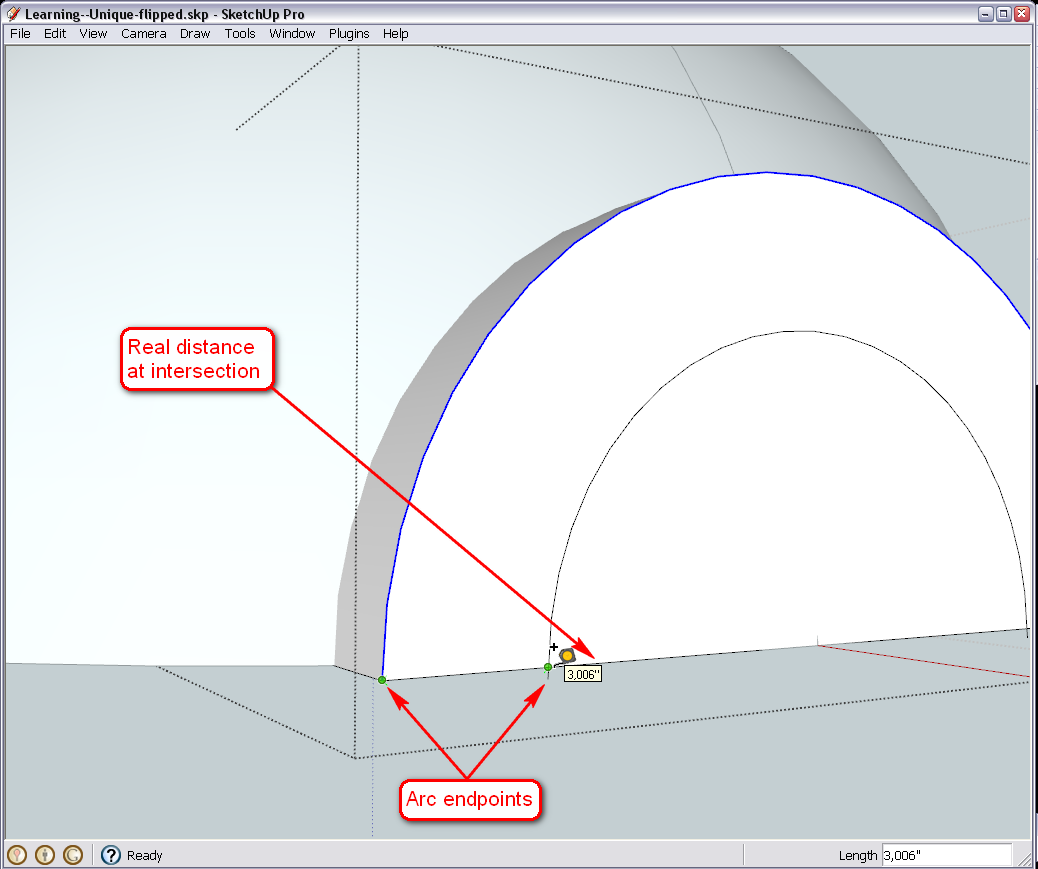
So instead of the Offset tool, we can draw the 3" distances from the endpoints of the outer arc...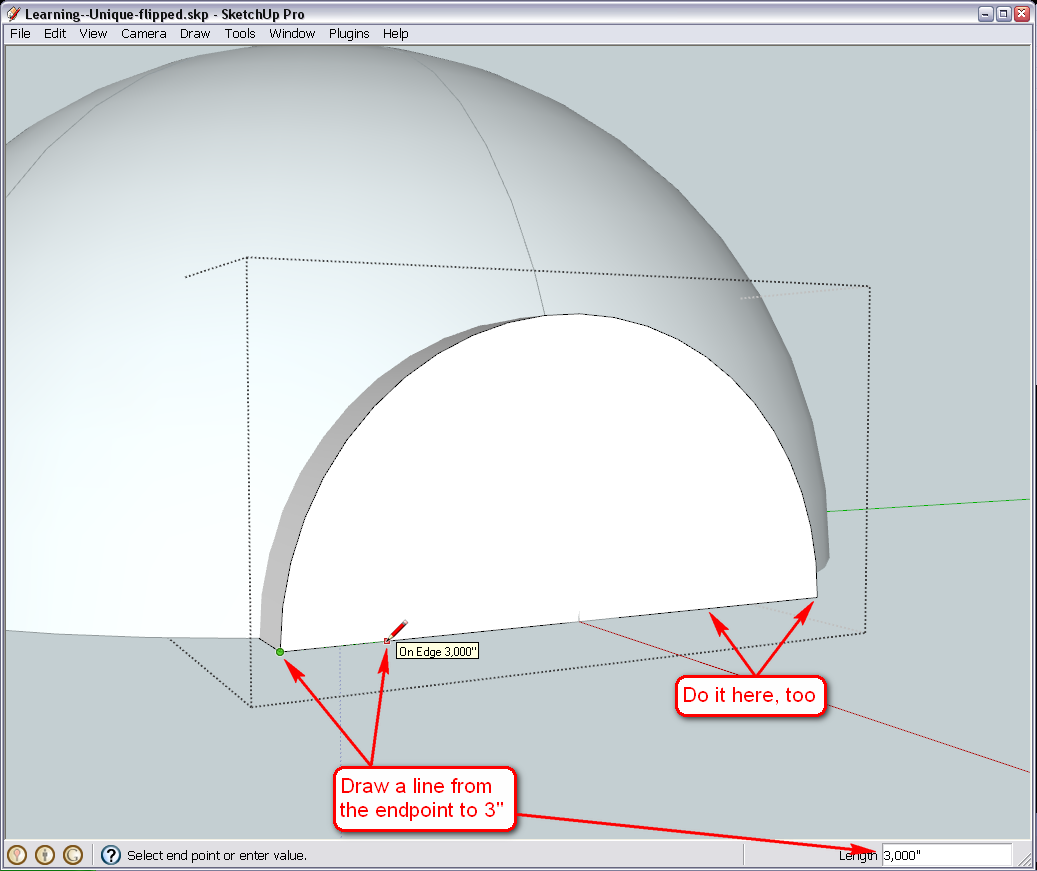
...and draw a new arc (again, a Half circle) from these endpoints. Make sure to change the segment count to 24 again.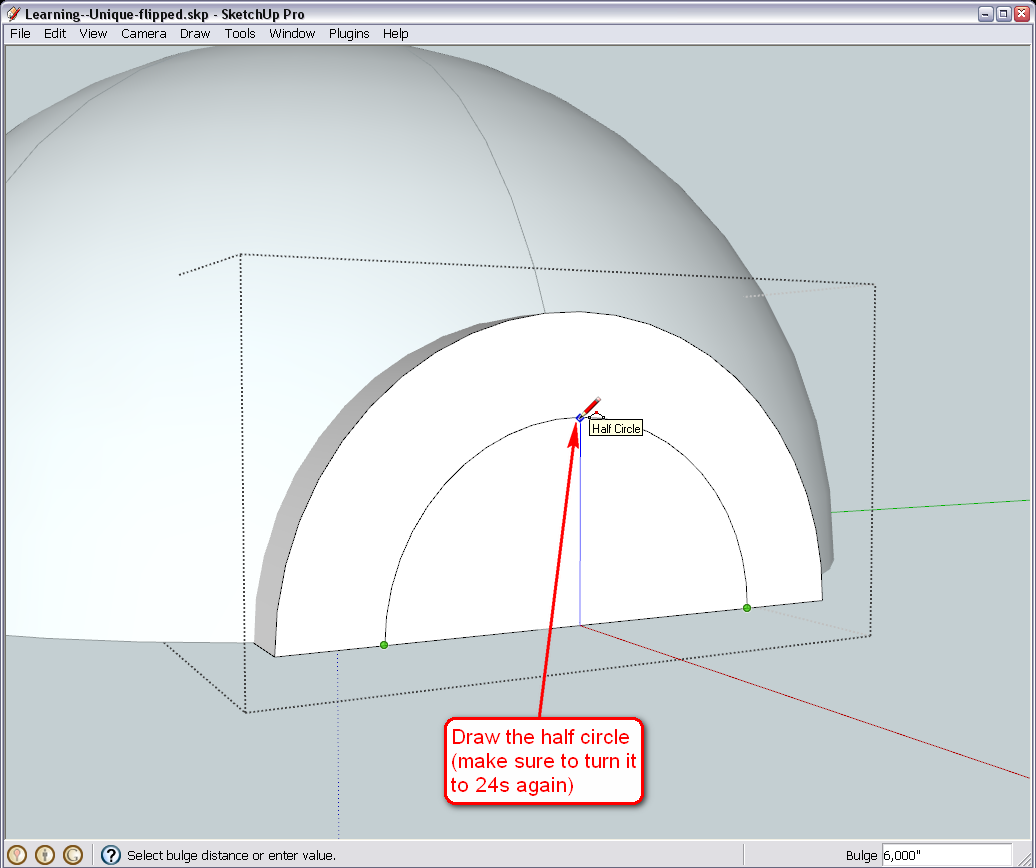
Finally, PushPull the "difference" in.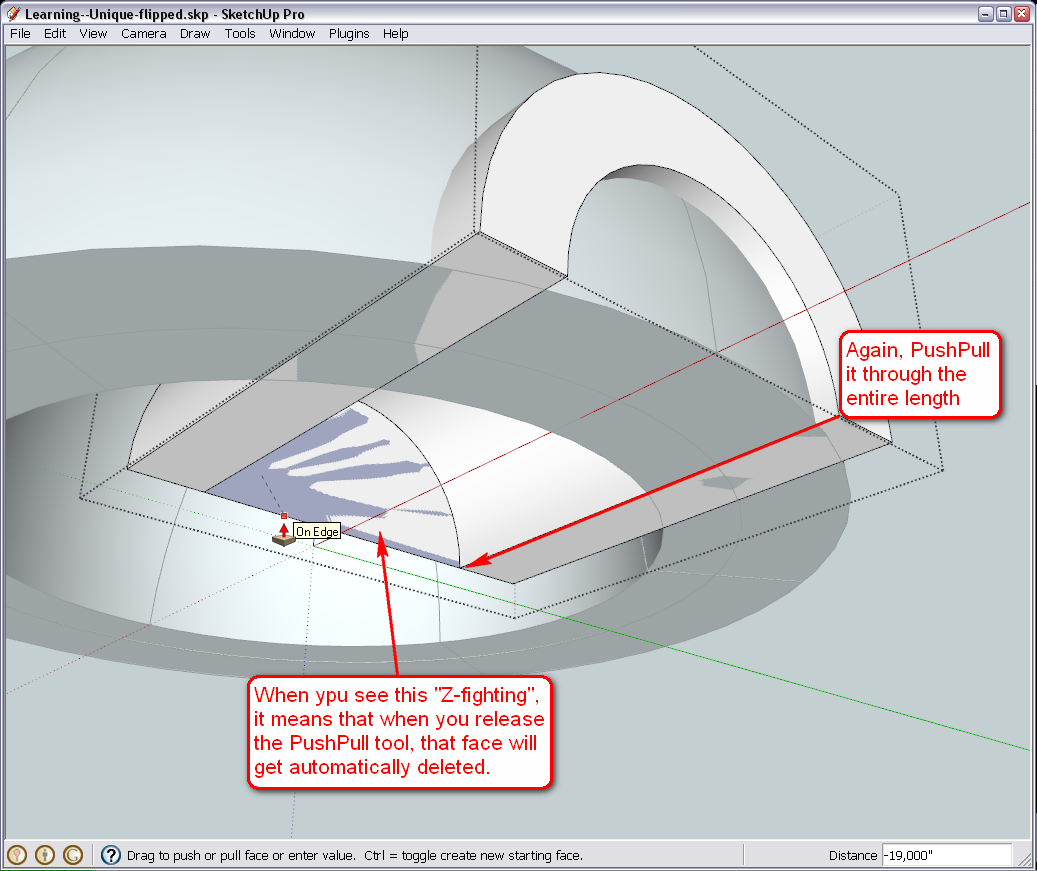
If the starting and ending faces are perfectly parallel to each other, SU will presume that we are to draw an opening (say a window in a wall with thickness) and will automatically remove the ending face.
Right before it does this, you can see the two faces in the very same space but one oriented with its back face to the camera. In such cases, when SU cannot decide which coplanar face to display, you can see this "flickering" that is called "Z-fighting".In 2D applications, where x and y are the natural horizontal and vertical extents of the screen, the apps generally have some kind of a tool to bring something to the front or send it back etc. (even MS Word has this). This is called "Z-value" - the higher it is, the greater priority it gets to be displayed on top of something with a lesser value.
In a 3D app like SU, there is no reason for this as (theoretically) everything in real world has some thickness and so should be in their 3D models. There are limitations however but they are out of the scope of this lesson now but I thought a few word about this Z-value and Z-fighting in Su do not hurt.
-
Hi Gai
I'm on track.That info about Z Fighting is quite interesting. In fact, thats the first time I've heard such a term.
You've done a phenominal job on the opening so far. I honestly did not have this type of opening in mind and you've really taken the creativity of my project to a new Level. Thanks
I guess the next step is to take out the back piece of the opening that was pushed into the dome.
-
Hi D0me and good morning!
Yes, something like that. We have already done intersection - we are going to use that technique again.
First of all, let's hide the inner dome pieces again so that they will not get intersected with the outer pieces (remember when your dome turned into a chess-board?).
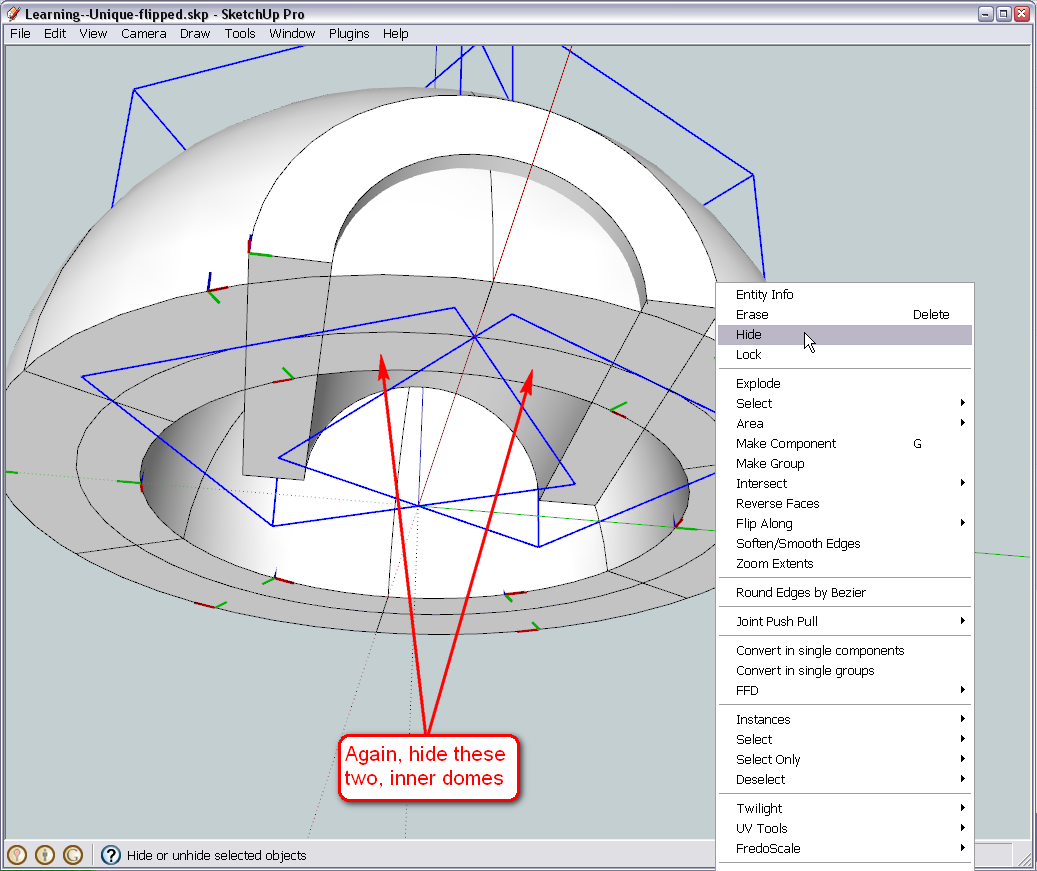
Now edit ONE of the outer components, select all by triple clicking on the bare geometry, right click and "Intersect... with model".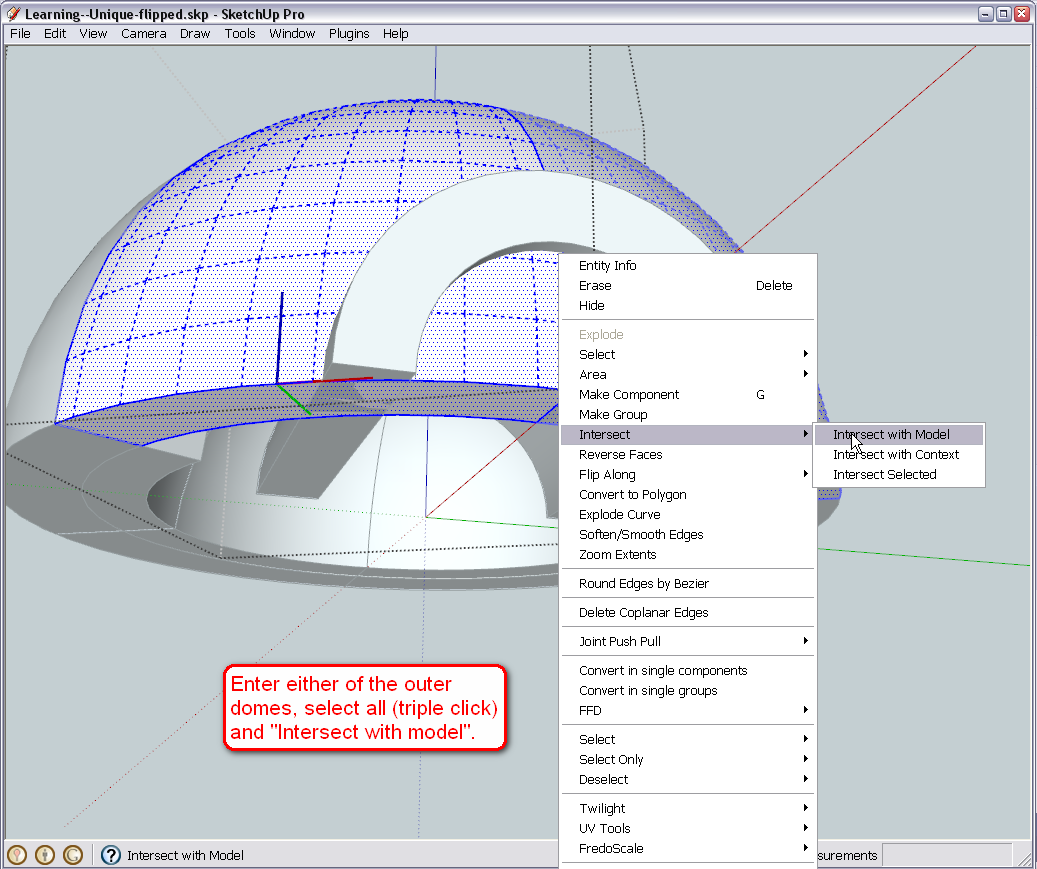
If you now hide the rest of your model (Ctrl+H, remember), you get a clean view of what is needed to clean up. Start carefully deleting unwanted geometry. Note that this is a sensitive part as we don't want to delete what we need but keep in mind that there is the Undo command (Edit menu or Ctrl+Z) all the time should you make any mistake so do it bravely.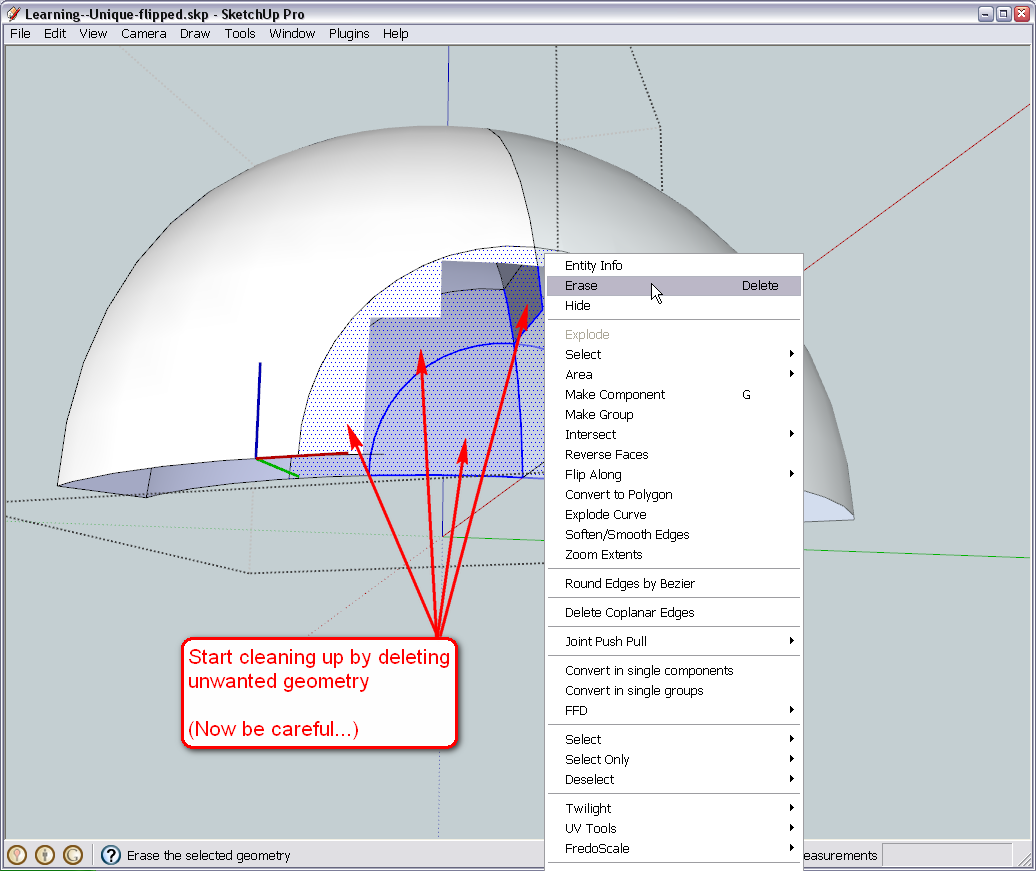
As you can see, this is where we make use of components and that we have a pair of mirrored components mated. We only work with one and the other is modified automatically.
We may need to redraw some pieces to close open gaps but that's already a piece of cake.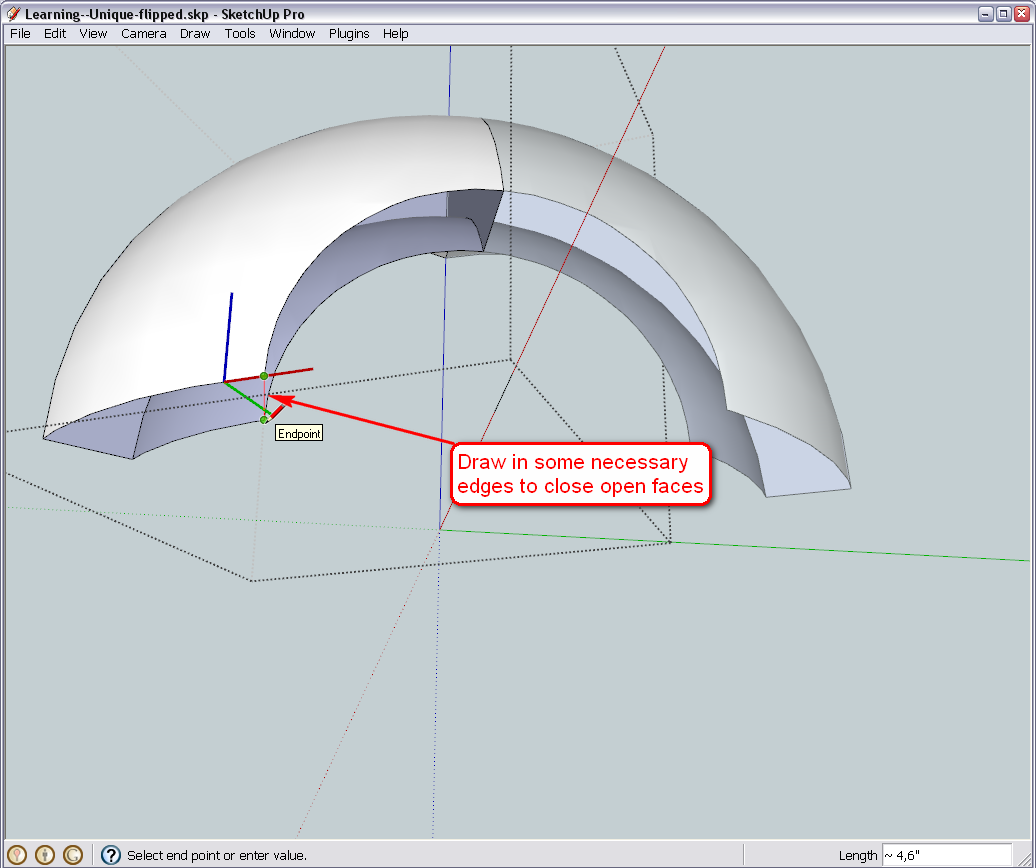
Now we change components - unhide the inner pieces (Edit menu) and hide the outer ones.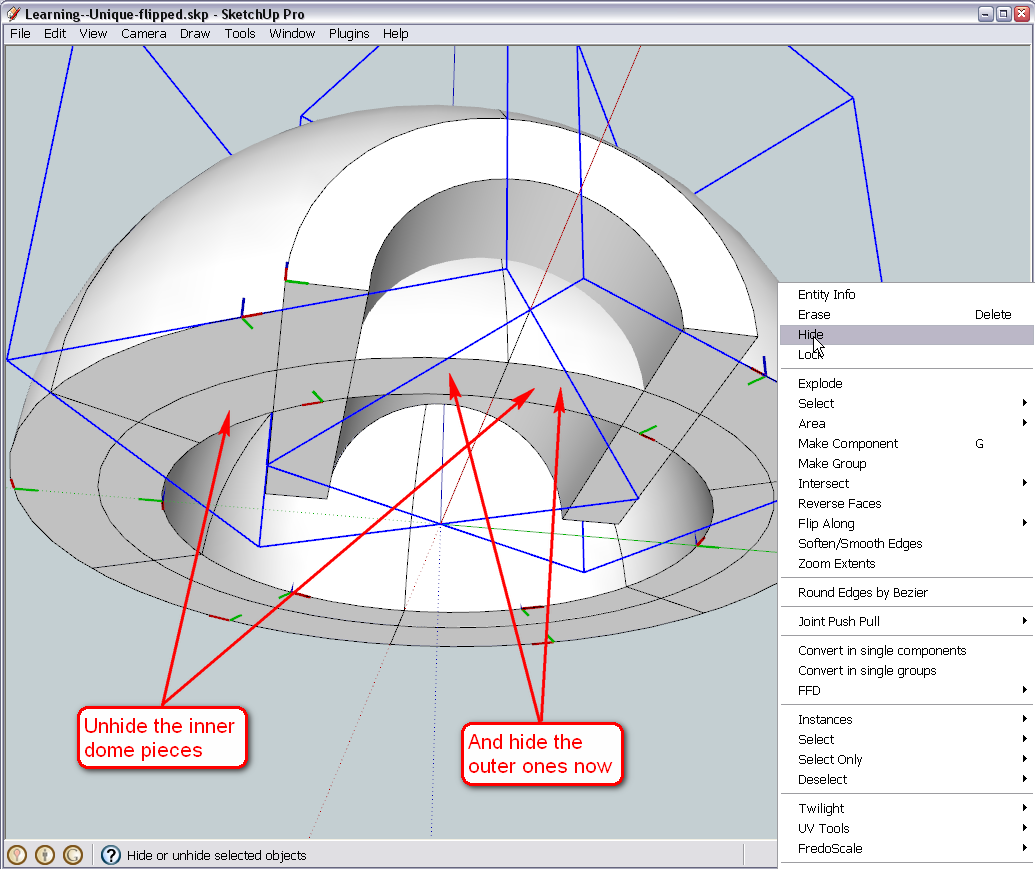
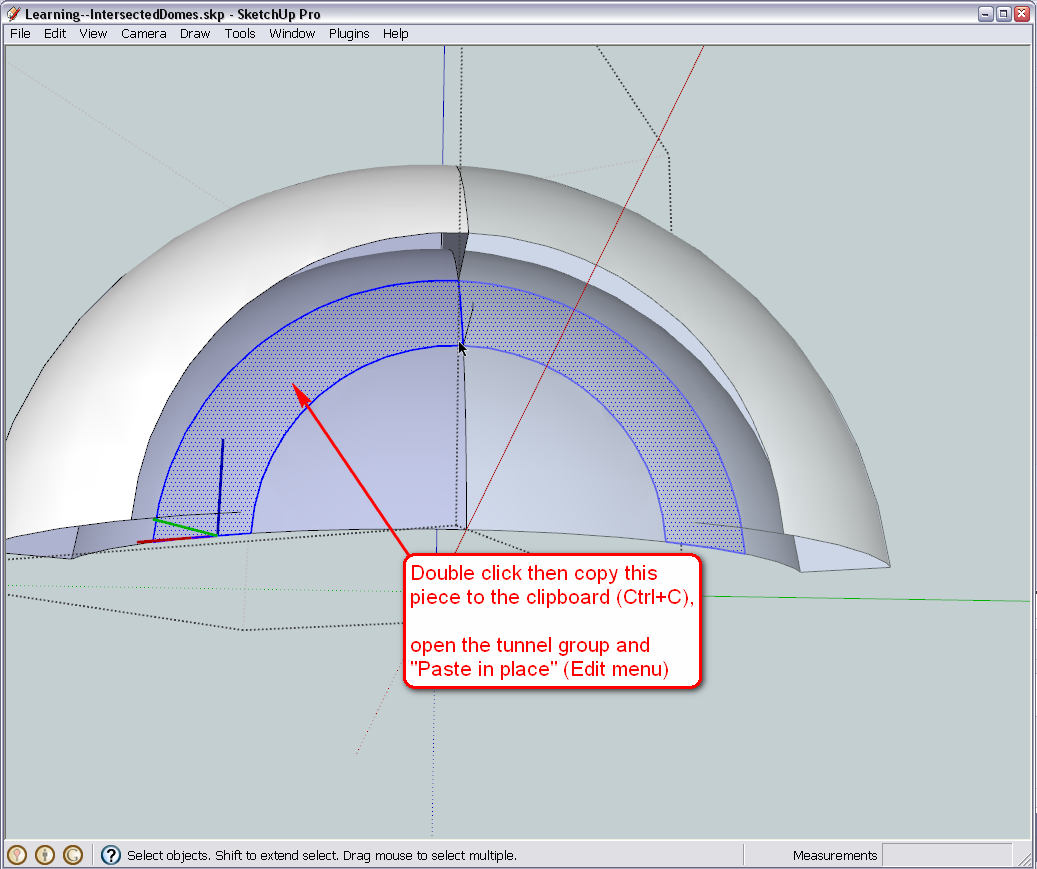
Do exactly the same with the inner components as you have done with the outer ones (use the "hide/unhide rest of model" - Ctrl+H - command to your needs again) Except one step - and this is extremely important! - Copy this piece I selected onto the clipboard before deleting its face then close the component, edit the tunnel (it's a group now), go to the Edit menu and "Paste in place". We need this little, curvy part later in this group. But if we get rid of it now, it will be hard to recover so therefore this extra step even before we deal with the tunnel.BTW you can assign a shortcut key to this very handy tool (Paste in place), too. I for instance have Shift+Ctrl+V (Ctrl+V is a general "Paste" shortcut in every app - just like Ctrl+C for copying or Ctrl+X for cutting)
And we end up with something like this.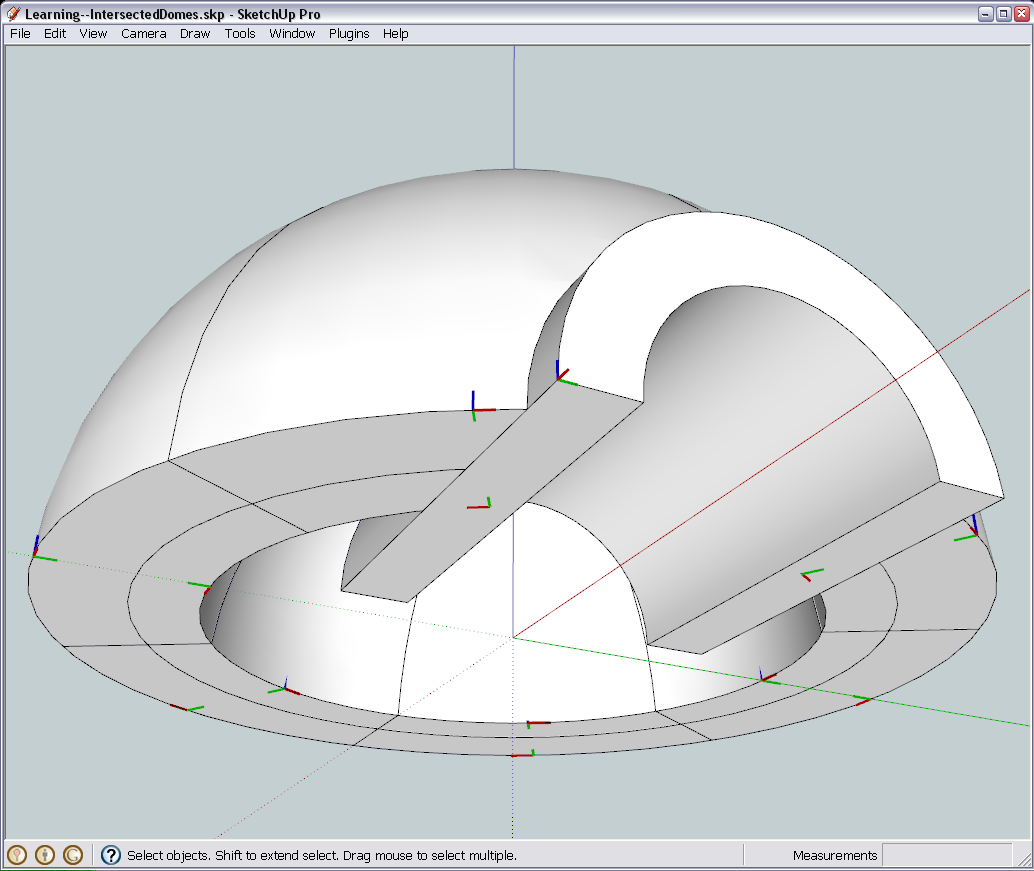
If you do not like those gaps in the domes where we intersected with the tunnel, we can deal with them later - as well as giving a final shape to the tunnel itself.(BTW the shape of the tunnel - I guess it is not bad to keep a flat front face in case you would like to apply some sort of "door" or such...)
-
Inline and on track, Sir.
I've done the cleanup as accurately as possible.@unknownuser said:
(BTW the shape of the tunnel - I guess it is not bad to keep a flat front face in case you would like to apply some sort of "door" or such...)
The way you have it seems fine although a door sounds good. Is it difficult to add or remove the protruding end at a later stage?
-
Well, if we didn't want to have something like that in the front, we wouldn't have needed to give thickness to the whole tunnel actually. I was also thinking about other solutions (maybe even simpler) but of course, we can replace that piece any time "borrowed" from an existing, untouched component from the outer dome.
BTW - the copy > paste in place was fine just you did not paste it inside the tunnel group but outside of everything. Not a big deal, we can always put it back later (the same way).
If we did the outside with the same technique, it could be without that flat face. (If you have a backup copy of the previous version, save it somewhere and we can go along that way, too). But we will also need to texture the whole thing. I'll look some good, similar examples up if you wish.
-
Hi Gai
@unknownuser said:
If we did the outside with the same technique, it could be without that flat face. (If you have a backup copy of the previous version, save it somewhere and we can go along that way, too). But we will also need to texture the whole thing. I'll look some good, similar examples up if you wish.
No Need to change the course of action at this time. What I would do is when i am doing the exam, I would make this change at this stage. I will need your help though at that time.
For now I think we continue as is.
-
How about now acting completely on your own?

The task would be to- enter the tunnel group (i.e. edit it),
- select all by triple clicking,
- intersect the selection with the model and
- clean up the mess.
Nothing that we haven't done so far - even with much more complex geometry.
I am pretty sure you could do it but of course, if you need help in the course of the steps, I will chime in.
One thing only - there is that little piece we copied and pasted in place. It only covers half of the surface needed - don't worry about that, we can deal with it later.
-
Wow feels good to actually do it alone eventhough it was a small step and all thanks to you. Im sure these little small steps will lead up to larger ones.
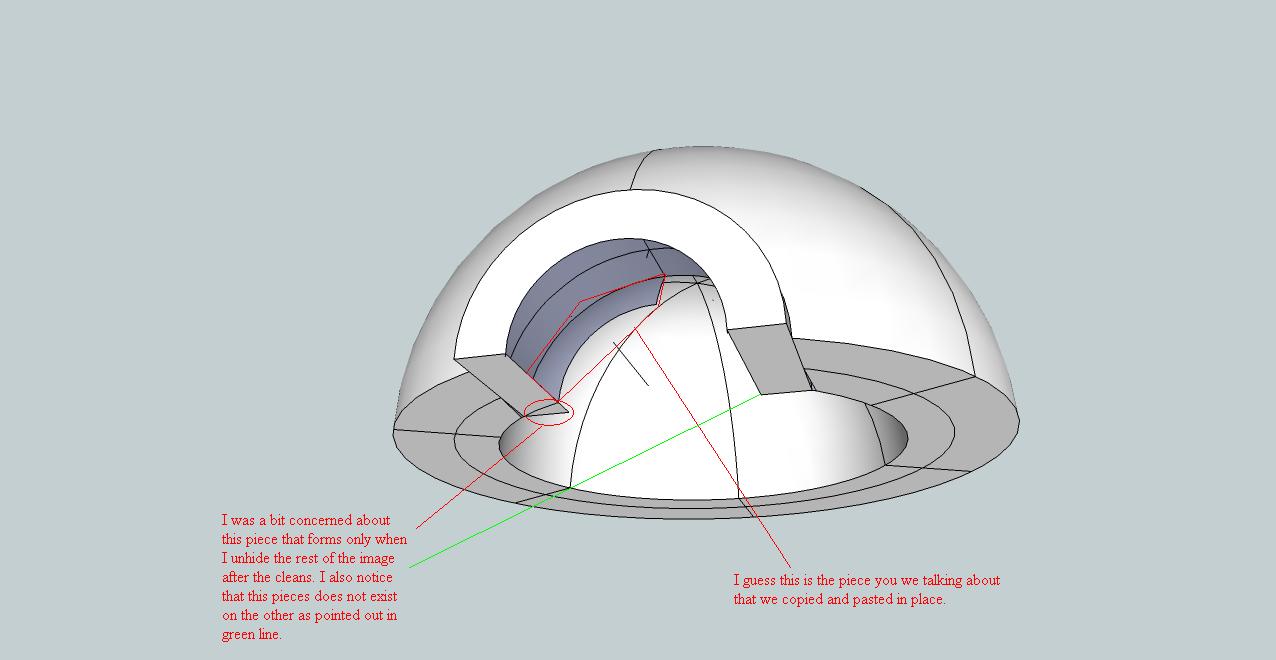
I have attached a Jpeg image of what I have now as well as the SKP for inspection to see if I am on track.
-
Well, those little pieces are easy to get rid - and yes, that other part is what we pasted in there however you managed to loose the whole inside of the tunnel! What happened there?
-
Hi Gai
@unknownuser said:
However you managed to loose the whole inside of the tunnel! What happened there?
I really done know what happened here. It seems I may have removed it in error and I didn't even realise my mistake. Sorry for that. Is there any way to recover this?
If not I have downloaded the version I uploaded in the following post. http://forums.sketchucation.com/posting.php?mode=reply&f=79&t=24930&sid=5acadaddbf65b132aad43f66c186234d#pr215930
I'm going to retry this. Will have it back to you in a few minutes for inspection, -
You can always undo unwanted changes (even after a save) but only until you close SU - so not in this case.
It could be "hand stitched" back but with a 24 segment arc, redoing the whole thing seems to be more straightforward.
-
Hi Gai
I'm having a totaly blank moment right now.
I've reopened the model before making my mess up and looked for areas to clean up but I don't know where.So I've done the following
- Double clicked tunnel to edit the group
- Tripple clicked it there after to get into the geomatary.
- Right clicked and selected intersect with model
- ctrl+H to hide rest of model
- Right click on the smaller arch of the opening and deleted it. ( Something dosent feel right with this step)
Please may I ask for some direction.
Thanks
-
Damn, you are right!
What an idiot I am! We removed those parts of the domes that should now intersect the inner surface of the tunnel! And I leave you alone with the job at this stupid mistake of mine - no wonder you cannot make it!
Sorry - I will post a corrected version soon.
OK, so the case is that when we have intersected the dome pieces, we should have intersected the tunnel as well before we start cleaning up by deleting the unnecessary parts of the dome pieces.
Now I went back a couple of steps, did both intersections and cleaned up the dome pieces but also left that part which is covered by the tunnel's thickness in (we'll do some magic with those later).
So now the tunnel is intersected already properly and you can try if you can clean this version up without any problem.
Sorry again for the hassle - it seems that I was rather pompous and big-headed when suggested you to always think ahead.

Advertisement


