Help Me Draw A Dome [TUTORIAL]
-
@gaieus said:
Hi d0ome,
Sorry but indeed I totally abandoned you.

I promise I will do those exports but I had a whole sh***tload of things to deal with during the week-end (and still have things to do).
No Problem Gaieus.
Whenever you have the time.I just realized a huge error of mine. The 48mm radius pipe in the centre of my dome was supposed to be 24mm radius. I should have paid more attention to math class because I just confused radius and diameter.
I tried all morning to resolve it but couldn't entirely. I managed to fill the 48mm bunghole but now I need to fuse it back with my dome pieces and then intersect my 24mm pipe.
The other solution is, as my usual self. I can redo the domes, intersect with 24mm pipe and then copy the entrance from my current model though I don't really know how to put this into practice on SU. Personally, the entrace is most time consuming, so redoing the dome will be easiest.
Well these are the only 2 solutions I can think of but I guess you have something in mind that's less complicated and time consuming.
Look forward to hearing from you
Thanks
Regards
D0me -

Good I didn't start exporting!Well, if that top is missing, it would be more to fiddle around filling it (and then reopening a smaller) than redoing it IMO. That entrance is not that hard - last time you skipped it anyway so now you can make it.

-
Hi Gaieus
I have started redoing my model with the correct pipe size.
I have already completed my domes. Now starting to slice up my melon and then proceed from there.Yep, I did skip the entrance the last time so this is my chance to it properly.
Thanks and will keep you informed
Regards
D0me -
Hi Gaieus
Hope you are well.I have completed my model.
It now has bunghole of 48mm Diameter.
Can you export the model for me on a 1:1 scale in the following way?
- Print the section cut as is with grids turned off
- Print the entrance from the right camera view as is
Also, can you show me a Step by Step of how to export as I will probably download the pro version of SU tonight and I would love to play around with this cool feature of SU.
Thanks
Regards
D0me
-
Hi Dome,
I was wondering what happened...
OK, I will do (as well as try to make screenshots in LayOut, too) but today is a very busy day for me (just hopping in in every half an hour to the forums to see if everything is okay) so I am not sure I will finish today.
-
Hi Gaieus
Not a problem
Whenever you have the time to do it works just fine for me.
Thanks
Regards
D0me -
Hi Gaieus
Just checking if you didn't forget about my exports and "How To" do it using layout?
Thanks
Regards
D0me -
No Dome, did not forget - and still only checking in to see if everything is all right - I have to finish a 7 page translation today and a 30-40 page manuscript on some Early Christian mural opaintings by tomorrow (although I suspect I cannot finish it just by the end of Eastern).
So I guess, during the holidays I can catch up with my things - including the dome (and sorry for the delay...)
-
Hi Gaieus
@gaieus said:
No Dome, did not forget - and still only checking in to see if everything is all right - I have to finish a 7 page translation today and a 30-40 page manuscript on some Early Christian mural opaintings by tomorrow (although I suspect I cannot finish it just by the end of Eastern).
So I guess, during the holidays I can catch up with my things - including the dome (and sorry for the delay...)
No need to apologies. The fact that you included my dome into your busy schedule is greatly appreciated.
Thanks
Regards
D0me -
Hi
I have been playing around a little with locking of inference using the shift key and this works like a charm however I found one problem which I cant seem to resolve. If I lock my inference on example the red axis and I have another object on that same red axis, I need to bring the newly created object in close proximity (about 5mm) to the other object that is already on the red axis. What I have found is that when I move the object too close to an object that is already there, it locks to the nearest endpoint. Is there a way around this?
Thanks
Regards
D0me -
Hi Gaieus
Wow! It's been a long time since posting here. It actually brings back some memories on my journey to draw a dome. And don't be fooled if you think this sketch didn't come in handy, I would say it was more of a neccessity.
But now i need some more help. I need to calculate how much of a specific type of material I would need to wrap it around the dome. Now, this is on the Refractory dome only which is 3" thick according to the sketch.. The product I refer to is a special type of material almost like a woolen blanket that will be draped on the outside of the dome. The material is 610mm wide and comes in 7 Metre lengths. Basically, I need to know how many meters of this stuff i would need.
Look forward to hearing from you.
Thanks
Regards
D0me -
Hi Dome,
Indeed long time no se...
First of all, I would suggest to upgrade to SU 8. It has a new feature called "solids" and it calculates volumes automatically. Since the material you need to purchase, will come in sheets (i.e. 2D) and we need to warp this onto a 3D curve, there will probably be issues but no worries, I still remember some maths I learnt some (more than) a quarter of a century ago...

-
Thanks Gaieus
I'm guessing the first thing I'd need to do is upgrade to version 8. Busy doing so now.
If you don't mind, can you calculate for me in the mean time the required amount of material but i still need you to show me.
If you hadn't run me through those tutorials, I don't know what i would have done because as my project progressed, i realized i needed to make certain changes and Voila! Thanks to you, i was able to do it all on my own.I have attached just the dome that i need the calculation for.
Thanks
Regards
D0me
-
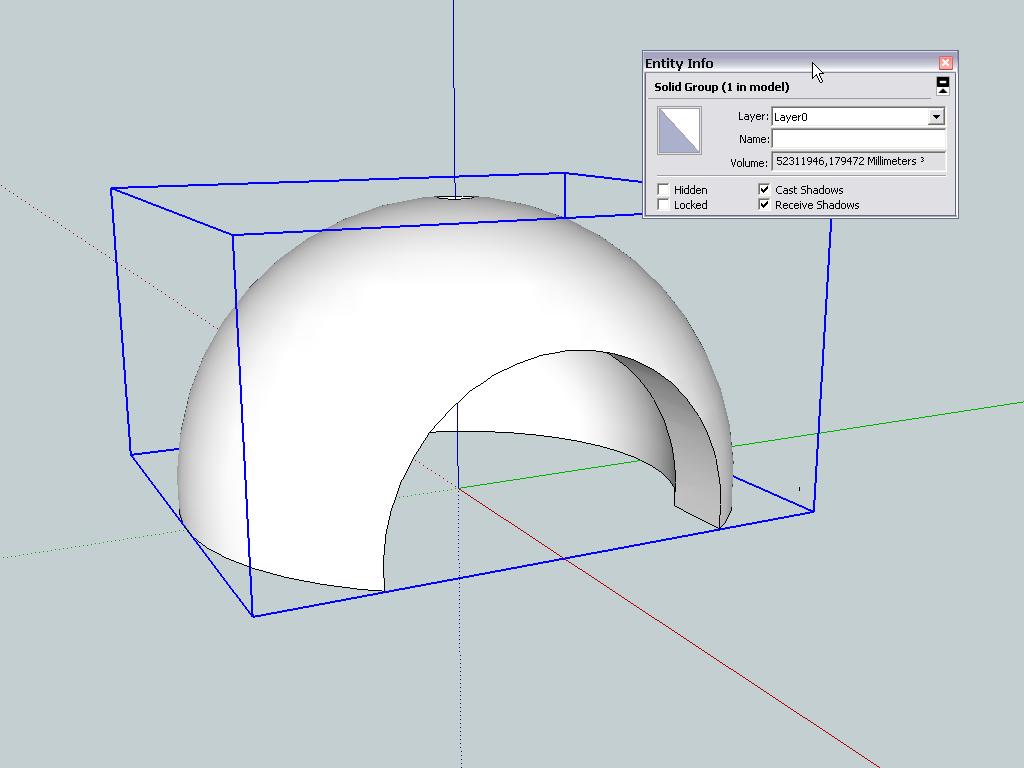
The inner components need to be exploded to make one, big solid volume. There was a bit of mess first and some missing pieces but after a quick fix and cleanup, it reports back as solid and see the volume in the entity info box.
-
Thanks for that Gaieus
Can I ask you another silly question?
Now that you've given me the volume, how do I calculate a rough estimate of the length of blanket that I need. Basically
its sold in metres so how many metres of this would I need to buy to cover the volume you've just given me.Thanks again
Regards -
The volume doesn't really give you that - a sphere has the least surface area per volume so your hemisphere will be quite good compared with a square box of the same volume or even worse a spiky form of the same volume which would have a much larger surface area for the exact same volume enclosed...
Don't forget you can't apply a flat sheet exactly over a curved surface, even cut into tiny postage stamp sized pieces each would have to curve and therefore distort and the more 'pieces' you use the more you use as presumably this stuff also has rules about how much each part must overlap!
You need one simple dimension to approximate this.
I recall the dome is about 30" diameter.
The circumference is therefore pi*D =~ 22 / 7 * 30" = 94.24"
Allowing for some end laps the half-circle up the dome is ~48"
The material is 24" wide so two widths should do a run in two strips around the circumference at the base and about half way up.
So the lower strip would be ~96" long [guessing the minimum lap is ~2"]
The upper strip would be around 2/3 of this [it's really not that critical] at say 64".
Because the strips have angled overlaps the offcuts can be used to 'patch' any under sized overlapping ends and even make a top 'cap' - as they'll probably be a messy 'hole' at the apex...
So we need around 96+64=160" which is about 4.1m. If you buy it 'by the meter' then 4m will just about do and 5m should be more than enough, so I'd get 5m...
You also said something about '7m'... so if that's the set roll size then it's plenty...
If you have the dome already made you can easily get some old newspapers cut to 24" wide and taped into lengths of ~2.5 and 2m, wrap them around the dome to see what the laps are like and measure how much you really need... Alternatively get a 3" orange [or similar fruit] cut in half and make some paper strips 2.4" wide and try wrapping the orange-peel dome in them - for the length of paper every 10cm is the real length in meters - approx. This will also give you a good idea of the pitfalls/difficulties of wrapping flat stuff around a sphere, the lapping involved etc !
As I said, the accuracy is not so important as there have to be overlaps and the cut patched because applying a flat sheet to a 3d curving surface will always be inaccurate, also you haven't mentioned the 'tunnel entrance' - wouldn't that need some of this too ?
Also-also, as you buy in 'increments' then the roll at 7m or steps of 1m up to say 5m is all you need to worry over... -
Thanks TIG. I was afraid I'd have to answer this question...

-
Hi Guys
I'm trying to get the cu.m volume of the following skp but it keeps popping up this error.
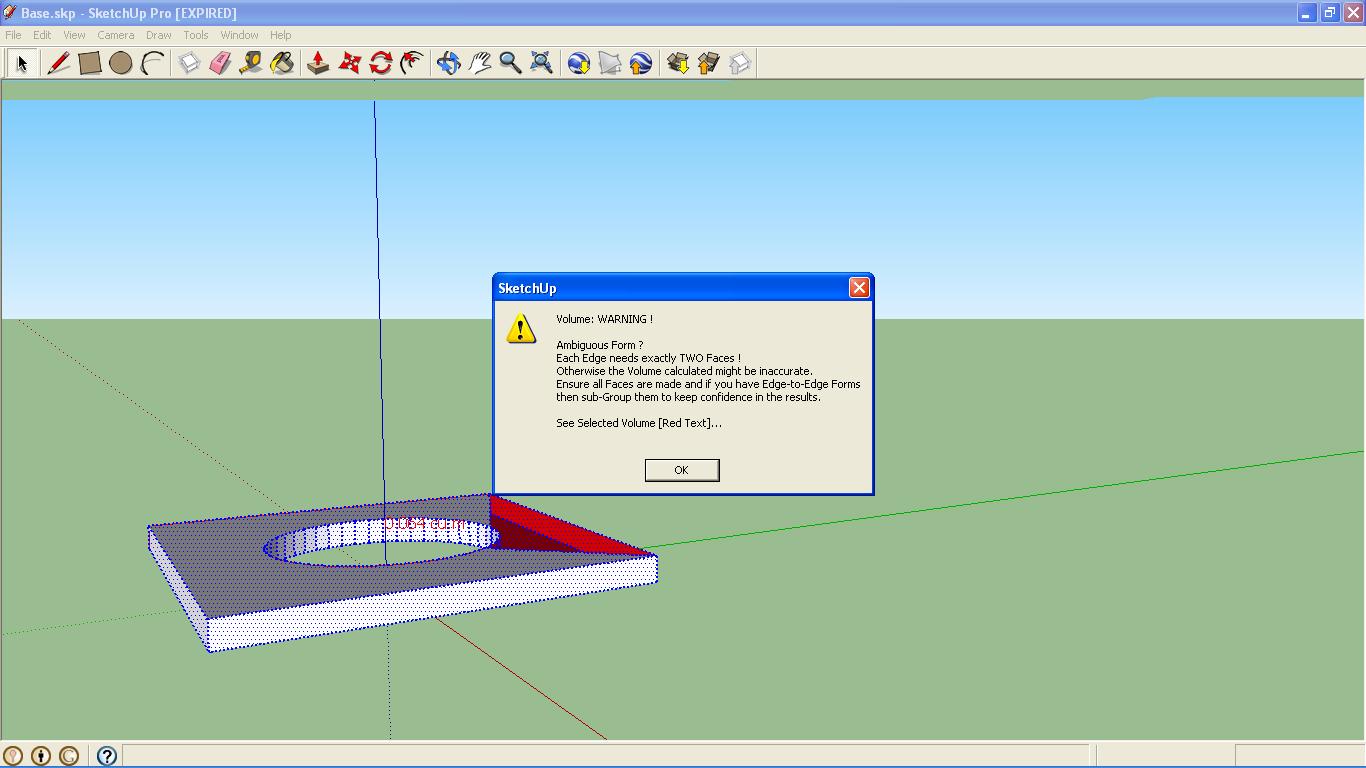
It skips a whole area, what have I done wrong, can't seem to find a solution.
Thanks
Regards
D0me
-
For some reason the Volume tool just doesn't like that form

The reported volume under v8 in Entity Info is 2.397cu' - which is 0.0679m3
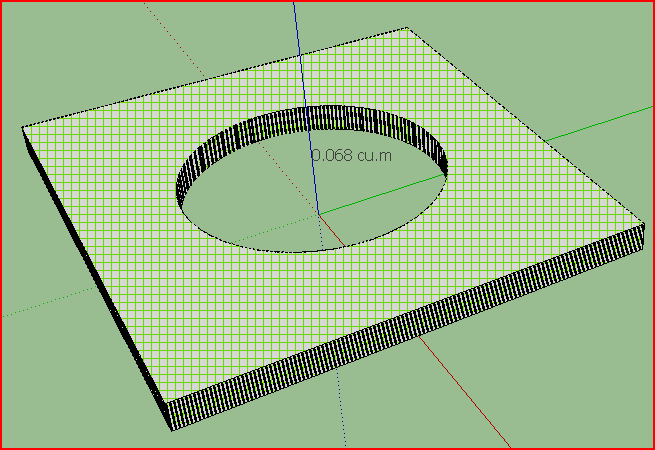
The old Volume tool [by integration] returns the correct volume [0.068m3] to within tolerance, BUT only after I fixed a longstanding and stupid typo that I am amazed no one has spotted before
I'll post an update...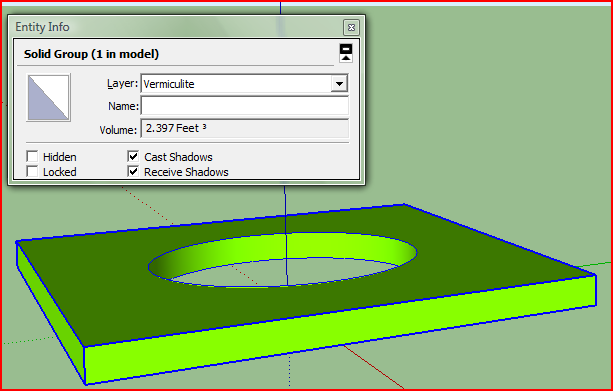
-
By the way, why don't you upgrade to version 8, Dome?
Hello! It looks like you're interested in this conversation, but you don't have an account yet.
Getting fed up of having to scroll through the same posts each visit? When you register for an account, you'll always come back to exactly where you were before, and choose to be notified of new replies (either via email, or push notification). You'll also be able to save bookmarks and upvote posts to show your appreciation to other community members.
With your input, this post could be even better 💗
Register Login


Advertisement