Material Images
-
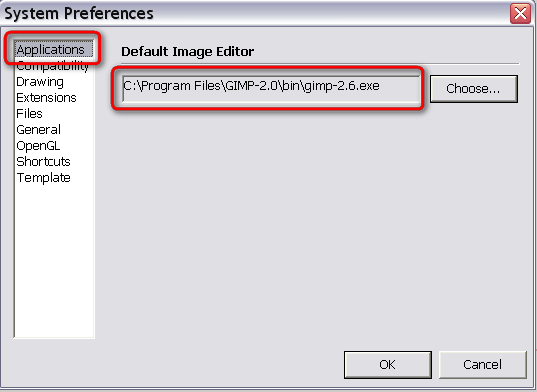
First of all, set PS as your "default image editor" in your Preferences in SU (that's from the Window menu on a PC). See, I have GIMP here but you can add anything.
Now if you paint anything with a material and right click on that face, go Texture > Edit texture image and SU will launch PS where you can do "anything" with the image (resample%compress whatnot) and when you press the save button in PS, it will refresh the SU file automatically.
You may have problems with the file type however so that needs a different approach. Save your original texture images with a better extension (I'd suggest png but jpg would also do it). Even at this moment you can weak them (resize/compress etc.)
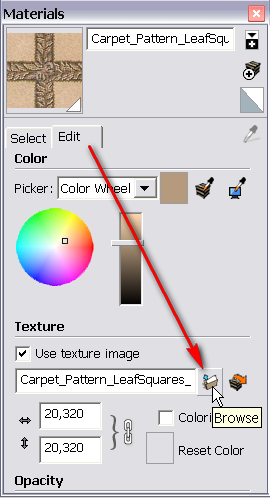
Now when you choose one of the "original" materials in your Material browser > In model (you have to paint something with that material to get it into the model), there's an Edit tab and there, at the (almost) bottom, you can "reload" the material image with what you have tweaked and saved recently:
As for how big and how compressed; I can't really give a good advice. It all depends on the material itself, how big area it should cover (the side of a whole building is obviously different than a table top). Note however that SU wouldn't be able to display bigger images than 1024 pixels (in either direction) if you couldn't set it to 2048 now in SU 7 but many computers will already suffer from large image sizes so there's no use to have bigger images than 1024 pixels. Although even that's a kind of "luxury" at times.
-
Here is an example of a 1000 x 1000 texture (one of my custom textures) that has been reduced in 20% increments.
So the first image is the texture at 100%, then 80%, 60% and last one is 40%, they are all still 1000 x 1000 just the compression of the .jpg has been reduced, so this way you can use the 40% one while modeling and exchange it for the 100% one for final render.
274kb
201kb
157kb
72kb -
Thanks Gaieus
I have taken old jpeg that I fist scanned and sent exported them using Picasa as per Dave R recommendation and I am now trying to convert them to png files using PS CS2 and it is asking thhe follwoing when I save as a png file:
A PNG Options dialog box opens up asking if the image Interlace - None or Interlace - which one do I select?
I am then thinking of just saving the new files as materials and deleting the old directory which i have in the materials library - is this sensible or should I just edit them - one by one - which seems too confusing to me at the minute.
Dermot
-
Thanks Gaieus
I missed your last post before I sent mine - I just wish I had the technical know how in relation to image compression etc as I am a bit lost here!! - Nothing ventured though so I will try that option and see how I get on.
Cheers
Dermot
-
Dermot, I can answer the question regarding interlace/non-interlace on the PNG but as to the materials files in SketchUp, if you think you'd really need the high resolution versions, you could keep them and just create a new Wood library from the low res images. Call it Wood LoRes or something.
You might want to look at your materials for size and make sure they are scaled accordingly.
I've got a bunch of hand-drawn wood grain materials that I've been using for some projects and I made sure to scale them during initial import to fit. the face grain boards are drawn to 8 feet long by 8 inches wide and the end grain is at least 8 inches wide and 3/4 inches thick. This makes it possible to a number of "pieces" out of a single "board" by moving the texture around much like you'd do if you were laying out the to cut the pieces out of a real board. That prevents the repeated pattern look. I also have flat, rift and quarter sawn in most of the wood varieties. This allows me to make the proper appearance when more than one edge of a board is visible.
I'll write you an e-mail when I get home this evening.
-
Thanks Solo
Those images look practically identical to my untrained eye - in PS CS2 there is an image size option but I dont see one specifically for compression - am I missing something or am I just thick??!!!
Dermot
-
Hi Guys (Dave, Gaieus, & Solo)
Just tried a few tweaks of a model I'm doing for my own office - the same stage earler today this model was about 20mb and its now down to 183kb so it was all down to materials and your help so far has been brilliant. I know i have so much to learn to get decent output so I will just have to keep doing the hardwork and learn not only SU but Photoshop and Piranesi aswell to get to where I want to be.
All guidance will be gratefully received on this journey!!!!
Cheers
P.S. I attach the model for your critiquesWotyacollit Office Model Stage 2 -
Dermot, here is a free app to compress a .jpg, on save you can set the percentages, I believe this is the best way to use lightweight images in a model.
http://www.trans4mind.com/personal_development/convertImage/index.html
I use an app called Deep Exploration, but it's very $$$$$ for just doing image compression.
-
Thanks Solo
Just downloaded it and tried to reduce the image but I really dont have a clue what I'm doing as I don't fully understand how or what the program is asking me to do - the help files do not open when I try them to get some instruction. My biggest problem is that I dont understand what the program is looking for me to do - not just this program but PS aswell - can you point me to an article which explains file compression / size so that I dont continue wasting your time on something probably very simple!
Dermot
-
I guess the easiest way to use it will be to open it up then navigating to the image you want to reduce and open that up, click the save icon and when the dialogue appears you will see a JPEG compression slider, slide it down to the amount of compression you would like (there is a preview of how it will look) then save it as a different name like Image_reduced40.jpg.
-
Thanks Solo
I need to take time to convert all the images I've saved and just get on with learning by doing now. I appreciate all your efforts.
Regards
Dermot
-
I cannot add too much to the practical ways of compression - every image editor has its own way to do it (mostly with some kind of a slider as Pete suggests).
As for interlacing however; you won1t need it. It means that when it's displayed in a web browser, it first displays a "reduced resolution" version until the whole image is totally loaded into the cacje of the browser and gradually "refines" the resolution of the display. So basically that setting is for large file sizes (which would take a while to load) on one hand and for internet use on the other.
Interlacing will add some Kb's to the file size but useless in SU otherwise.
Hello! It looks like you're interested in this conversation, but you don't have an account yet.
Getting fed up of having to scroll through the same posts each visit? When you register for an account, you'll always come back to exactly where you were before, and choose to be notified of new replies (either via email, or push notification). You'll also be able to save bookmarks and upvote posts to show your appreciation to other community members.
With your input, this post could be even better 💗
Register Login


Advertisement