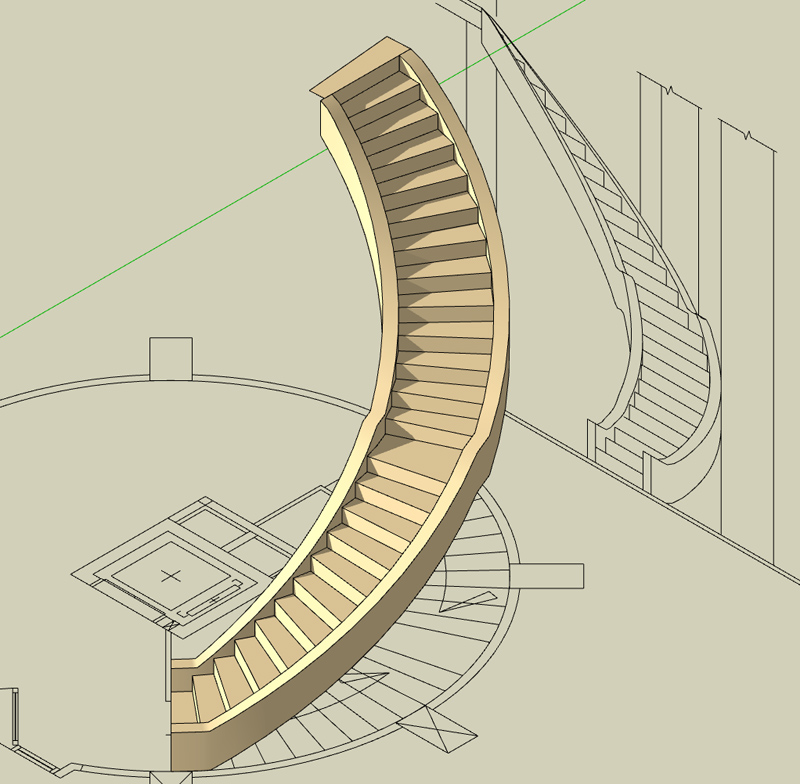
How to make the spiral stair (have drawing) [Tutorial]
-
-
witjazz,
The methods of constructing these stairs in SketchUp are several. The detail and accuracy of your imported CAD imagery is really precise, which helps in the construction. Rotating the elevation to a vertical position, and moving it to align properly with the top view should be your first steps.
I started with drawing the steps. Counting the step interval, I found that there were 25 radial divisions, spread over 135 degrees. Draw arcs with 25 segments, tracing right on top of the top view. Draw radial lines to each of the arc endpoints. This will provide 25 radial 'wedge' faces, flat on the 'ground.' Each of these faces can be 'push/pulled' to equal-interval heights, based on the elevation view (except for the middle landing, which is comprised of two radial segments.) If the overall height is a bit off, you can select all of the 25 radial faces, then 'scale' the height to fit precisely with the elevation view. Finishing off the steps can wait until you complete the curving helical sides. You will note that I 'grouped' the steps, to keep them from 'sticking' to subsequent geometry.
To draw the curved sides, I used a copy of the same 25-segment arc upon which the steps were based. Drawing two central, radial lines, from the center crosshairs to the endpoints of the arc will produce a pie-shaped wedge, which can be push/pulled to produce a curved, cylindrical wall. The flat vertical 'walls' that connect to the centerline can be deleted, leaving just the curved surface. With 'hidden geometry' turned on, sloped, diagonal lines can be 'stitched' on the cylindrical surface, from one vertical line to the next. The slope of these lines is derived from the top-forward edge of each step (which is why I started with step construction.) When 25 sloped line segments are completed, you will have produced a helical spiral.
It's difficult to describe in words, but the general helix method described above is copied or repeated to produce top and bottom edges, and inside edges. You'll find that helix construction is a popular topic at SketchUp forums, and several tutorial models can be found in the 3D Warehouse. Search for terms, "helix" or "spiral." Most of these describe how to 'stitch' lines across helix edges to produce the upper and lower surfaces of the spiral sides. Use of SketchUp's 'smoothing' feature will hide the stitched lines.
If you learn how to construct such helical surfaces, you will have mastered one of the more complicated constructions that you can do in SketchUp. I encourage you to search for helical discussions and tutorial models, and study them. I've attached my model, also provided for your study.
Regards,
Taff

-
Hi TaffGoch
Thank you verymuch
but if you have free time make it how to step by step again
-
Hi witjazz,
Have a look at this search result - there are a couple of examples here:
http://www.sketchucation.com/forums/scf/search.php?keywords=spiral+staircase&terms=all&author=&sc=1&sf=all&sr=posts&sk=t&sd=d&st=0&ch=300&t=0&submit=Search -
Hello, I'm new on this forum.

So, may I suggest another method ?
To draw spiralstairs, I use two plugins available in the rubydepot : draw helix13 and spiralstairs (ou escalier en spirale).
I first draw two concentric helix, which I select and then apply the plugin spiralstairs.Some adjustments of parameters are necessary, but with some experience, it's pretty easy to obtain the final result. And as it takes few time, you may try again if you are not fully satisfied.
-
I think you forgot the file/image....thanks!
Chris
EDITL Thanks for adding it now!
Advertisement


