[Solved] Translate along a plane, or from Plane to Plane
-
I need to use a script to 'draw' some lines that lie on a plane. So the user selects a face, or two lines, or anything I can get a plane from, then I need to be able to draw something in 2Dish cordinates, and translate that so that the points lie on said plane.
I'm going to go look at how planes are defined more closely and try to think up the maths incase there isn't a simple method.
This is my first post btw

EDIT: Also, I guess my actual question is how to take a set of lines or points that lie on one plane, and translate them to another...
-
to draw geometry on a surface we have the great OnSurface-Toolset created by fredo6.
this gives you the ability do draw all kinds of shapes on any surface - one of the greates rubies ever!
if you want to draw something on a flat surface and then translate it to a curved surface, simply draw it on a plane, place the plane above the curved surface (both have to be grouped, I think) and then use the "Drape" funktion of the Sandbox-Tools to drape the lines on the surface...
-
That's a pretty cool bunch of scripts, but I don't think it's what I'm looking for.
Another example: I want the user to be able to select a face, and then with ruby, I want to be able to have a script draw another set of faces that have the same normal as the selected one. Like, the user selects a square that is somewhere out in modeling space, and the script generates some circles, squares, and other shapes, that are on the same plane.
If it's possible to draw within a set of local axes defined by the plane, that would work. If there is a way to set the global axes in ruby, then I think I could use the plane normal to set the global axes in a position where the surface of the plane lies on two of the axes, and the normal of the plane is the remaining axis. This would allow me to easily do my stuff.
So... can't look atm, but if anyone knows how to do any of the things above, please post.
 If not, I'll work on it more myself tonight.
Thanks
-
I am not sure if I understood completely, what you want.
but can the align axes tool help you? simply right click the face you want your axes aligned to and choose "align axes"when you are finished, right click on one of the coordinate axes and chose "reset axes" to return to the original orientation.
-
Ya, I think that might work exactly how I need, however, I would like to be able to do it all from within a Ruby script.
-
You have a point in the plane and a plane normal, right.
So just generate 2 orthogonal vectors that define your 2d plane and you have the 'origin' from the point the user selected in the plane.Now you've generated the affine transform just like 'align axis' does. ie you've got a x axis, a y axis and z axis and a translation.
And yes, I know, you're going to say you'd like some Ruby code..
 Got some other stuff to do, but I'll come back to this later.
Adam
-
@adamb said:
You have a point in the plane and a plane normal, right.
So just generate 2 orthogonal vectors that define your 2d plane and you have the 'origin' from the point the user selected in the plane.Now you've generated the affine transform just like 'align axis' does. ie you've got a x axis, a y axis and z axis and a translation.
And yes, I know, you're going to say you'd like some Ruby code..
 Got some other stuff to do, but I'll come back to this later.
Adam
Lol, well you sound like you've been around a few coding forums before. I don't think I need you to go through the trouble for the code though. I kinda had figured out something that would work, along those same lines (pun unintended). I found the transformation.axes method, which is exactly what I want if I could get the parameters for it. I was stuck trying to get the 2 orthogonal vectors from the plane, not knowing a whole lot of 3d maths myself. I eventually realized that I can (at the very least... will make it more decisive than this in practice) pick any two connected edges of this face and use their difference in vertex positions to get the 2 axes along the plane, and ofcourse the normal for the face is the third.... So, ya think I've got it figured out. Hold off on that code for a while, and let me see if I can get it myself.

If not, I'll be back.... ... ..
-
W00t
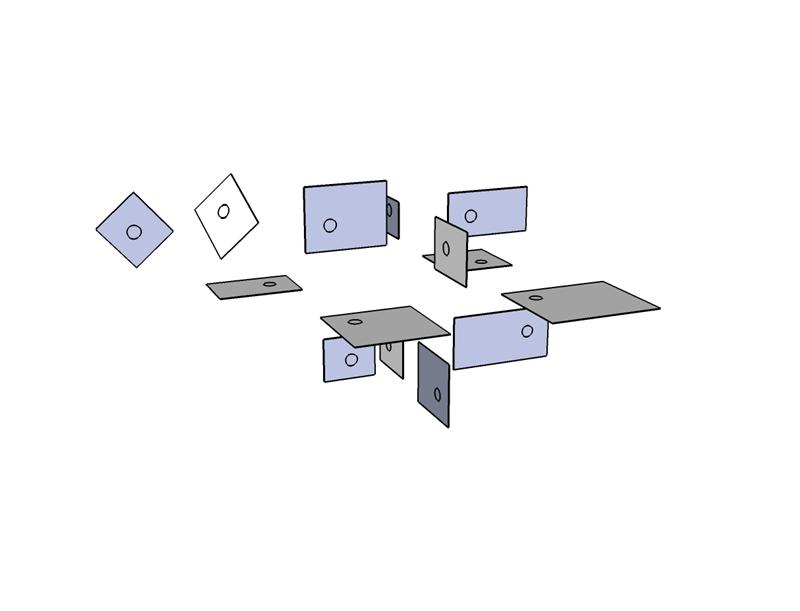
Ok, got a small script made that tests out the general idea. The attached image shows the results of it, all of the circles where created by the script, having run it with the each square selected.
May not be much, but it's my first script! (aside from 'UI.messagebox "Hello World"')
Thanks for the help, both of you helped me wrap my head around what I wanted to do, and how to do it, conceptually.
Hopefully it'll be the start of many scripts, in an attempt to mold Sketchup to my liking.


-
ah, and now I understand your intentions and why a script is needed for that - one command and all the circles are created in one go!
nice one, Scienthsine. I envy you for the ability to speak this powerful language (ruby)

-
Ya, that is actually a test, the final script is completely different but it needs to be able to do something similar in one operation.
Thanks for the compliment, we'll see how I do with the final script

-
oh dear, you made me curious

after all, this is not the only thread where you are gathering information. something great is about to happen...

-
@scienthsine said:
Another example: I want the user to be able to select a face, and then with ruby, I want to be able to have a script draw another set of faces that have the same normal as the selected one. Like, the user selects a square that is somewhere out in modeling space, and the script generates some circles, squares, and other shapes, that are on the same plane.
Interesting, because I precisely included this functionality in my Tools On Surface (for all Shapes, but not yet for the Line tool). This is explained in the documentation, pages 11-12, in a section about drawing 'without a surface'.
Here is an exerpt of how it works
%(#4000FF)[As you can guess, when there is no surface, you need to figure out one. Sketchup has the same problem and usually uses the horizontal plane. For the Shape tool, this is the default, but you have the option to specify your plane direction:
1) By typing an Arrow key, corresponding to the normal to the plane, so:
- UP: for horizontal plane
- LEFT: for vertical plane defined by Green and Blue axis)
- RIGHT: for vertical plane defined by Red and Blue axis)
- DOWN: custom plane (see below)
2) By selecting an existing face of the model and use it as the plane for
drawing. For this, just mouse over the face, without clicking and hit Shift. The face will briefly highlight in blue. Then the shape will be drawn in the plane defined by your origin point and the plane of this highlighted face.

Important: The above applies to the ‘default’ plane when there is NO surface. When drawing on a surface, the surface geometry will of course have precedence.]
-
Lol, kinda the opposite of what your plugin says it does... isn't it?

Still not what I need however, I need to be able to do this in a ruby script, but I think I got it down.
Gotta give your plugin, and a few others a try sometime. There are some very good ideas being worked on around here.
[Edit] Ohh and from what I can see in the pictures there, your tool creates shapes on a parallel plane, I need them on the same plane, just not necessarily within the face selected.
Advertisement


