Pont du Gard
-
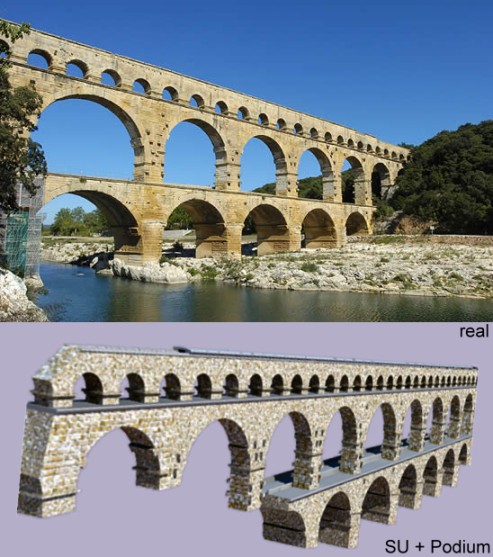
i made a model of the Pont du Gard (bridge on the Gard) which is a roman aqueduct in the south
of france.
you can read more about it on Wikipedia.it isn't a reconstruction of the original aqueduct, but a copy of it as it is now.
Older version
the model i uploaded on the 3d warehouse has the google earth terrain too:
http://sketchup.google.com/3dwarehouse/details?mid=eea41b24223ea44656ca704cc2c611df
EDIT: i uploaded the completed version: download that instead of the old one.
i left the attachment of the old one so you can compare the two versions.
NEW VERSION:
-
Gran bel lavoro, complimenti!
Only one suggestion:
I would have used radial brick texture on the arcs -
Nice model Julius, well done.
-
Yes, I like it too. I'm an architect interested in archaeology (and french, incidentally)
-
Great model, Julius!
I like it!

regards...
-
thank you!

@gjenio said:
Gran bel lavoro, complimenti!
Only one suggestion:
I would have used radial brick texture on the arcsi thought about that... but how can that be done?
i was wondering whether i should post this model in the special interest user group "Archaeological & Historical Reconstruction".
i've noticed that there isn't a model of this bridge on google earth yet. do you think i should notify it to someone of the google team? (for example Craig...).
-
For the radial brick texture you can either amke a curved texture outside of SU and the apply it to the face, or alternatively you can split the arc in to lots of sections and then rotate a texture to get a radial effect.
Very nice model btw, i love the detail.
If you want to get this on google earth youll ahve to cut down the model size a lot, Probably the easiest way to do this is to use projected textures for most of the faces as opposed to modelling all the details (as fun as it is
 )
) -
Very good work

-
Cool
(model by Julius of course
-
-
Hi Julius,
Nice model, really! I have positioned (rotated radially) the texture on the arch for you hoping that you used the same component at least on that storey...
 but then I realised that I edited the one unique arch and then I was too lazy to do the job elsewhere, too.
Also, the positioning could have been done more nicely...
Well, anyway, this is basically the way to adjust the arch if you do not have a ready-to-use arch material.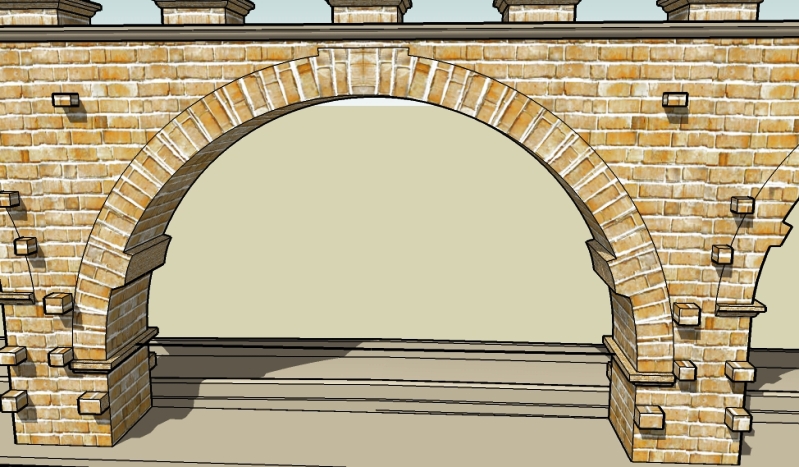
Note that you seem to have applied the material from outside the components' context, you will have to apply it onto the individual faces one-by-one first to be able to position it.
-
@gaieus said:
Hi Julius,
Nice model, really!
i'm glad to hear you like the model.
@gaieus said:
I have positioned (rotated radially) the texture on the arch for you hoping that you used the same component at least on that storey...
but then I realised that I edited the one unique arch and then I was too lazy to do the job elsewhere, too.i must admit i did quite a mess with components...
@gaieus said:
Also, the positioning could have been done more nicely...
Well, anyway, this is basically the way to adjust the arch if you do not have a ready-to-use arch material.thank you very much! yes, it could have been positioned more nicely, but it doesn't matter, you did a great job...but...i'm too stupid to understand how you positioned the material
...@gaieus said:
Note that you seem to have applied the material from outside the components' context, you will have to apply it onto the individual faces one-by-one first to be able to position it.
this is because i added the texture when the model was cmplete, and i was too lazy to add it to each compnent (as you've seen they're quite a lot: the arches on the same stories seem to be identical, but in fact they are not, they have little differences).
so, could you explain me how you positioned the material on the arch? thanks in advance.
-
Gaieus gave me a good idea for my roman theatre with the textures.
Julius, with our models one day we will be able to do our own roman city!

-
@pichuneke said:
Gaieus gave me a good idea for my roman theatre with the textures.
Julius, with our models one day we will be able to do our own roman city!
why not?
-
Take a look at

Ancient Rome Rebuilt! Digitally
Rome's Mayor Walter Veltroni will officiate at the first public viewing of "Rome Reborn 1.0," a 10-year project based at the University of Virginia and begun at UCLA to use advanced technology to digitally rebuild ancient Rome. “Rome Reborn 1.0" shows almost the entire city within the 13-mile-long Aurelian Walls as it appeared in A.D. 320. At that time Rome was the

Science Codex (www.sciencecodex.com)
-
@watkins said:
Take a look at
Ancient Rome Rebuilt! Digitally
Rome's Mayor Walter Veltroni will officiate at the first public viewing of "Rome Reborn 1.0," a 10-year project based at the University of Virginia and begun at UCLA to use advanced technology to digitally rebuild ancient Rome. “Rome Reborn 1.0" shows almost the entire city within the 13-mile-long Aurelian Walls as it appeared in A.D. 320. At that time Rome was the
Science Codex (www.sciencecodex.com)
the article is quite old, in the meantime the major has changed
btw, it's an interesting project. -
Hi Julius, with what I wrote "the positioning could have been nicer" I meant what I did. With more careful positioning I could have achieved better results.
As you asked for i9t, I will make a tutorial about how to do this positioning thing (although if I can find the one I remember, I may just link there).
Edit: I have found the tutorial:
http://www.sketchucation.com/forums/scf/viewtopic.php?f=18&t=635&M technique was somewhat similar - although since your arch here is not perfectly a half circle, I had to adjust each and every segment of it. As for rotating the material, read about "Manipulating a Material Using Fixed Pin Mode" in the SU Guide. You can use the green grip to rotate your texture about the red grip.
-
i love this roman aqueduct
my holiday photo:
http://www.panoramio.com/photo/3347979
http://www.panoramio.com/photo/3536096
http://www.panoramio.com/photo/3535761 -
Thank you Gaieus! I attach an image of the first arch i've done: it was quite boring and i still have to do the other arches.

@mcat said:
i love this roman aqueduct
my holiday photo:
http://www.panoramio.com/photo/3347979
http://www.panoramio.com/photo/3536096
http://www.panoramio.com/photo/3535761nice photos, i remember the olive tree! i think it comes from spain or something like that.
-
Yes, Julius, certainly it is very boring but once you finish an arch, you may be able to use it as a component on arches of the same size and shape. And don't forget; texturing (especially if you want to render in an external application) is almost as important as modeling itself.
Hello! It looks like you're interested in this conversation, but you don't have an account yet.
Getting fed up of having to scroll through the same posts each visit? When you register for an account, you'll always come back to exactly where you were before, and choose to be notified of new replies (either via email, or push notification). You'll also be able to save bookmarks and upvote posts to show your appreciation to other community members.
With your input, this post could be even better 💗
Register Login


Advertisement