Radius challenge
-
I created a shape using 2 intersecting surfaces and now I want to create a radius at the top. Is this possible?
Model:
http://sketchup.google.com/3dwarehouse/details?mid=846c15f6e39cad2ad08ab9931a7b465a -
What do you mean by "radius" in this case?
-
Dont know how you mean on top,but you can draw a desire thing on bottom and than pull,intersect and erese unvanted geometry.
-
I assume that you mean something like this with a curved edge all the way around the top??

-
That shape remind me on some kind of shoes,maybe you want something like this,by the way one of option in making this,not a accurately but just to get a general idea.
If is this what you want.
-
double click the top face, then select follow me and click on the fillet. You'll then have to delete any excess faces around the top.
p.s. the fillet in your model does not have a face - try making it again.
-
That image reminds me more of a computer mouse...

-
@rodentpete said:
double click the top face, then select follow me and click on the fillet. You'll then have to delete any excess faces around the top.
Got me thinking now as this doesn't work so well with a steeply curving top surface, a problem I think I've come up against before, like in this .skp:

and ends up with a bulge like here:

I worked out a long way around of getting it how I wanted it, but just wondered how others might do it?

-
Thanks everyone for the many answers to this. For some reason, the email notifier didn't kick in and I only now went and looked here. I'll check the various techniques out and get back to you!
-
Gaieus, what I meant to say was 'fillet'.
rsw, yes, exactly. How did you do that? When I extrude along the face path, it doesn't close the top of my mouse. Do you hand stitch?
Pagan, I tried to download your .avi twice, but for some reason my WMP won't play it. Says it encountered an error and had to quit. Some special codec perhaps?
Rodentpete, I did as you suggested, and now I have the 'fillet' but it's open on the top. Any way to force it to 'skin' the top as well?
-
Forget about video,it's look like it's not what you need.

Just download K-Lite Mega Codec Pack,contain almoust all needed video and audio codec. -
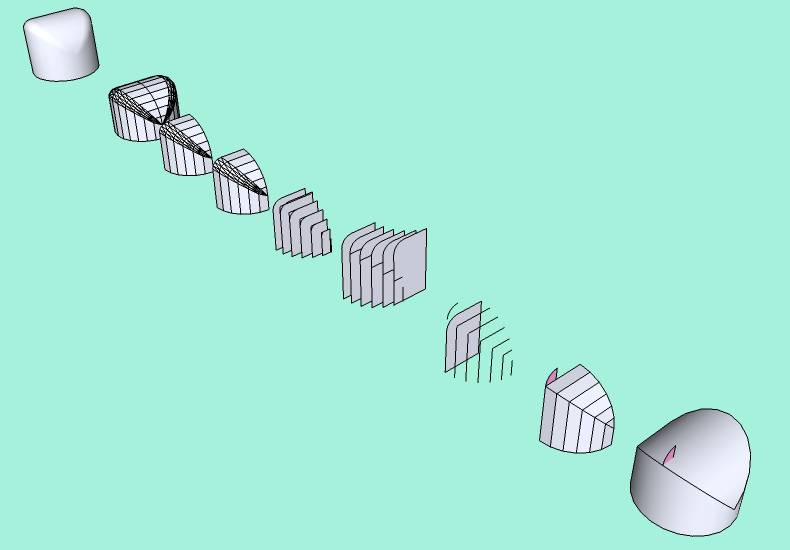
I played with it a little and couldn't come up with any real quick way of doing it. The only thing I did which made it go quicker was to first cut it into quarters and delete three of those quarters.
Then I made the largest "rib" a component and copied it down the form. I tried scaling each new rib and I tried just moving each rib down to the right level. It didn't make a big difference in the final product. Then I deleted the original object and exploded my new components so I had a wire frame of sorts of the ribs.
Then I rather than stitch each rib together, I used the "skin.rb" ruby to do the stitching, but doing it by hand wouldn't have taken much longer since the ruby's output needed to be cleaned up afterwards.
Then copy and scale by -1, put the two quarters together. Repeat that once to connect the two halves and it's done.
-
Here,use this if is good to you or rearange it.
[attachment=0:1wh77c3s]<!-- ia0 -->Untitled.skp<!-- ia0 -->[/attachment:1wh77c3s]
-
Dear Richard,
How did you produce the shape in your third image. Could you put together a small tutorial?
Thanks,
Bob -
@watkins said:
Dear Richard,
How did you produce the shape in your third image. Could you put together a small tutorial?
Thanks,
BobI'm not Richard, and he may have a better way, but here's a tutorial on how I did it.
It seems amazingly complex when I write it all out, but it was simple and quick enough when I was doing it.
-
Hi SchreiberBike,in your tutorial you mention:
Explode all the components.
Use the Skin.rb ruby to connect the faces and to
clean up the excess lines.Could you explaine what you mean and how you do that with Skin.rb ruby.
Thanks.
-
Hi Pagan,
Here you can find different versions of the skin.rb.
It will alsoput a toolbar onto your work area (you may need to activate it from the View > Toolbars menu). Select either the faces (if you have them) or the lines/edges and run the script. Play with it a little bit until you have a grip on it (sometimes it seems to bee a bit tricky). -
[quote="Gaieus"]
Thanks,wonderful,didn't know for this.Make easyer a lot's of thing.

-
Dear SchreiberBike,
Thanks for for putting together the tutorial. I will have to give it some thought.
Kind regards,
Bob -
A quick tutorial on how I created the image in my last post and the first image I posted. This was really just an experiment to see how/if a shape could be chamfered and does not work for every shape.
A - Create your basic shape and group it:


you can see in this example there are not all lines carry on across the whole object, thus there are no 'ribs' as in SchrieberBike's example
B - Create your radius
C - Create a flat plane below your object and using the sandbox tools drape your object onto the flat plane
Edit: There shouldn't be any need for this step instead keep a copy of the shape of the object when you create it, but this way would be good for more complicated shapes created from lots of intersections etc.
D - Delete excess geometry, move your created radius down to here and offset the shape inward to the points of the radius

E - Copy the top of the shape up to the points of the radius (similar to idea as above)

F - Push pull every other section of the offset shape (step D)

G - Intersect the shapes created in step E, and then delete the geometry from step F

H - Delete excess geometry so you are left with the top cap and contours for the chamfer

I - Use skin.rb to skin the chamfer

J - Explode all the geometry, soften/smooth edges (its also worth deleting any coplanar geometry to tidy things up a little)

Heres the model as well bevel.skp


Hello! It looks like you're interested in this conversation, but you don't have an account yet.
Getting fed up of having to scroll through the same posts each visit? When you register for an account, you'll always come back to exactly where you were before, and choose to be notified of new replies (either via email, or push notification). You'll also be able to save bookmarks and upvote posts to show your appreciation to other community members.
With your input, this post could be even better 💗
Register Login


Advertisement