Newbie Hi & Technique Question
-
Hi, great site! It's great to see some many people willing to help each other out and share their techniques. I've only been reading this forum for a few days and I've already learned a ton. Many thinks to all the contributers.
I'm extremely new to 3D design, not just extremely but brand new, never done any before SketchUp. I think I'm going to keep at it because SU is such a cool tool, I'm thinking it could become quite addictive, can't believe how user friendly the application can be.
Now to the ulterior motives for my first post. I did have a question that I was hoping someone could advise. I've been trying to create a natural hanging netting effect using lines and am having a heck of a time figuring out how to make it look right. I've attached an example I found on SU 3D Warehouse (Soccer_Goal.skp) of what I'm going for. I would love to know how they made the lines of the net hang / drape uniformly and naturally like that.
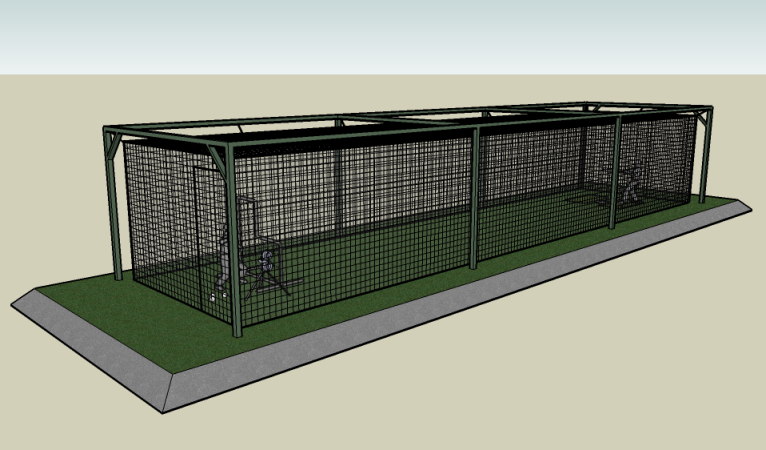
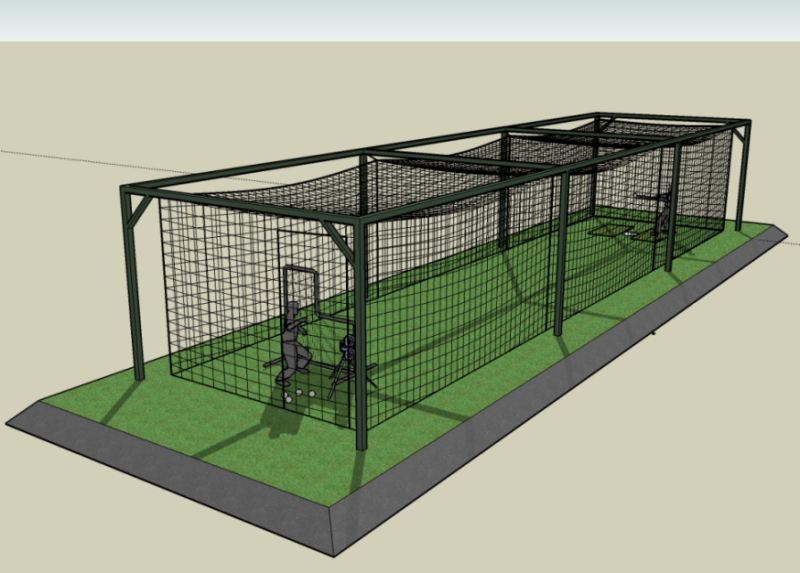
I've been working on a model of a batting cage (pic attached) and would like to make the netting look more natural. Any suggestions would be greatly appreciated.
Thanks again for such a great site!
I'm trying to recreate the netting effect from this model I found on SketchUp 3D Warehouse.
-
jstubler,
(low reply-rate)
What you are after can easily be done with tools from the sandbox ()
Make a grid (will be in a component) on the ground applying the ‘From Scratch’ tool ()
you can adjust the grid-spacing rigth after selecting the tool.
Next edit this component (edit mode), pushing the grid down with the ‘Smoove’ tool. (*)
The sides are done in the same way. Here the grid is positioned vertical before ‘Smooving’
Also for the back: the grid is rotated in a slanted position before ‘Smooving’.After selecting the ‘Smoove’ tool you can adjust the radius in the VCB (+[Enter])
With some practice you get these grids together nicely.
%(#BF00BF)[You can even try to have all the grids connected in one component (one level)
and only then apply the ‘Smoove’ tool to save you some extra work.]
The ‘Smoove’ tool always works vertical as does gravity!
(unless….. you use ‘Smoove’+holding down [Shift])cheers,
Wo3Dan -
Hi jstubler, welcome to the forums here!
Wodan is right; you can easily create quick grids with the sandbox tool.
Also I can imagine that some of the warehouse examples use some transparent "fencing" images as textures. Go to the "fencing" folder in your material browser (activated when you try to apply the Paint bucked tool or you can also activate it from the Window menu) and there you can find a bunch of textures that are semi-transparent png images where the "holes" between the wire/iron fencing is transparent.
Now of course while these are great and useful in SU (you need not model the lines as well as keep your model light weight), they cannot be used in external rendering applications (that you are not using yet but I'm sure will be soon interested) but simple lines cannopt really be rendered there either.
-
Gaieus,
Most professional or semi-professional rendering applications handle alpha-channel transparency quite perfectly, they can even use it for casting shadows. All SU materials are either totally transparent or totally opaque to the shadow-casting engine, as determined by the SU transparency setting. So in SU it is possible to make a totally invisible material that casts a shadow...
Anssi
-
@anssi said:
Most professional or semi-professional rendering applications handle alpha-channel transparency quite perfectly, they can even use it for casting shadows...
Or if they don't (like Kerkythea with the current exporter - though you may not take it for "professional"), you can always use clipmasks.
As for the SU part here that's true. However SU either casts that shadow or doesn't - there's no way that the light only goes through that alpha mask (which is the pain of most of those 2D plant designers).
-
Thanks for the advice, that was exactly the sort of thing I was looking to do. I was messing around with the smooth tool before but couldn't figure it out because I neglected to view the group in edit mode..
The only thing I couldn't figure out is when I smooth on a vertical surface the curve of the top and bottom parallel line stay the same. I couldn't figure out how to get the line at the bottom to stay flat while having the top line droop. Sorry I not explaining very well. See the pic attached to this post, see how the bottom of the net is cut straight across, I was hoping to get the droop to gradually taper off the closer it gets to the ground. Oh well, it still looks a bunch better in my opinion, thanks again.
-
I see what you mean.
Now you modelled those lines or is that some kind of a semi-transparent texture? (It seems to be modellet though).
It could be done by using differently scaled arcs...
-
@gaieus said:
I see what you mean.
Now you modelled those lines or is that some kind of a semi-transparent texture? (It seems to be modellet though).
It could be done by using differently scaled arcs...I made a block, and then applied 'from contours', then drew lines on it and intersected them all, then used the smooth tool to push down on the top. It looks exactly like I was wanting to except the bottom. I thought of using a texture too but wanted to try lines first.
And now that you said that and I'm thinking about it for a minute, I probably should have used arcs. I don't know why I didn't, that would have been just as easy as drawing straight lines. Back to work with me...
-
jstubler,
I have to disagree with you about the lines at the bottom in a vertical or slanted plane like in the back, see:
http://www.hillsport.com/images/7-a-side.JPG
The distance between knots stays the same (above each other)along the line and going from left to rigth.
You will see part of the net on the floor/ground in real life.Anyway, If you insist I will try to explain how what you want can be done with the 'Smoove' tool.
Normally all points on (a) blue axis stay spaced like they were before the use of the tool. That,s how it works. The further away from the center, the less the points move in a smooth degree till nothing happens (no move at all) at radius distance.
I guess that is why the tool is called Smooth+Move = Smoove.I'll be back (where does that come from?
 )
)
Wo3Dan -
jstubler,
This is how it could be done with 'Smoove'. See in 3DW:
http://sketchup.google.com/3dwarehouse/details?mid=ddd73336a94a3809c64f5c20341137c8cheers,
Wo3Dan -
@wo3dan said:
jstubler,
This is how it could be done with 'Smoove'. See in 3DW:
http://sketchup.google.com/3dwarehouse/details?mid=ddd73336a94a3809c64f5c20341137c8cheers,
Wo3DanThat's awesome, thanks a ton for doing that. I see what you mean bout the picture of the soccer goal, how it sort of gathers at the bottom. I think I'll try for a middle ground, partial gather and partial straight at the bottom. Your method is definitely better then what I was trying to do.
Again thanks! Cheers to ya too..

Hello! It looks like you're interested in this conversation, but you don't have an account yet.
Getting fed up of having to scroll through the same posts each visit? When you register for an account, you'll always come back to exactly where you were before, and choose to be notified of new replies (either via email, or push notification). You'll also be able to save bookmarks and upvote posts to show your appreciation to other community members.
With your input, this post could be even better 💗
Register Login


Advertisement