[Tutorial > Modeling] How would you model this? (wood stove)
-
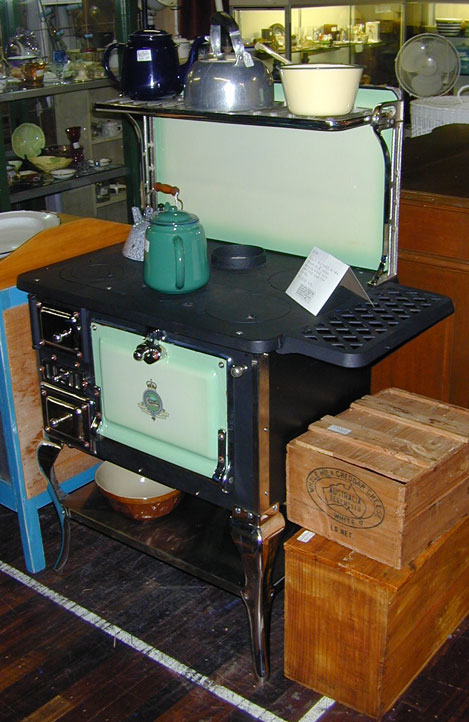
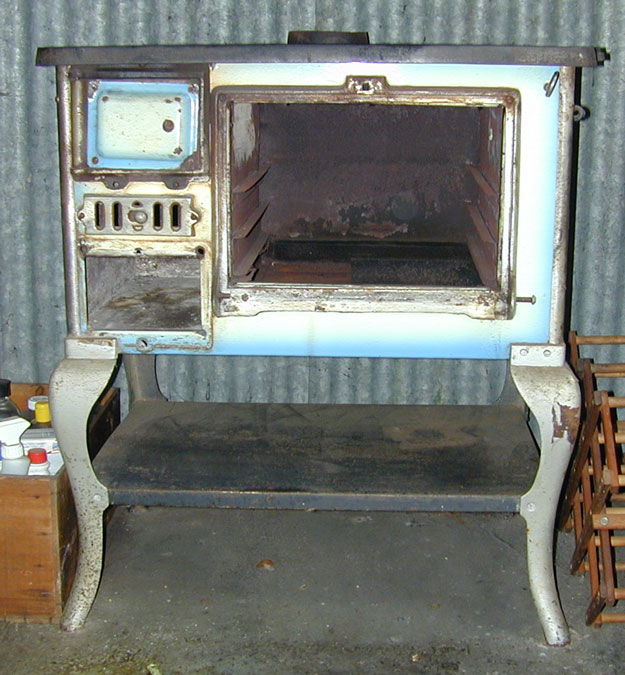
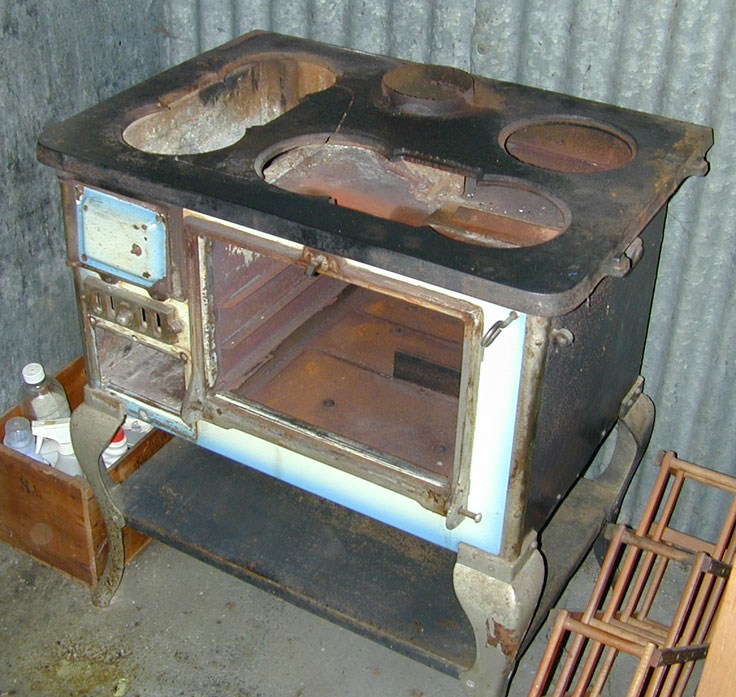
I'm having a very old wood stove restored to fit into the stove recess of a little old Queensland [Australia] colonial worker's cottage. It is quite straight forward except for the legs which have complicated 3D curves that are beyond my level of expertise.
I'm sorry, these are the only images I have of it since the stove is about 150 km away being restored.
Any ideas on how to even attempt this would be appreciated.
(Bernard Hagan)


-
I will take a stab.
It seems I can only upload 3 images at a time so I will do this in shifts.Draw your profile.

Push unwanted.

Draw cut profile.

-
Second panel.
Push cut profile through and intersect with model.

Delete unwanted and make it a component.

Copy, mirror and rotate.

-
And last...
Edit component, intersect with model and delet unwanted.

Clean up and add details etc...

I hope this helps.
-
Bernard, I had a bright idea and it seems to have worked:
Trace the leg (better than I did), push/pull it, copy/rotate to cross, intersect with model, erase out the wings (now you have a nice wood table leg), copy each of the outside faces and move inward to create the metal thickness, erase out the inside material to create the cast shape. Lastly, smooth the edges.
Neat! I didn't know I had it in me...thanks for the fun puzzle. Best, Tom.
Edit: (So you guys are the reason I timed out so many times, this thread was empty when I started trying to post :`)
-
Ooof. It seems my model has been intersected

Edit, it seems we are in force tonight!Like so.

I also noticed that the corners were rounded, you could explode the components into one and smooth the edge.
-
I'd like to move this to the Tutorial section or Boo, you could create a new thread there with this valuable information in it...?
-
No, you had it (modelhead...I've lost or don't know your name), mine doesn't smooth as much as the reality requires. Still, I won't be a-scared of table legs anymore, Thanks!
-
Wow! Great stuff! I was only away a few hours and I find three solutions to something that has been worrying me for months. This is just how the old @Last Forums used to be. It makes me feel right at home - though a bit guilty at not having made many contributions myself.
Many, many thanks Eric, modelhead and Tom. I'll go through each solution and post the finished model - for those interested in early Queensland Crown wood stoves - after I get the stove back from Toowoomba in a couple of months.
Greatly appreciated.

(Bernard Hagan)
-
Bernard,
I've got fairly vivid [and mixed] memories of one of these stoves.
It was during my Gauguin period , living dirt poor in an unfinished house, in the middle of a banana plantation, on the ocean side of Buderim.
It was chop the wood, light the fire, boil the water......for a cup of tea...or a bath.
And just the thing to cook the the Sunday roast on.....say during the rainy season in January

Stu
-
ust to show off [I doubt there is anyone who could actually use them] - here's a pair of legs for a No 7 Crown wood stove.
Thanks again to the boys - Eric, modelhead and Tom. You can be very proud of your student - I am.
Stu - like yours, my childhood memories of these types of stoves are of
  - burning toast propped up with a fork at the open door of the firebox
  - having a hot bath in an old galvanized iron tub on the kitchen floor in front of it
  - the smell of stews and roasts that filled the kitchen.
Dad was a carpenter but worked at the meat-works in Rocky and built the house around us on weekends. It was on 8 foot stumps, Queensland style, and we used a ladder instead of stairs for the first few months. I was about 7 or 8.
It was a great adventure. Just imagine what the reaction to that would be today.
I'm having my present stove converted to gas once it's renovated - can't put up with soot and all that cleaning - getting too old [and green] for that.
(Bernard Hagan)
-
@unknownuser said:
@unknownuser said:
I'd like to move this to the Tutorial section or Boo, you could create a new thread there with this valuable information in it...?
Kris/Boo...let me know if you would like me to put a more detailed profile-followme-intersect with model method together. I'd be happy to if you are consumed with other things...let me know...cheers
Bruce, I will not have time to start a tut this morning, I can get to it tonight. If you want to start a thread go ahead, then I can tack on to it. That way we can have 2 methods in the same thread. What do you think?
If it is ok with Bernard, post one of the pictures from this thread of what was requested.And if you do, please post a link from here to the new tut thread.
-
It has already been moved/copied. Thanks Coen. No need to re-do.
-
What I love about this group, this forum (this program): this thread says it all! Three distinct paths to the same solution...shared...then utilized. Plus, now I get to think about the next problem a little (or a lot) differently.
Sweet!
Yeah Eric, Bruce, Bernard!
-
Another great thread!
Really useful seeing the methods shown to complete this. There is alwayss loads to learn with this program
Dylan
-
@unknownuser said:
...although the moderators may have other thoughts about whether our little session has any value??...
No Bruce, moderators do not consider value. They may - at the very most - consider a topic/thread to be more useful elsewhere. Value is added by the users.
(I've been following the topic with excitement!
 )
) -
Here is a tutorial showing the processes I used. It may be of value to those of you wanting to create
other complex curves - eg. appliances, automobiles and organic solids.Thanks to Eric, Bruce [modelhead] and Tom who showed me how - and to Coen who slimmed down the size of this tute file.
(Bernar Hagan)
-
Very nicely explained Bernard, that makes the process seem quite simple!
Dylan
Advertisement


