[Plugin] Model Director — Movie Creator for SketchUp
-
Ya, surely. At some point in time we may want to introduce raytracing. If @pixelcruncher has already created plugin for this then we may seek his help.
-
This post is deleted! -
For this walk through the plaza, I chose Cinematic Moonlight with Orchestral music and a dramatic mood.
The camera passes beneath the pergola and turns toward the fountain before continuing through the space. The subdued lighting gives the water and surrounding structures more presence.
Made in SketchUp with Model Director. Curious to hear which night treatment you prefer—this one or Midnight Moonlight.
Pritam
Sketchingo -
This post is deleted! -
From SketchUp model to a 4K presentation movie in under 10 minutes
Thanks to everyone who has been following the examples here. Instead of another single shot, this post shows how the pieces come together.
Built for people who aren’t SketchUp experts
Many architects and interior designers we talk to use SketchUp only now and then. Model Director is made for them too. You draw a route in the model, and within about 20 seconds you’re watching it as a live walkthrough in the Camera Monitor. Most people get comfortable in about 20 minutes. After that, a complete video takes less than 10.Three ways to move the camera
Walk: through the rooms at eye height, with a natural walking feel
Facade slide: a steady glide along the building front
Drone: orbit, spiral, rise-and-reveal, fly-over or your own custom path12 presentation looks
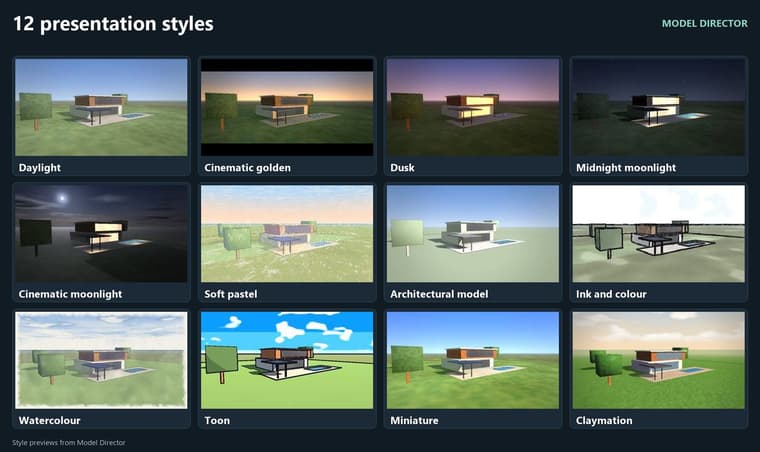
Daylight, Cinematic golden, Dusk, Midnight moonlight, Cinematic moonlight, Soft pastel, Architectural model, Ink and colour, Watercolour, and the playful ones: Toon, Miniature and Claymation. (Game styles)Music in under a minute
Pick an instrument (drums, orchestral strings, piano, marimba, guitar and more) and a mood (calm, warm, uplifting, dramatic or energetic). Press Create new and it creates a new tune within 10 seconds.A complete movie, not just a clip
This is the part we’re most excited about. Add presentation slides between your shots for the project name, your company, the client, or a short note on the design idea. Model Director joins the shots, slides, transitions and music into one finished movie, ready to show a client. There’s no second program, no editing software and no exporting back and forth.Export
MP4 or WebM, 720p to 4K.Try it
14-day free trial with every feature included. Watermark.
 https://sketchingo.com/plugins/model-director/
SketchUp 2024 or later, Windows.A question for you: when you present to clients, what goes on your title and in-between slides? Project name and logo only, or also plans, notes and before/after views? Your answers will shape how we develop the slides next.
Pritam
Sketchingo -
The plugin is available for download at https://sketchingo.com/plugins/model-director/
-
I've shared a few finished movies earlier in this thread. Here is a closer look at the controls behind them, split into five posts so the screenshots are easier to follow.
The first decision is how to move through the model:
Walk follows a route drawn in the model or on the drawing sheet.
Facade Slide keeps the camera facing a facade as it moves along the path.
Drone offers Orbit, Ellipse orbit, Spiral, Rise & reveal, Fly-over and a Custom path.
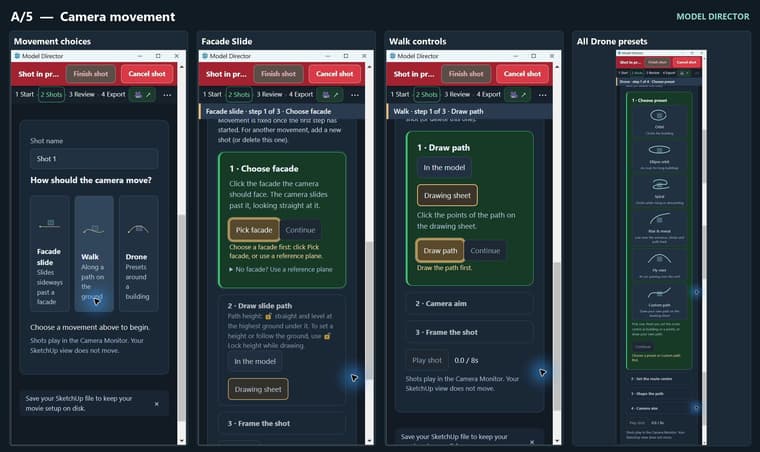
For a building presentation, that could mean an orbit to establish the site, a slide along the main elevation, then a walk through the entrance.
The Camera Monitor is a separate window, so you can check the shot while keeping your SketchUp working view available. The screenshots below show the movement choices and the setup steps for each one.
-
D/5 — Putting the presentation together
The Review panel is where the separate shots become a sequence. You can change their order, choose which ones are included, and play the movie through.
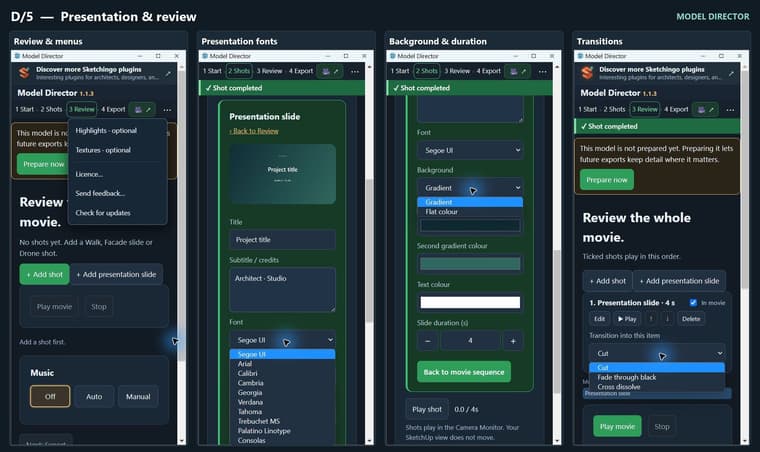
Presentation slides can sit between the camera shots. They have a title, a subtitle or credits, a font choice, background and text colours, and a duration. The background can be a flat colour or a gradient.
For example, a project title could lead into the site view, followed by an “Entrance approach” slide before the walkthrough, with your studio details at the end.
The transition menu offers Cut, Fade through black and Cross dissolve. A cut keeps things direct; a fade can mark a change of section.
These screenshots show the slide controls and transition menu in detail. It gives the film enough context to be sent to a client on its own.
-
C/5 — Instruments, mood and music
A closer look at the music controls, since the instrument and mood can change the feel of the same camera movement quite a bit.
Manual mode gives you eight choices:
Piano — gentle, struck notes
Strings — a fuller, cinematic sound
Synth — modern and spacious
Orchestral — a grander arrangement with timpani
Ambient — slow, minimal pads
Marimba — bright, wooden notes
Drums — a drum beat under the tune
Drums only — just the drum kit, without a tune
Then choose Calm, Warm, Uplifting, Energetic or Dramatic. The instrument and mood are separate choices: you can keep the instrument and change the character of the music.
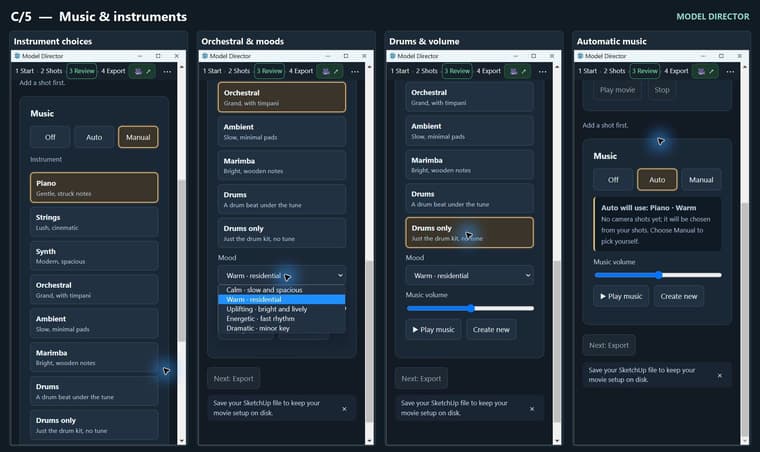
Play music lets you listen, Create new generates another tune, and the volume slider sets its level. Auto mode chooses the instrument and mood from the camera shots if you'd rather start there.
The gold outlines in these screenshots show Piano, Orchestral and Drums only selected. The open menu shows all five moods.
-
Camera highlights and export
One more camera control before export: Highlights. You paint the part of the model you want the camera to look towards—an entrance, a facade, a fountain or another feature. Walk, Drone and Facade Slide shots can use those areas to guide the camera's attention. The paint marks don't alter the model geometry.
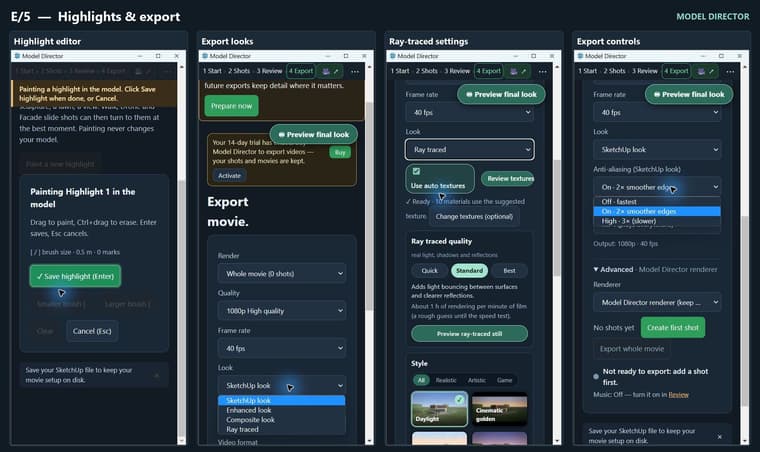
The export panel brings together the resolution, frame rate, video format and final look. The look menu shown here includes SketchUp, Enhanced, Composite and Ray traced.
For the SketchUp look, the edge-smoothing menu offers Off, 2× and 3×. The ray-traced panel has Quick, Standard and Best quality settings, plus a still preview to check before rendering the movie. Render time will depend on the model and the settings.
-
Giving the movie its look
Once the camera route is in place, you can decide how the project should look in the film.
The Composite gallery has 12 styles. These include Daylight, the evening and moonlight treatments, Architectural model, Ink and colour, Watercolour, Soft pastel, Toon, Miniature and Claymation. I've included the whole gallery below so you can see the choices together.
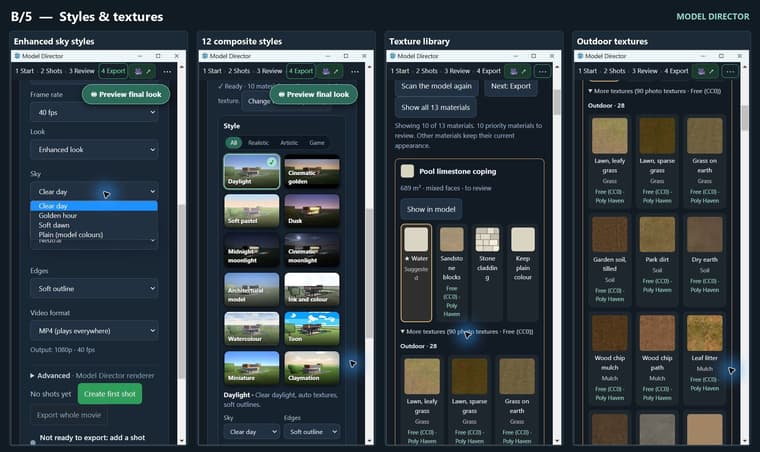
There are also separate sky choices in Enhanced look: Clear day, Golden hour, Soft dawn and Plain, which keeps the model colours.
The texture panel lets you review suggestions for plain-coloured materials. You can accept a suggestion, browse the larger library, or keep the plain colour. These choices are for the Composite export; they don't repaint the SketchUp model, and textures you've already applied are kept.
A useful place to start is one clear daytime treatment and one more illustrative version of the same route.
-
Presentation styles
-
The purpose of this plugin is to create wonderful movies within minutes to show to your client. This plugin is not for photorealism but to create interesting presentation using different styles.
Hello! It looks like you're interested in this conversation, but you don't have an account yet.
Getting fed up of having to scroll through the same posts each visit? When you register for an account, you'll always come back to exactly where you were before, and choose to be notified of new replies (either via email, or push notification). You'll also be able to save bookmarks and upvote posts to show your appreciation to other community members.
With your input, this post could be even better 💗
Register Login


Advertisement