Here is how you can use PhotoMatch with cropped photos
-
OK, so I expected to find a lot of answers on the internet for how to find the center of projection (or attention) for a photo, but surprisingly I didn’t find any techniques. Ok there are techniques that look at peoples eyes to see if they have been composed into a photo; this work through finding the center base on analysis of the eyes - the bad eyes will project a different center than the rest; but not really relevant for PhotoMatch.
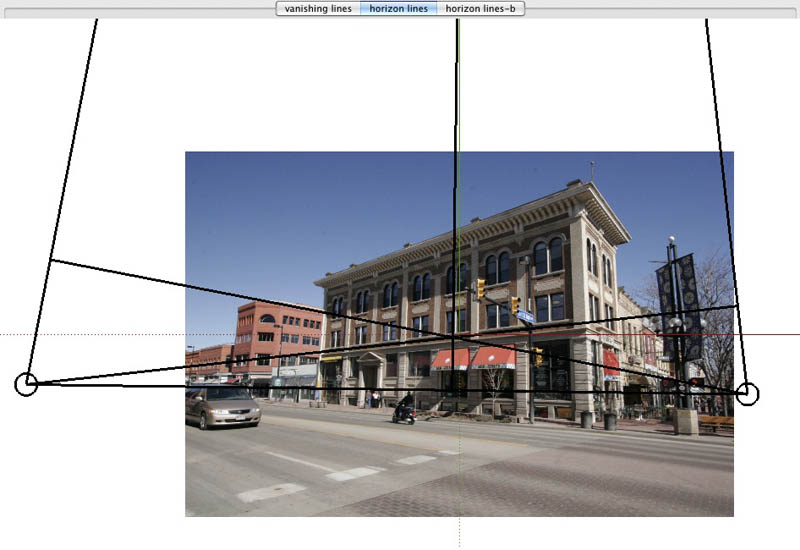
Well two things came to mind that I thought would be useful for this. First is that there isn’t just one horizon line, but rather three (for cube shaped object – 3 90deg axis). Second is that each horizon although it goes off infinitely in both directions, kind of has a center. This center is the point along that horizon, where a vertical line doesn’t tilt in or out regardless of tilt of camera. It is perpendicular to the horizon and goes through the third vanishing point (the one not forming this horizon). Ok, a third thing was that as you tilt your camera up, your verticals start to converge at the top, and your horizon moves lower on your photo. the question was how to translate the amount of vertical vanishing to a camera tilt amount; this would seem to vary based also on the FOV of the lens.
So I drew this line for the three horizons, and wouldn’t you know it, they all cross at (or very close to) the center of the original photo. You can crop the photo all you want, but this point won’t change. Of course you need to have content in the photo to define the vanishing points.
The attached photo (pic 3) shows me drawing the lines perpendicular to the horizons through the opposing vanishing point. This particular test was off about 3% from the true center, but keep in mind, this error may be the camera’s sensor, they are always off to some extent, although 1% would be more typical. The other flaw is that I may not have drawn my lines correctly do to use error, or other lens distortion. But I think its close enough to provide good results. Had this photo been cropped off center, I would now open in Photoshop and expand the canvas with extra white space on the sides making sure to re-center on the newly found center of projection.
So it seems this works great when you have the camera tilted up or down (where there is a vertical vanishing point), but when you are truly or close to being level, your vertical vanishing point is so far off that verticals appear parallel to each other. Well, that doesn’t let me get my center of projection. I know it is on the x-y horizon so I can resolve vertical cropping, but I won’t be able to correct for cropping to the sides of the photo in this case. This doesn't seem to be an issue for PhotoMatch though. If you don't have converging verticals, then you don't have to worry about cropping to the sides. It is probably a good idea however in this case to rotate the photo so the horizon is level. This way no-matter where the center was across the horizon, it is still vertically in the center of photo.
Happy un-cropping. I'm hoping to not find the need for this in SU7, and also hopping for mostly automated calibration as well. Maybe also option for telemetry based solution to work with non-square and non-adjacent geometry. (but I'm just guessing and wishing)
Feel free to post problem images, and let me or others take a stab at finding the center.
-
Make just the verticals vertical and all will works fine

1 Second in any 2D prog with any headache

-
Well, making things vertical isn't really enough. See Picture 6 attached. If you also play with the horizontal perspective to get the horizon level at the same time and the verticals, and then you adjust the canvas size to get the horizon in the center, then you can do it this way; see Picture 7 for screenshot after additional adjustments. But that is also a lot of work, and requires distortion of source image. The method I used just expands the canvas, and doesn't degrade the image.
My test image on previous post was not cropped. It was a test image where I know the center, but the method I used to find it doesn't rely at all on the edges of the photo. If you do same analysis on small piece of the image, you will find the same center, may even be off the edge of the photo.


-
I don't understand
What importance if the sides are deformed, house on the middle is ready for the photo match -
I don't care so much what the edges are like. The point I was making, is that my goal of my process was to be able to find the center of the photo without just measuring to the middle from the sides. I find the center purely on geometric markers. This allows me to see if a photo was cropped and which sides.
The less re-sampling of your source photo, the better. SketchUp is already going to have to re-sample the photo (when applied to surfaces), no reason to have Photoshop do it as well.
For photos where your aren't looking up or down (parallel verticals) I do need to do a little more research. While I thought I resolved it and modeled geometry looks OK, I have my thoughts that maybe not accounting for side cropping correctly could affect measurements on the building.
By the way, I also believe it should be pretty easy to model one point perspective. I'll post on that another time.
-
dear, DavidBoulder. please don't read the following! I want to spread some rumour about you...
if you do read this, please do not comment - I want to keep my believe, that my guess is true
so, here we go:
DavidBoulder does not give any information about himself, no name, no place of residence, nothing.
David is obviously his first name. but Boulder, Colorado is the location, where the Google programmers are working on the new SketchUp version!
David seems to have spent a great deal of thought about the photomatch tool in SU.
he refers to the new SketchUp version (what could be in there...)
@davidboulder said:
I'm hoping to not find the need for this in SU7, and also hopping for mostly automated calibration as well. Maybe also option for telemetry based solution to work with non-square and non-adjacent geometry.
regarding all this information my conclusion is:
David is working on the new photomatch tool for SketchUp. he is (indirectly) asking for help at SCF, for new ideas, wishes and possibilities.
so everything we post here, will be found (if possible to achieve) in the new SketchUp release! so lets put all our desires (like a flexible multi-pin photomatch system) in this thread, with loads explanations as how to achieve this (to make Dave's life easier)...
oh, I love spreading unfounded rumour!

sorry DavidBoulder, I just had to...
-
@davidboulder said:
By the way, I also believe it should be pretty easy to model one point perspective. I'll post on that another time.
David,
Were you ever able to figure out how to photo match a one point perspective?
I did a quick search but couldn't find anyone with a solution.
Thanks,
Todd
-
@Todd:
You just unearthed an ancient thread that has mentions of things being wished for in Sketchup 9. -
@thosford said:
@davidboulder said:
By the way, I also believe it should be pretty easy to model one point perspective. I'll post on that another time.
David,
Were you ever able to figure out how to photo match a one point perspective?
I did a quick search but couldn't find anyone with a solution.
Thanks,
Todd
Kind of, although not quite a one point perspective. If you have a situation like a main street where you have a bunch of connected facades where you only see the front of the building, but not the sides; I have a solution. Take a picture, but not straight on, shoot the photo off to the side a little so you have an x or y vanishing point. So how to you get a second vanish point? you cheat, Tilt the camera up or down so the z vanishing is your second one. To get this to work in Match Photo, before you import your photo, setup a special axes setup where you take the blue axis that is normally vertical and set it instead for your unknown x or y. Then that x or y axis becomes vertical z axis for your photo match scene. In essence if you turn your photo 90 degree sideways, it is like a normal old match photo. You are just changing which Axis Sketchup determines for you without having to really having to rotate your photo. This same technique allows you to use Match Photo on a building that doesn't have any 90 degree angles in plan, however you now need walls that are vertical, which should cover most buildings, but certainly not all. I don't have a tutorial up now, but I can try to make one when I get a chance.
-
The picture book version. I'm assuming that you can have the image any size/proportion you like, as long as the all-important centre of perspective is smack in the middle.
Jakob, those of us who attended Basecamp 1 and saw David demo Photomatch before it's launch (except it wasn't called Photomatch back then) already know who he is.

-
Sorry I missed the 2011 activity here. It is a shame that in 2013 I still can't have auto-calibrated photo match scenes that work with any photo

Alan, your drawing describes the technique much more clearly.
David
-
I must be missing something in establishing the start point for the uncropped outline. The bottom is coincident with the bottom of the image, but how is the left side established?
-
You could just keep it coincident with the left as well. In Alan's drawing he might have just been trying to maintain the same aspect ratio as his starting photo.The main goal is to re-center the image. You can't really tell how much of the original photo was cropped, just that it was cropped in a way that moved the center. This technique just expands one or two of the for sides to re-create the original center point.
If you took a good photo and cropped x" off both the left and the right, and then y" off the top and bottom MatchPhoto would work fine. The real problems are introduced when you crop X" from the left and Y" from the right.
-
Thanks, David. Your explanation clears that up for me.
-
Hi David,
Does your method work with any kind of photographs, or are there limitations to the orientation of the camera vs. horizon?
Did you continue to work on the subject? -
efeme75 I have not done anything this this in a while, although there are more photogrammetry and LIDAR based options out now that may be more automated that PhotoMatch. With the approach from this thread, the orientation of the photo relative to the horizon doesn't matter, but it does require an orthogonal object in the scene large enough to find vanishing points, and create perpendicular lines as shown in Alan's example.
-
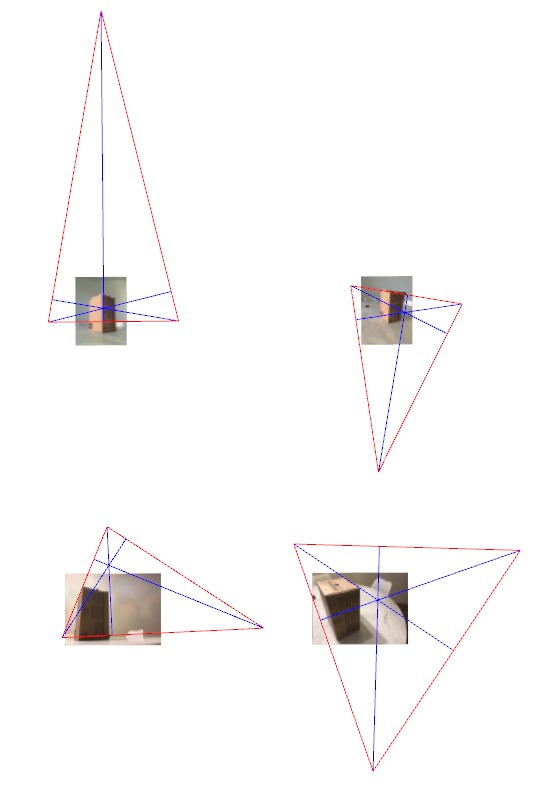
Dear David,
Pursuant to my last message, please find illustrations of your method in 4 cases (the edge colors are identical to the ones in Alan's attachment). In the first one (upper left uncropped image), the parallelepiped box is centred, and the resulting Central Point as well. In all other cases where the box is not centred in the uncropped image, the resulting Central Point is not in the centre of the image... Any thoughts?
-
Its a little hard to work with the small thubnails but the bottom two phots pretty clearly have misplaced vertical vanishing point. The top right is a big tricker to tell, with the camera plane seemingly in line with the top of the box, very small movement in the left or right vanishing point will swing the magenta line form vertical vanishing left or right. In three of the photos I've added new yellow vanishing point triangle, and new magenta lines perpendicular to the horizons. I've added while ring where the magenta lines cross.

-

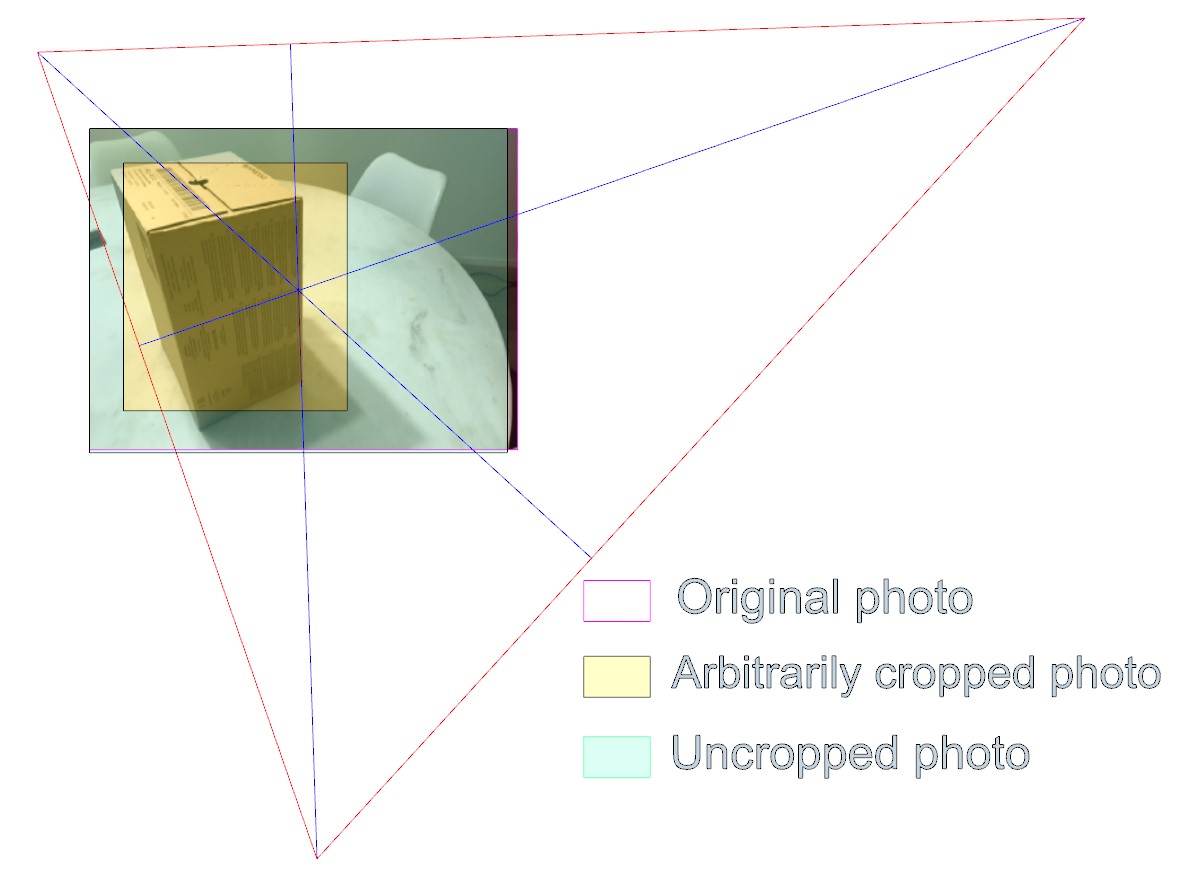 Dear David, Thousand apologies, my sloppiness and Sketchup's inferences caused the inaccuracies of my initial central point's graphical determination (see corrected drawing). In a second attachment, the superposition of the original photograph (magenta edge), the yellowish cropped image), the greenish reconstructed uncropped photo show the usefulness of the method. Since I am dealing with 1900 photos, LIDAR and other techniques aren't really helpful here... Many thanks for diving in after so many years!
Hello! It looks like you're interested in this conversation, but you don't have an account yet.
Getting fed up of having to scroll through the same posts each visit? When you register for an account, you'll always come back to exactly where you were before, and choose to be notified of new replies (either via email, or push notification). You'll also be able to save bookmarks and upvote posts to show your appreciation to other community members.
With your input, this post could be even better 💗
Register Login


Advertisement