Medeek Wall Plugin
-
Version 2.7.2 - 01.31.2022
- Fixed a bug with the window preset system within the window edit menu.
!!!!Alert!!!!
This bug existed within the window edit menu when creating a new window preset. Any window presets created prior to this bug fix may need to be manually removed from the window preset config file. This can be easily done by editing the file with any basic text editor (ie. Notepad).Properly configured window presets will begin with the following character string "b1=". If the preset does not have this specific string followed by a number (the preset number) it is corrupt and should be deleted from the preset file.
In Microsoft Windows the presets are found here:
C:\Users%Username%\AppData\Roaming\Medeek\2022\medeek_wall_ext\presets
The window preset file is named:
WINDOW_PRESETS.txt
-
Version 2.7.3 - 02.01.2022
- Added casing "Style D" for rectangle doors (Victorian style casing with plinths and rosettes).
- Added casing "Style D" for rectangle windows (Victorian style casing with rosettes).
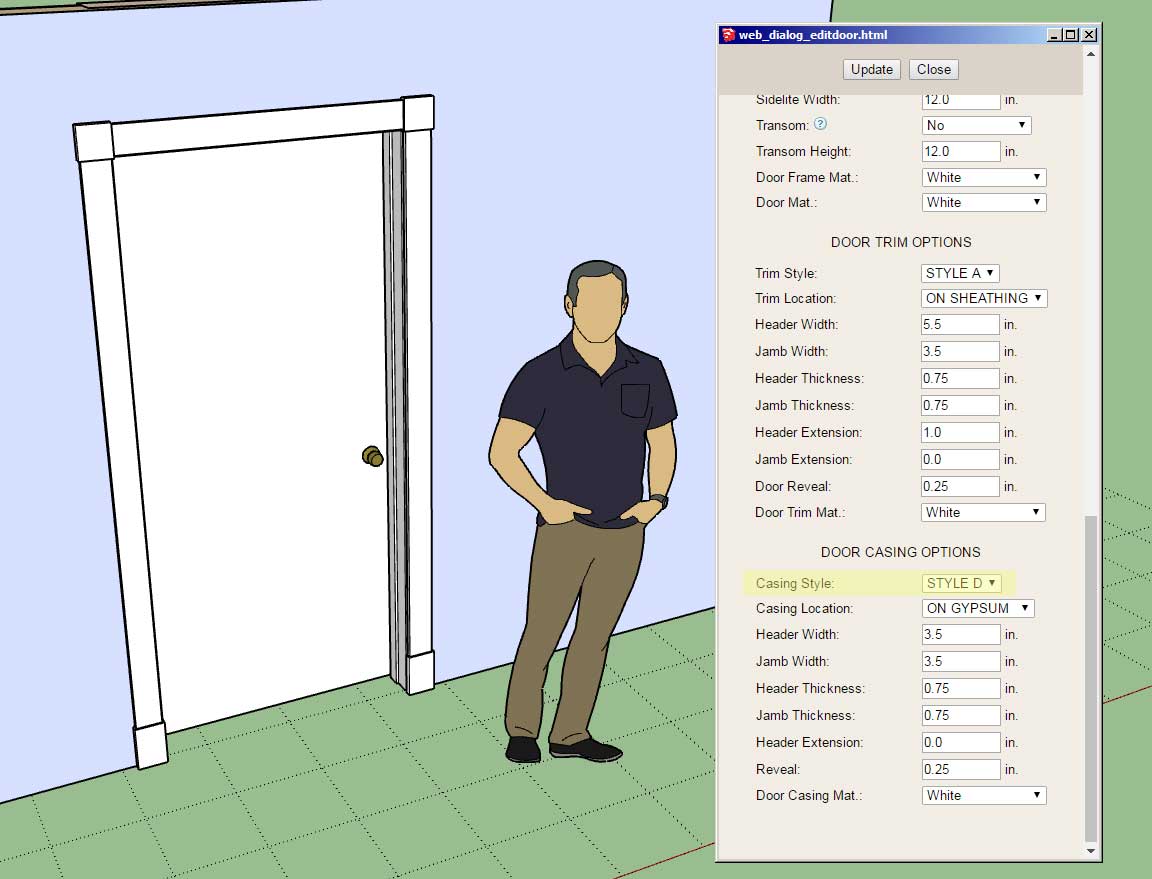
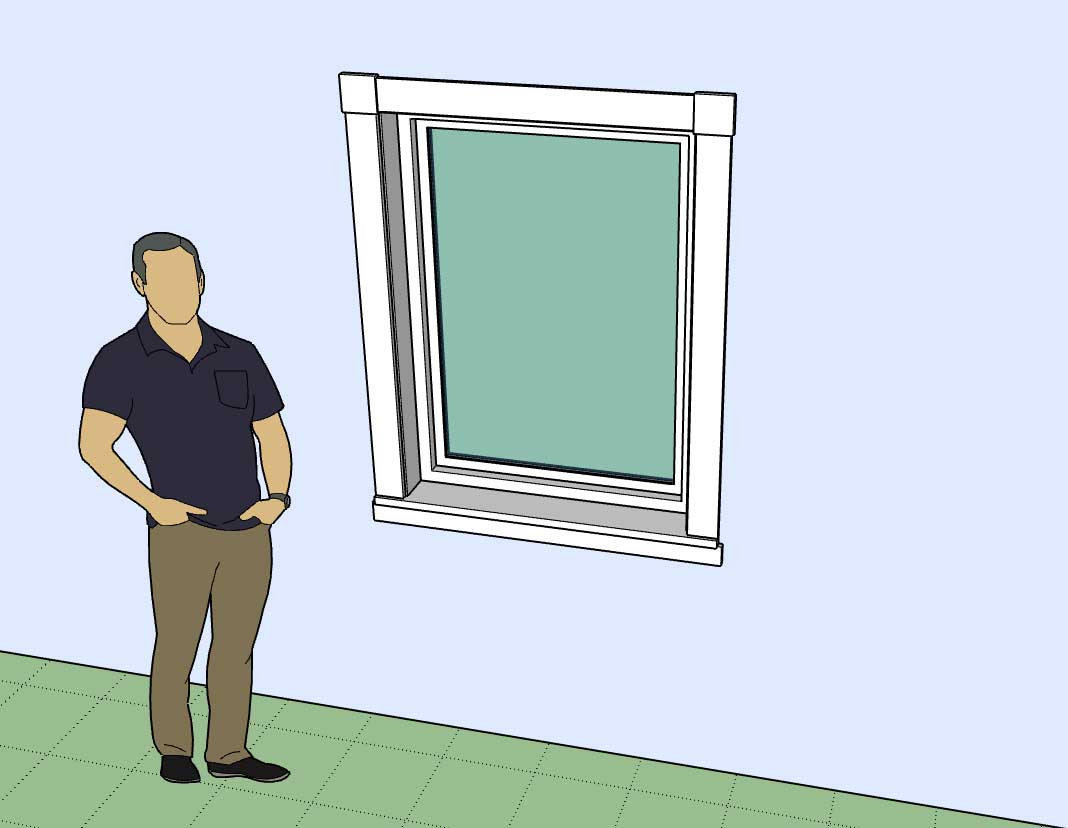
This is a low-poly version of a Victorian style casing. The details in the rosettes and plinth blocks are missing and the typical fluting in the jamb and header are also missing.
-
Version 2.7.4 - 02.03.2022
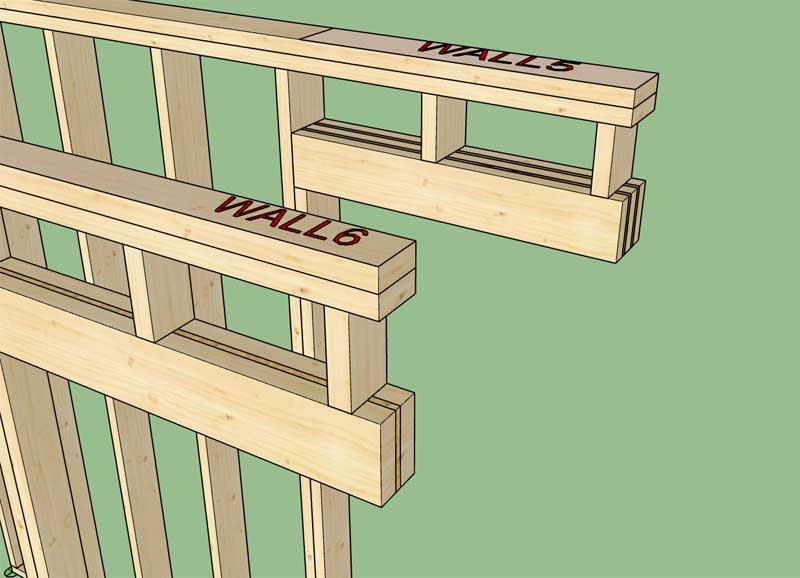
- Added two additional (advanced framing) layers: Bottom Plate, Header 2.
- Added an option for the cutting of bottom plates for doors and garage doors.
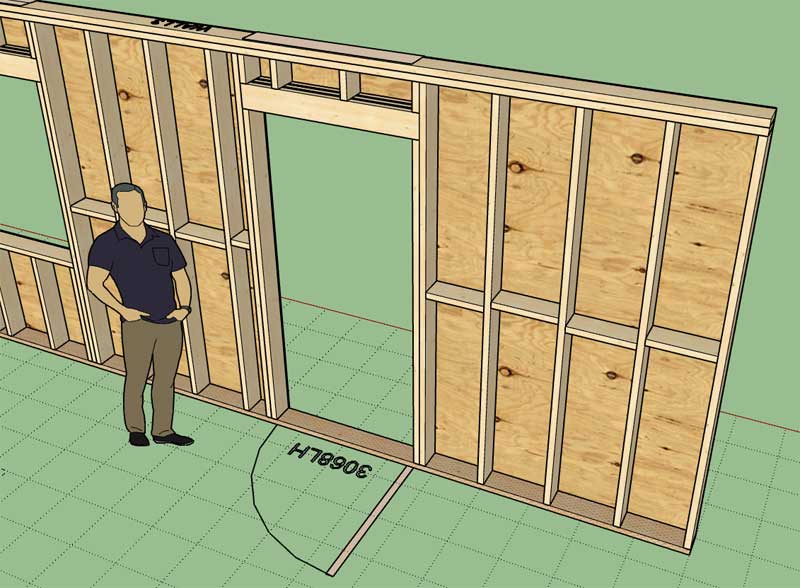
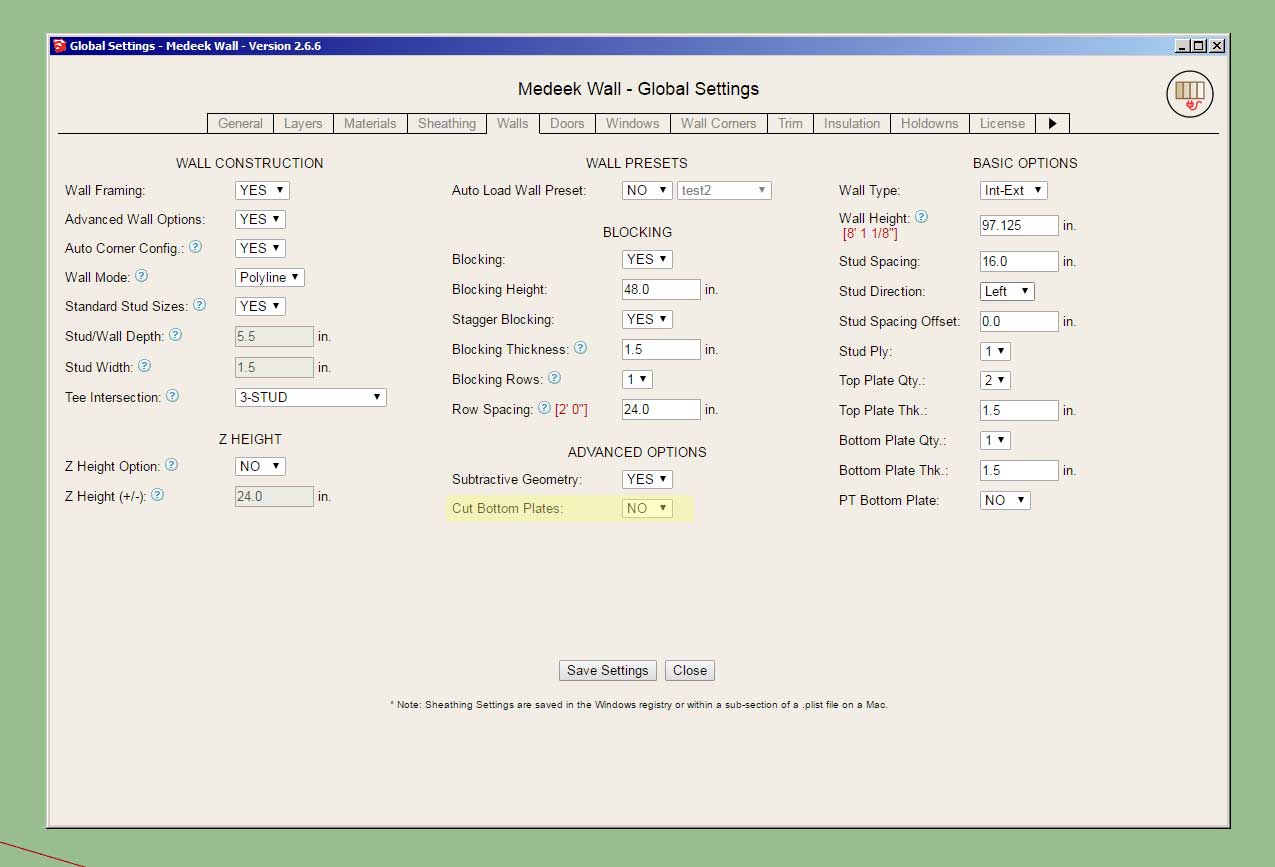
The "Cut Bottom Plates" option by default is turned on (YES), however when it is turned off then the bottom plates are not cut out for door and garage doors. This is useful for wall panel manufacturers who would rather leave the bottom plates intact for shipping/transportation and other reasons.
The "Header 2" layer is specifically for the sheathing placed between the lumber of spaced headers:
-
Version 2.7.5 - 02.06.2022
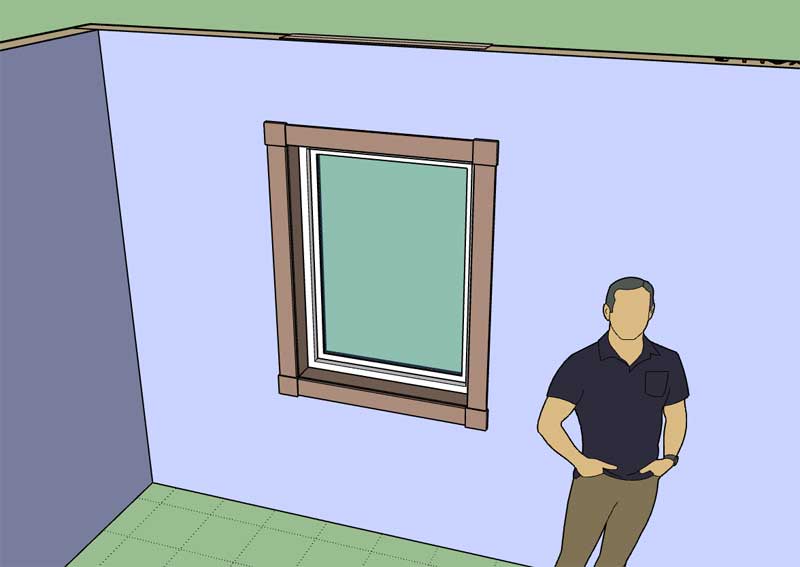
- Added casing "Style E" for rectangle windows (Victorian style casing with rosettes).
- Fixed a bug related to upgrades introduced in Version 2.6.8 specifically for CMU and "No Framing" walls.
!!!! Critical Fix !!!!
If you are using CMU walls or the "No Framing" option, this update is a critical fix for doors and garage doors. Please update your plugin to this latest version. Always remember to first uninstall the existing version first before installing the updated plugin within the Extension Manager in SketchUp.Style E is another common variant of the Victorian style of casing that I thought would be a good addition and complete the recent window and door casing upgrades to the plugin. Again my objective here is to provide a low poly version to represent the overall configuration rather than all of the minute details of such a typically ornate window treatment.
-
Version 2.7.6 - 02.07.2022
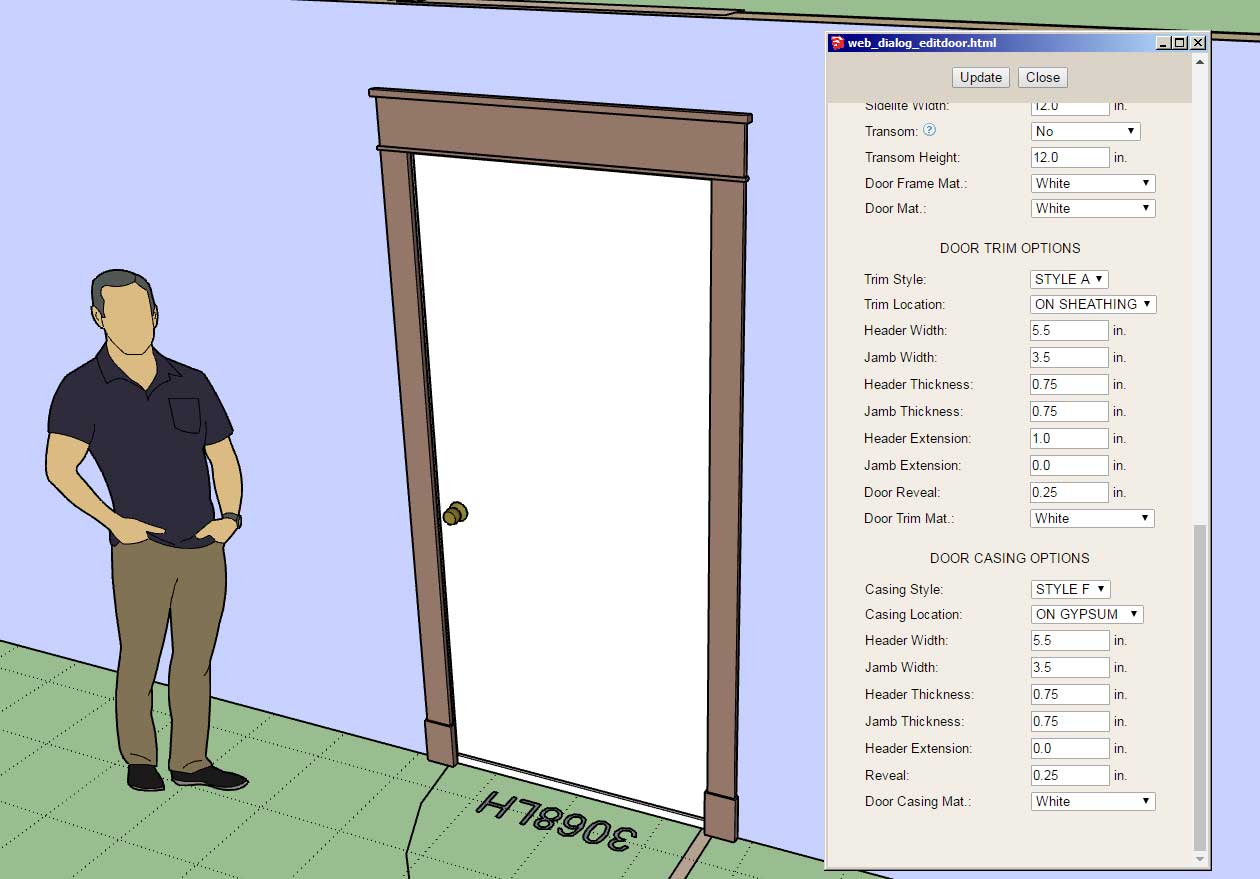
- Added casing "Style F" for rectangle doors.
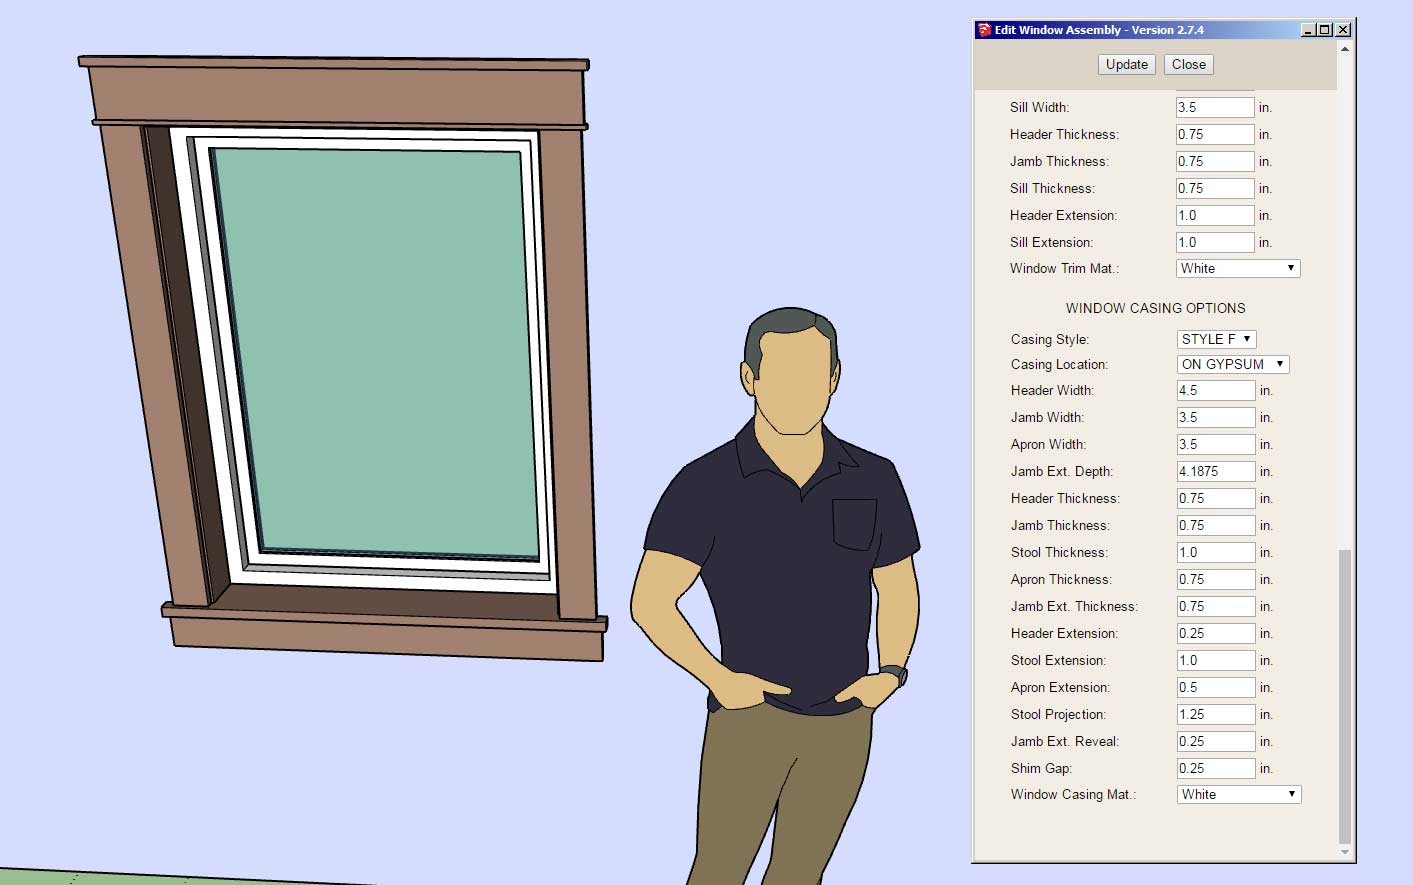
- Added casing "Style F" for rectangle windows.
- Enabled a VTP (very top plate) Offset option for rectangular walls.
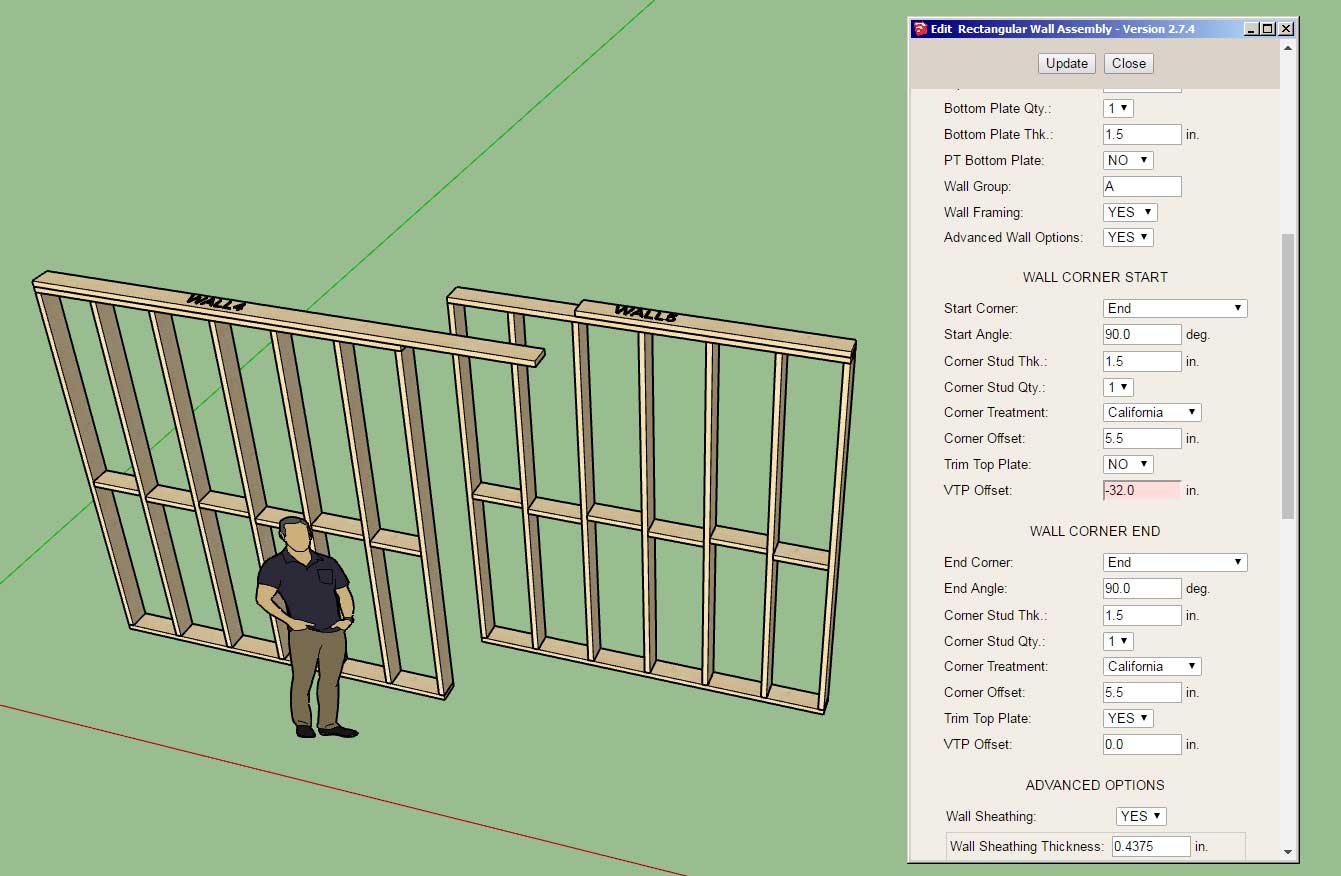
The VTP offset allows for more manual control of the "very top plate" and how it overshoots or undershoots the wall on either end (start and/or end of the wall panel). In order to use this parameter the "Trim Top Plate" must be set to "NO" (ie. manual mode is then enabled), and then either a positive or negative length can be entered which will offset the VTP accordingly as shown.
This feature was specifically requested by wall panel manufacturers so that they could more closely control the overlapping of the top plates in their shop models and construction drawings.
*Note that Trim Top Plate and VTP Offset options are currently only active for rectangular walls.
-
Version 2.7.7 - 02.08.2022
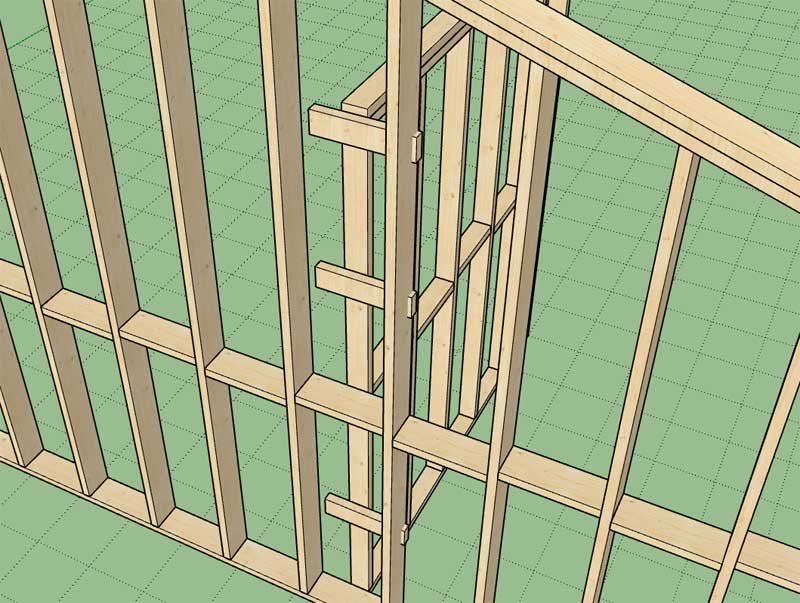
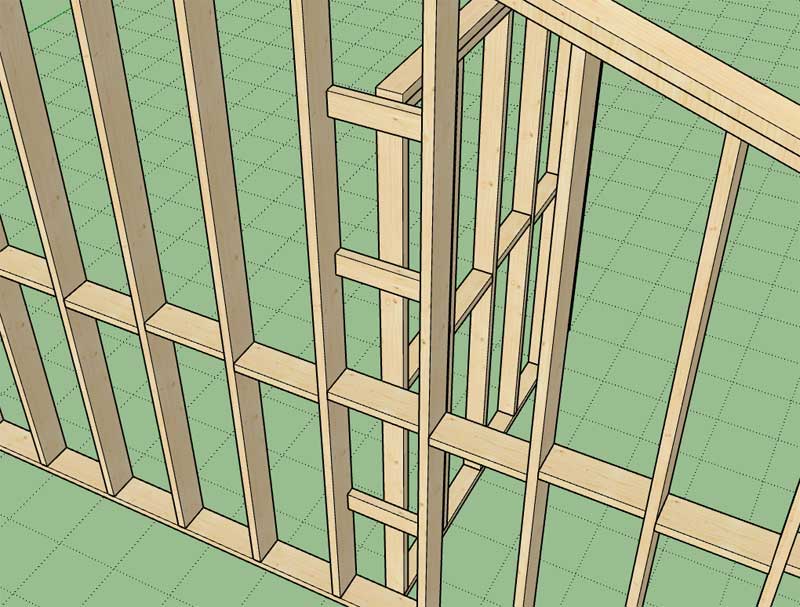
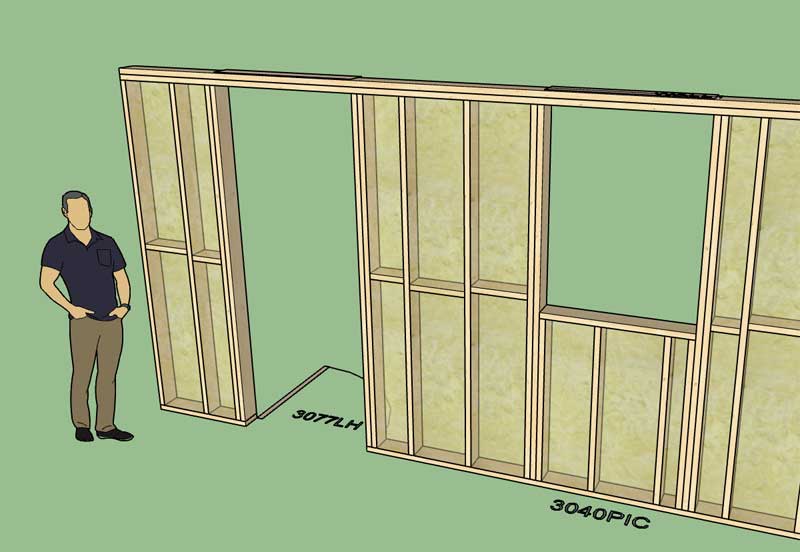
- Added a "NO" header option for windows, doors and garage doors.
- Fixed a bug with ladder blocking when the stud offset is non-zero.
- Fixed a minor bug with ladder blocking for hip walls.
-
I've had quite a few requests for a tool that will draw circular walls however I need to wrap my head around the geometry and some of the issues that arise when you curve the entire wall (or partial arc) like this:

As you can see things get a bit interesting when you introduce windows and doors into a tightly curved wall. In particular notice how the window opening is framed normally (no curve) and the cripple stud in the middle of this opening is problematic. So how does one handle this? The problem really is how to frame a straight opening like a window or a door into a curved wall.
View model here:
3D Warehouse
3D Warehouse is a website of searchable, pre-made 3D models that works seamlessly with SketchUp.
(3dwarehouse.sketchup.com)
Before I can make this a functioning tool I need to iron out some of these details in a rational manner.
-
my guess? i would find a way to generally mimic the radius (e.g. splitting the window or door frame) as an option, and presume that the window or door finishing will finalize the curved (or not) surface with jamb, extensions, etc. also i would presume the rough framing of the walls (and domed / curved ceilings
 ) will use various finishing techniques (e.g. curved/kerfed plywood + gwb, steamed lumber, etc) rather than expect the framing to be perfectly curved. this gives options for going from 6-8-12 sided gazebos to circular or elliptical structures...
 -
Version 2.7.8 - 02.11.2022
- Enabled staggered studs for rectangular walls.
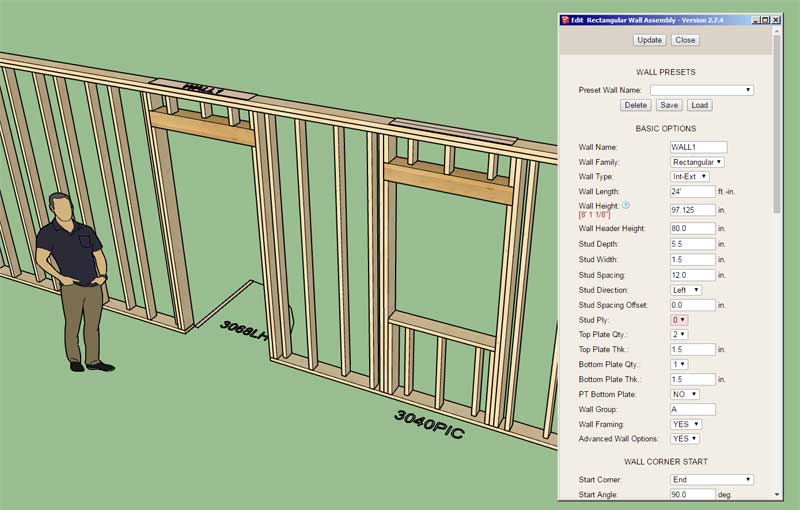
Rather than enable yet another parameter and make the menu that much bigger I decided to utilize the "Stud Ply" parameter to toggle this option. If you set the stud ply to "0", you will get a staggered stud wall as shown.
View model here:
3D Warehouse
3D Warehouse is a website of searchable, pre-made 3D models that works seamlessly with SketchUp.
(3dwarehouse.sketchup.com)
-
Version 2.7.8b - 02.14.2022
- Enabled staggered stud walls within the Copy Wall tool.
Tutorial 27 - Staggered Stud Walls (15:09 min.)
-
Version 2.7.9 - 02.16.2022
- Fixed a bug with vertically offset doors and garage doors in the "No Framing" mode.
- Fixed a bug with (arched) half or full glass doors that have a prairie or perimeter grilles installed.
Some minor fixes but annoying little bugs nonetheless, one was just a simple typo that has been waiting to be found for months. Highly recommend updating to this latest version if only to make these two bugs go away. A big thank-you to the user base who finds these bugs and notifies me so that I can address them.
-
Version 2.8.0 - 02.19.2022
- Enabled insulation within the preview menu of the estimating module.
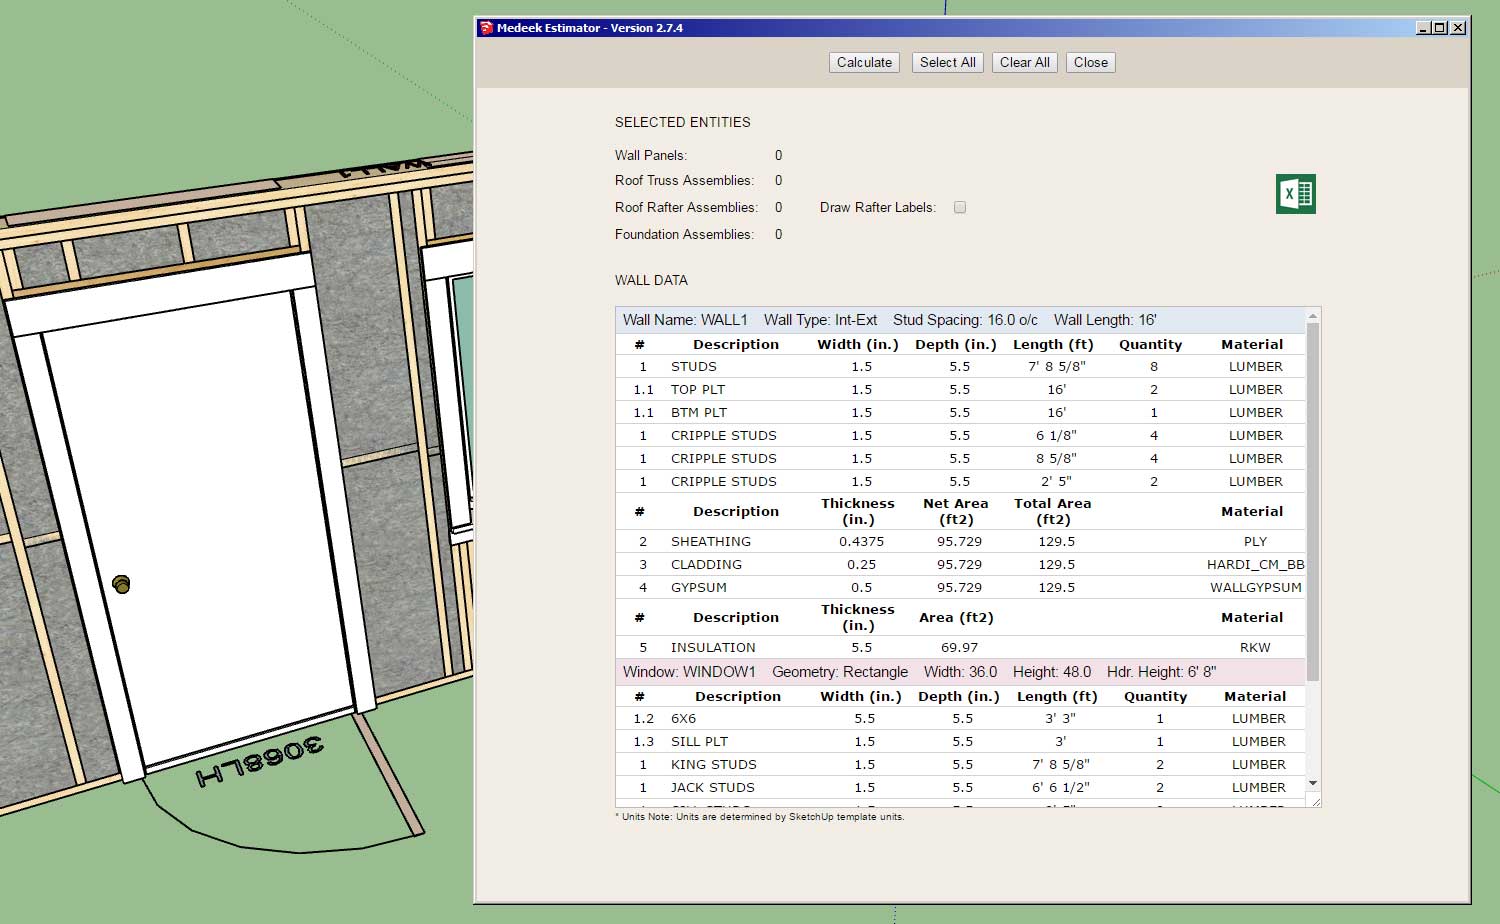
The insulation was already part of the CSV file output however I had not added it to the preview screen.
This update was per customer request.
-
Tutorial 28 - Estimating Preview (12:02 min.)
I'm still not entirely sure what direction I am going to take the estimating module but much work remains to be done.
-
My biggest issue with adding totals for any specific item (ie. sheathing) has been the variability of these items. In other words you don't want to total up all of the sheathing if some of it is 1/2" and some of it is 7/16", or perhaps you have some OSB and some plywood sheathing on different wall panels for whatever reason all in the same model.
After giving it some additional thought I devised a simple hash (accounting) solution and now the module can provide totals and break it out separately based on thickness and/or material as needed. Here is an example of three different wall panel sheathing totals with different sheathing parameters for each wall panel:

-
Version 2.8.1 - 02.21.2022
- Added material totals to the CSV output of the estimating module: Common Studs, Top Plates, Bottom Plates, Sheathing, Cladding, Gypsum and Insulation.
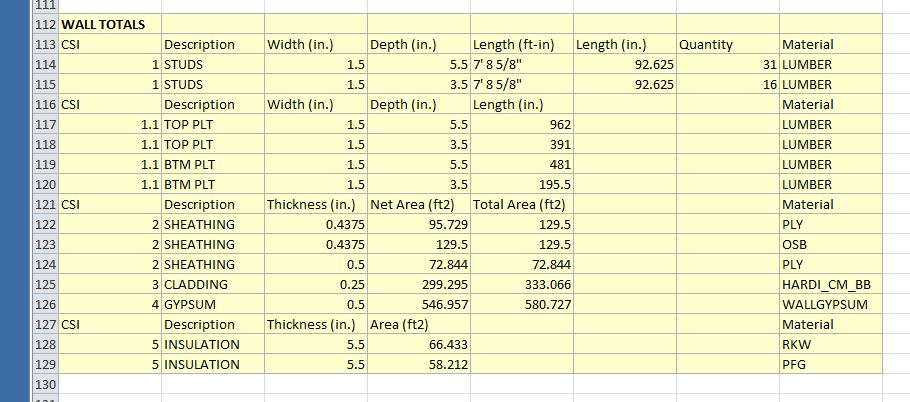
I will need to give some additional thought on how to handle cripple studs, king studs, trimmer studs, sill plates, headers and studs from non-rectangular walls. Some of these may not need a project/model wide total and the current tabulation may be sufficient.
-
In order to start off the year on the right foot I will be offering a 10% discount off of the regular mdkBIM bundle price (permanent license) using the coupon code SPRING22. (promotion ends Mar. 31, 2022).
This will reduce the bundle price (permanent license) from $280.00 USD to $252.00 USD. This promo code does not apply to any of the extensions purchased separately or to the electrical plugin. The offer also ends on Mar. 31 and no rain checks will issued thereafter.

-
I think it might make more sense to just have the total lineal footage (or inches) for cripple studs and sill plates.
However the king studs are typically the same as regular studs so probably better just to provide a quantity (count) on those.
Trimmer studs may vary quite a bit in length/height so I’m still waffling on what to do with them.
Regular studs, yes the quantity makes the most sense and the logic is smart enough to break out these totals based on height and stud depth and/or width if necessary.
Thoughts?
Once I code this I’m going to be reluctant to change it unless there is a really good argument to change it up.
-
Version 2.8.1b - 02.22.2022
- Added material totals to the CSV output of the estimating module: King Studs, Jack Studs, Cripple Studs and Sill Plates.
- Fixed a bug in the estimating module for in-wall columns.
The new items I just added are highlighted in yellow:
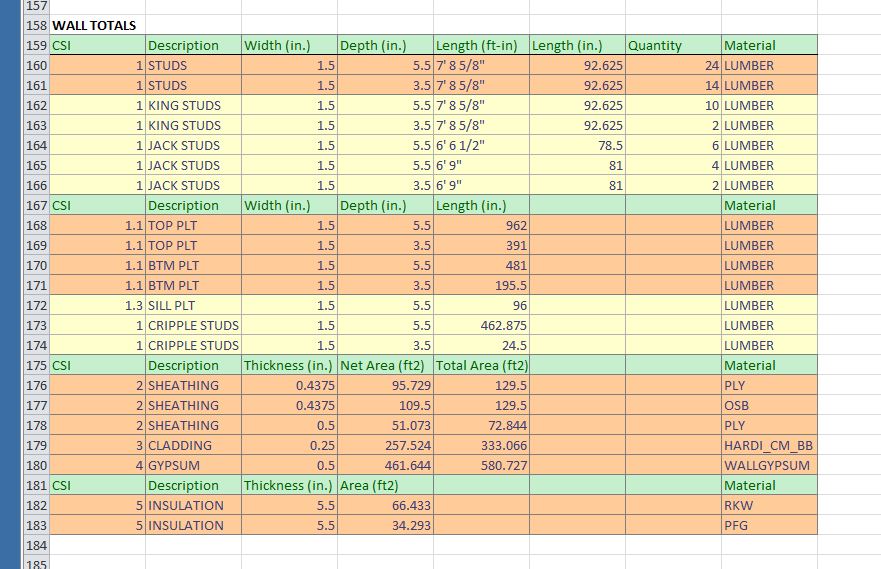
There are still a number of items that need to be added to the estimating module for the wall plugin, but I will take those on a case-by-case basis as requested. Some items that come to mind are:
- holdowns w/ anchor bolts
- window and door units
- blocking (is this important?)
- stairs (treads, stringers, railing etc...)
- free standing posts
- beams
- shutters
- exterior trim
- interior casing/molding
- exterior wainscoting
-
Now that I have the totals more or less in place for rectangular walls I think it would be a good time to build a “cost database” into the estimating module.
I don’t think it makes much sense to breakout the cost on a per wall basis so the totals section is where I would implement the cost analysis and display the dollar amounts.
Some items like Studs would be priced on a per item basis, while plates and cripples will be on a LF basis. Sheathing, Cladding, Insulation and Gypsum would be on a SQFT basis.
-
Here is a first look at the cost database system:

There is probably still a few things to work out with this system but the basic framework is now in place and now all I need to do is implement the cost system with the estimating module and see if we can get some output.
There will also be quite a few more cost "types" that will need to be added to the system as well as to the Medeek Estimator. Lots of work ahead.
Advertisement


