[Plugin] GKWare Cabinet Maker
-
Would be nice indeed, the sliding doors, and those type of handle.
EDIT SEPTEMBER 2
for the question below, I just forgot to switch from "sink" type cabinet after generating this one. So problem solved
OTher question: since i upgraded I have a problem with drawers. If I choose 1 drawer, there is no drawer box in the cabinet, so nothing happen if i click "interact".
If I choose more than 1, it's the same for top drawer, but not for the other below.
It looks like an option like "make top drawer as fixed panel" but I don't find anything like that.About drawer, you mentionned drawer systems template... I'd love to have Blum Legrabox. I don't know how common they are among your client though.
-
You should email me directly via cabmaker32 - that is if you want quick a response.
The manual states that a cabinet drawer height of 0 - means do not include a drawer box. Set it to -1 if you want CabMaker to calculate drawer box heights. There are situations where users do NOT want a drawer box since they want to use other specialized hardware.
-
Getting ready to release CabMaker 5.0.147 and CutMaster 4.0.1.90
CabMaker
- Fixed PROJECT tab Finished Panels section.
- Added Rotation Group for CutMaster
- Cleaned up Finished Panels and Finished Backs for Door Panel parameter.
CutMaster
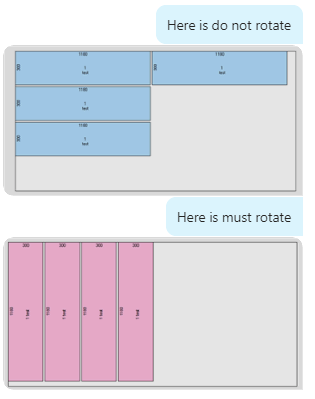
- Added User Flag (Rotation Group). You can now allow various parts to rotate which increases yield.
There are 4 settings
0 - use sheet grain
1 - do not rotate
2 - can rotate
3 - must rotate
-
HEllo,
I can't figure out how to add a simple color to CAbmaker. I'm trying to follow the steps described in the manual (page 206), I already did it with a texture, but I'm stuck at step 1 because it's not a texture but a color this time.
When I go in sketchup in the materials panel, if I right click on the color I want to add to cabmaker, I can't select "export texture image". It's grayed out.
If I choose a material which is clearly a texture (wood, metal...) the option is available.
any workaround?
I'm trying to add a black that's a bit "less black" as the one in cabmaker is black as this new M.I.T. material, and make every details invisibles, even with shadows.
And I want a real anthracite gray too. the dark gray is not very dark. -
Hello,
I got an error: "undefined method '[]=' for nil:NilClass" while trying to select the "omit drawer front" option for a sink cabinet.
So the cabinet exist. It is defined as a sink cabinet. It has 2 drawers. So far so good. But if I edit it and try to change juste that, I get this error.
If I choose tip ou tray it works, but not "omit..."
br,
-
Martin,
As previously stated - for support please email me directly.
Garry
-
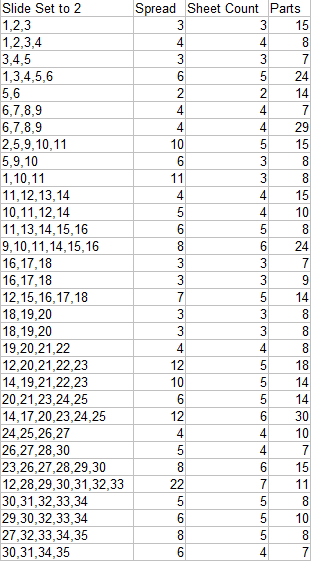
Notice that cabinet 1 has 15 parts and is completed by sheet 9
Cabinet 32 has 7 parts and starts on sheet 24 and is completed on sheet 34.
The whole idea here is to drastically reduce handling of large parts and to allow the completion of cabinets sooner. Although the material yield is a bit lower the labor savings should be substantial.
-
Adding and removing colors is quite simple
Here are a few lines from colors.txt
Make sure you copy the file and put it into the config folder- The first line is a new color that shows up as pink_1 where the actual color is rgb the final = sign separates the rgb value from the opacity (optional).
- The second line is also a new color but this time shows up as pink_2 where the actual color comes from the hex value. Again opacity follows the second = sign (optional)
- The third line is a texture (because it isn't an internet named color) and needs to be included in the textures.txt file where it will be specified as a bmp or a jpg
- The fourth line is an internet color
pink_1=255,176,216=0.99
pink_2=#FFFACD=0.99
brushed_aluminum
aquaJust omit internet colors and or textures from this file and your drop down list will be paired down. Also note that the order of colors / textures in the drop down list follows the order that they are in the colors.txt file.
-
I was able to duplicate the nil class error when choosing 'Omit Drawer Front'. The fix will be in the next release which is fairly soon.
-
I've been asked to show a tighter distribution. It adds a sheet of material but cabinets come off the CNC sooner.
-
CabMaker 5.0.148 and CutMaster 4.0.1.90 are now available from my website
CabMaker
- Added rotation group to Cabinets 2 tab
CutMaster
- Added Sliding window for Cabinet number priority optimization.
- Added Rotation control during import.
- Added Rotation Drop Down for each part.
- Added narrow part layer name modifier.
- Fixed Tall cabinets - no longer drilling hinge holes twice.
- Fixed Backs with notches for hanging brackets.
- Added option to jump to first thumbnail after optimize.
- Fixed Off cuts.
-
CutMaster 4.0.1.91 is now available.
- Added parts padding for small parts with area less than x. This is to help isolate small parts because vacuum is often insufficient especially when small parts are at the outside edge of a sheet of nested parts.
-
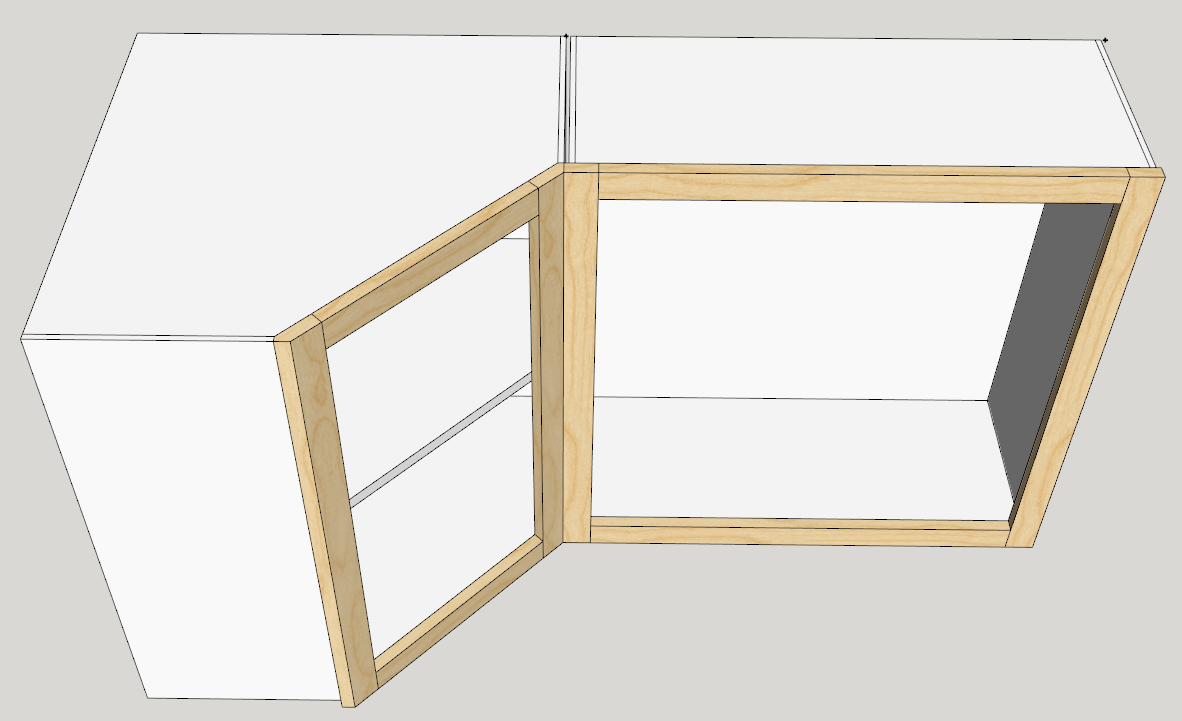
I've had a request to handle face frame cabinets for angled corners differently. Please respond if any of you are interested.
-
HEllo,
I just discovered that you could use the same sketchup licence on 2 computers provided that you don't use both at the same time. This is great news to me.
So I was wondering if it was something that you could consider for CAbmaker? I'm pretty sure that almost every pro here would love to be able to do that (desk comptuer and laptopt, or laptop and home computer).
-
I decided long ago to keep prices low so that hobbyists and retirees could afford a license.
I also decided that companies that wanted my plugins on a second computer could afford a second license (my prices are quite low) or they can put a single license on their laptop and use that in the office.
I also provide perpetual license so users do not have to upgrade if they do not want to. I give new users free upgrade if they purchased a license within 3 months of a new major release. I offer users free updates for any release while still in the same major version. And I offer a discount for users that have purchased the last major version more than 3 months ago (moving 3 to 4 etc)
If anyone is confused by this then please email me.
-
Hello,
When I select "top" or "bottom" for "Handle Location:" in drawer section of project tab, I end up with handle on the edge of the face (instead of a few cm from the top or the bottom). I cannot find where this come from. I don't see any option that supposed to manage this.
br,
-
The handle is placed at stile width / 2.
I'm guessing that you have slab doors and have set the stile width to 0
-
@garry k said:
The handle is placed at stile width / 2.
I'm guessing that you have slab doors and have set the stile width to 0
yes, that was it. I did not think to check stile options as I was using plain doors.
thank you -
Hello everyone, and happy new year.
Double question here:
-
I often wanted to define a different thickness to finished panels and fillers. is it possible?
-
[SOLVED, see below] here I have a weird result. I actually have 2 different thickness, I don't know why, and it is exactly the opposite of what I want

I'd like a finished panel of 30mm and a filler of 19 so it would be flush with the door. Is it a bug or is it me?

and maybe this will help to diagnose the problem: weirdly enough, if I change the door material for 40, for example, i get this!
door style : "metric plain door"
door shape : "plain panel"OK I got the answer to my problem but I keep this post for reference for people having the same issue:
my finished panel (in cabinet 2 tab) "door panel" option was defined as "metric plain door" which seemed fine to me. I just switched it to "--" which solved the issue.I still would like to change my filler thickness though.
-
-
Email me directly if you wish to discuss your needs. There are many permutations and combinations when you want something a bit different than the majority.
Here is an example using a slab door for the finished panel and setting the thickness of the finished to a different thickness for the filler.
If you just go through the forum for these types of questions then I wait for others to respond. If you email me directly your request will receive higher priority.
Hello! It looks like you're interested in this conversation, but you don't have an account yet.
Getting fed up of having to scroll through the same posts each visit? When you register for an account, you'll always come back to exactly where you were before, and choose to be notified of new replies (either via email, or push notification). You'll also be able to save bookmarks and upvote posts to show your appreciation to other community members.
With your input, this post could be even better 💗
Register Login


Advertisement