• Login
sketchucation logo sketchucation
  • Login
🤑 SketchPlus 1.3 | 44 Tools for $15 until June 20th Buy Now

3D Truss Models

Scheduled Pinned Locked Moved Plugins
1.5k Posts 31 Posters 869.7k Views 30 Watching
Loading More Posts
  • Oldest to Newest
  • Newest to Oldest
  • Most Votes
Reply
  • Reply as topic
Log in to reply
This topic has been deleted. Only users with topic management privileges can see it.
  • M Offline
    medeek
    last edited by 16 Apr 2019, 00:07

    Version 2.3.2 - 04.15.2019

    • Enabled the "Edit Truss Assembly" function for all scissor trusses (imperial and metric units).

    Nathaniel P. Wilkerson PE
    Medeek Engineering Inc
    design.medeek.com

    1 Reply Last reply Reply Quote 0
    • M Offline
      medeek
      last edited by 18 Apr 2019, 00:47

      Version 2.3.3 - 04.17.2019

      • Enabled the "Edit Truss Assembly" function for attic trusses (imperial units only).
      • Improved formatting of all HTML edit menus: Common, Monopitch, Scissor, Attic.

      http://design.medeek.com/resources/images/truss_su378_800.jpg

      Nathaniel P. Wilkerson PE
      Medeek Engineering Inc
      design.medeek.com

      1 Reply Last reply Reply Quote 0
      • M Offline
        medeek
        last edited by 22 Apr 2019, 21:13

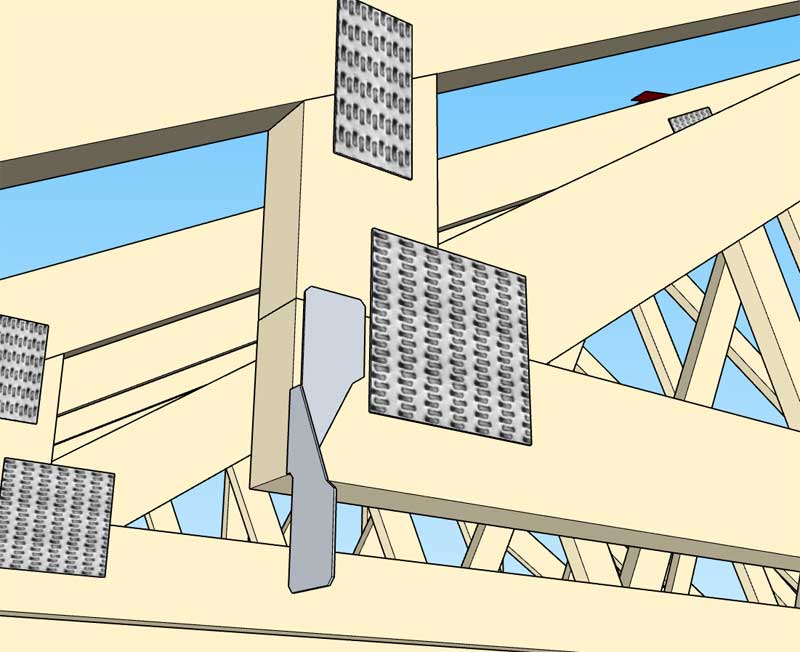
        When I originally enable hurricane (uplift) ties for the trusses I failed to check to see how things looked with a raised heel when the H2.5A (simpson) tie was used.

        In this particular case the tie needs to be flipped around so that it is facing towards the interior rather than the exterior. I've made the correction and added the logic into the code. I will release the fix with the next version:

        http://design.medeek.com/resources/images/truss_su379_800.jpg

        Nathaniel P. Wilkerson PE
        Medeek Engineering Inc
        design.medeek.com

        1 Reply Last reply Reply Quote 0
        • M Offline
          medeek
          last edited by 24 Apr 2019, 21:16

          Version 2.3.4 - 04.24.2019

          • Enabled the "Edit Roof Assembly" function for gable and hip rafter roofs (imperial and metric units).
          • Corrected an issue with H2.5A hurricane ties when utilized with raised heel trusses.

          http://design.medeek.com/resources/images/truss_su380_800.jpg

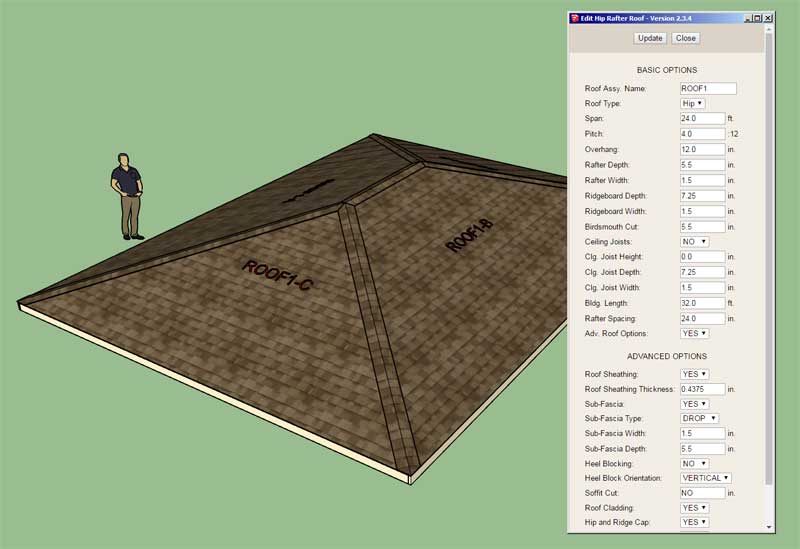
          This is a fairly substantial upgrade for the plugin and now gives the user the ability to edit stick framed roofs. Previously only certain truss roofs could be edited.

          I still need to enable editing for the other rafter roof types (shed roofs, I-Joist, rafter roofs with glulam beams etc...), but at least I've now got the two most common roof types with full parametrics enabled.

          Nathaniel P. Wilkerson PE
          Medeek Engineering Inc
          design.medeek.com

          1 Reply Last reply Reply Quote 0
          • M Offline
            medeek
            last edited by 25 Apr 2019, 02:40

            This brings me back to some topics I was exploring last year at about this time regarding asymmetric rafter roofs. I will set aside the hip roof for a minute and look at the simple gable roof in continuation of this discussion.

            Each side of the roof may have a different pitch. Additionally the top plate height may differ as well as the birdcut. Things tend to get a little complicated when the symmetry is broken.

            Basically one can boil it down to a symmetric or asymmetric gable roof. The asymmetric variant will have the following additional parameters:

            Roof Type: Symmetric Gable, Asymmetric Gable
            Pitch2 - Roof pitch of right side roof
            Birdcut2 - Birdcut length of right side of roof
            Delta Height - Difference in height between left and right bearing walls (left side is reference)

            One could even go so far as to define a different rafter depth for the opposite side, as its length may be more or less than its opposite side:

            Rafter Depth 2 - Rafter depth on right side of roof.

            Nathaniel P. Wilkerson PE
            Medeek Engineering Inc
            design.medeek.com

            1 Reply Last reply Reply Quote 0
            • M Offline
              medeek
              last edited by 25 Apr 2019, 18:59

              With the asymmetric variant the secondary pitch and bearing height cause the location of roof peak to be off center. In order to draw the roof one must first solve for the location of the roof peak (x direction). The solution is given by:

              http://design.medeek.com/resources/trussplugin/asymmetric_gable_pg1_800.jpg

              http://design.medeek.com/resources/trussplugin/asymmetric_gable_pg2_800.jpg

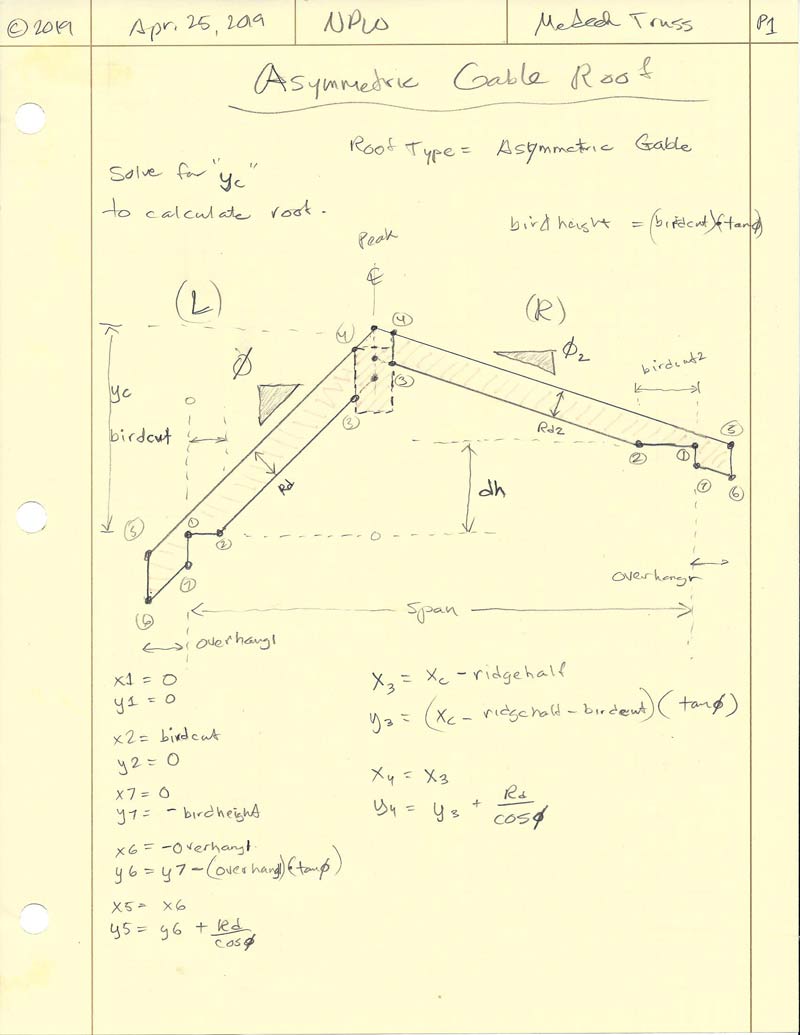
              I won't really know if the math is correct until I drop it into the ruby code and test it.

              I will also need to check for null solutions, where certain combinations of pitches and delta h create impossible geometry.

              I kind of miss the rigor of the math often required with the development of the truss plugin. Asymmetric hip roofs are going to be even more math intensive.

              I'm not exactly sure on what to do with the ridge board. I can either bevel it or drop it to the same height as the lower side rafters.

              Nathaniel P. Wilkerson PE
              Medeek Engineering Inc
              design.medeek.com

              1 Reply Last reply Reply Quote 0
              • M Offline
                medeek
                last edited by 29 Apr 2019, 02:10

                Version 2.3.5 - 04.28.2019

                • Fixed the show_modal bug for macOS in the Materials tab of the global settings.

                Nathaniel P. Wilkerson PE
                Medeek Engineering Inc
                design.medeek.com

                1 Reply Last reply Reply Quote 0
                • M Offline
                  medeek
                  last edited by 30 Apr 2019, 23:07

                  First look at an asymmetric roof:

                  http://design.medeek.com/resources/images/truss_su381_800.jpg

                  Note the addition of "Asymmetric Options" in the edit menu (4 parameters).

                  Also note that the rafter depth is different for each side of the roof as well as the birds mouth cut.

                  If the delta height is non-zero (can be either negative or positive) then I have the ceiling joists disabled for now. I will need some more direction with regard to that possible configuration.

                  I now just need to focus on the advanced options and bring them up to speed for an asymmetric gable roof (ie. gutters, hip and ridge, rake boards, sheathing, cladding etc...)

                  I've also spent some considerable time cleaning up the rafter roof module and re-organizing the file structure where it seemed prudent. The thing about these plugins is there is always more to do.

                  Nathaniel P. Wilkerson PE
                  Medeek Engineering Inc
                  design.medeek.com

                  1 Reply Last reply Reply Quote 0
                  • M Offline
                    medeek
                    last edited by 2 May 2019, 00:15

                    Version 2.3.6 - 05.01.2019

                    • Enabled asymmetric gable rafter roofs (imperial and metric units).

                    Tutorial 14: Asymmetric Gable Roofs

                    Sometimes you just never know until you dig into it. This latest update required a virtual rewrite of the entire rafter roof module. Asymmetric roofs literally change everything up. I'm glad to get this one wrapped up and behind me.

                    Nathaniel P. Wilkerson PE
                    Medeek Engineering Inc
                    design.medeek.com

                    1 Reply Last reply Reply Quote 0
                    • M Offline
                      medeek
                      last edited by 2 May 2019, 03:03

                      The asymmetric roof addition beat me up pretty hard for about three days, but in the end I won out. Now I need to look at the hip roof and how best to deal with multi pitches...

                      With the hip roof we are now talking about four different possible top plate heights with four different possible pitches, birdsmouth cuts, and rafter depths.

                      If one is to assume that the fascia boards all line up (gutters), then the top plates heights are actually driven by the roof overhang and the pitch of each roof plane. Only one roof plane (Plane A) will actually have its plate height set (the zero or base height of the roof), the other roof planes' top plate heights will be automatically calculated.

                      I suppose there is always the possibility where the fascia don't line up but I think this is more the exception than the rule, correct me if I am wrong.

                      As I've given this some more thought it occurred to me that typically the designer will set the roof pitches from the outset. Then, in order to get the fascia to line up, he/she can either adjust the overhang or the top plate height (assume that the birdsmouth cut is set to some value). So depending on the situation the user may want the plugin to calculate either the overhang (same top plate height) or the top plate height (same overhang). I will need to give this some more thought.

                      If the user keys in a numeric value for the overhang (roof planes B, C or D) then the edit menu can automatically set the delta height (top plate heights) for each respective roof plane to "AUTO". Likewise if a value is keyed in for the delta height the HTML form can set the respective overhang(s) to "AUTO".

                      Nathaniel P. Wilkerson PE
                      Medeek Engineering Inc
                      design.medeek.com

                      1 Reply Last reply Reply Quote 0
                      • M Offline
                        medeek
                        last edited by 2 May 2019, 18:53

                        I don't normally post on the boards regarding price changes in the plugins however I thought it might be worth noting that I have decreased the renewal price on the Truss plugin to $10.00. The idea being that once you have paid your initial license fee ongoing renewals are mostly a token payment.

                        Nathaniel P. Wilkerson PE
                        Medeek Engineering Inc
                        design.medeek.com

                        1 Reply Last reply Reply Quote 0
                        • M Offline
                          medeek
                          last edited by 2 May 2019, 20:50

                          Continuing on with regards to multi pitch hip roofs we need to be very clear about what point on the roof lines up when we talk about lining up the fascia. Do we mean the sub-fascia, rafter tail or the fascia?

                          Since I currently don’t have the fascia and soffit added yet I can probably ignore these for now and state that the top of the fascia board must line up with other fascia boards on other roof planes.

                          Nathaniel P. Wilkerson PE
                          Medeek Engineering Inc
                          design.medeek.com

                          1 Reply Last reply Reply Quote 0
                          • P Offline
                            pbacot
                            last edited by 3 May 2019, 07:21

                            That make sense but in cutting rafters or fabricating trusses, isn't the only thing they can really do is line up the top of the rafter tails? Actually if there are tails, the truss manufacturer will leave it to the carpenter.

                            MacOSX MojaveSketchUp Pro v19 Twilight v2 Thea v3 PowerCADD

                            1 Reply Last reply Reply Quote 0
                            • M Offline
                              medeek
                              last edited by 4 May 2019, 22:46

                              @pbacot said:

                              That make sense but in cutting rafters or fabricating trusses, isn't the only thing they can really do is line up the top of the rafter tails? Actually if there are tails, the truss manufacturer will leave it to the carpenter.

                              In the field I think its typical to provide rafter tails that are too long so that they can be trimmed all at once (chalk line) to ensure that they all line up.

                              Nathaniel P. Wilkerson PE
                              Medeek Engineering Inc
                              design.medeek.com

                              1 Reply Last reply Reply Quote 0
                              • M Offline
                                medeek
                                last edited by 5 May 2019, 08:05

                                I've got the asymmetric options added to the edit menu and the common rafters and fascia are calculating correctly:

                                http://design.medeek.com/resources/images/truss_su382_800.jpg

                                Note that all four pitches are different values, however the fascia lines up all the way around the roof as it should (in this case I have the overhangs auto calculating).

                                Next I will work on the hip rafters and jack rafters. As we can see in this example, all symmetry is broken, each hip rafter will be unique (x4) as well as each set of jack rafters (x8). Luckily we can program this sort of thing, drawing this type of roof manually would be a real headache.

                                Nathaniel P. Wilkerson PE
                                Medeek Engineering Inc
                                design.medeek.com

                                1 Reply Last reply Reply Quote 0
                                • M Offline
                                  medeek
                                  last edited by 5 May 2019, 19:49

                                  First look at the sheathing and labels for an asymmetric hip roof:

                                  http://design.medeek.com/resources/images/truss_su383_800.jpg

                                  http://design.medeek.com/resources/images/truss_su384_800.jpg

                                  Nathaniel P. Wilkerson PE
                                  Medeek Engineering Inc
                                  design.medeek.com

                                  1 Reply Last reply Reply Quote 0
                                  • M Offline
                                    medeek
                                    last edited by 6 May 2019, 04:02

                                    Pitch and SQFT callouts/labels are now working:

                                    http://design.medeek.com/resources/images/truss_su385_800.jpg

                                    Nathaniel P. Wilkerson PE
                                    Medeek Engineering Inc
                                    design.medeek.com

                                    1 Reply Last reply Reply Quote 0
                                    • M Offline
                                      medeek
                                      last edited by 8 May 2019, 03:03

                                      Hip and Ridge Cap is now working:

                                      http://design.medeek.com/resources/images/truss_su386_800.jpg

                                      This chunk of code is just for the ridge cap geometry:

                                      @Phi1_3 = atan(sin(@Phiplane13) * tan(@Phi) * cos(@Phihip13))
                                      @Phi3_1 = atan(cos(@Phiplane13) * tan(@Phi3) * cos(@Phihip13))
                                      				
                                      @Phialpha1_3 = acos(cos(@Phihip13) * sin(@Phiplane13))
                                      @Phialpha3_1 = acos(cos(@Phihip13) * cos(@Phiplane13))
                                      
                                      @Psi1_3 = asin(0.70710678118 * sqrt(1.0 - cos(@Phi)*cos(@Phi3)))
                                      
                                      @Phi2_3 = atan(sin(@Phiplane23) * tan(@Phi2) * cos(@Phihip23))
                                      @Phi3_2 = atan(cos(@Phiplane23) * tan(@Phi3) * cos(@Phihip23))
                                      				
                                      @Phialpha2_3 = acos(cos(@Phihip23) * sin(@Phiplane23))
                                      @Phialpha3_2 = acos(cos(@Phihip23) * cos(@Phiplane23))
                                      
                                      @Psi2_3 = asin(0.70710678118 * sqrt(1.0 - cos(@Phi2)*cos(@Phi3)))
                                      
                                      			
                                      @Phi1_4 = atan(sin(@Phiplane14) * tan(@Phi) * cos(@Phihip14))
                                      @Phi4_1 = atan(cos(@Phiplane14) * tan(@Phi4) * cos(@Phihip14))
                                      				
                                      @Phialpha1_4 = acos(cos(@Phihip14) * sin(@Phiplane14))
                                      @Phialpha4_1 = acos(cos(@Phihip14) * cos(@Phiplane14))
                                      
                                      @Psi1_4 = asin(0.70710678118 * sqrt(1.0 - cos(@Phi)*cos(@Phi4)))
                                      
                                      
                                      @Phi2_4 = atan(sin(@Phiplane24) * tan(@Phi2) * cos(@Phihip24))
                                      @Phi4_2 = atan(cos(@Phiplane24) * tan(@Phi4) * cos(@Phihip24))
                                      				
                                      @Phialpha2_4 = acos(cos(@Phihip24) * sin(@Phiplane24))
                                      @Phialpha4_2 = acos(cos(@Phihip24) * cos(@Phiplane24))
                                      
                                      @Psi2_4 = asin(0.70710678118 * sqrt(1.0 - cos(@Phi2)*cos(@Phi4)))
                                      
                                      			
                                      @Ridgex = (cos(@Phi)*@HRthk*tan((@Phi + @Phi2)*0.5)) - sin(@Phi) * @HRthk
                                      @Ridgey = (sin(@Phi)*@HRthk*tan((@Phi + @Phi2)*0.5)) + cos(@Phi) * @HRthk
                                      
                                      
                                      if @Sheathing_option == "YES"
                                      if @Roofbatten == "YES"
                                      if @Cboption == "YES"
                                      thtot = @Cbheight + @Battenheight + @Sheathing_thickness + @Roofcladding_thickness
                                      else
                                      thtot = @Battenheight + @Sheathing_thickness + @Roofcladding_thickness
                                      end
                                      else
                                      thtot = @Sheathing_thickness + @Roofcladding_thickness
                                      end
                                      else
                                      if @Roofbatten == "YES"
                                      if @Cboption == "YES"
                                      thtot = @Cbheight + @Battenheight + @Roofcladding_thickness
                                      else
                                      thtot = @Battenheight + @Roofcladding_thickness
                                      end
                                      else
                                      thtot =  @Roofcladding_thickness
                                      end
                                      end
                                      
                                      
                                      # Extension at Peak
                                      
                                      @Wa3 = PI - (@Phialpha3_1 + @Phialpha3_2)
                                      @Beta23 = atan(sin(@Wa3)/(tan(@Psi1_3)/(tan(@Psi2_3)) + cos(@Wa3)))
                                      @Beta13 = @Wa3 - @Beta23
                                      
                                      ext13 = (thtot * tan(@Psi1_3))/(tan(@Beta13))
                                      ext23 = (thtot * tan(@Psi2_3))/(tan(@Beta23))
                                      
                                      			
                                      @Wa4 = PI - (@Phialpha4_1 + @Phialpha4_2)
                                      @Beta24 = atan(sin(@Wa4)/(tan(@Psi1_4)/(tan(@Psi2_4)) + cos(@Wa4)))
                                      @Beta14 = @Wa4 - @Beta24
                                      
                                      ext14 = (thtot * tan(@Psi1_4))/(tan(@Beta14))
                                      ext24 = (thtot * tan(@Psi2_4))/(tan(@Beta24))
                                      
                                      
                                      # Ridge Length and Extensions
                                      
                                      ridgedx = (cos(@Phi)*thtot*tan((@Phi + @Phi2)*0.5))
                                      ridgedy = (sin(@Phi)*thtot*tan((@Phi + @Phi2)*0.5))
                                      
                                      length_sq = thtot**2 + ridgedx**2 + ridgedy**2
                                      	
                                      
                                      rext3 = sqrt(ext13**2 + (thtot/(cos(@Psi1_3)))**2 - length_sq)
                                      rext4 = sqrt(ext14**2 + (thtot/(cos(@Psi1_4)))**2 - length_sq)
                                      
                                      phicheck3 = atan(ext13*cos(@Psi1_3)/thtot) + PI - @Phihip13
                                      phicheck4 = atan(ext14*cos(@Psi1_4)/thtot) + PI - @Phihip14
                                      			
                                      if phicheck3 > PI
                                      	rext3 = -1.0 * rext3
                                      end
                                      	
                                      if phicheck4 > PI
                                      	rext4 = -1.0 * rext4
                                      end
                                      	
                                      @Ridgecaplength = @Arraylength - @Hipf - @Hipb + rext3 + rext4
                                      

                                      Nathaniel P. Wilkerson PE
                                      Medeek Engineering Inc
                                      design.medeek.com

                                      1 Reply Last reply Reply Quote 0
                                      • P Offline
                                        pbacot
                                        last edited by 8 May 2019, 04:38

                                        WOW.

                                        I hope you never see a roof like this, but kudos for handling the situations where we may have a couple different pitches anyway.

                                        MacOSX MojaveSketchUp Pro v19 Twilight v2 Thea v3 PowerCADD

                                        1 Reply Last reply Reply Quote 0
                                        • M Offline
                                          medeek
                                          last edited by 8 May 2019, 06:07

                                          Gutters and Downspouts are now functional for the Asymmetric Hip Rafter Roof:

                                          http://design.medeek.com/resources/images/truss_su387_800.jpg

                                          Even with the different overhangs and top plate heights the gutter height (fascia) is the same height all the way around. However the downspouts on opposite sides of the roof are customized per the overhang on each respective side.

                                          Tomorrow I will jump back into the hip and jack rafters and see if we can wrap this one up.

                                          The good news is that the required code for the asymmetric hip and jacks already exists. I will be borrowing from the roof return module where I handled dissimilar pitches. The bad news is that after a cursory review of this block of code I have absolutely no idea how it actually works anymore (I haven't looked at it in about 2 years). It's just a matter of reverse engineering my own code for about an hour and it will all come back to me.

                                          Nathaniel P. Wilkerson PE
                                          Medeek Engineering Inc
                                          design.medeek.com

                                          1 Reply Last reply Reply Quote 0
                                          • 1
                                          • 2
                                          • 55
                                          • 56
                                          • 57
                                          • 58
                                          • 59
                                          • 74
                                          • 75
                                          • 57 / 75
                                          57 / 75
                                          • First post
                                            1136/1498
                                            Last post
                                          Buy SketchPlus
                                          Buy SUbD
                                          Buy WrapR
                                          Buy eBook
                                          Buy Modelur
                                          Buy Vertex Tools
                                          Buy SketchCuisine
                                          Buy FormFonts

                                          Advertisement