Medeek Wall Plugin
-
The final handrail design will most probably differ from what you have available, meaning they will most probably end up being replaced by the modeler in the end. Having a few basic options (low poly) available will probably be helpful but rather focus on the core functionality of the extension and turn the handrails into components for ease of replacement.
-
@juju said:
The final handrail design will most probably differ from what you have available, meaning they will most probably end up being replaced by the modeler in the end. Having a few basic options (low poly) available will probably be helpful but rather focus on the core functionality of the extension and turn the handrails into components for ease of replacement.
You are probably correct in that. I'm not wanting to delve too deeply into handrail profiles, just a few basic or popular ones. The user can upload any profiles they like so the flexibility is already there. My big issue right now is debugging the module in metric templates. It never fails, I get everything wrapped up in imperial units and then I switch to a metric template and there is always something amiss. I will probably take me the rest of the night to verify the updates to the stair module in metric, but I'll get there.
-
Version 0.9.9p - 12.01.2018
- Added handrails to the stair module.
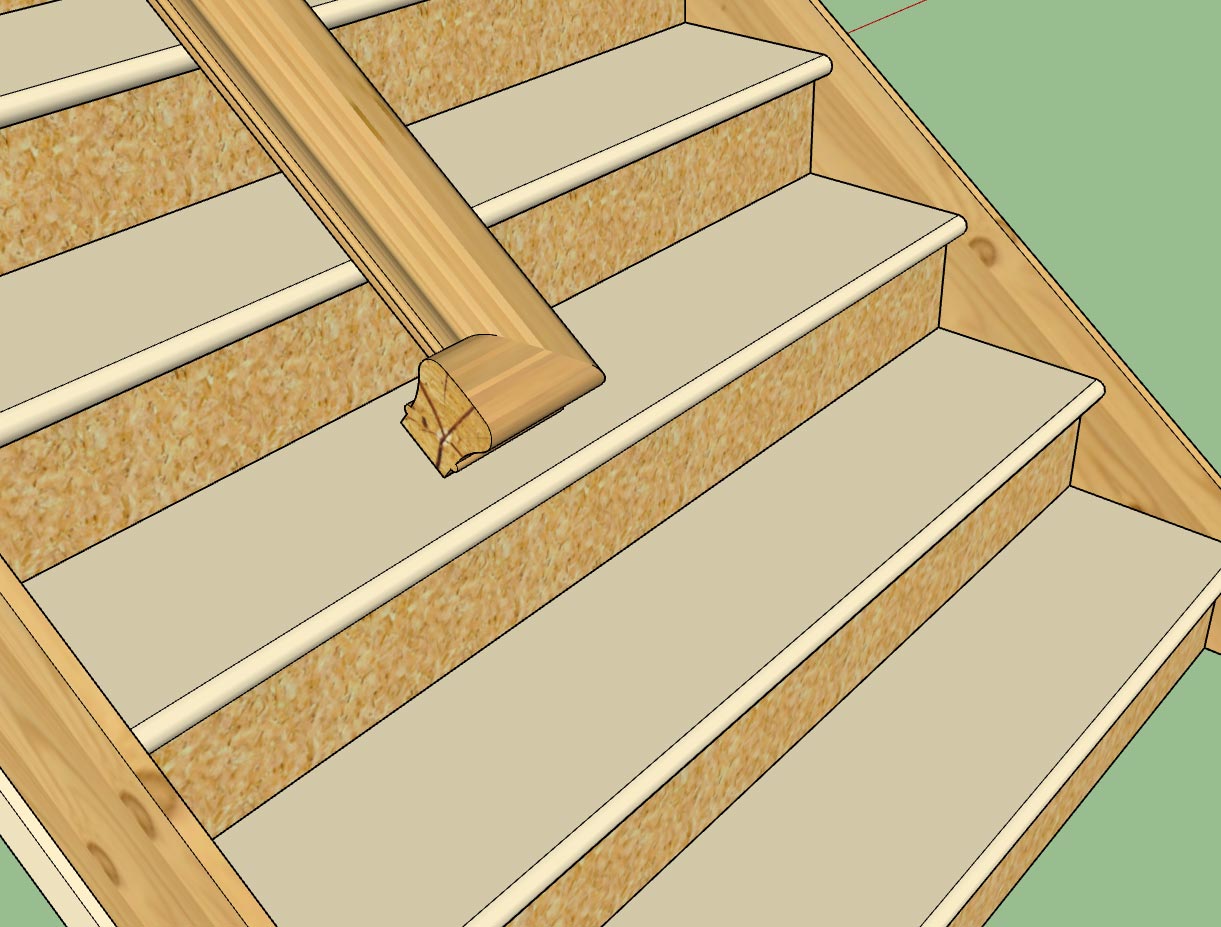
I rewrote a good chunk of the stair module this evening so this release probably resolves some additional issues with metric templates, as such I consider this version a critical update.
-
I've been looking at a lot of stairs and handrails the last couple of days and I've noticed that at that the top of a run of stairs with open treads the handrail often terminates in a single riser or two riser gooseneck. Usually the two riser gooseneck is used where the handrail takes a ninety degree turn at a landing and then proceeds up another flight of stairs.
The single riser gooseneck is a bit confusing to me though. I guess it is used so that the handrail can transition to the landing rail height before it encounters the landing newel post.
Using a follow me algorithm is really not to difficult to generate the gooseneck:
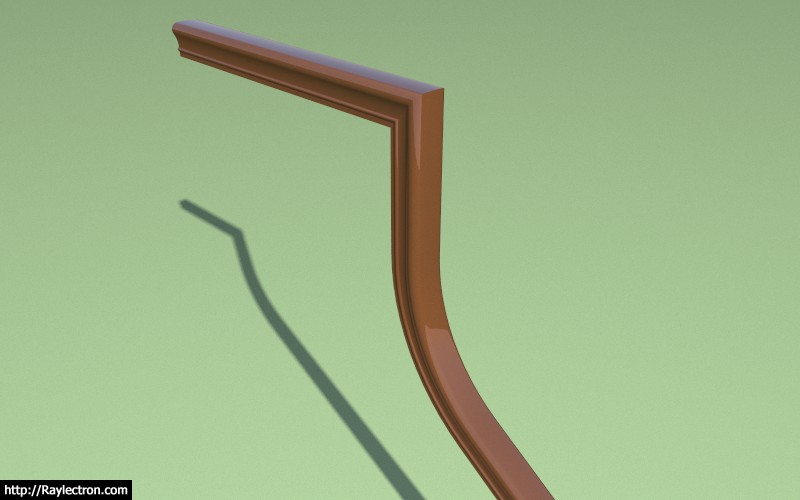
What is the typical radius of the gooseneck (up-ramp)?
I've found some interesting and helpful information here:

Ordering Specifications for Fittings for Your Stair Remodel or Project
Follow these ordering specifications for fittings. Ordering stair parts can be complicated, but we're here to simplify your next stair remodel or new project.

Direct Stair Parts (www.directstairparts.com)
I was wondering what to do about a handrail on a partially open stairs, now I know:

P.S. After some further reading it appears that a 4" difference in height is fairly typical between the landing/balcony rail height (38") and the stair handrail height (34"). This explains the need for the gooseneck fitting. I learn something new everyday with this plugin.
-
This last week I've also had quite a few inquiries about including metal studs (CFS) within the plugin.

Unlike wood framing, metal framing (studs) has a more complex profile (c-shape) with numerous cutouts for wiring/plumbing.
Could one represent metal framing with a simple rectangular member (like wood) but somehow texture it in such a way so that it looks like a metal stud? Would this be acceptable to those designers that utilize metal framing?
What level of modeling detail is optimal for metal framing?
If you add too much detail and the model becomes heavy. Obviously one would not show every bend and corrugation in a steel stud (added to increase stiffness), however even modeling the stud as a c-shape with a lip involves quite a few more polygons than a simple rectangle profile (12 faces vs. 4 faces).
Then there is also the possibility of not modeling it as solid at all but just as edges and faces, so that the thickness of the steel is not represented. This would certainly cut down on the number of polygons but would break from my long standing practice of representing everything as 3D solids.
I typically use the pushpull or followme method to generate geometry within the API, however an edge/face type model would require a new approach to modeling.
I am open to suggestions.
-
Don't do a lot of metal, cut I think a simple C profile (e.g. for the stud shown) is sufficient. I don't know if you need the cutouts since you don't show wiring (yet). The thing is that for plate/stud and all connections it is very different. I don't know what use a rectangular illustration would be. I think you are into a whole different sub-routine with steel. The graphic representation is going to be more difficult as steel often looks like "nothing" in detail drawings unless drawn carefully. I would tend toward simle extruded shapes with thickness, but not sure that's feasible with the final poly count. It should double the number of faces for your framing.
-
Until someone sends me a model of a wall with steel studs, track and a couple of openings with headers etc... I will probably put this on the back burner for now. At this point I don't have enough information in order to properly add steel framing to the plugin. More study will be required.
On a related note, what steel stud manufacturer(s) is the most commonly used for residential and commercial construction?
-
-
Version 0.9.9q - 12.03.2018
- Enabled "Over-the-Post" termination (single rise gooseneck and starting ease) for all handrail profiles.
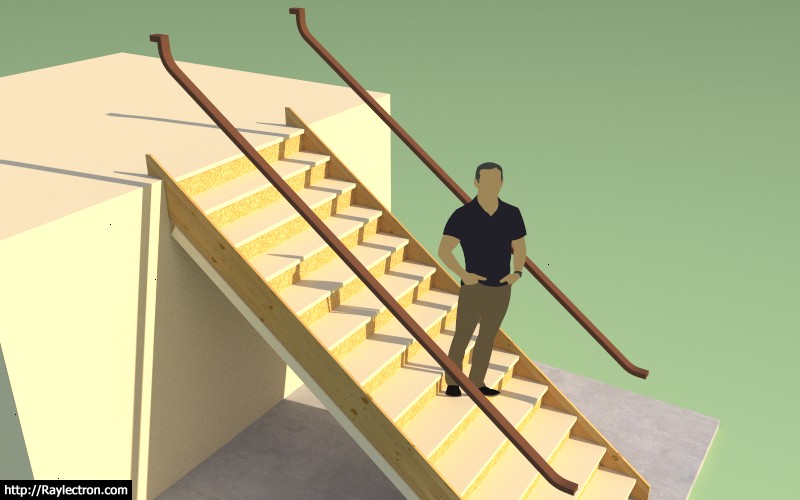
The utilization of this termination option won't really become important until I setup open sided stairs with the accompanying newel posts and balusters.
Also note that the delta Z for the starting ease and also the gooseneck is plus 4" for now, at some point I will probably want to allow the user to customize this height differential(s), but in the US market 4" seems pretty much standard.
View model here:
3D Warehouse
3D Warehouse is a website of searchable, pre-made 3D models that works seamlessly with SketchUp.
(3dwarehouse.sketchup.com)
-
I'm not even sure what to call this next tool that I am considering.
Perhaps the Blocking Tool would be the appropriate name. Basically I need to have a tool that will allow the designer to insert various/miscellaneous elements throughout the model. They may want these elements within a wall panel assembly (group) or outside of any group. The use of this tool would be primarily for additional studs or blocking.
The parameters would be:
Edit menu only:
Length: models units
Rotation: DegreesDraw and Edit menus:
Size: CUSTOM, 2x4, 2x6, 2x8 etc...
Depth: in. or mm (grayed out when standard size selected above, available when custom size selected)
Width: in. or mm (grayed out when standard size selected above, available when custom size selected)Category: BLOCK, STUD, JOIST, POST
Level: 1, 2, 3, 4, 5, 6 (this parameter will be implemented in the future for wall panels, stairs and beams as well)
Material: LUMBER, LUMBERPT (custom materials from global settings as well)
Framing: 2D, 3D
If the elements are inserted within the wall panels, they must be retained during a regen, not a problem since I already have that issue worked out.
These elements will be fully parametric.
Are there any additional options or parameters that anyone else would like to see made available with this feature?
-
This tool will create simple rectangular members only. Which means I will probably remove the POST category since stand alone posts will require a whole host of other features such as wrapping and associated base and cap hardware.
I’ve had some feedback that this feature is probably not needed at this time, but I’ve also had some comments specifically requesting it. Before I progress any further feel free to voice your opinion on the matter. This is really quite a small module and most of the code will be recycled from the beam and stair modules so I don’t anticipate taking more than 48 hours to complete it however I don’t want to invest time into a feature that will rarely be utilized.
Ultimately the plugin is for you, not for me. I don't design houses anymore, I just design the software that designs the houses. As such your opinion of what tools are made available carries more weight than mine does.
-
I think the key issue with which I am trying to address with this new tool is best summed up when you compare SketchUp (SU) with Chief Architect (CA). Both can be used to model a structure, one is fully parametric but is quite locked down and restrictive while the other is very free form, allowing the user to do as they please. The downside to this freedom is that the program has no way of keeping track or making sense of all these custom changes and hence the parametric ability cannot natively exist.
CA does a nice job of keeping everything well contained but its 3D environment locks the user down too much in my opinion, and for the designer (who is not too different from an artist) who wants to express their creativity, I think this can be too restrictive.
Being able to insert "custom" geometry into the wall, roof and foundation assemblies, whilst categorizing and tracking it maintains the parametrics (and estimating) but also allows flexibility. Being able to retain this custom geometry after a regen is critical to the success of this paradigm.
In a nutshell the plugin is trying to maintain the flexibility of SU while giving the user the parametrics of a program like CA.
-
Running the stair module through a few tests this evening, found one minor bug and was fairly pleased with the stair envelope for checking headroom height:
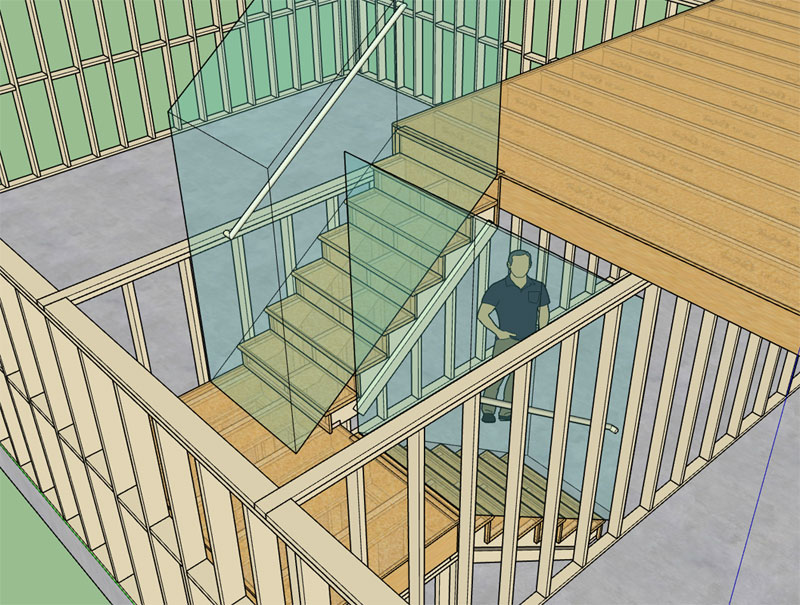
I've also added one additional termination (OTP with a 2 riser gooseneck) which is typically used where you go from one flight of stairs to the next as show below:
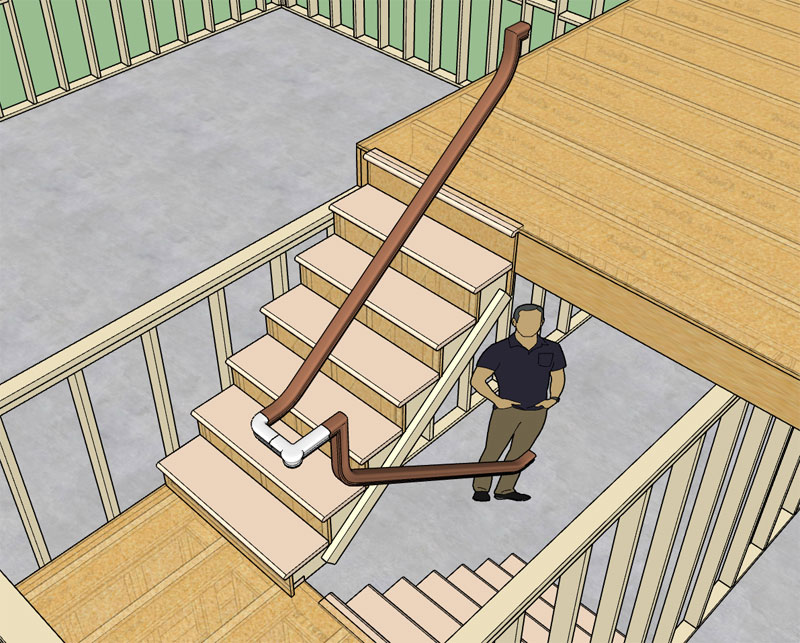
As long as the riser heights match (like they should) for each run of stairs then the 2 riser goosenecks matches up perfectly with the starting ease of the next run of stairs. Of course the specified hand rail height for each run must match as well.
Note that the white color (handrail fittings) components are not being automatically generated by the plugin those were manually inserted, however the brown sections of handrail are automatically generated and they matched up perfectly as expected (Z height). I left the fittings white so you can see what elements were required to be brought into the model.
These fittings will be included with the plugin in the library/handrail_fittings subfolder. If I get ambitious I may have to actually model up some volutes for the bottom of the handrail but for now the list of supplied fittings (for the LJ6010 profile) is:
- S7011 (right handed)
- S7019
- S7020
- S7021 (right handed)
You'll also notice that in the top image I've created a landing with a 2x4 pony wall supporting it (sorry barely visible). When you go to create walls like this it would be nice to have the plugin ignore any surrounding walls and basically treat these walls as completely isolated from the rest of the structure.
With that in mind I reworked the auto-corner configuration algorithm ever so slightly, so that it is now possible to place any number of wall panels within an over arching group. What this does is effectively isolate these walls from any other groups within the model.
I will need to make some updates to the estimating module so that it is smart enough to look for groups in the root of the document with embedded walls. I will also need to make a video demonstrating this technique, and when and where it would be useful.
Granted, I have not extensively tested out this new feature so I would say proceed with caution but my preliminary testing shows that it is quite effective and convenient when modeling sub-assemblies within a larger context.
-
Version 0.9.9r - 12.05.2018
- Added a "2 riser gooseneck" Over-the-Post termination option for all handrail profiles.
- Adjusted the auto-corner configuration algorithm so that wall panels can be placed within larger groups within the root of the model (wall panel isolation).
- Fixed a bug in the Over-the-Post section of the handrail/stair module.
-
Here is a quote from a review of Nick Sonder's book on Amazon that parallels some of my own thinking. The reviewer first touched on his use of the book but his final remarks regarding SketchUp and design work really hits home:
@unknownuser said:
This books has a lot of different tips when working with SketchUP. But I have to say, after going through many weeks thinking I was able to use this for production drawings I was sadly mistaken. By time I was able to get everything exported out to Layout, the drawings just did not look good at all. The resolution was way too grainy for my liking. The vector overlay was too bulky and raster was too pixelated. I am sure there is a way to fix this, however the next part made me re-think the whole process. Layout was so slow to regenerate the image. Each time I would pan it would pulse the screen and my workstation grade computer was just not able to do what Layout was requesting of it. My computer and workstation graphics card is not by any stretch old or limited. The thing runs all other software great. This was a huge disappointment...
All around if you are thinking about transition from your existing software to Sketchup Layout I would recommend some hesitation. However, if you want to learn a decent way of putting a Sketchup model together, I do recommend the author's techniques. I still use them for normal Sketchup use, I just cannot see investing in the time and patience with regards to Layout work. If someone is thinking of transitioning it might be better to look at an actual BIM software and if you are like me Chief Architect seems much more appropriate. I want to love this, because I think Sketchup is by far the most flexible software when it comes to heads up design. You are not stuck in dialog boxes, which for design flow and immersing yourself in the architecture SketchUP is great. I wish Trimble would take a few notes from a software like Chief Architect and simply some of their rules and plop them into Sketchup. I also think if Sketchup spent more time thinking how Architects might use Layout as full production drawings would be great, you really should not have to go through some of these crazy steps to get great drawings from SKUP. It's just not quite there, and this process does not make it that much smoother.
I'm not wanting to disparage Nick Sonder's work or his workflow, I think out of anyone his is some of the best. My concern is with Layout and SketchUp itself as an architectural tool. I feel like the plugins are starting to bridge the gap or parametric edge that Chief Architect has had over SketchUp (with a fair distance to go yet). However, the other area we are falling down in is the creation of construction drawings and documents.
I am excited to start work on the automation of this piece of the puzzle and really dig into the Layout API, however at the same time I am genuinely concerned with Layout itself, and how well it functions as the 2D engine underneath the hood. SketchUp's recent updates to Layout in the last two years/iterations have been tepid at best. We really need a solid 2D drawing environment, something that can go toe-to-toe with AutoCAD. I realize that this is a big ask, but it needs to happen.
I've already invested a considerable amount of my time into developing these plugins and I will continue to invest more. I've been full time at it since April of this year and rather than work a salary man's job I chose to pursue this much more interesting path (we will see whether this was foolish on my part in the months to come).
As I continue to develop these plugins I think it will not only benefit myself and the designers who use the software but also SketchUp itself as more architects, engineers, designers, contractors and draftsmen are able to utilize SketchUp as their primary design tool. The work I do, as well as others like PlusSpec and John Brock to name a few, is helping put SketchUp on the map in the architectural design world. We are helping pull users of other design software, such as Revit and Chief Architect, and converting them to SU. We are trying to do our part.
It is now up to SketchUp to boost the Layout development and do their part. We need a world class 2D engine. Without it, we can't compete, it doesn't matter how good my 3D models are, they have to translate into construction documents, and it has to be seamless and effortless and a joy to use. Unless Layout is brought up to par I will be forced to go alternative routes such as exporting floor plans to DXF etc... This is really not the route I want to go but right now I am seriously considering it.
-
Hi Nat,
I haven't attempted what Nick does,(but I did buy his book right off the bat). I generally run my building elevations through LayOut directly to pdfs in PowerCADD and finish drawings and notes there (the graphics, text, and CAD tools are so far beyond LayOut to ignore) Still Nick's work looks great (in contradiction to the review)and he does it somehow without going crazy from the slowness. I do agree LayOut is very slow, and Hybrid at highest quality is the only way to go, yet produces heavy pdfs (Mac print to pdf). The reviewer didn't mention that working in LO at a lower resolution is quite OK, to avoid slow performance, even though output is going to be slow. Just hoping it's going to be better. I think the reviewer would be interested in your plugins, if he likes Chief Architect.
Peter
-
@pbacot said:
Hi Nat,
I generally run my building elevations through LayOut directly to pdfs in PowerCADD and finish drawings and notes there
Peter
How exactly are you getting your drawings from Layout into PowerCADD? What file format (PDF)? Vector data I'm assuming.
-
I'm adding two extra parameters which will allow an extension of the bottom of the stringer as shown in the detail below:
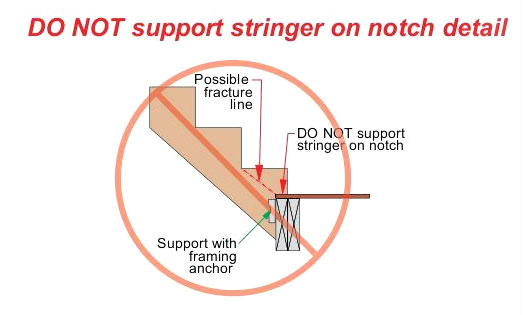
This detail was taken from literature for LVL stringers. Notice the use of framing anchors to help bear some of the vertical load.
I prefer to extend the landing back to catch the full bearing of the stringer but I guess there are some situations where additional headroom is needed or other configurations where this method of stringer support is optimal.
-
@medeek said:
@pbacot said:
Hi Nat,
I generally run my building elevations through LayOut directly to pdfs in PowerCADD and finish drawings and notes there
Peter
How exactly are you getting your drawings from Layout into PowerCADD? What file format (PDF)? Vector data I'm assuming.
Generally I am just using thr pdf image and drawing over it in scale and adding notes. If I need to snap (or get edges) I can import dwg or an exploded version of the vector pdf and place it behind the image. Sometimes I do use the linework itself without the pdf.
I found a way to print all the LayOut pages to pdf with names "house page 1, house page 2" etc.) in one operation. I reference the pdf file in PowerCADD (instead of importing) and they update if I save new pdfs.
-
First look at the stringer extend option with its associated notch:
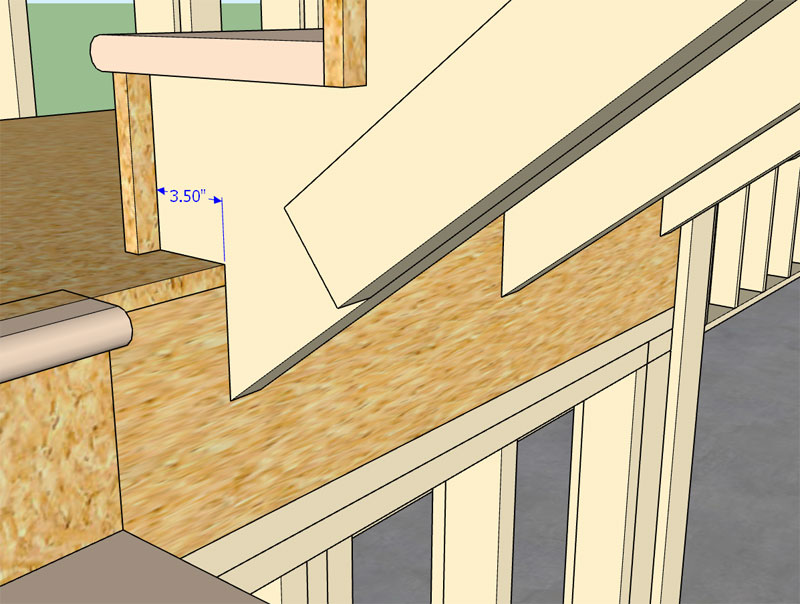
You can also enable the thrust block with the extension/notch but I don't really see the point to doing that, it only further weakens the stringer at its point of bearing.
I'm thinking I should probably extend the side spacer down all the way until it meets the landing/notch, unless there is a good reason not to.
Also I've been reviewing all of the html menus and there are quite a few places where I am displaying
or requiring input in inches and it would be nice to also display the same dimension in ft-in. (fractional), I am looking at this now.
Advertisement


