Medeek Wall Plugin
-
Tee intersections will now automatically remove the gypsum where the walls meet:
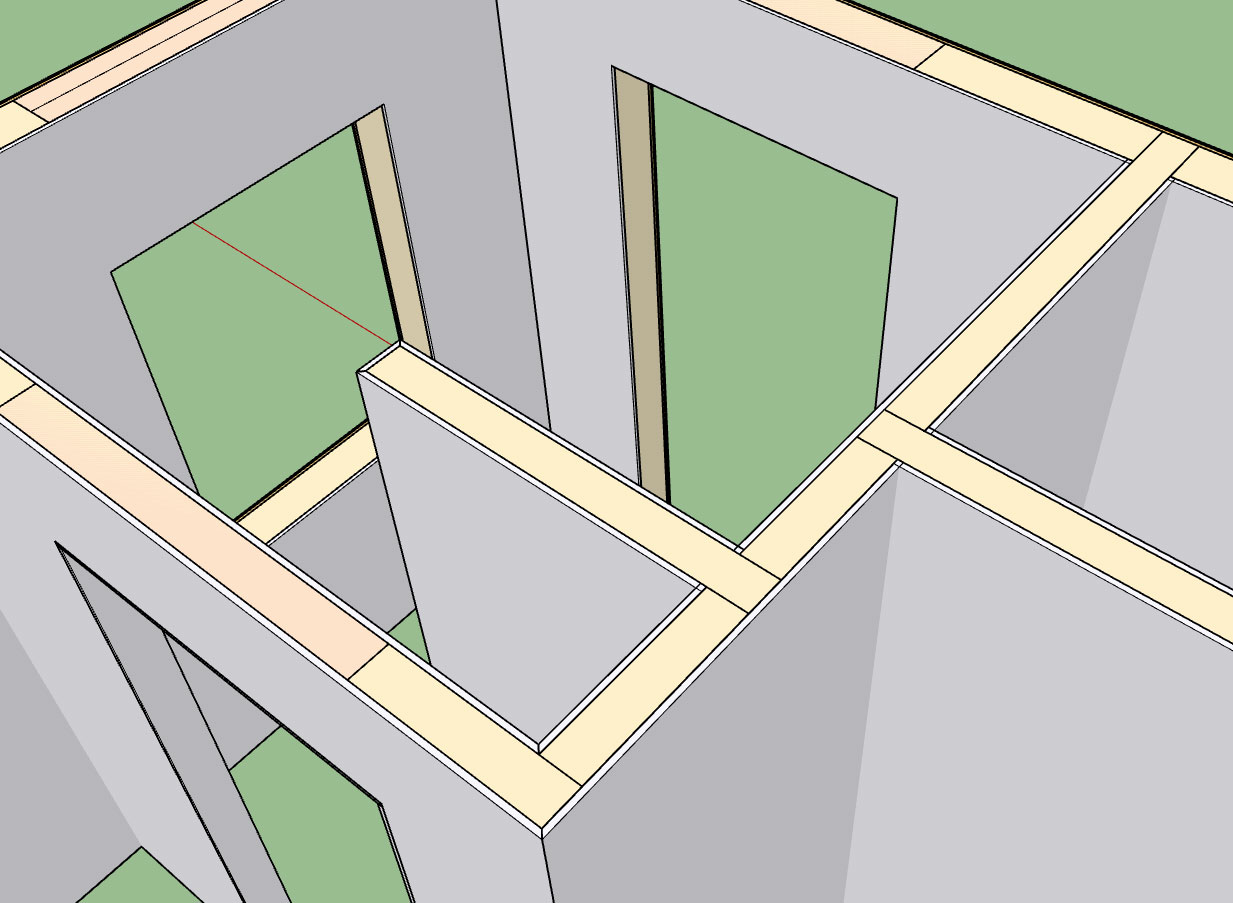
The algorithm which notches out the top plates is very similar to this algorithm, which notches out the gypsum. For interior walls, as shown above, the tee intersection may be on either the "interior" or "exterior" of the wall. Hence the algorithm needs to be smart enough to detect which side of the wall is being affected and notch the appropriate gypsum wall panel.
Further refinement is probably in order since the result is not a true mitered corner however it is a start and certainly and improvement from when tee intersections were simply ignored with the gypsum.
-
The number of garage door types and variants is almost exhausting, yet another plugin within a plugin. To begin with I will start with the following door types:
- Solid
- Panel (Panels will consist of 18" or 21" panels (or metric equivalents: 455mm, 525mm) arranged in such a way to allow for 3" (70mm) increments in door height.)
- Standard Raised Panel
- Long Raised Panel
- Standard Flat Panel
- Long Flat Panel
- Glass Standard Raised Panel (Glass indicated that the top panel will have glass inserts)
- Glass Long Raised Panel
- Glass Standard Flat Panel
- Glass Long Flat Panel
- Full Glass Standard Panel (Full glass indicates that entire door is glass)
- Full Glass Long Panel
There are many other garage door variants: Carriage doors etc... those will be added per user request.
-
If you could build these child plugins in a way that a person could do a basic execution of whatever and could purchase the child plugin for the additional functionality it may be a good indicator of demand for the child plugin while bringing the main plugin cost down (thus more accessible) and a separate income stream from the child plugin (which may or may not be able to be used on its own).
-
Slowly working through the garage door module. Here is a first look at the garage door casing:
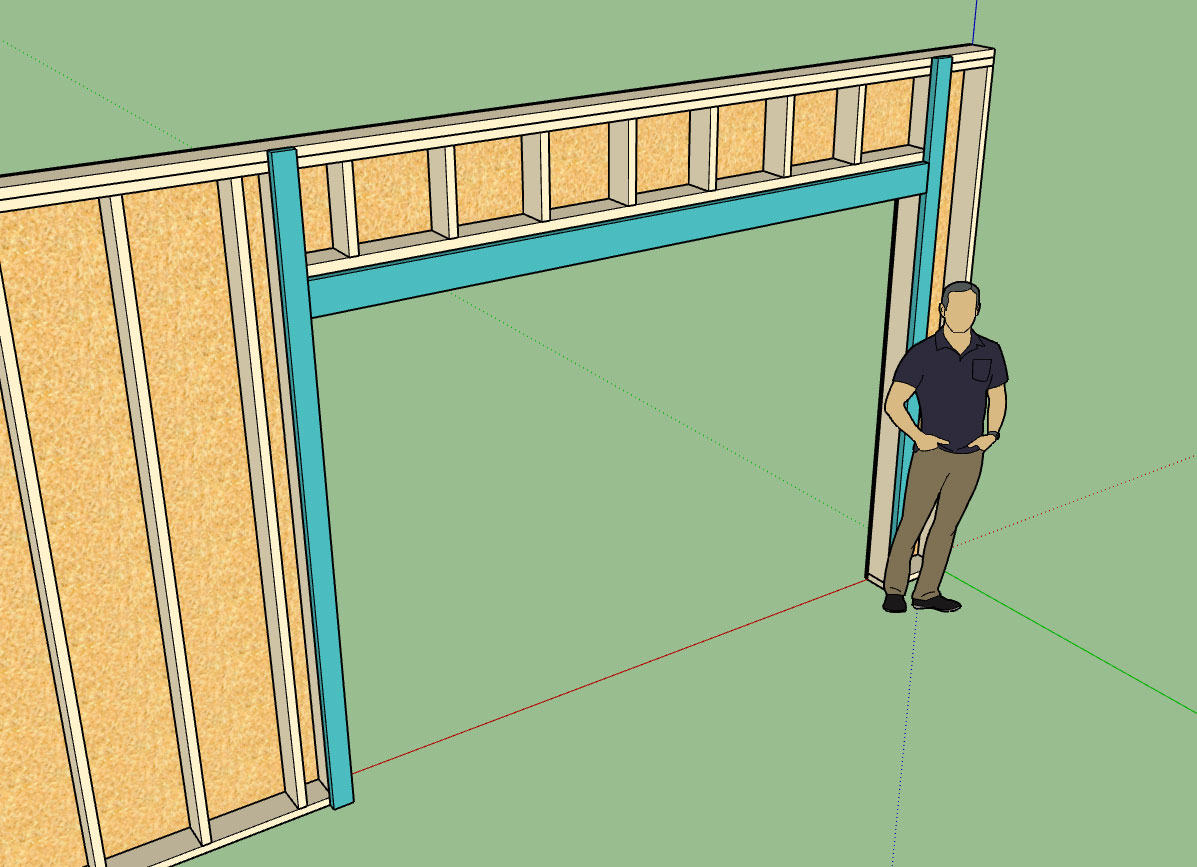
(Painted blue for emphasis)
With this new module I'm getting things right from the get go. Materials options are incorporated from the new Material Library so that piece of the puzzle will be much more streamlined and easy to use.
Since I am working through this a little more slowly (and carefully) it may be a few days before I release any fixes, I apologize for the delay.
As I mentioned in a previous post I have broken garage doors out into their own separate container, as such garage doors have their own edit menu etc... this is a little bit more work but will result in more flexibility and long term improvements will be more attainable.
-
I'm fielding at least 5-10 questions per day on the plugin (need to put up a FAQ). However, I thought this particular question on utilizing layers within the plugin was worth posting here:
QUESTION:
Just to clarify, all pre-loaded layer names for all Plugins can be changed/modified through the global settling interface.
Can layer names be changed at anytime or must layer name changes be in place at the start of modeling? How would you update existing model layer naming to new names?
ANSWER:
As mentioned in previous posts, editing or do anything to modify a wall panel (ie. adding a door or window) will cause the plugin to redraw the wall panel from scratch.
This is particularly advantageous for making layer modifications (changing a layer name).
Try it out, create a wall, then update the name for the framing layer (or any other layer name being used) to something different in the global settings.
Then regen the wall panel(s), ie. drop them down to 2D and bring them back up again into 3D. You will notice that the new layer name has been added and that the old layer name is also still present. If you have regenerated all of the wall panels then nothing should remain on the old layer unless you have manually placed something there, and you can safely delete it. SU will prompt you if something does remain and what action to take.
So the long answer to this question is that layer names can be changed at anytime and are not restricted to being set at the start of a model.
-
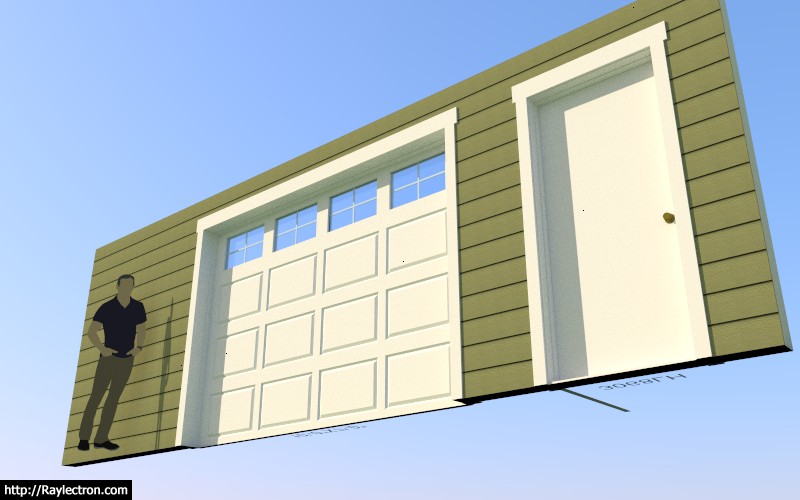
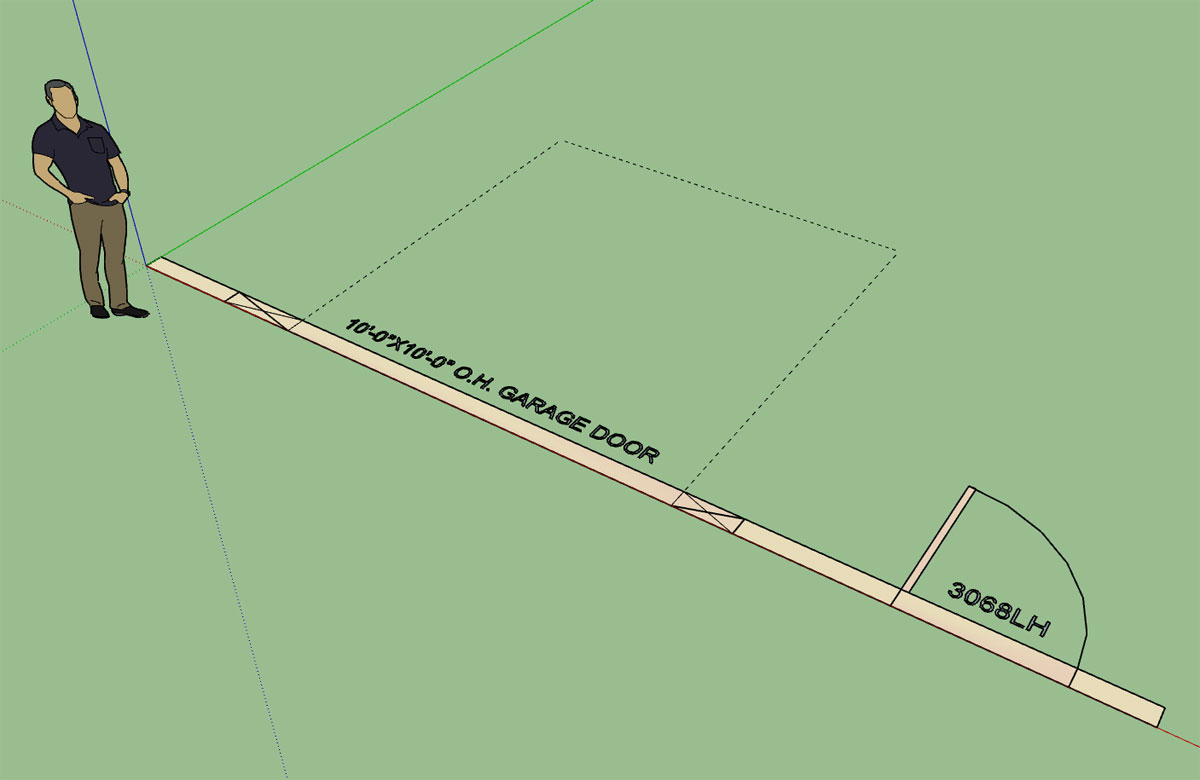
So here is what I have for the garage door callout so far:
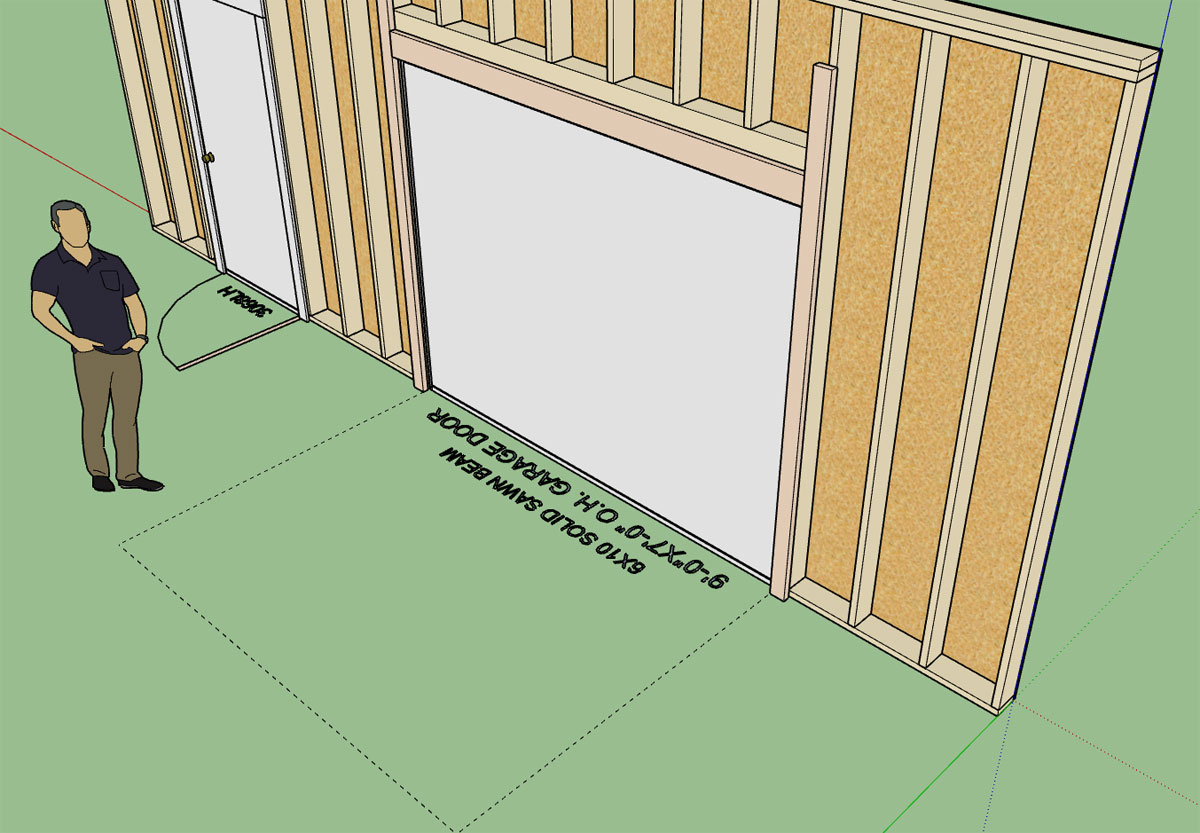
The second (smaller) line of text will display the header/lintel size:
Glulam headers will display the glulam dimensions and the term "GLULAM BEAM"
A typical lumber (nail lam) beam will be: (2) 2X8 LUMBER BEAM
A typical LSL Callout: (2) 1-3/4X7-1/4 LSL BEAM
I'm sure everyone has their own favorite way of making these callouts and I need to figure out a way to allow for enough flexibility but at the same time to not over complicate the matter.
The dashed line shows the footprint of the overhead door, with its depth equal to the door height.
Please feel free to chime in with suggestions or concerns.
-
Another very good question:
QUESTION:
How can you release drawn geometry (wall plug-in) from being parametric?
Is there a global setting to deactivate or is exploding the only way to achieve this?
ANSWER:
Exploding the main wall group is one way to do it, then group it back together if you wish.
If you do this you essentially eliminate the attribute library of the wall group so this action is irreversible once you save the file and exit the model.
Another method is to rename the Instance Name of the group (remove the RECT_WALL_ASSEMBLY keyword string). If you do this the plugin will not recognize the wall panel group as one of its own and will essentially ignore its existance.
The good thing about this method is that if you at some time in the future do want to restore parametric ability to this wall panel you can do so by renaming the Instance Name to include the keyword string above.
Just make sure the trailing digits or text after the keyword is unique to that wall panel, so that the plugin does not somehow confuse it with another wall panel.
-
Just a side note:
I've dug myself in pretty deep with the garage door module. Yet another fun rabbit hole (ie. arched doors, portal frames, separate garage door plugin within a plugin).
If I'm a little slow to get back to you on a specific bug or question or potential fix this is why. I'm trying to keep focused on the garage door module so that I get it right. I appreciate your patience.
-
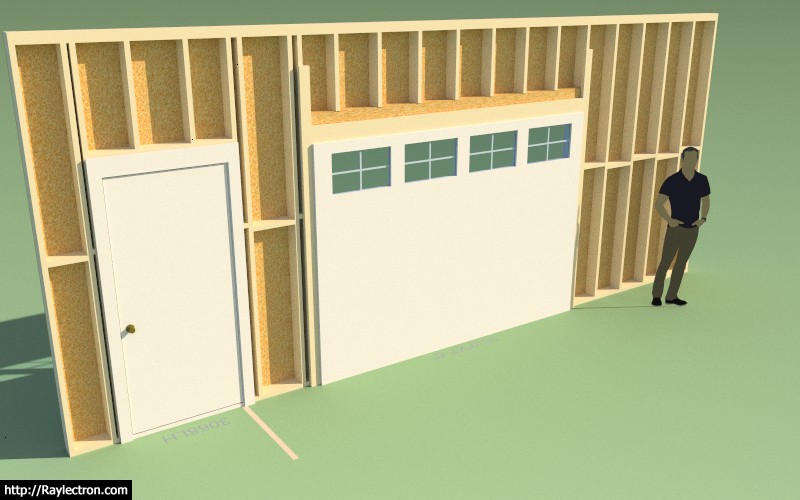
The detail below shows most of the basic elements of the portal frame that will be drawn by the plugin:
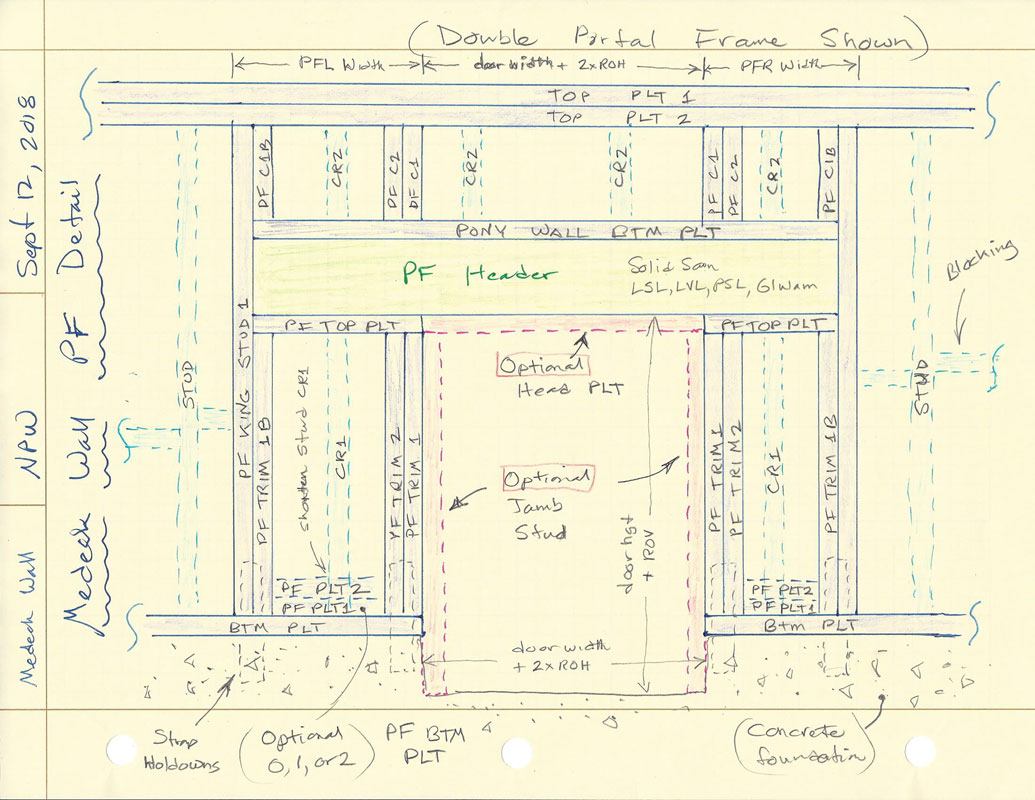
The PF King Stud and PF Trimmer Stud parameters will allow the user to increase the quantity of the king and trim studs accordingly.
The PF Bottom PLT parameter will allow PF Bottom Plates to vary from zero, one or two.
Optional head and jambs studs can be specified (shown in red).
The detail shows a double portal frame, a single portal frame is very similar with one side conventionally framed and one side portal framed as shown.
The light blue elements are the regular studs (or cripples) on their typical 16" o/c spacing.
PF C2 and PF C1B are probably optional elements but I like to include them, please let me know if there are any objections.
For now only strap holdowns will be available since this seems to be the prescriptive path most people employ. However in my professional opinion other holdown types (HDU) could be permitted provided that the proper engineering has been done.
Eventually I will include a PFH calculator in the plugins engineering module based on my own Excel based Portal Frame Calculator:
http://design.medeek.com/resources/PFH/PFH_CALCULATOR.pdf
Please feel free to chime in with any comments, suggestions, concerns or additional options or parameters you would like to see added to this module.
-
Leonard's codex!

-
PF Framing algorithm is complete:
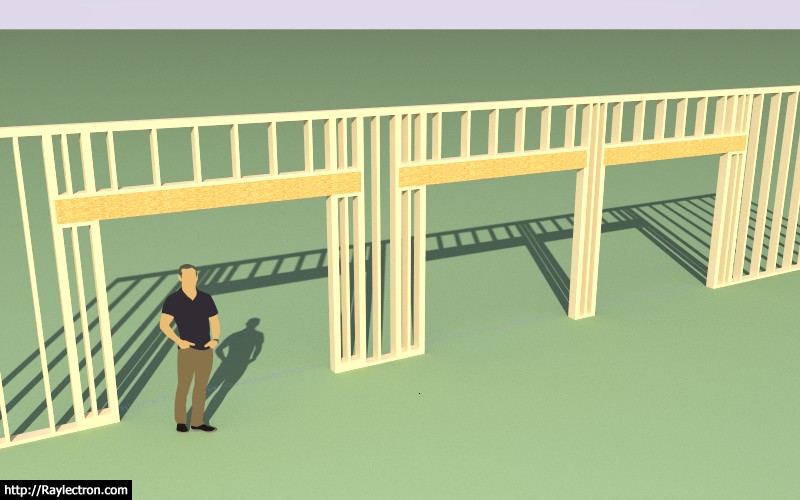
Double, Single (Left), Single (Right)
In this case a 10' wall creates a pony wall above the headers.
Now I just need to add in the logic for the optional jamb studs.
-
A garage door with optional head and jamb studs enabled:
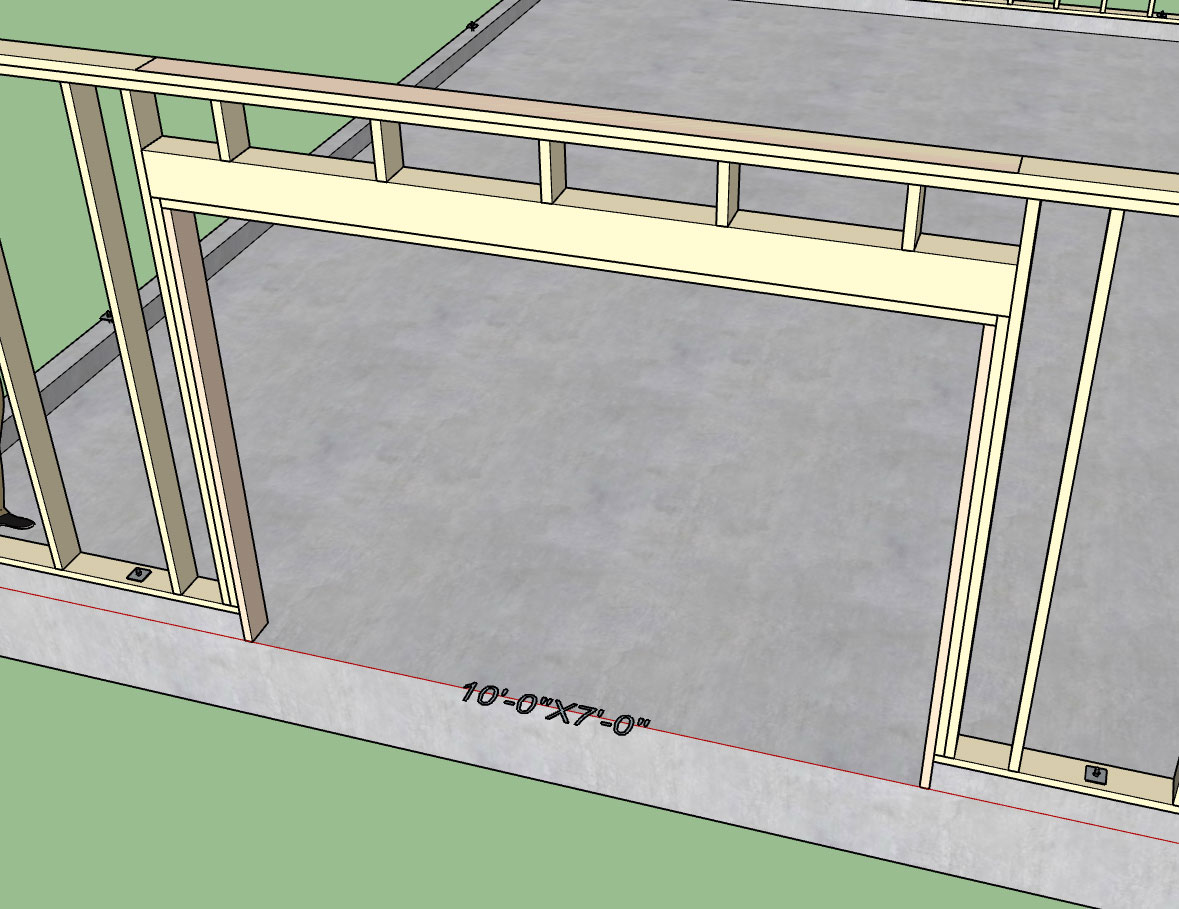
Also note that this feature can be utilized in the CMU or no framing mode:
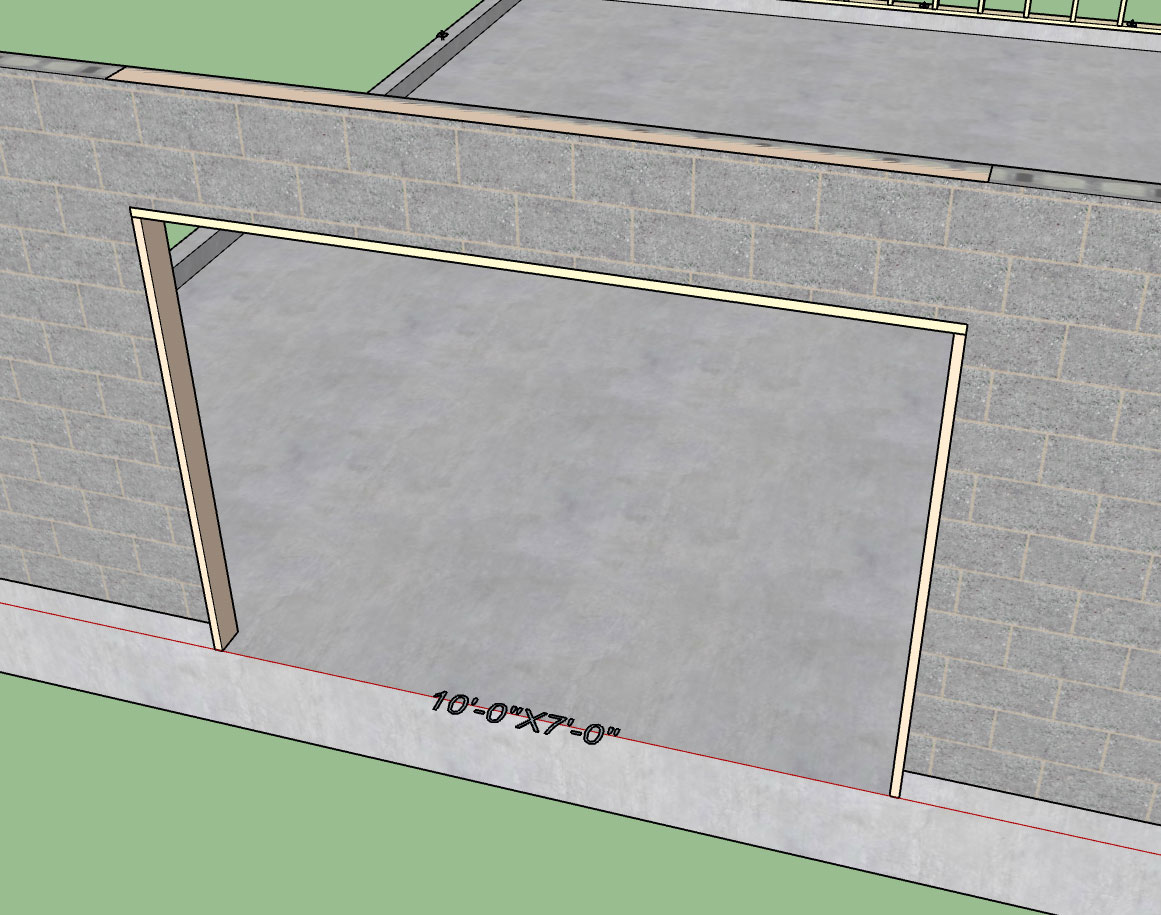
Typically I see jamb studs used in a situation like this, where the door drops below the framed wall (vertically offset) into a garage curb or stemwall. By default the jamb studs are assigned to PT lumber. However, they can also be utilized without a vertical offset.
-
I've been thinking about the parametric ability of the plugin and the fact that manual edits to the plugin geometry are for the most part discouraged since they will be blown away when the wall panel is updated by the plugin.
With that in mind does it really make sense to use components rather than groups, even for wall studs?
Components are essentially the same thing as groups and actually involve more overhead and hence a heavier model.
-
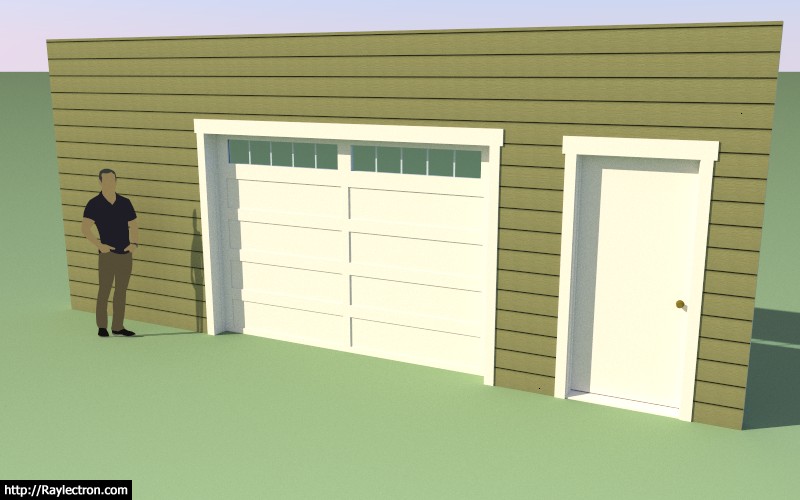
A typical raised panel and flat panel garage door (10'x7') with the panels parameters set to "AUTO":
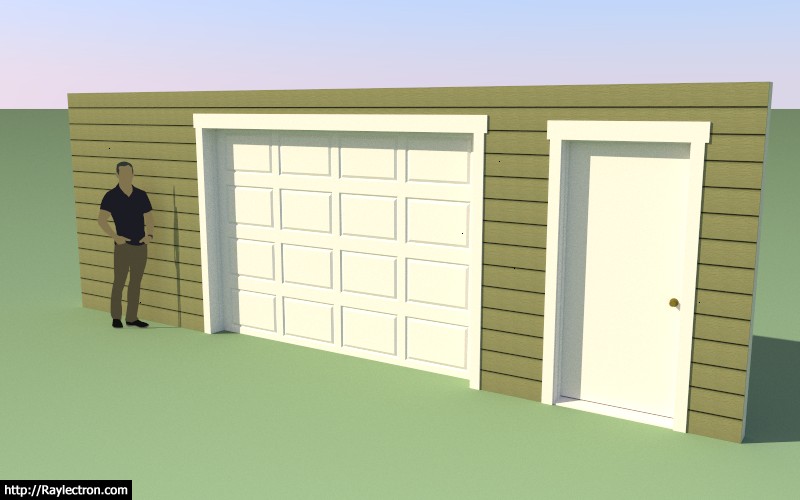
I may need to fine tune the spacing parameters a bit (I have not exposed the parameters to the user, it would probably just over complicate things) depending on feedback from designers.
Working on the window versions of these two variants now.
Then the all glass version for commercial applications (ie. Fire Station overhead doors etc...)
I will probably not release a carriage door style just yet, not until I have further researched this type of door and determined what configuration and additional parameters might be needed.
Below is a preview of the Garage Door Edit Menu (note that most of the advance options have been disabled so that if fits on the screen):
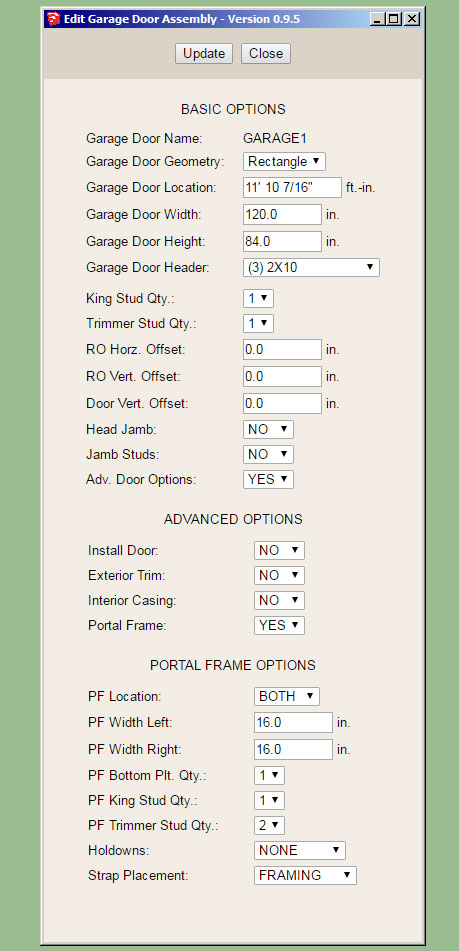
I've enabled the Portal Frame option so that you can see the available parameters.
-
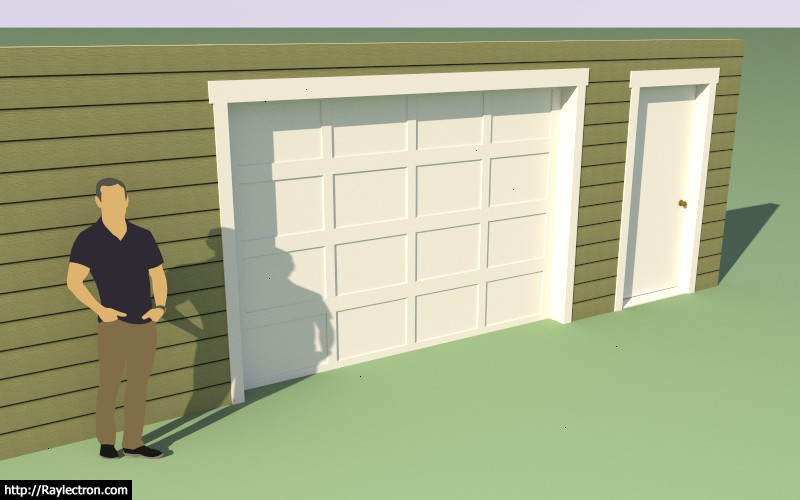
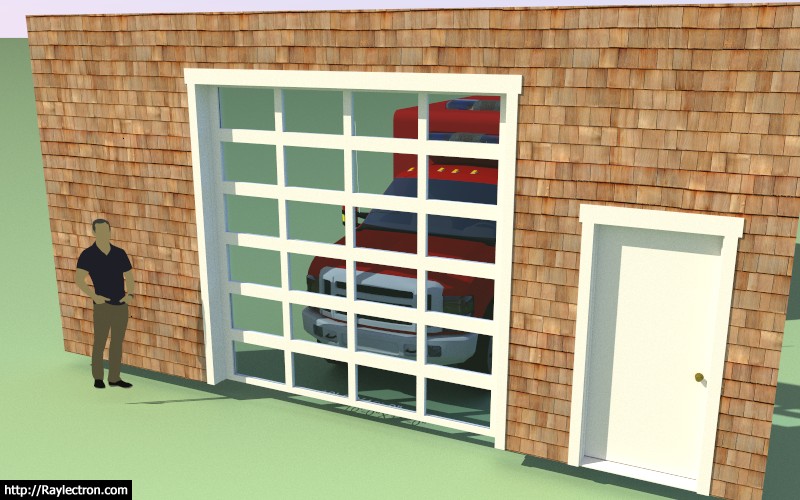
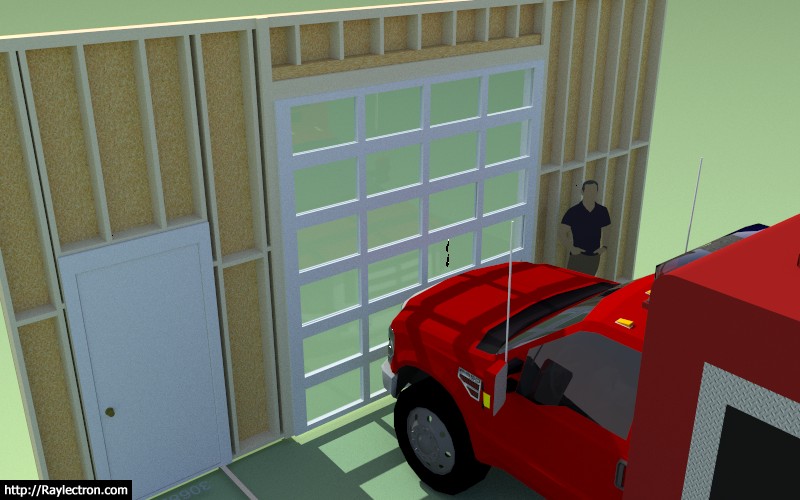
Exterior and interior of a 10'x7' garage door (raised panel with glass and 2x2 grille):
-
The number of horizontal and vertical panels can be specified or be set to AUTO so virtually any number of combinations are possible:
Full glass door exterior and interior. However I'm noticing that these types of doors usually have a kick panel (no glass) installed.
-
A glass door with a threshold and door lever (hardware):
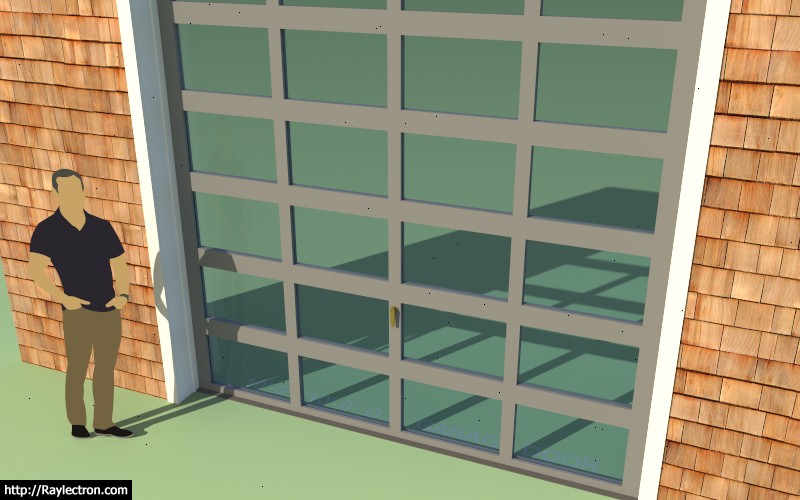
Note that the grey material applied to the door was first created in the material manager in the global settings and then applied in the garage door edit menu. I am very happy with the implementation and added functionality of the new material manager.
The blocked out areas on each side of the garage door indicate the extent of the portal frames when enabled:
-
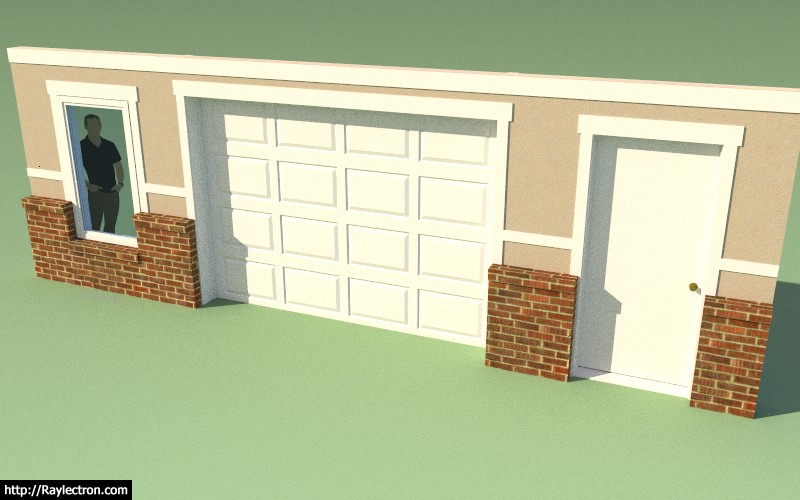
Garage door with ext. trim and wainscoting:
-
I was just about to release the latest release when I noticed a few issues with the insulation when portal frames are enabled for the garage door openings:
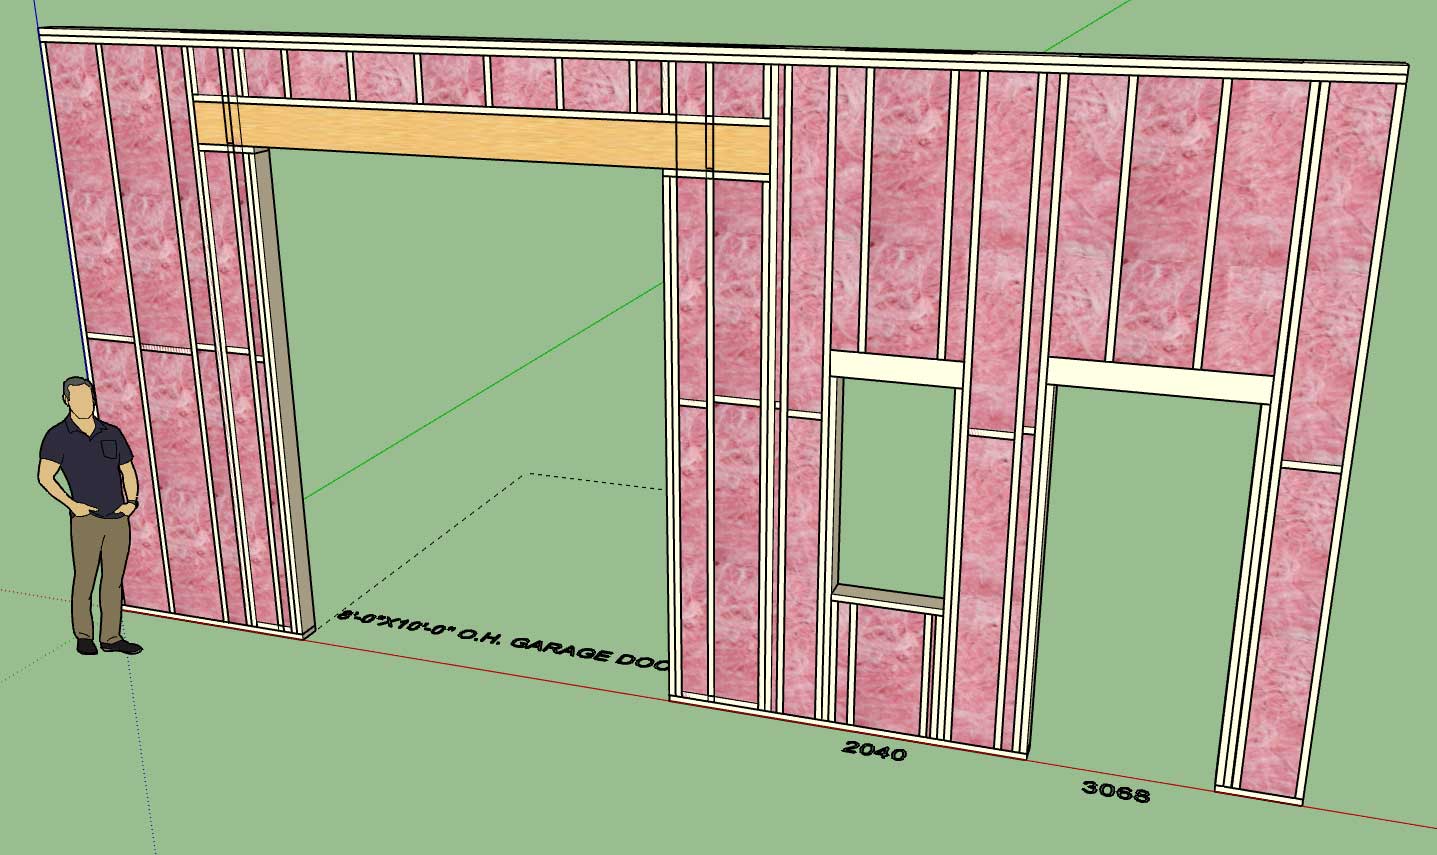
The portal frames added a whole new level to the stud framing, blocking and insulation algorithms.
I will hit it again tomorrow and see if we can't finally push out this latest version. I think everyone will be pleasantly surprised with the new functionality and bug fixes.
-
Now that the garage module is finally out I'm able to refocus back onto the gable wall module, and hopefully get something going with this in the next week or two.
As I've been contemplating it implementation this morning I've come to the following realization. A gable wall can be separated into two cases:
1.) A true gable wall (ie. balloon framed wall from rafters to floor)
2.) A gable pony wall that rests on top of a regular rectangular wall.
However a gable wall is still a gable wall whether it rests on top of another wall or floor. So the basic algorithm for it remains the same. Like a regular rectangular wall it also still has inside or outside corners as well as tee intersections and also an end case.
Unlike a rectangular wall when it intersects other walls its top plate(s) don't mesh neatly with the other walls. This has been cause of some concern for me as I want to make sure I figure out the best way to handle intersecting sloping walls.
Also gable or sloping walls can get quite a bit more complicated than just your simple symmetric gable or shed wall, there are a lot of possible variations with the potential for multiple pitch breaks with the top plate(s). Even more interesting are special pony walls between various roof lines where the bottom plate of the wall is also sloping or has multiple pitch breaks (probably not as common).
The simplest incarnation of a dual pitched gable wall (vs. a shed wall with a single pitch) should have four basic parameters:
1.) Left Wall Height (start)
2.) Right Wall Height (end)
3.) Left Pitch (x:12)
4.) Right Pitch (x:12)By default wall heights and pitches will be equal, resulting in a symmetric gable wall.
Setting the wall height to zero will result in a triangular shaped wall segment.
Please feel free to offer any corrections to these observations, comments or additional suggestions with regards to gable walls.
Hello! It looks like you're interested in this conversation, but you don't have an account yet.
Getting fed up of having to scroll through the same posts each visit? When you register for an account, you'll always come back to exactly where you were before, and choose to be notified of new replies (either via email, or push notification). You'll also be able to save bookmarks and upvote posts to show your appreciation to other community members.
With your input, this post could be even better 💗
Register Login


Advertisement