• Login
sketchucation logo sketchucation
  • Login
🤑 SketchPlus 1.3 | 44 Tools for $15 until June 20th Buy Now

3D Truss Models

Scheduled Pinned Locked Moved Plugins
1.5k Posts 31 Posters 869.7k Views
Loading More Posts
  • Oldest to Newest
  • Newest to Oldest
  • Most Votes
Reply
  • Reply as topic
Log in to reply
This topic has been deleted. Only users with topic management privileges can see it.
  • M Offline
    medeek
    last edited by 12 Dec 2016, 14:53

    @Juju

    I concur, after work today I will dive back into my shopping cart code and see if I can't add the renewal code by tonight. The nice thing is that I already have a similar system in place for renewals on my API service. I just need to figure out what I did for that service about two years ago and replicate it for the two plugins.

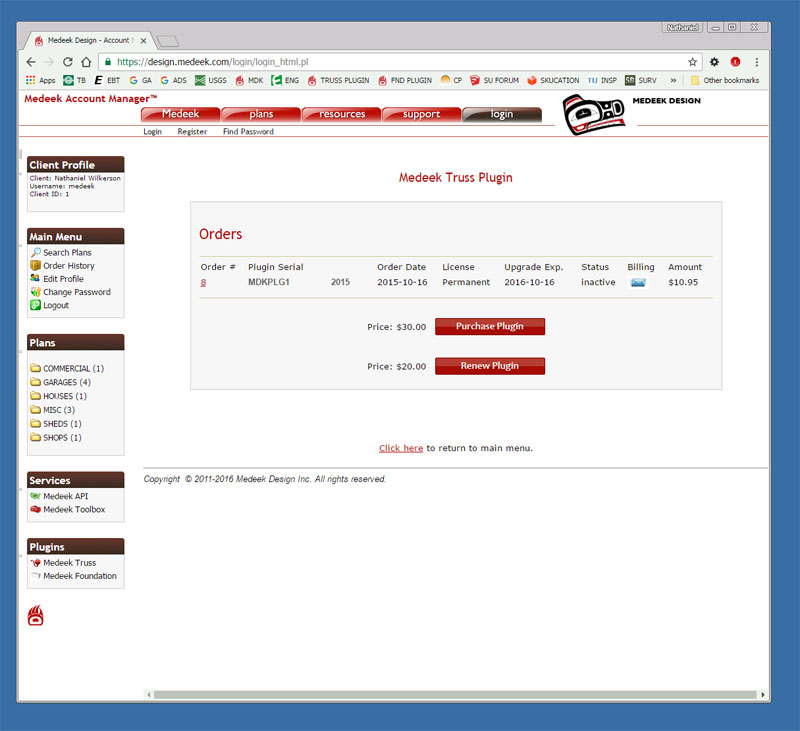
    Under the purchase new license will be the renewal button:

    http://design.medeek.com/images/renew_plugin.png

    I've updated your renewal expiration date in the database as I promised. I apologize for the delay on this.

    If anyone else has purchased a new license in an attempt to renew their license in the last 2 or 3 months, please email me and I will extend your renewal expiration by another 6 months.

    Nathaniel P. Wilkerson PE
    Medeek Engineering Inc
    design.medeek.com

    1 Reply Last reply Reply Quote 0
    • M Offline
      medeek
      last edited by 14 Dec 2016, 02:41

      Pre-Op tomorrow and then operation on Thursday.

      Timber Truss icon for the Graphical Truss Menu:

      TIMBER_TRUSS.png

      Nathaniel P. Wilkerson PE
      Medeek Engineering Inc
      design.medeek.com

      1 Reply Last reply Reply Quote 0
      • J Offline
        juju
        last edited by 14 Dec 2016, 06:12

        @medeek said:

        Version 1.7.1 - 12.08.2016

        • Enabled metal plate connectors for the common fink truss.

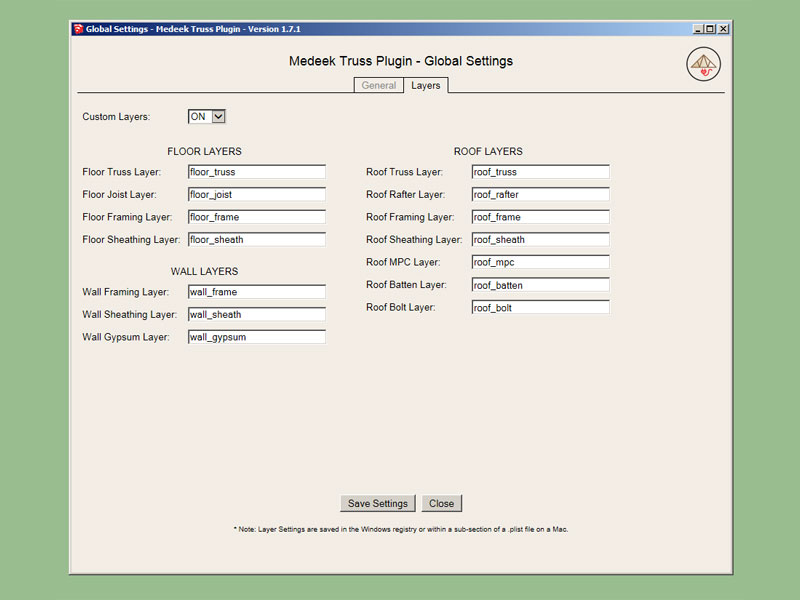
        I enabled the connector plates in the settings, but it doesn't show up when the trusses are generated. I'm using version 1.7.1. I also noticed that the splash screen with all the various truss types icons seem to be different (window not resizing / icons running off of the page) to before I enabled the connector plates in the same version?

        ++++ EDIT ++++
        OK, it seems to be working now, I double checked the settings, assigned user defined layers and saved them again. It seems to be working now. The battens are not being assigned to a layer other than Layer0?

        Save the Earth, it's the only planet with chocolate.

        1 Reply Last reply Reply Quote 0
        • E Offline
          EarthMover
          last edited by 14 Dec 2016, 07:11

          Those timber trusses are amazing. Perfect actually for a job I'm working on. Thank you for making such a phenomenal plugin!

          3D Artist at Clearstory 3D Imaging
          Guide Tool at Winning With Sketchup
          Content Creator at Skapeup

          1 Reply Last reply Reply Quote 0
          • M Offline
            medeek
            last edited by 14 Dec 2016, 08:52

            @Juju

            Thanks for pointing out the non-layer assignment for battens, I will try to jump on that tomorrow, its a quick fix.

            The layer implementation is far from complete, I only just started on it and I have numerous files to go through and add the layer logic in so please bear with me.

            Nathaniel P. Wilkerson PE
            Medeek Engineering Inc
            design.medeek.com

            1 Reply Last reply Reply Quote 0
            • M Offline
              medeek
              last edited by 14 Dec 2016, 08:54

              I'll see what I can do with the timber trusses, those should be a lot of fun to add in and with a decent html menu with preview screen should be fairly intuitive for the user.

              I've updated my database and shopping cart programming so now you should be able to renew your plugin (license) for the $20.00 renewal fee. You always have the option of purchasing multiple licenses at the full price, and the renewal form allows one to pick which serial number they would like to renew if they have multiple licenses.

              It took me about 4 hours to make this work, unfortunately the paypal integration complicated things, that was not anticipated. Now my arm is on fire, good thing I'm going into surgery Thursday, I really need it at this point.

              PLUGIN_RENEWAL_SCREEN.jpg

              Item #22 on the todo list should now be complete. Now I just need to go back into my foundation plugin scripts and database and do the same thing.

              Nathaniel P. Wilkerson PE
              Medeek Engineering Inc
              design.medeek.com

              1 Reply Last reply Reply Quote 0
              • J Offline
                juju
                last edited by 14 Dec 2016, 11:58

                @medeek said:

                @Juju

                Thanks for pointing out the non-layer assignment for battens, I will try to jump on that tomorrow, its a quick fix.

                The layer implementation is far from complete, I only just started on it and I have numerous files to go through and add the layer logic in so please bear with me.

                No problem, thanks for the work you put into this, it is appreciated and doesn't go unnoticed.

                I suggested to the author of "Window+" (on EW) to implement something similar to what you have done with the custom layer assignments, he too thinks it a great idea and will probably implement it soon. Let's hope the idea spreads to more extension authors as it helps to save time when these can be pre-assigned as opposed to having to iterate through the entire model assigning groups / components to layers.

                All the best with the surgery tomorrow! Godspeed!

                Save the Earth, it's the only planet with chocolate.

                1 Reply Last reply Reply Quote 0
                • M Offline
                  medeek
                  last edited by 15 Dec 2016, 00:36

                  @Juju

                  Which layer would you like the battens assigned to, roof sheathing or roof framing.

                  Nathaniel P. Wilkerson PE
                  Medeek Engineering Inc
                  design.medeek.com

                  1 Reply Last reply Reply Quote 0
                  • M Offline
                    medeek
                    last edited by 15 Dec 2016, 02:26

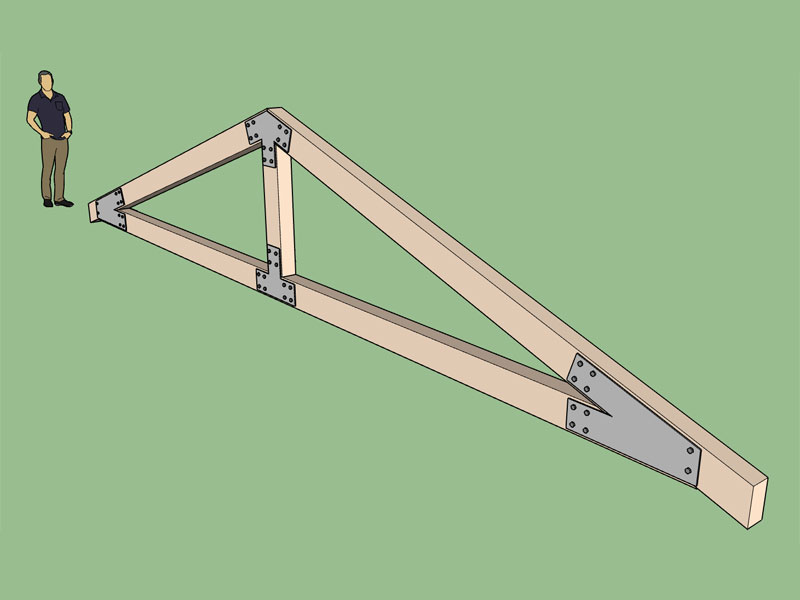
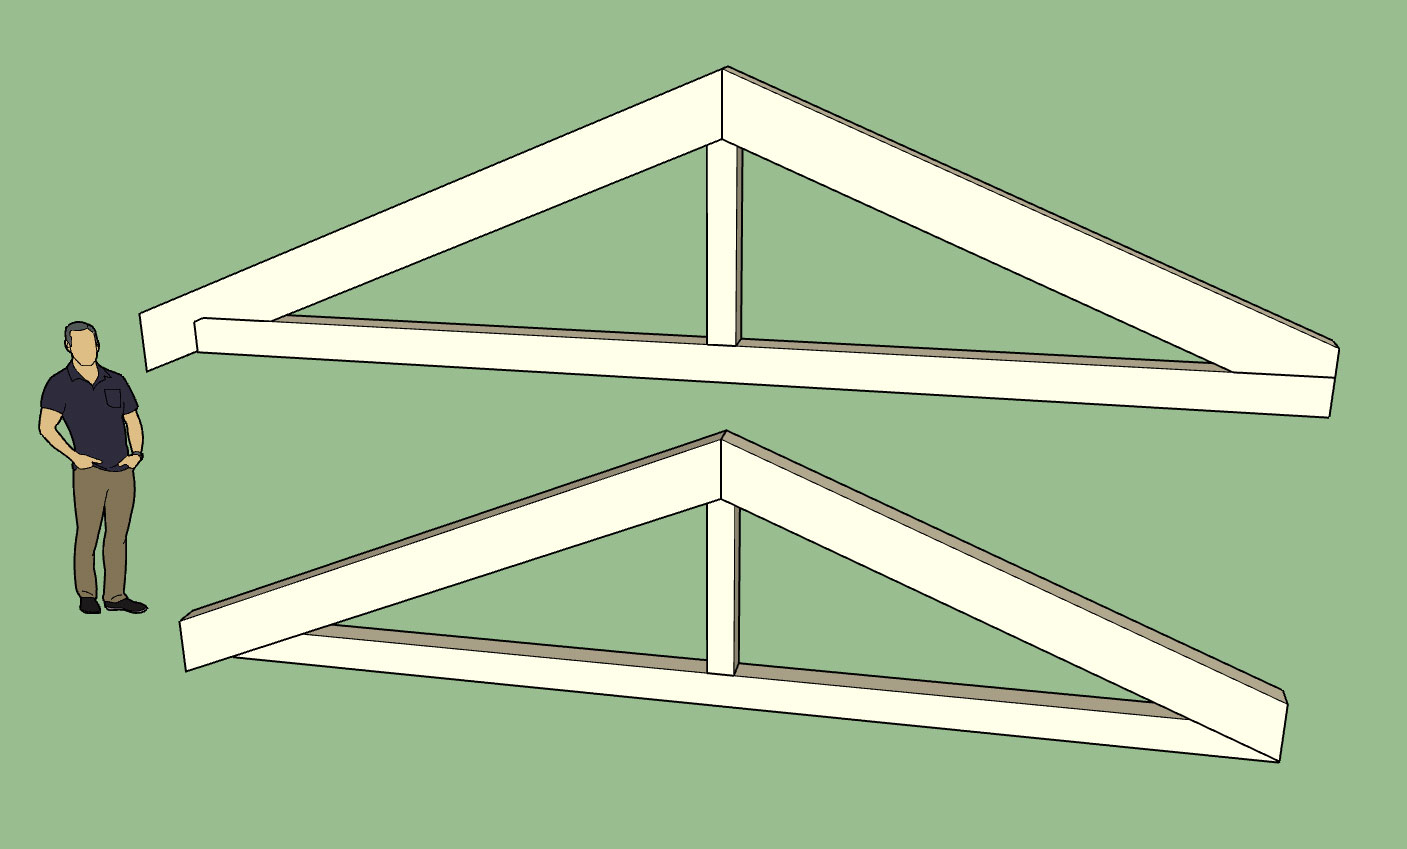
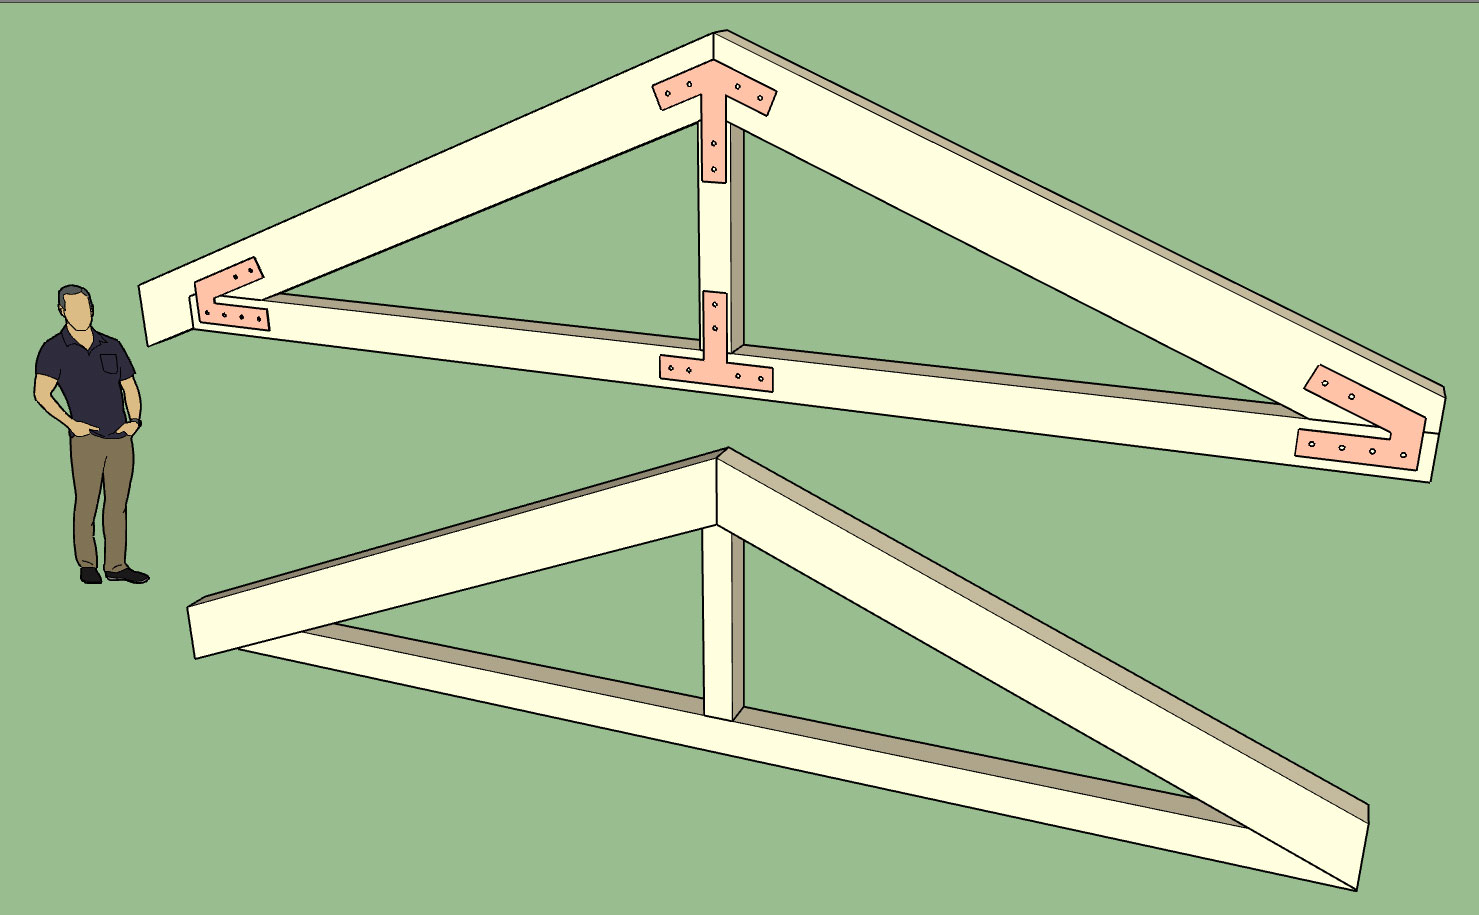
                    I need to review some of my old files (local residential designs) to get a better idea of timber truss designs but out of curiosity I attempted to manually create a sample timber truss to see how long it took me create one. About an hour into it I had come up with this:

                    http://design.medeek.com/resources/images/truss_su165_800.jpg

                    View model here:

                    Link Preview Image
                    3D Warehouse

                    3D Warehouse is a website of searchable, pre-made 3D models that works seamlessly with SketchUp.

                    favicon

                    (3dwarehouse.sketchup.com)

                    Specifications:

                    • King Post truss with 4:12 pitch, 12" overhang and 1/4" buttcut, span 28'
                    • 6x10 Timbers (TC, BC, King Post)
                    • 3/8" Thick Connector Plates
                    • 5/8" DIA. Heavy Hex Nuts and Bolts
                    • 2 Rows of Bolts
                    • 4.5" between rows of bolts
                    • 4" bolt spacing between bolts in a row
                    • Plates offset from timber by 3/4"
                    • Bolts offset from end of plates by 2"
                    • Bolts offset from edge of plates by 1.5"
                    • No washers

                    This particular connector plate configuration uses two additional bolts at the apex of the heel plates, many other variations are possible.

                    Please feel free to comment. This example is just a concept to give me a better idea of the design parameters and issues with this type of truss.

                    Nathaniel P. Wilkerson PE
                    Medeek Engineering Inc
                    design.medeek.com

                    1 Reply Last reply Reply Quote 0
                    • J Offline
                      juju
                      last edited by 15 Dec 2016, 06:15

                      @medeek said:

                      @Juju

                      Which layer would you like the battens assigned to, roof sheathing or roof framing.

                      I would prefer a separate custom layer, I use SKALP in the "by layer" manner, it also makes it simpler should I export a report on materials.

                      Save the Earth, it's the only planet with chocolate.

                      1 Reply Last reply Reply Quote 0
                      • M Offline
                        medeek
                        last edited by 15 Dec 2016, 15:45

                        I will add in two new layers for roofs:

                        http://design.medeek.com/resources/images/truss_su166_800.jpg

                        I will have to roll that revision post-op, off to Olympia for the neck surgery at 10:00AM

                        Nathaniel P. Wilkerson PE
                        Medeek Engineering Inc
                        design.medeek.com

                        1 Reply Last reply Reply Quote 0
                        • M Offline
                          medeek
                          last edited by 15 Dec 2016, 22:19

                          Out of surgery, sore.

                          Right arm feels considerably better with only a slight tingle. Neck brace has me nicely immobilized.

                          Swallowing is extremely painful, thank goodness for ice cream.

                          I'm probably going to lay low for about a week, no programming or significant computer time, that is what the Doctor suggested.

                          Nathaniel P. Wilkerson PE
                          Medeek Engineering Inc
                          design.medeek.com

                          1 Reply Last reply Reply Quote 0
                          • M Offline
                            medeek
                            last edited by 16 Dec 2016, 16:13

                            Version 1.7.2 - 12.16.2016

                            • Enabled custom layers for roof returns, battens and counter battens.
                            • License renewal enabled in Medeek Account Manager.

                            Nathaniel P. Wilkerson PE
                            Medeek Engineering Inc
                            design.medeek.com

                            1 Reply Last reply Reply Quote 0
                            • M Offline
                              medeek
                              last edited by 16 Dec 2016, 19:09

                              I like the new addition of the layers, it helps being able to hide certain aspects of the model. This has led me to think it might be useful to somehow implement materials (colors, textures), either at the layer level or based on the geometry (ie. specific color or texture for the I-joist web -> OSB wood).

                              http://design.medeek.com/resources/images/truss_su14_800.jpg

                              For now I don't think I will make the material assignment(s) customizable, in the global settings you will be able to turn it on or off, if it is turned on then I will have the plugin assign some fairly generic colors for lumber, pressure treated lumber and texture for OSB sheathing. Metal plates will be assigned a texture as well, this should be rather interesting.

                              Nathaniel P. Wilkerson PE
                              Medeek Engineering Inc
                              design.medeek.com

                              1 Reply Last reply Reply Quote 0
                              • J Offline
                                juju
                                last edited by 18 Dec 2016, 04:46

                                Thanks for the upgrades! I'm on holiday and am looking forward to this when I'm back at the grindstone in a few weeks time!

                                Save the Earth, it's the only planet with chocolate.

                                1 Reply Last reply Reply Quote 0
                                • M Offline
                                  medeek
                                  last edited by 18 Dec 2016, 04:54

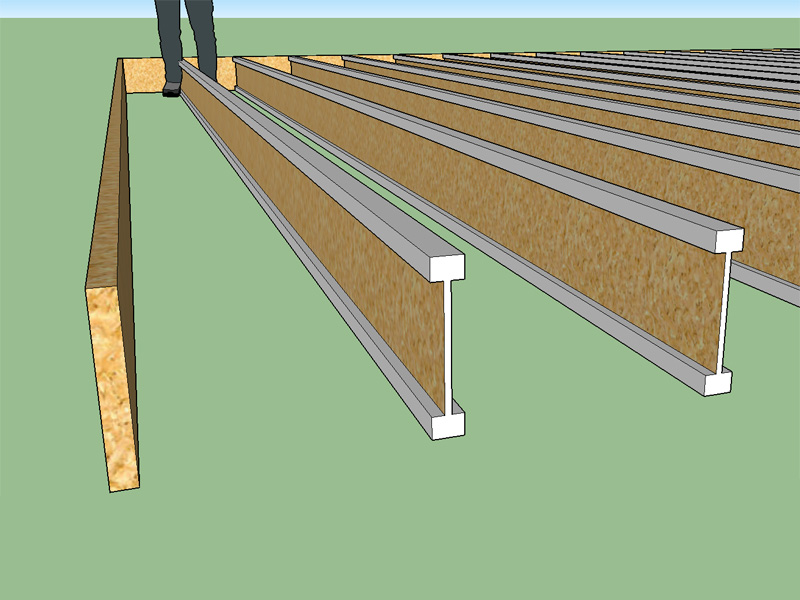
                                  Version 1.7.3 - 12.17.2016

                                  • Added a "Materials" tab within the global settings; Auto material assigment (colors and textures) is now an option.
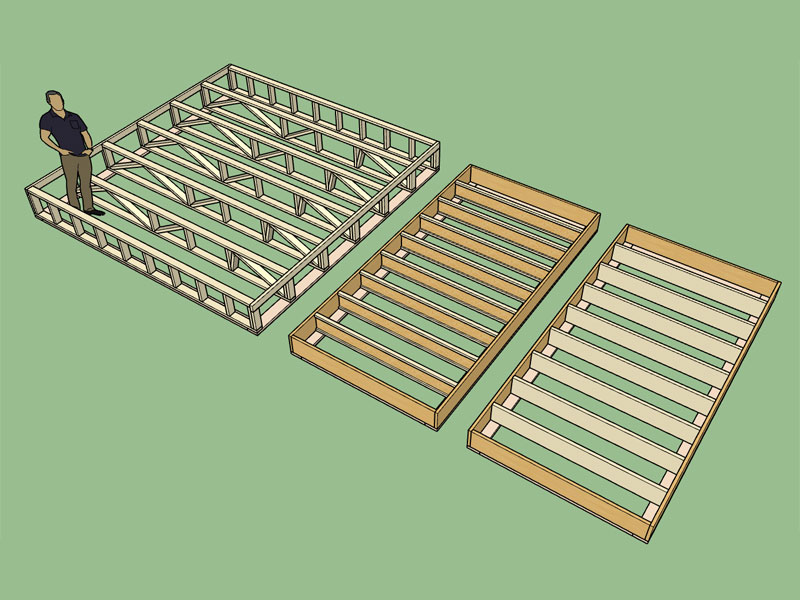
                                  • Enabled materials and custom layers for floor trusses and joists.
                                  • Enabled materials for common trusses: metal plate connectors, lumber, and OSB.

                                  http://design.medeek.com/resources/images/truss_su167_800.jpg

                                  View model here:

                                  Link Preview Image
                                  3D Warehouse

                                  3D Warehouse is a website of searchable, pre-made 3D models that works seamlessly with SketchUp.

                                  favicon

                                  (3dwarehouse.sketchup.com)

                                  http://design.medeek.com/resources/images/truss_su168_800.jpg

                                  A big thanks to those on the SketchUcation and SU board who helped me with the custom materials part of the API, the SketchUp community is a great asset.

                                  By default the metal plate connectors, custom layers and auto materials is turned off in the global settings.

                                  Nathaniel P. Wilkerson PE
                                  Medeek Engineering Inc
                                  design.medeek.com

                                  1 Reply Last reply Reply Quote 0
                                  • M Offline
                                    medeek
                                    last edited by 18 Dec 2016, 21:40

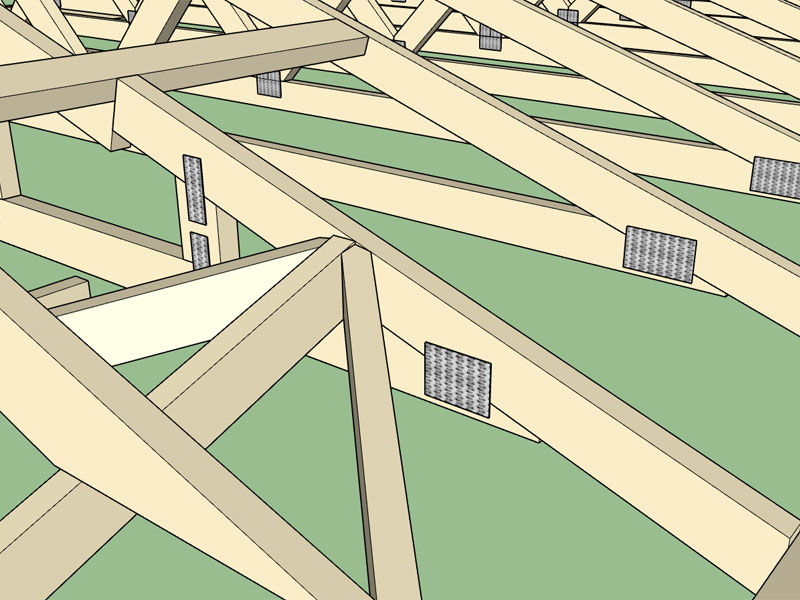
                                    • Enabled metal plate connectors for floor trusses.

                                    http://design.medeek.com/resources/images/truss_su169_800.jpg

                                    View model here:

                                    Link Preview Image
                                    3D Warehouse

                                    3D Warehouse is a website of searchable, pre-made 3D models that works seamlessly with SketchUp.

                                    favicon

                                    (3dwarehouse.sketchup.com)

                                    The algorithm for the plate placement is fairly complex but not nearly as bad as I thought it would be, just knocking out some low hanging fruit while I'm recovering. The painkillers have kept me a bit off my "A" game so I haven't tackled anything big yet, like the completion of the stepdown hip truss set.

                                    Nathaniel P. Wilkerson PE
                                    Medeek Engineering Inc
                                    design.medeek.com

                                    1 Reply Last reply Reply Quote 0
                                    • M Offline
                                      medeek
                                      last edited by 19 Dec 2016, 20:38

                                      Looking through some old plans I've managed to dig up I came upon a couple of designs by another engineering firm.

                                      Typically when I've dealt with truss designs I always seen a scarf cut on the bottom chord with the top chord remaining un-notched. In this other example the bottom chord is kept intact and the top chord is scarf cut or notched, while still allowing a continuous section to extend for the overhang with a depth equal to at least 1/2 the top chord depth. I think the picture below explains this far better than I can with words:

                                      http://design.medeek.com/resources/images/TIMBER_TRUSS2.jpg

                                      For MPC trusses I am used to seeing a 1/4" butt cut, however for timber trusses what is more appropriate?

                                      Which method above would go with (arch. and structural reasons)?

                                      View model here:

                                      Link Preview Image
                                      3D Warehouse

                                      3D Warehouse is a website of searchable, pre-made 3D models that works seamlessly with SketchUp.

                                      favicon

                                      (3dwarehouse.sketchup.com)

                                      Nathaniel P. Wilkerson PE
                                      Medeek Engineering Inc
                                      design.medeek.com

                                      1 Reply Last reply Reply Quote 0
                                      • M Offline
                                        medeek
                                        last edited by 19 Dec 2016, 22:28

                                        Plates applied to the top truss:

                                        http://design.medeek.com/resources/images/TIMBER_TRUSS3.jpg

                                        Specs:

                                        • Truss Type: King Post
                                        • 6x10 TC, 6x8 BC, 6x6 kingpost
                                        • Plate thickness = 0.25"
                                        • single row of bolts with two bolts per row.
                                        • connector plate width = 4.0"
                                        • Bolt Dia. 3/4"
                                        • Bolt Edge Distance (timber) = 4.0"
                                        • Bolt Edge Distance (plate) = 2.0"
                                        • Bolt Spacing = 4.0"
                                        • Bolts and Washers not shown.

                                        View model here:

                                        Link Preview Image
                                        3D Warehouse

                                        3D Warehouse is a website of searchable, pre-made 3D models that works seamlessly with SketchUp.

                                        favicon

                                        (3dwarehouse.sketchup.com)

                                        Nathaniel P. Wilkerson PE
                                        Medeek Engineering Inc
                                        design.medeek.com

                                        1 Reply Last reply Reply Quote 0
                                        • M Offline
                                          medeek
                                          last edited by 20 Dec 2016, 07:06

                                          This particular joint on a gambrel attic roof I am finding particularly difficult to plate:

                                          http://design.medeek.com/resources/images/truss_su170_800.jpg

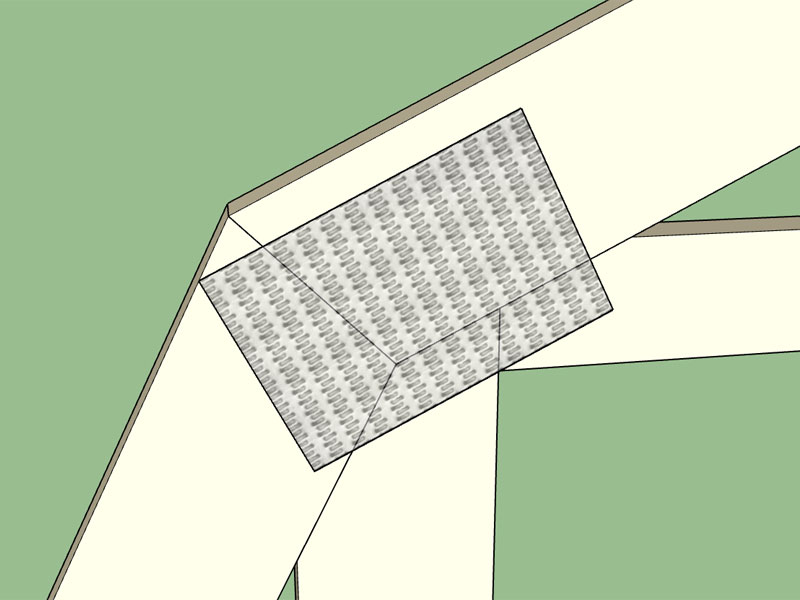
                                          Luckily I have a few samples to use as guides. Given my web configurations at this joint this seems to be the most reasonable method to plate this joint. Note that the plate should touch the interior corner and the exterior of the lower top chord but at the same time not project past the lumber into the spaces. Also the plate is rotated so that it is parallel to the upper top chords pitch.

                                          The algorithm I devised to do this is quite clever I think but can be boiled down to a few concise lines of code:

                                            # Plate 2 (Gambrel Left)
                                          
                                          	x2 = @W2x2 - (mpcyy)/(sin(@Phi2))
                                          	y2 = @W2y2
                                          	m2 = tan(@Phi2)
                                          
                                          	x1 = @X2
                                          	y1 = @Y2
                                          	m1 = tan(@Phi1)
                                          
                                          	x0 = (y2 - y1 - m2*x2 + m1*x1)/(m1 - m2)
                                          	y0 = y1 + m1*(x0 - x1)
                                          
                                          	xoffset = (mpcxx/2.0)*(cos(@Phi2)) + (mpcyy/2.0)*(sin(@Phi2))
                                          	yoffset = (mpcxx/2.0)*(sin(@Phi2)) - (mpcyy/2.0)*(cos(@Phi2))
                                          
                                          	mpcx = x0 + xoffset
                                          	mpcy = y0 + yoffset
                                          	mpcrot = -@Phi2
                                          	MedeekMethods.metal_plate mpcx, mpcy, mpcxx, mpcyy, mpcrot, "PLGL"
                                          
                                          
                                          	# Plate 2 (Gambrel Right)
                                          
                                          	mpcx = @X5 - mpcx
                                          	mpcy = mpcy
                                          	mpcrot = @Phi2
                                          	MedeekMethods.metal_plate mpcx, mpcy, mpcxx, mpcyy, mpcrot, "PLGR"
                                          

                                          This joint has been the most difficult so far, everything else has been cake.

                                          Nathaniel P. Wilkerson PE
                                          Medeek Engineering Inc
                                          design.medeek.com

                                          1 Reply Last reply Reply Quote 0
                                          • 1
                                          • 2
                                          • 27
                                          • 28
                                          • 29
                                          • 30
                                          • 31
                                          • 74
                                          • 75
                                          • 29 / 75
                                          29 / 75
                                          • First post
                                            569/1498
                                            Last post
                                          Buy SketchPlus
                                          Buy SUbD
                                          Buy WrapR
                                          Buy eBook
                                          Buy Modelur
                                          Buy Vertex Tools
                                          Buy SketchCuisine
                                          Buy FormFonts

                                          Advertisement