Help with window hole in wall script
-
Since we are now discussing stylistic issues
Personally I like
I generally use parentheses for if statements and for methods even though ruby does not require them. This helps me with speed reading code as you can immediately distinguish a mehod from a var
Aslo I prefer ! instead of not
and I prefer || instead of or
This is because of my C / C++ backgroundI use single quotes ' for simple strings (slightly faster)
'my simple string'I use double quotes " when strings include escape characters or variable replacements
"my variable#{variable} \n with a newline" -
Me again!!

Trying to group the reveal entities to make it easy to move a window and it opening if I need to. I have managed to create the group but it ends up being transformed and its not inside the wall groupd as expected. I also get a copy of the elements (not grouped but within the wall group transformed to the wall group origin. Also get a BugSplat! Anyone have an idea what I've done wrong?module DeanBy7 module Window_Opening def self.main @olt = 103.mm if(!@olt) @twt = 315.mm if(!@twt) @wfd = 70.mm if(!@wfd) @wdi = 50.mm if(!@wdi) mod = Sketchup.active_model sel = mod.selection unless sel.grep(Sketchup;;ComponentInstance).empty? prompts = ["Wall external leaf thickness", "Wall total thickness", "Window Frame Depth", "Window inset"] results = UI.inputbox prompts, [@olt,@twt,@wfd,@wdi], "db Window Opening" if results @olt,@twt,@wfd,@wdi = results; mod.start_operation "db Window Opening" sel.grep(Sketchup;;ComponentInstance){|cdi| trn = cdi.transformation org = cdi.transformation.origin wid = cdi.definition.bounds.width hgt = [cdi.definition.bounds.depth,cdi.definition.bounds.height].max fog = cdi.glued_to if fog!=nil if fog.is_a?(Sketchup;;Face) p0 = org; ents = mod.active_entities xa,ya,za = fog.normal.axes elsif fog.is_a?(Sketchup;;Group) gt = fog.transformation;ents = fog.entities p0 = org.transform(gt.inverse) gf = ents.grep(Sketchup;;Face).find{|f|f.classify_point(p0)==1} xa,ya,za = gf.normal.axes end cdi.glued_to = nil p1 = p0.offset(xa,wid) p2 = p1.offset(ya,-hgt) p3 = p0.offset(ya,-hgt) cut = ents.add_face(p0,p1,p2,p3) cut.pushpull(-@olt) p0.offset!(za,-@twt) p1 = p0.offset(xa,wid) p2 = p1.offset(ya,-hgt) p3 = p0.offset(ya,-hgt) cut = ents.add_face(p0,p1,p2,p3) cut.pushpull(@olt-@twt) q0 = p0.offset(za, @twt - @olt) q2 = p2.offset(za, @twt - @olt) rev_faces = [] ents.each {|e| if e.is_a? Sketchup;;Face clp = e.classify_point q0 if clp == 2 rev_faces << e end end } ents.each {|e| if e.is_a? Sketchup;;Face clp = e.classify_point q2 if clp == 2 rev_faces << e end end } rev_grp = fog.entities.add_group rev_faces rev_grp.name = "Reveals" vect = cdi.transformation.zaxis.reverse vect.length = @wfd+@wdi cdi.transform!(vect) else UI.messagebox "Component not Glued!", MB_OK end } mod.commit_operation end end end end end unless file_loaded?("dbwindowwallopen") UI.menu("Plugins").add_item("db Window Opening") { DeanBy7;;Window_Opening.main } file_loaded("dbwindowwallopen") endI'm learning through a lot of mistakes!!!
-
Doon't know the exact issue...
BUT I see this...
Once you have made a face [cut] and used it to PushPull you can't reuse it.
The PushPull destroys it.
Recreate it where you expect it to be and then redo the PushPull...
I think you do this...Stop your script by adding a 'return' after some operation.
Then you can work out where it fails... -
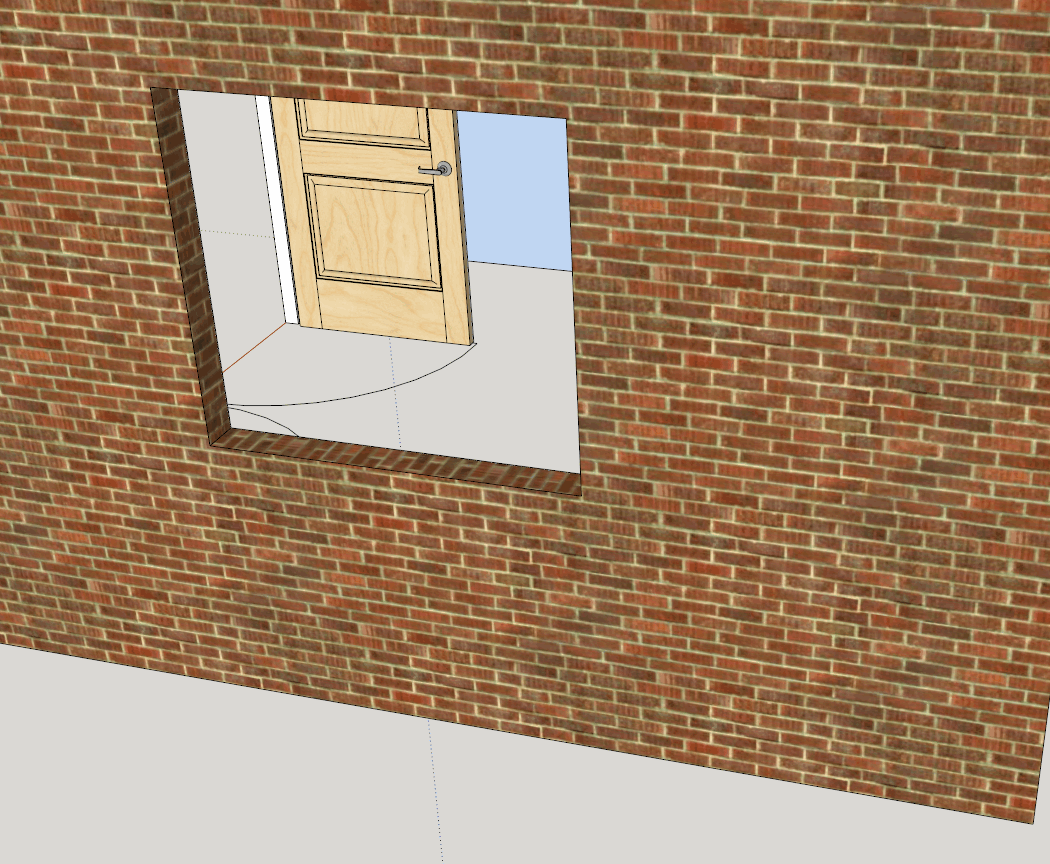
Here is an image of my test wall opening!

After the pushpull operation, I've tested the face entities to see if they connect with 2 vertices i've offset into the middle of the reveals (diagonally opposite corners of opening). These faces then reside in rev_faces. I'm trying to create a reveal group within the wall group.
-
You can't use
entities.add_group(somethings)UNLESS theentities==model.active_entities!!!So you need to create an empty group, then add new 'cloned' entities into that...
rev_grp = fog.entities.add_group() rev_faces.each{|face| rev_grp.entities.add_face(face.outer_loop.vertices) }This is totally untested !
But you get the idea...
Make an empty group and add faces into it by 'cloning'.
Also remember to erase any redundant faces in the original context.It might be best to do this operation inside a group, initially clone face, material etc, then do the pushpull ? ... ?
-
@deanby7 said:
Trying to group the reveal entities to make it easy to move a window and it opening if I need to.
Here comes the outsider (growing an interest in your plugin)... That's a nice idea!
-
It's the faces produced by the pushpull operations (the reveal faces "rev_faces") that I want to group together. Can this be done?
-
I would probably not use pushpull in that case. First Make the cutouts in the opposing wall faces. Then create the frame group and create the rest of the geometry inside the new group.
-
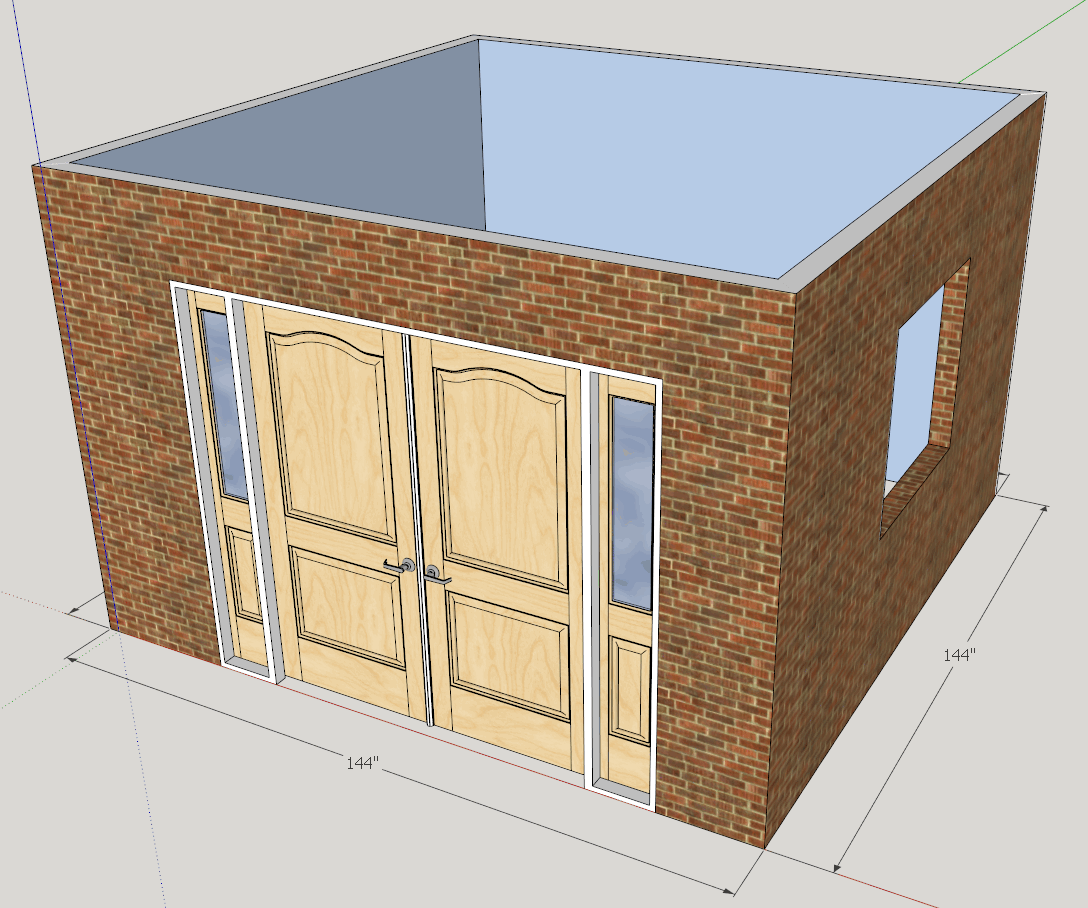
By using the pushpull, the reveals inherit the materials of the main wall faces. In the case of the outer face the reveal brickwork pattern is maintained round the corner, which is good! However, it appears that moving geometry with Ruby is a no-no. Therefore if I want to group the reveal geometry for later ease of movement of window etc then I will have to create it as you say within a group. But I will have to add the material and probably align the texture to suit. It's a trade off I think! Unless anyone has a solution!! Here's hoping

-
pushpull doesn't align the texture completely. The sides are close. But the top and bottom are not.
Notice the panel raised door through the window opening. It was created with a ruby script with 1 texture.
Parts were created vertically and then moved and rotated into position.
-
I take your point. The sides of the reveal are good enough. The bottom is usually covered by a window cill, and the top reveal could be adjusted if needed but could be adjusted but is not as visible as the sides in views of a building. Your door looks good. Was it created with your own plugin? I'd like to play with that! I have a quick and dirty window builder which I created as my first Ruby project. The code is nor pretty, but it works!!
-
All my plugins have a 7 or 14 day free trial.
I have 2 versions of door maker - same code base. Pro makes doors for cabinets and furniture. Gold adds more features including Passage Doors, Bifolds and Entry doors. There are built in features such as pivot hinges for large heavy doors.
http://sketchucation.com/pluginstore?pln=gkware_doormakerI have been asked to build a window maker along the same lines as door maker.
I also have stair maker for curved stairs and spirals.
http://sketchucation.com/pluginstore?pln=gkware_stairmakerAnd I've put quite a bit of work into CabMaker which creates kitchen cabinets, vanities and various types of furniture.
http://sketchucation.com/pluginstore?pln=gkware_cabmakerI am also currently working on a Wall Maker that works a bit like Chief Architect
-
Here's the entry door with side lites and astragal.
Here's a bit of the wall maker. You can turn on / off the dimension layer. You can edit the length of the wall by double clicking on the dimension text. Change it and the wall changes length. The tool tip shows the length of the wall. You can straight type and let the VCB make the change to length, or provide length and height with a comma between the values (semi colon for users that have their decimal indicator as a comma). There is a button to toggle between top view orthographic and perspective. The wall being created is in ortho.
Walls have a category and a name which corresponds to a file with inside material, outside material, height and wall width. Users can create their own wall specifications.
I just started this plugin a week ago.
-
Gary K - They look interesting, I will check these out!
With TIG and sdmitch's very informative help I have succeeded with my little script!
Posted here for information. Cheers guys.
Now to look at automating the move of window component with its associated reveals! Hmmm observers?
Hello! It looks like you're interested in this conversation, but you don't have an account yet.
Getting fed up of having to scroll through the same posts each visit? When you register for an account, you'll always come back to exactly where you were before, and choose to be notified of new replies (either via email, or push notification). You'll also be able to save bookmarks and upvote posts to show your appreciation to other community members.
With your input, this post could be even better 💗
Register Login


Advertisement