Help turning my ideas into solids for 3d printing
-
First off I want to thank this amazing website for everything it offers and the people on here who take the time to read and respond to people like me. I have searched everywhere so I hope I am not posting something that has been covered by someone. If so please post the links and I will use those. I have tried my best to find the solution to my problems but I have no luck making my prjoect how it needs to be because I have no guidance. I'm a self taught noob.
I am currently making my objects and designs in Sketchup 8(Free Version). Now that 3d printing is so available to everyone I would like to print the things I have been making. The only problem is I haven't been worrying about making the solid because I was never intending on turning my ideas into actual "SOLID" objects. I have searched this website for every type of plugin to fix or even point out the problems with my object. When I use FixSolid there are so many fixes that it doesn't know what to do so it turns my object to a small box. When I use plugins to point out the problem it says there are so many that I have no idea where to start. If I go through and smooth every edge will that do anything?
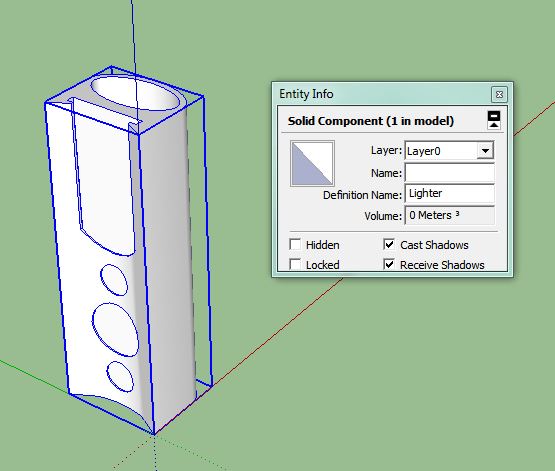
I have random components and groups. Nothing is organized how it probably should be so I am asking if I should just start from scratch and try to make a Solid from the Start? Or Can I somehow fix this with some miracle? I will attach pictures of the project. I am trying to make a lighter holder that can hold a magnet. It is not as complicated as some of the impossible prints I have seen so I know this is possible with a little guidance. Hopefully some Sketchup god can help get me through this so I can start on my next CREATION


-
Understanding what a solid is helps, so jump to this post by Tig to read a good explanation of a solid.
@tig said:
There are several separate threads on making things solid...
You can search for those and read up on the issues...Here a précis...
A 'manifold' solid is a group [or component] that contains only geometry [guidelines/points are also permitted as they never interact with other objects, but best avoided].
Geometry is defined as faces and their edges.
So that means...
NO nested groups or component-instances or images [if so explode them into the 'container' group].
NO other objects like text, dims etc.
Every edge must have two faces associated with it.
No fewer and no more.
So that means...
NO faceless ['lone'] edges.
NO edges with one face - e.g. as flaps, shelves, hole-perimeters etc
NO edge with three or more faces - e.g. internal partition faces, where some edges will have three or more faces, and no otherwise-solid-blocks meeting along a shared edge that then has four faces etc.
NO coplanar faces exactly duplicated and 'overlaid' - these are difficult to 'make' manually because such faces usually 'merge', but sometimes faces like can result from complex operations and they can be hard to find without helper tools.***
Faces should also be consistently 'oriented' - with their front-material outwards [although a completely inside-out object will still be consider as a solid if there are no other issues with its geometry].When checking your object ensure that all hidden entities as visible [View > Hidden Geometry ON], and that all layers are switched ON, in case some things that are causing issues would otherwise not be seen.
Sometimes you can have very short bits of lone-edges or tiny holes which stop your object being solid.
These can be hard to find.***Thomthom has made the 'Solid Inspector' tool, which will examine a selected non-solid and highlight problem areas.
These will then need fixing manually, or my 'SolidSolver' tool can try to repair it - although if the object is badly formed with several issues it can fail.
To assist you in a manual repair use a Style that has clear front/back default materials and view in Monochrome mode and 'reverse' selected faces that are 'backwards'.
The Style should also have end-points ON, and distinctly different edge and profile edge thicknesses to help you find flaps and holes.
X-ray mode toggled on/off helps you see whats inside the object - like internal-partitions and overlaid faces
To work inside a form use a section-plane cut and delete unwanted partitions and flaps internally.
In tricky internal areas temporarily hiding or deleting a face so you can gain access to delete things is also an option - but in that case remember to unhide or reform the temporarily removed face [as that itself will case non-solidness].
The 'Entity Info' dialog shows if a selected object is a 'solid' in its 'header' text... If it doesn't say it's a 'solid' then it is not a 'solid' !Having read that, look at your model again and you might see the problems more clearly. Softening the edges won't help.
It would be easiest to start from scratch.
It's really only one shape pulled up and a couple of holes cut through it.
Pull the profile to make the shape then intersect some cylinders with it to create the holes in the curve. Work at a larger scale than reality and scale down to correct size when you have finished. -
Can you share your model?
-
Here's a 3 minute version by eye that is a solid. Have a look at the construction and compare it to your own.
-
All I can say is WOW! I go to bed hoping my post will get looked at and I wake up in the morning having all of the answers I need! I can't believe how well this forum is setup with all the great community members. I now have a much better understanding off Solids and can make my next ideas a solid from the start. I cant thank enough for the help BOX!. Taking the time to make the solid for me is amazing even though that is something very simple to most of you. Teaching myself it took me hours to make my simple lighter holder.
I am attaching the model so if something comes to this forum they can open it and see the mistakes I have made. Box do you mind if I take your perfect rendition of the lighter holder and print it now so I can start on my next invention!

-
You are certainly welcome to use it but I would point out I only did it by eye, so I doubt it would fit a lighter.
It really needs more work to make it nice and the right size. On your model the top is different, mine is just flat.
For the cost of printing it you may as well make it right.
I had a very quick look at your model and it is fixable, but I'm busy right now. I'll have a look at it a bit later assuming someone else doesn't pop in and fix it up for you.
One important thing I noticed straight away, you have some faces reversed. The bluegrey default colour is the back and white is the front, they need to be the right way around for things to work properly. In other words, all the inside faces of your solid should be bluegrey and the outside should be white. -
Your model has two problems:
- internal faces
- bottom with no thickness
If you repair these, it's getting solid... (see screencast)
-
Good little tutorial, Carsten. Running the cleanup plugin at the start will make it go even faster.

-
Man I get all excited seeing someone who actually knows what they are doing in Sketchup. It was like magic seeing you flow through my project like that! I am working on getting there but I just don't know the tricks of the trade so more practice, practice, practice. The one I originally made was too scale and seeing Cotty make my project his bitch; It gives me more faith in myself that I can fix my projects instead of starting from scratch. THANK YOU GUYS 1,000,000 times for the help! Hopefully my lighter will be magnetized to my "piece" in no time!
-
It's better to redraw from scratch, you will learn more; the model is not so big.
Fixing a bad geometry is a waste of time, try to make good geometries as you start. -
Sometimes if you are thinking and designing as you go you can end up with bad geometry, because you've added a bit here and chopped a bit off there and scaled that bit....you need to stop and cleanup a bit before you get too far ahead of yourself. So find the correct bits of your shape and use those to redraw a new component.
In other words, take the profile and the circles and their positions from your model as your starting point and make a new one correctly.
That's why it was so fast for me, I just saw four elements and put them together. You had to think up those elements to begin with.As Gilles says, trying to fix stuff is often a waste of time when the parts can be quickly redrawn.
However, there is nothing wrong with "sketching" in sketchup, but knowing when to consolidate a piece is the trick, and very quickly you will start to find that you are "sketching" correctly and rarely have to go back and rebuild.
Hello! It looks like you're interested in this conversation, but you don't have an account yet.
Getting fed up of having to scroll through the same posts each visit? When you register for an account, you'll always come back to exactly where you were before, and choose to be notified of new replies (either via email, or push notification). You'll also be able to save bookmarks and upvote posts to show your appreciation to other community members.
With your input, this post could be even better 💗
Register Login


Advertisement