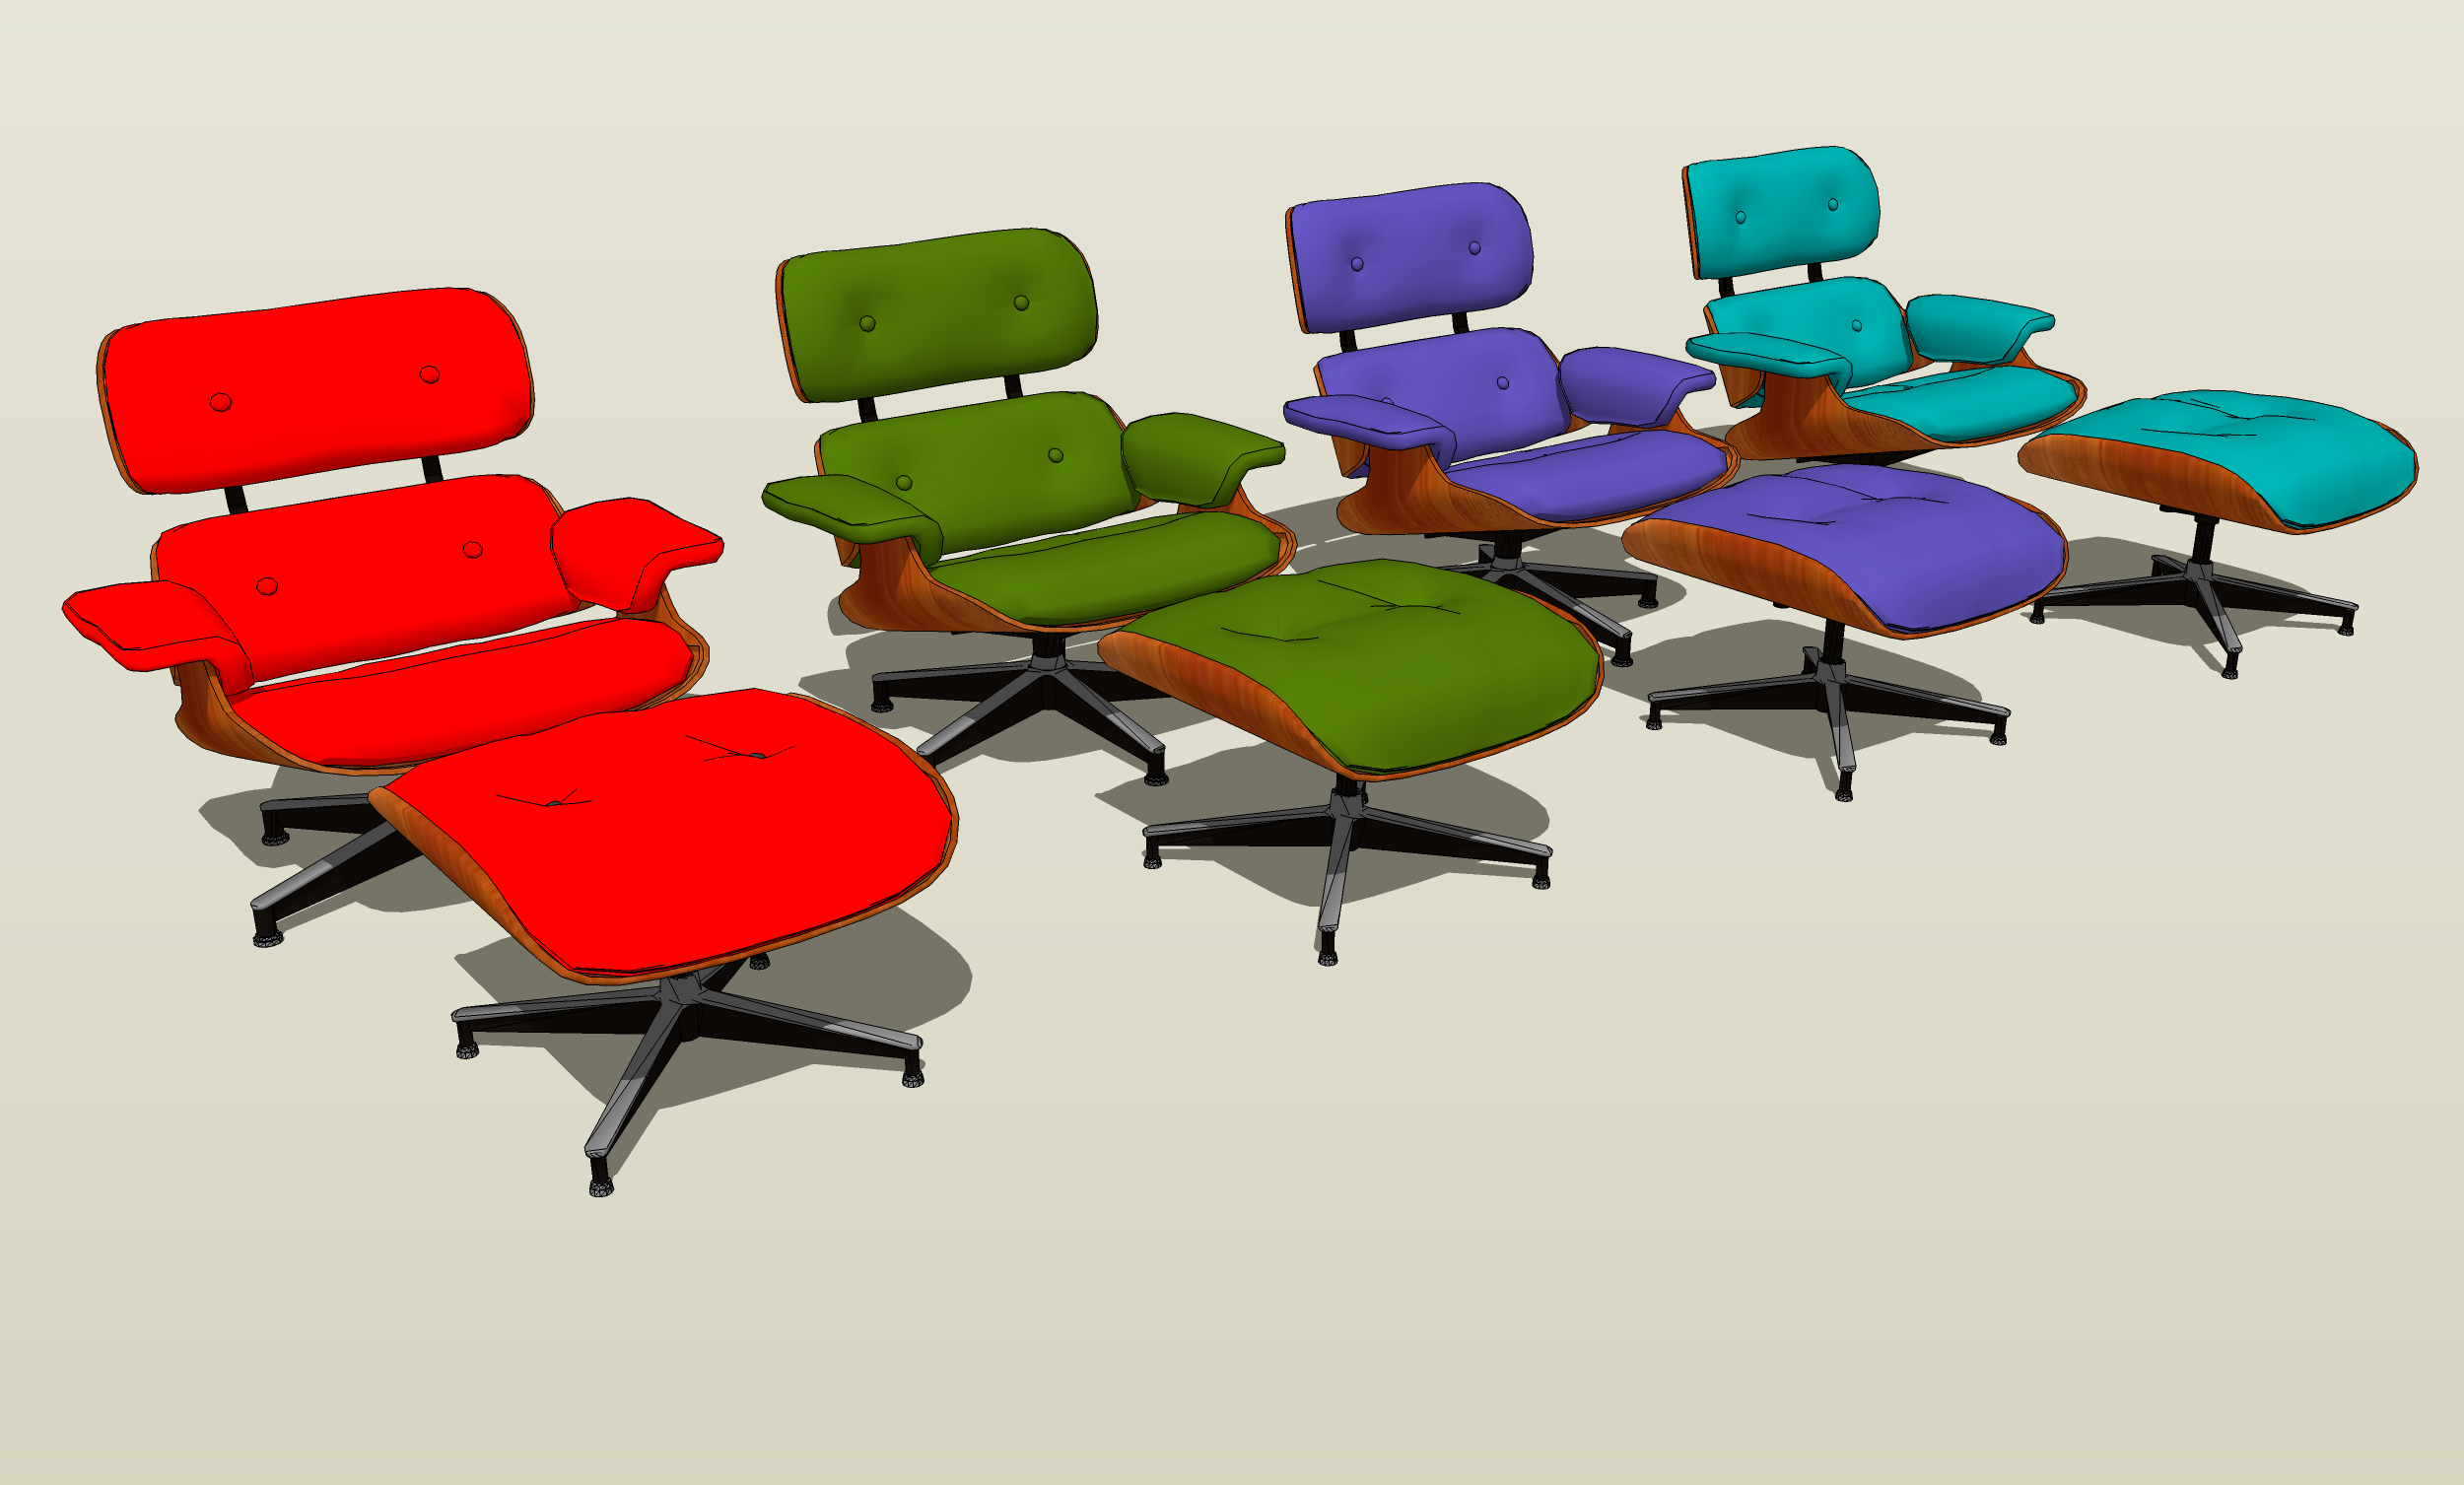
One component, many colors?
-
Hi, everyone,
This has probably been addressed before but I'm still unused to SketchUp terminology, so I may not be searching for the problem correctly. Anyway, here goes.
I am modelling a small hotel. It's got several rooms, all in different colors (the green room, the red room, etc). I have made a set of furniture for the rooms, which should structurally all be the same but should be colored to match the individual room.
What I want to know is, is there any way, apart from "Make Unique," to re-use all the furniture components but with only the paint job changed? I am trying to do everything I can to keep the file size down as the model, of which the hotel is a part, is already 17 meg.
Thanks in advance for your help! And if there's a proper way to ask this question, please let me know.
-Fa
-
Instead of painting the faces in the component, paint each component individually. Make sure you have only the default material applied to the faces in the component.

Here's a quick example. I downloaded the component from the Warehouse for this. I repainted the faces for the cushions to the default color. The base and wood parts of the chair have the faces painted so those materials override the colors I painted onto the outside of the components. Thus only those faces with the default material show the materials painted on overall.
-
And have a look at this tutorial by Csaba...
-
Thanks, Dave and Cotty! (Smacks forehead with hand). All those years of working with Flash have addled my brain.
That seems to work fine for solid colored things, but still leaves me with a problem. I've made, for example, a couch, using Soap Skin and Bubble to get nice gushy cushions. If I recolor the couch with a pattern, the pattern is all screwed up. Is there any way to make sure the pattern is painted on correctly even on a soap-bubbled surface?
-
You'll need to paint the faces to have that kind of control so I expect you'll need to use Make Unique on them. I rarely use them but I wonder if a Dynamic Component might be useful here.
-
Yeah, that's what I thought. I'd thought of Dynamic Components, but I don't have the pro version. Yet...
-
Maybe it's time.

-
Even if SU Pro is totally worth it, Dynamic Components will only add complexity to your problem and there is an easier way to solve it.
Having said that I had never thought of a solution to your question until you asked for it... So thank you already!
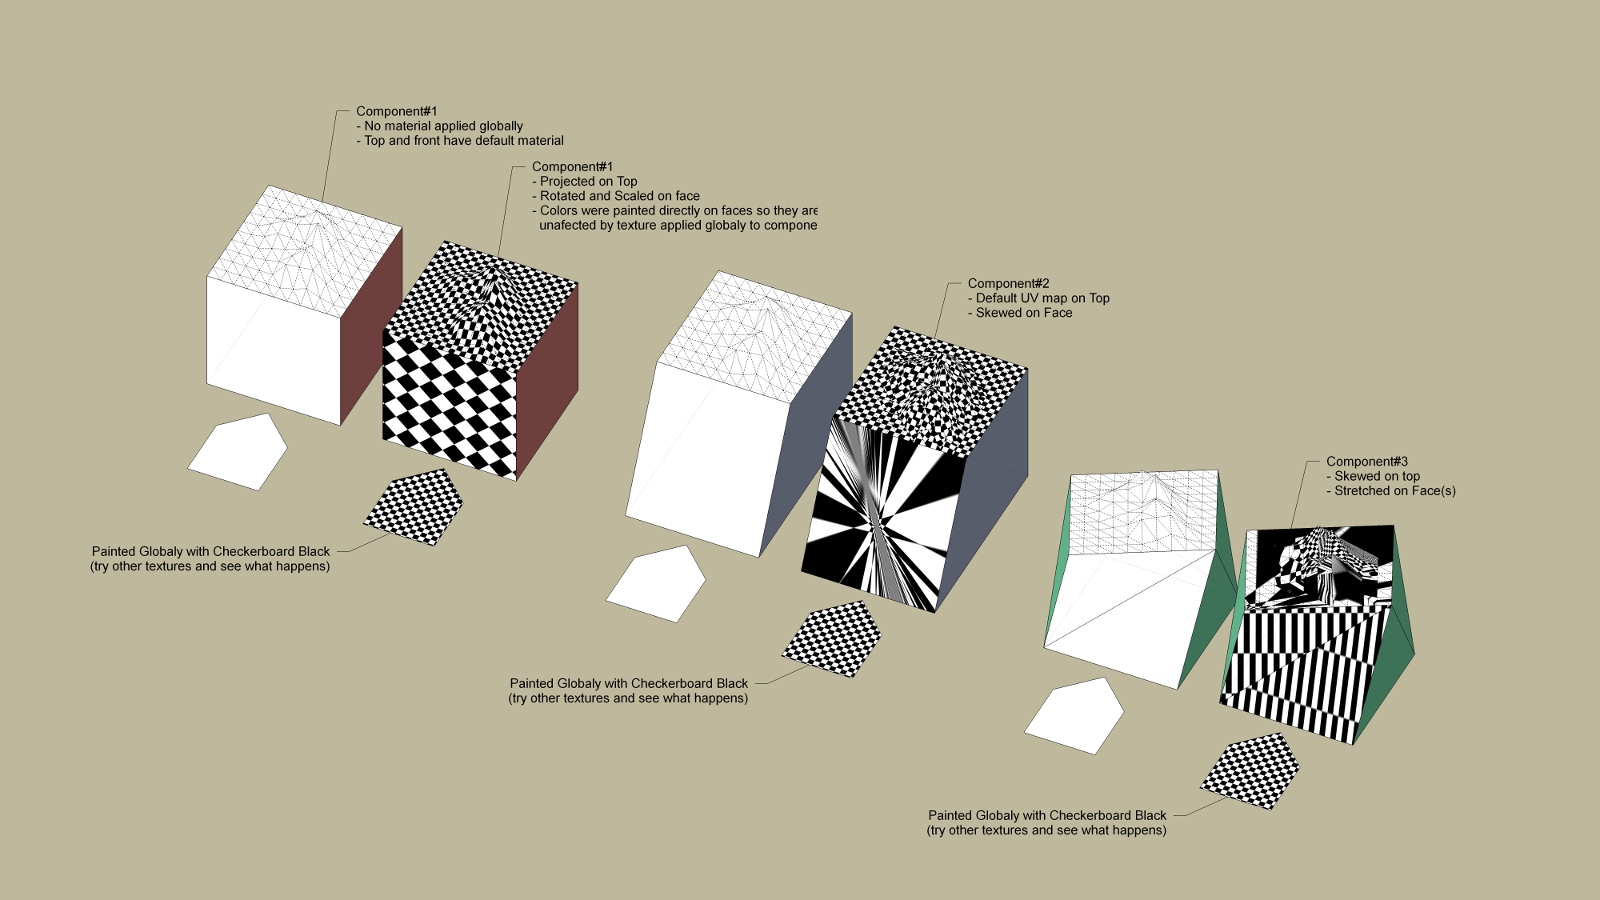
See the attached image and skp file for reference.

When a texture gets scrambled like that on a mesh the simplest thing to do is to project the texture using another face for reference, with the material applied. This will only work for faces and meshes but there is a workaround to use it (or any other UV mapping) on groups/components. So here it goes:
A - Projected Textures
A.1 - To do that, apply a textured material on a face that as the average inclination of your mesh (in the example I used an horizontal face)
A.2 - Right click the face being careful not to select edges or anything else
A.3 - Click texture > projected on the context menu(aparently nothing happens)
A.4 - Press B or click on paint bucket
A.5 - Press and hold alt key and click on the texture that you just turned to projected. You can release alt, and from now on you've "memorized" this UV for this material.
A.6 - Paint the mesh/faces directly and the texture is projected on those facesAs I said before this doesn't work on groups or components though. If you try that, everything gets scrambled. That happens because the faces inside have only global Sketchup UV coordinates. To define UV coordinates "locally" you'll have to apply materials directly onto faces, projecting or positioning them... You are then applying materials and UV mapping faces the sketchup way. After that you'll have to somehow replace those materials with the default one, as only the default can absorb other materials applied to groups and components. The problem is you have to do that and also keep UV coordinates leaving you with no chance to paint the faces with the default material directly again...
Lost already? You need a work around! Follow the next steps and have faith:
B - UV coordinates on Default Material inside Components
B.1 - Get inside the component until you can select the faces to paint.
B.2 - Use a material with a nice and regular texture (like checkers or tiles) and apply that to the faces/meshes you want to change later. Lets call this material "UV Checkers" (check the model attached for "UV checkers")and give it a simple scale. In my case 1mx1m per square, wich means a 2mx2m material.
B.3 - If you are using 3d meshes the simplest method of getting good results is if you use projected textures like explained above.
B.4 - If you use plane faces you can right click the face and position the material with texture > position (do not select anything else but the face or it won't show that option on context menu).
B.5 - You can copy this "UV" position to other faces using step A.5 of the projected texture tut above.
B.6 - After step B.3 and/or B.4 you have the faces UV maped. However you also have a material applied to them so, if you apply a material to the component, nothing will happen to those faces.
B.7 - The workaround is to simply delete the material from the material library. To do that Press B or click on paint bucket, go to select tab, find your material (in this case "UV Checkers") right click on it and delete it. Now those faces have the default material applied AND are UV mapped. They will absorb materials applied to the component globally, AND will position them correctly on faces.NOTE - Don't paint those faces directly again or you'll loose the UV mapping and materials.
Try erasing "UV Checkers" material from the reference model and see what happens to the components that were painted with it.
I tried to cover every aspect and I sincerely hope it was useful. Best regards,
JQL
-
SU Pro is, indeed, totally worth it, just for the lighting plugins! But alas, gotta pay for digging out from this flood first.

JQL, what you've posted looks intriguing! I've downloaded your samples and will study the procedure, and let you know how I fare! Thanks so much for all your effort!
-
@spottedrose said:
just for the lighting plugins!
Just checking what you mean by this. Most plugins work with free as well as pro.
I wanted to make sure you aren't meaning rendering plugins, because you don't need to have Pro to be able to use a render engine.If there are lighting plugins that come with pro I'd be happy to be enlightened.
-
@box said:
If there are lighting plugins that come with pro I'd be happy to be enlightened.
That's a feature for which pro SketchUp users are sworn to secrecy.


No, there aren't any lighting plugins included with the pro version.
S. Rose, there are very few plugins that don't work in the free versions.
-
@dave r said:
That's a feature for which pro SketchUp users are sworn to secrecy.


I always knew you rich yachties had it all over us poor people, i bet you don't get bug splats either

-
Bugsplats? What you mean by that?

-
The lighting stuff isn't included, no. You have to buy it separately. But lighting effects are my thing.

-
JQL, Just got a chance to try your method (I tore down the whole building; it got messed up after a cat knocked a huge cup of tea all over the keyboard, the tablet, the mouse and...
It works a treat!! Thanks SO much!
-Fa
-
You're welcome. Just giving back to this forum, whatever I can, whenever I can! You were only the ideal victim

JQL
Advertisement


