Drawing 3D Star using compound mitres
-
Hi
I need to draw a star that will eventually be cut from 9mm MDF. I'm having trouble with all of the angles involved. This is the basic shape I need to end up with

When cutting it out of wood I will cut 10 identical scalene triangles from 9mm mdf as this image depicts.

What I can't work out is all of the angles to make it 3D. I can normally hack my way around sketchup to get what I need, but this has eluded me for days.
Can anyone assist pls?
-
Or draw one branch in 3D then Copy Rotate * 4

(so one triangular face in 3D then Mirror by Tig )
Mirror can be replaced by a copy / Move / Scale -1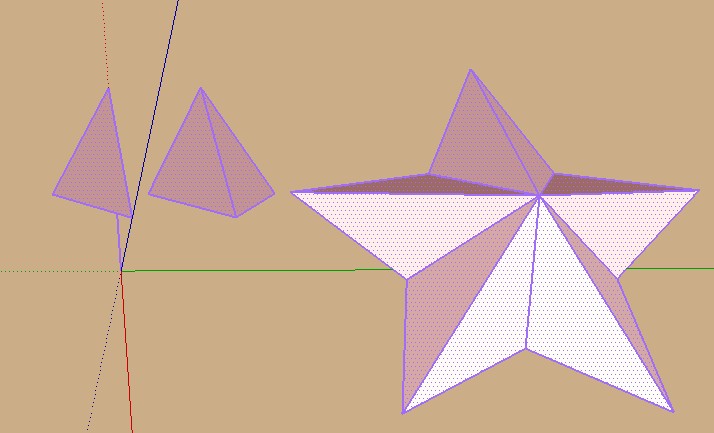
-
Draw the star flat as your image shows, with all the lines joining, then with nothing selected use the move tool to lift the center point in the blue direction the desired distance.
[screenr:31u1p7si]U5MH[/screenr:31u1p7si]
-
or check out Dave R's great tutorial: http://www.finewoodworking.com/item/33023/a-star-exercise

-
Thinking on it more, the simplest way would be to use a component.
Draw your star accurately to the correct scale so that each of your 10 triangles are the same.
Make one of them a component and push pull it to 9mm or equivalent for your scale. Copy and mirror it as Pilou says so you have one point of the star, 9mm thick but still flat, copy rotate the other four points of the star.
Now open one component for editing and select the midpoint vertical edge where they all come together and move it up on the blue axis. This will form your 3D star and give you the correct angles to cut your MDF. You would need to intersect with a flat plane to trim the bottom edge.
-
For this application, Box's last suggestion is probably best.
Thanks for the plug, Michael.

-
Hey Dave

ok I'm going to need a little more help on this. I've followed Box's instructions up to " select the midpoint vertical edge where they all come together and move it up on the blue axis." I'm lost at this point. Literally don't understand how to proceed.

-
How high do you want the middle?
I would approach this by drawing the 3D star as Box indicated and then deconstructing it.
Hang tight. I'll make up something to show you.
-
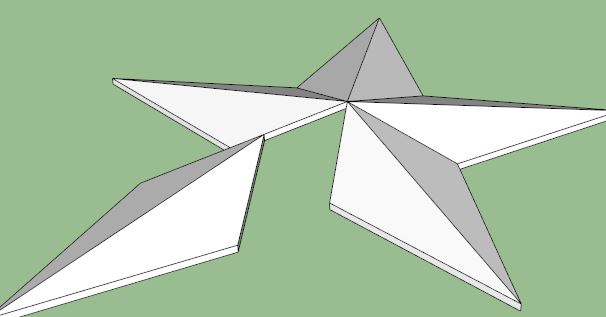
Let's see if this helps.

From the left,
I left your star in the model.
Draw the 3D complete 3D star. You don't need all that geometry but it probably makes it easier to see what you're getting to confirm it will look right.
Give it the required thickness. I just Joint Push/Pull but you could make a copy of the star and move it down the required distance. After that you would just have to draw lines to connect the faces around the perimeter of the wedge.
Delete all the bits except the one wedge. Make it a component and adjust its axes so one of them runs along the centerline. It would have been easier to do this if I had used a wedge section at the top of the star instead of the one I did.
Make a copy of the wedge, flip it to create a mirrored version. Place it next to the first one to complete a point of the star. Use Copy/Rotate to rotate copy the point 72 degrees x4.
-
That's fantastic Dave. Very grateful for your help, as always. Worked a charm. Gives me the ability to play around with it until I get something that will work.
Just as a slight aside. Is there a simple way to take one section, lay it down flat and then measure all the angles. i.e I'm going to be cutting this for real out of wood and the next step is working out how to lay it all out. I'm using Sketchup to reduce some of the trial and error in the workshop.
Thanks everyone for chipping in. For some reason I can't get my head around some of the intermediate sketchup techniques
-
Actually I have a problem. I'm obviously missing a step somewhere. I draw one of the sections from scratch, make it a component and pull it out 9mm. When I open the component, select move and click the middle of one of the uprights, it moves the whole component in the blue direction.
If I do that on your model Dave, it behaves differently, it tilts the section up. Just like I want.
Where am I going wrong?
-
I sent you a PM so take a look at that.
I expect on the wedge in my model you aren't clicking on a component when you move it. Instead of trying to tilt the component into position, draw it in place at the correct angle. I can show you that.
As for making it easy to measure from it, when adjust the component axes correctly you'll be able to drag a copy out from the In Model components library and it'll sit flat on the ground plane.
Hello! It looks like you're interested in this conversation, but you don't have an account yet.
Getting fed up of having to scroll through the same posts each visit? When you register for an account, you'll always come back to exactly where you were before, and choose to be notified of new replies (either via email, or push notification). You'll also be able to save bookmarks and upvote posts to show your appreciation to other community members.
With your input, this post could be even better 💗
Register Login


Advertisement