Problem with drawer boxes
-
you could post the skp
-
As Mics_54 says, perhaps you could post the drawer model.
Does the cutlist show the drawer? It kind of sounds to me as if you don't have the parts as components but rather loose geometry. The cutlist shows the lowest level components only so if the parts making up the drawer were perhaps exploded after the nested component was created, the drawer would show up but not the parts making up the drawer.

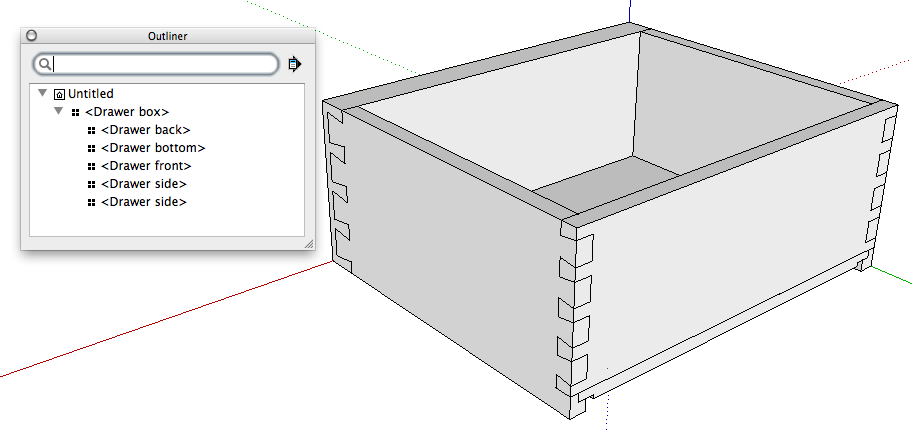
I made up a quick little dovetailed drawer component as an example. The outliner shows the drawer box component contains the five required components. A cut list from this model would show those five components and, if the box for 'by Sub-assembly' was ticked, it would show them listed together under 'Drawer box."
Those dovetail pins are kind of obese, aren't they?
-
Thanks for the input, evidently, when building the drawer box, I got out of step somewhere because my Outliner doesn't have a list for the box like the example. I think in doing the nested components is where I've messed up. Btw, the joinery for the box is going to just be simple pockethole since it's a shop cabinet. I've attached the file, any suggestions are appreciated.
-
Wait a minute. Looking.
-
What parts are missing from your cut list?
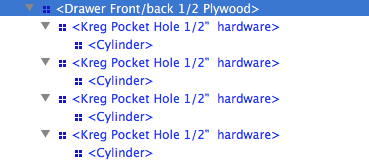
On the deeper drawers you've made a common mistake and inserted the pocket hole components into the drawer back and front so those pocket hole components would be at the lowest level. The pocket holes will show in the cut list but not the drawer back and front.

This is the outliner for one of those drawer backs. The lowest level component is actually 'cylinder' so it is what would show in the cutlist.
I've seen this sort of problem many times and it always seems to involve this pocket hole component. In order to get it to cut the opening in the surface, it has to be placed inside the "board" component which then causes problems with the cut list.
I think you have to decide which is more useful. The pocket hole component or the cut list. Personally I don't see much value in the pocket holes. Placing them and dealing with the problems they cause takes time that could better be spent in the shop.
-
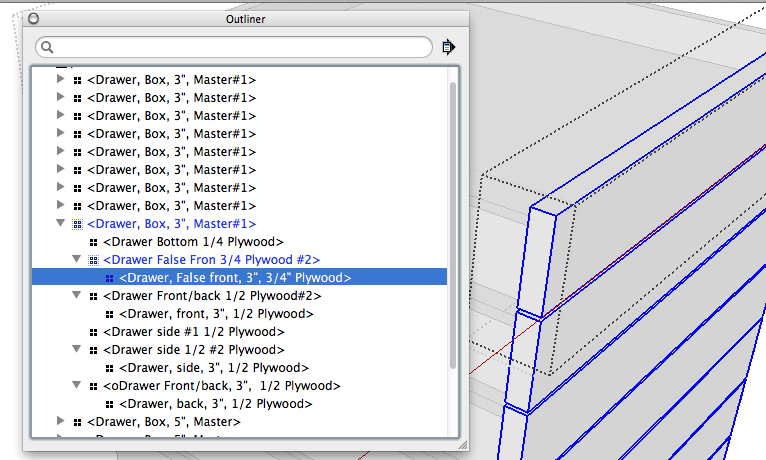
I was digging into your model further and one thing I don't understand is why you have some of your components "double wrapped"

Is there a reason for doing that?
-
I cleaned up your model so it should make you a useful cut list. I did delete all the pocket holes but now they won't cause any problems. I also purged the unused stuff out and reduced the file size considerably.
-
@dave r said:
I was digging into your model further and one thing I don't understand is why you have some of your components "double wrapped"
[attachment=0:154yjrlw]<!-- ia0 -->outline drawer.png<!-- ia0 -->[/attachment:154yjrlw]
Is there a reason for doing that?
Thanks for your help. If I double-wrapped something it was because of a newbie error in my process. It's been a learning curve to get as far as I have in the Sketchup process. I keep watching tutorials and reading on techniques so I'm still on the left side of the bell curve. This particular rendition of the cabinet is my fourth restart and I've revised it many times as I've learned new things.
For example, I didn't know to look at the Outliner to help solve the problem, but now I do, so I'll add that to my error detective list.
I will eliminate the pockethole inserts in future models and just do it in the actual build process after the pieces are cut. -
Well, it's good you're learning something each time.

-
How would I have prevented something from being doubled wrapped? Is that caused by the nested component process?
Sent from my iPad using Tapatalk HD
-
It could be due to the way you made your nested components. I guess I could see a couple of ways to inadvertently wind up with the double wrapping but they would require doing things like cutting and pasting components or having the component open for editing and making a new component of the geometry inside.
One other thing I noticed about your model was that you had a layer other than Layer 0 active and had some (but not all) components inside a nested component on different layers. Make sure you leave Layer 0 active at all times and only make layer assignments for components. All geometry should be drawn on Layer 0 and it should remain on Layer 0.
Maybe you and I should look at how you go about creating your models starting from the beginning.
-
@dave r said:
One other thing I noticed about your model was that you had a layer other than Layer 0 active and had some (but not all) components inside a nested component on different layers. Make sure you leave Layer 0 active at all times and only make layer assignments for components. All geometry should be drawn on Layer 0 and it should remain on Layer 0.
Maybe you and I should look at how you go about creating your models starting from the beginning.
I figured out the double wrap problem, I had made the drawer components, then assembled the drawer and made the entire thing a component. Then I had gone back and added a drawer pull and then made it a component again. Should have just opened the drawer for editing and then added the pull.
Yeap, I have been building components on layers other than 0. I'll stop that practice right now. Only will draw on layer 0, and then assign the components to layers. I do like being able to turn a layer off so that I can see to work on a component.
I have your ebook " The Basics" and Bob Lang's WWGuide to SKU, so I'll go back and read some more on the use of layers.
I'll work some more on my drawing skills and then get with you. One of the things I'm going to have to do is get a new mouse. Sometimes mine will work with scroll wheel and other times it won't. Got any recommendations on a good mouse to work with SKU?Thanks
Dave -
Dave,
It sounds like you're getting on the right track with layers and components.
eBook? Did you get Tim's e-book or my DVD?
As far as a mouse goes, there are some folks who seem to like the expensive mice with a gazillion buttons and a coffee maker. For me, the simpler the better. My suggestion is to buy an inexpensive USB mouse or else an inexpensive Logitech wireless mouse. 3 buttons (left, right, center mouse button/wheel) will do the trick. If you get a Logitech mouse, just plug in the receiver, put in a new alkaline or lithium battery and get back to drawing. Don't load the driver software.
-
@dave r said:
Dave,
I
eBook? Did you get Tim's e-book or my DVD?
Got your DVD, the one showing how to do the wall cabinet.
-
Ah. Does it help?
-
@dave r said:
Ah. Does it help?
It was tremendously helpful. I liked it because I actually worked the projects along with the video, starting and stopping it as I figured out how to do things. I'm more of a "Monkey See - Monkey Do" type of learner.
-
Excellent! I like monkey see, monkey do.

Advertisement


