Cutting curved sections out of rectangles
-
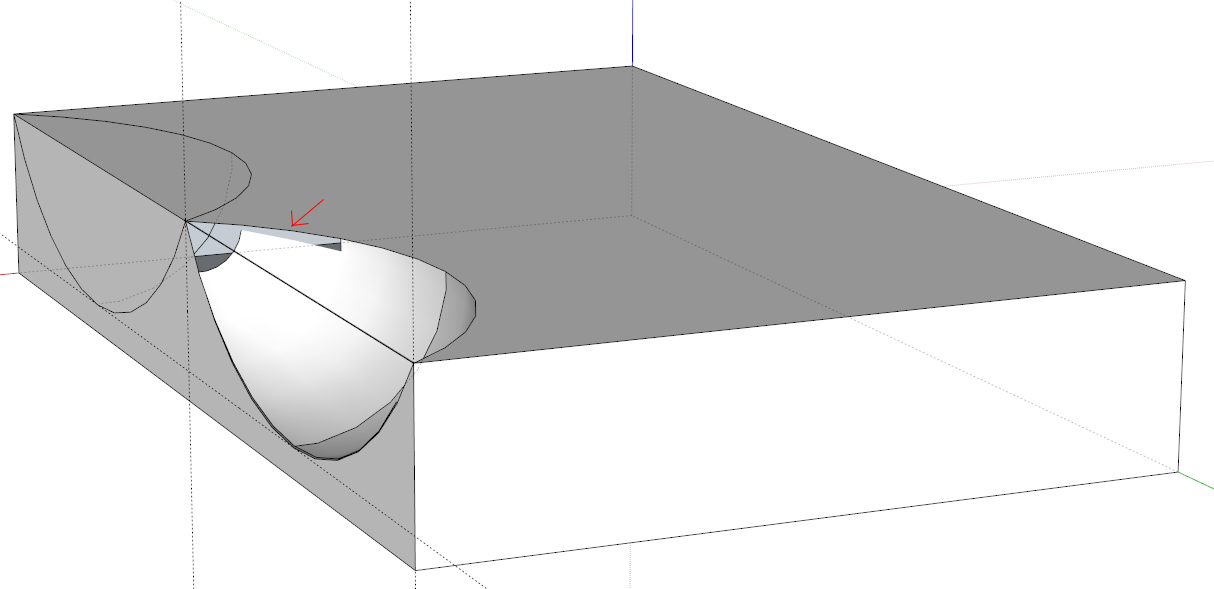
Hello, i am new to sketchup and I'm trying to remove curved pieces from the edge of a rectangle. The project is a steel railing with a hammered effect along the edges.
My problem is, as i use the follow tool to create the back wall of what will be my 'dented' area of railing, the edges of the back wall dont fill in. They always remain transparent and i cant seem to find any way to fill these in.
I will attack an image to show you what i'm getting at, The problem area is marked with a red arrow. can anyone help?
thanks
-
Maybe the whole model is too tiny (SU has issues with creating small faces). Try to scale it up by 10 or even 100, do the job and if it fills, you can scale it back (SU will support already existing, tiny faces).
-
Thank you very much. now it's looking much better. there are TINY little gaps but my model is simply for illustration purposes so this will be great.
@gaieus said:
Maybe the whole model is too tiny (SU has issues with creating small faces). Try to scale it up by 10 or even 100, do the job and if it fills, you can scale it back (SU will support already existing, tiny faces).
-
Those gaps could be some alignment errors, too. Now, knowing what caused the major issue, it would be easy to remodel it with no faults at all.
-
This is looking very good now, i'll do as you say for future projects, but for this, it will be presented to people at something like 1:25 scale, the gaps are only visible when i zoom in to something like 3:1 scale.
I spent hours trying to solve this. Thanks again.
-
I'd look for other ways to do this without follow-me. SU has issues with lathing along arcs. You can use sphere and "intersect faces with model". Or just arcs, stitching the faces in between (do you really need the dish effect here)
Anyway I guess you know once you have a hammer dent aligned properly you can duplicate it along that edge and should be able to delete the unwanted faces. You can scale it to. Also for what you are doing, which will be a small scale detail in the end, you don't need to have many facets in each hammer dent. It will look the same at typical viewing scale.
-
@pbacot said:
Or just arcs, stitching the faces in between (do you really need the dish effect here)
No i dont need the dishing really. i can just take an arc on the top face and an arc on the side face and connect them somehow. when you say stitch between the arcs, what do you mean, or how is this done?
I apologise for my ignorance with this application but it's completely new to me.
-
@drewshki said:
@pbacot said:
Or just arcs, stitching the faces in between (do you really need the dish effect here)
No i dont need the dishing really. i can just take an arc on the top face and an arc on the side face and connect them somehow. when you say stitch between the arcs, what do you mean, or how is this done?
I apologise for my ignorance with this application but it's completely new to me.
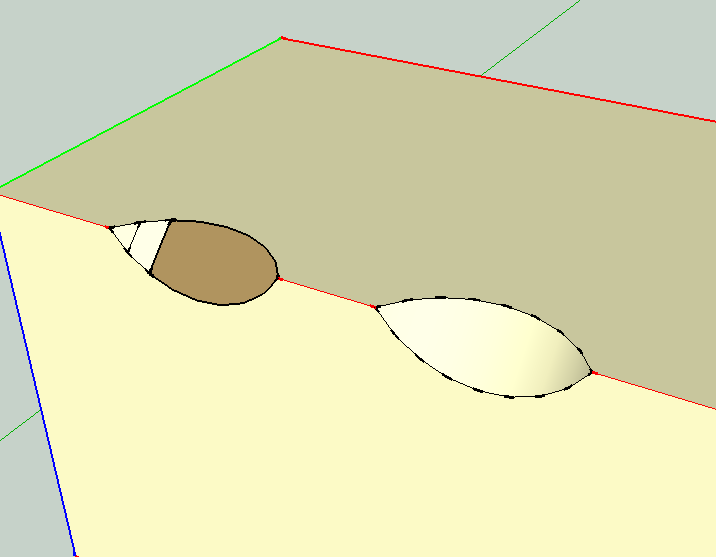
You draw edges between the many endpoints along the arcs (SU arcs, of course are really a series of segments). As long as the points are coplanar, they will form a face. If necessary triangular faces can commonly be made. We call it stitching, and if you have to do a lot, you look for another way
 but it's fine for little fixes.
This is the same arc radial duplicated with the rotate tool.
-
@pbacot said:
You draw edges between the many endpoints along the arcs (SU arcs, of course are really a series of segments). As long as the points are coplanar, they will form a face. If necessary triangular faces can commonly be made. We call it stitching, and if you have to do a lot, you look for another way
but it's fine for little fixes.This is the same arc radial duplicated with the rotate tool.
I understand now what you mean by stitching. I've not heard this term before now. I have made a pretty nice indent now & am copying it down the length of the edge using the move tool, then intersecting the faces so i can delete the centre of the arc on the new copies.
thank you both for your help here.
-
Here's another way you might approach this.
First, the arc for the edge of the hammered dent doesn't need to be all that smooth. It's going to be a very small detail in an overall view of the railing. Not worth "spending" a lot of geometry on it.
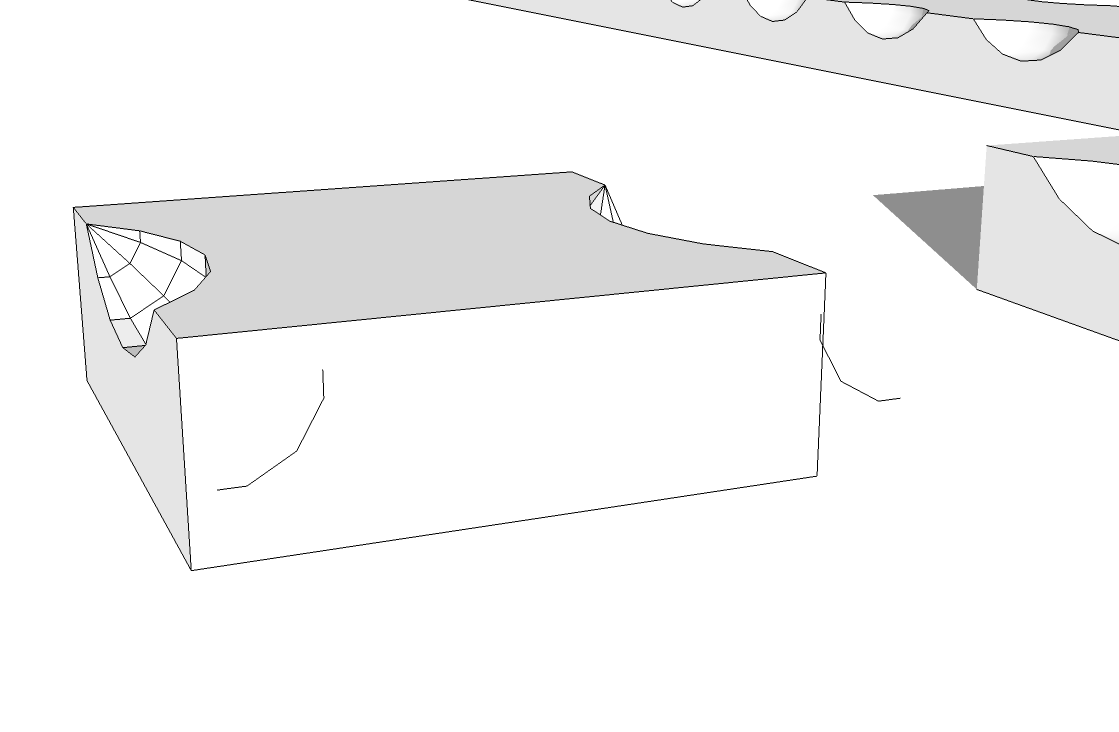
In this view you can see the arc I drew for the edge of the dent has 6 segments instead of the default 12. Up close it doesn't look very pretty but wait.
I also used Follow Me which works fin IF the first segment of the path is perpendicular to the profile. the last segment in the path must be perpendicular to where you want the profile to stop. In this case it is the side of the railing. For the path, I drew a 12-sided circle centered on the edge of the railing. I rotated it so there were sides positioned horizontally and vertically. Then I drew a couple of line segments to break the edge of the circle at the midpoints of these sides and deleted all but the quarter circle arc. Note the short segments at each end.
Next was the Follow Me operations to form the dents.
I only made a single pair of dents in a very short section of the rail. This then became a component. the end faces were deleted as you can see in the middle of the next image. The edges surrounding the ends were hidden.
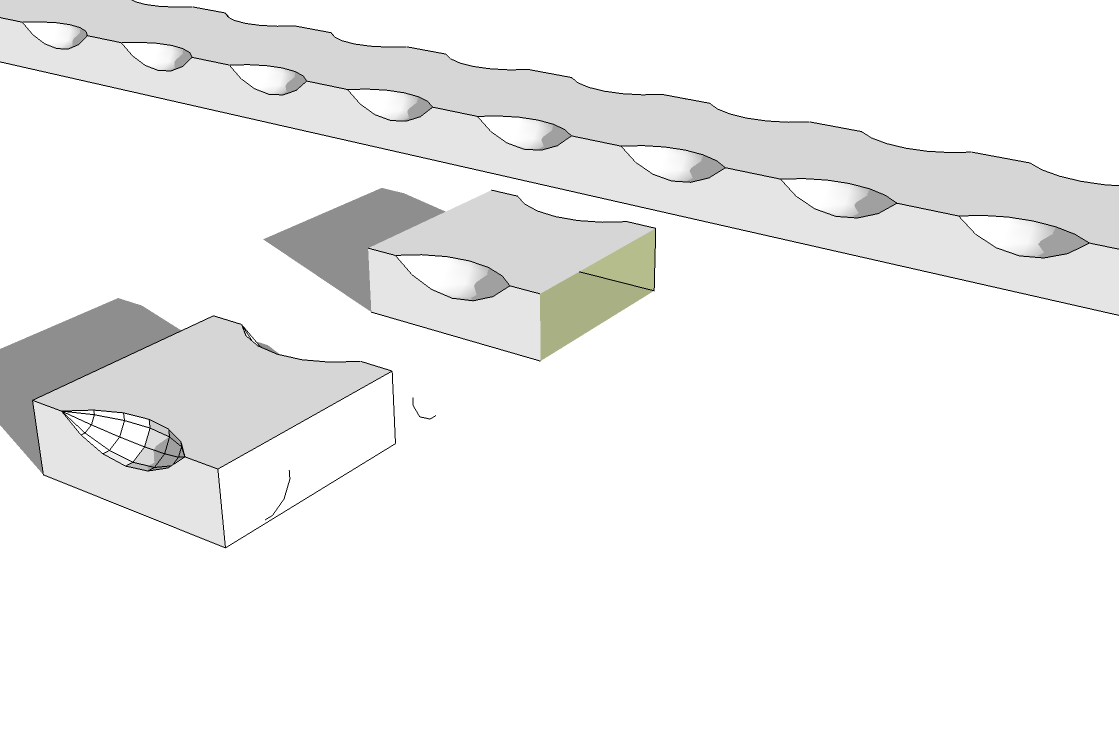
Now, using Move/Copy, I can make a rail whose length is any length that is a multiple of the segment. Of course by making the end components unique, their length can be edited without affecting the rest. You could modify the length of the dented component to adjust the spacing of the dents and you could add non-dented sections or other shapes at the ends if desired. It's light as far as the entity count and file size is concerned. It's flexible in its use and once you've made the component, you don't need to make those dents again.
-
I'm up to the point now where i have a similar section of rail as yourself Dave.
I have a couple of questions about what you said. How do you set the number of sides on your circle?
My second question would be, is it possible for me to use my single section of railing and make it automatically repeat all along a line in the same way as the follow-me tool does with a face? I'd like to make curves, or arches and fill the whole length with the railing model.
-
You can change the number of sides on a circle or an arc by selecting the tool and immediately typing the desired number followed by hitting Enter. You'll notice when you pick either of those tools (Or the Polygon tool for that matter) the Measurements box shows the number of sides. Default is 12 for an arc, 24 for a circle and 6 for a polygon.
You can make a linear array as I did with Move/Copy along a straight line. You'll move the first copy the length of the element, hit Enter followed immediately by *n, Enter where n equals the number of copies in addition to the original that you want.
Going round curves will get to be a bot more involved. If they are circular curves you can make a radial array using the copy function of the Rotate tool in the same way as you make a linear array with the Move tool. The trick is you'll need to edit the components in the curved area to make their ends angles so they fit together correctly. If the curve is not circular, you'll have to move the components into place and adjust each one so they all fit together. Whether you use this method ort the method you've been using but making lots of dents along the length of the rail, it's still going to be a fair amount of work in the curved areas.
Depending upon exactly what you are after for a final product, you might find it easier to use a texture image instead of real dents or it might make sense if this is to show a client, to forego the dents altogether in your drawing and show a photo of a piece of rail with those dents in it already. My inclination is since time is money and no matter how much detail and time and effort you put into drawing the rail, it still isn't going to be a rail your client can use. It might be really neat to make a detailed drawing but maybe you're better off giving the client the overall view with the drawing and save the details for separate images. Just my .02 and you can take what you paid for from it.
-
OK! This gives me a lot to go on, and this is only one of 20 different styles of rail

I'll get trying it, see how quickly i can put this together and maybe just make real dented sections for areas which are fairly standard sizes. Then do as you suggested with textures for the more complex parts. I hadn't thought of this, i'm still getting a feel for the capabilities of this software, let alone how to implement them
Really apreciate the help and instruction, great information.
Thank you.
Hello! It looks like you're interested in this conversation, but you don't have an account yet.
Getting fed up of having to scroll through the same posts each visit? When you register for an account, you'll always come back to exactly where you were before, and choose to be notified of new replies (either via email, or push notification). You'll also be able to save bookmarks and upvote posts to show your appreciation to other community members.
With your input, this post could be even better 💗
Register Login


Advertisement